
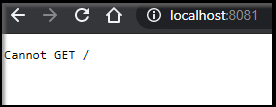
While there are guides to creating FORTRAN containers to solve local builds, I felt it would be a great logical followup to try and make a containerized microservice using FORTRAN. More importantly, could we not only use AKS to host this, but also leverage the power of Azure DevOps to build and deploy with proper CICD.
First, I want to give credit to Jessica Kelly who wrote this great Medium Article (Fortran and Docker: How to Combine Legacy Code with Cutting-Edge Components) for Data@Urban we will use to get started.
Setup
Most of the time I lead you into creating projects and repos for Azure DevOps. We will assume you have foundational knowledge of AzDO for this guide. I’ve made the project public so you can find source and pipelines here
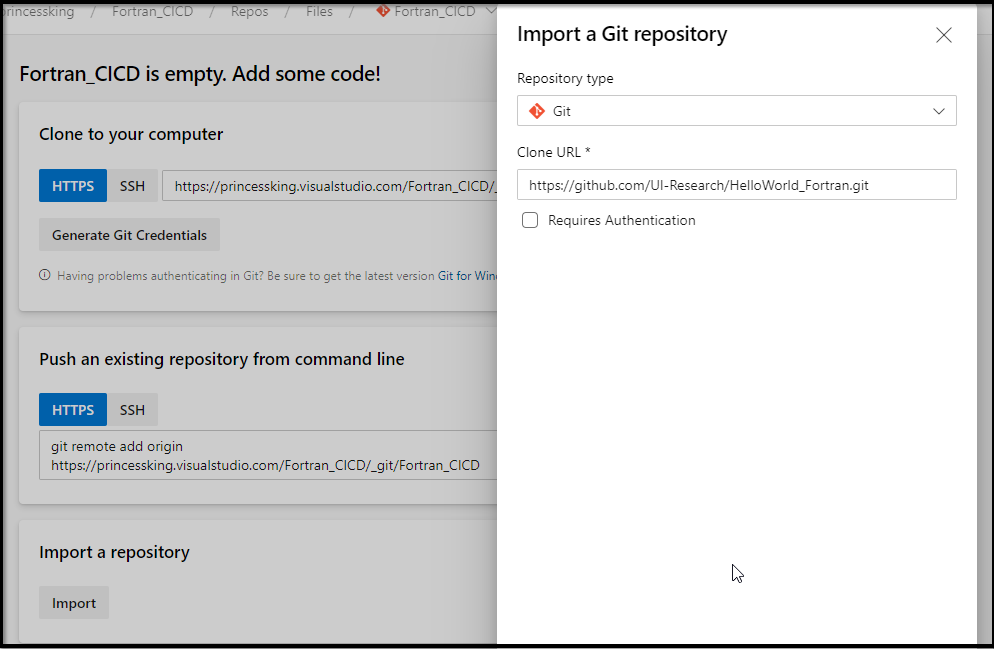
I’m going to start with a fork of their github repo (https://github.com/UI-Research/HelloWorld_Fortran)
There is now a handy “Import” button so we need not clone and set another origin as we did in the past:
A quick note. I use Gitflow. Creating a new Develop branch was easy, however, the new Repos settings page hid the “set as default branch” menu. Thus, i disabled the “preview feature” of repository settings just so i could “set default” branch again with the ellipse menu:
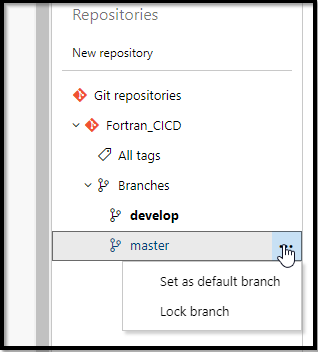
Microsoft does need to consider not removing core features when rolling out new UIs. I hope they correct this before going live with the new Repo browser.
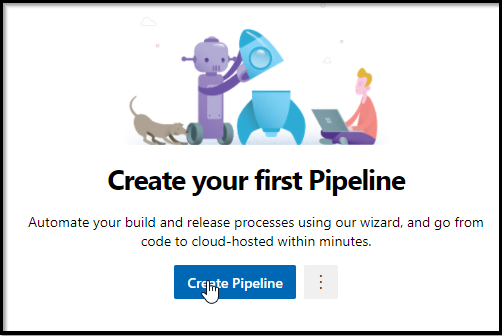
Now that we have develop set, let’s make our pipeline. I will start with the wizard for YAML and then paste out the full azure-pipelines.yaml below
Before we go on, we can look at the f90 code:
! Small generic program. Will read from file, do something, and then print to a file
!
! Requires file called: HelloAgainInput.txt
! Outputs file called:  IAmHere.txt
!
! Jessica A. Kelly


program HelloAgainWorldF90
  real, dimension(:), allocatable :: x ! array that we will read into
  integer :: n 			! value that is read from file


  write(*,*) "Hello Humans!"
  write(*,*) "Starting to read file."

  open(unit=99, file='HelloAgainInput.txt', status='old', action='read')
  read(99,*), n 		!first element in the file is the number of elements in the array
  allocate(x(n))
  read(99,*) x 			!now read in the array

  !do something to the array, like loop over it and multiply by 2
  do i=0,n
   x(i) = x(i) * 2
  end do

  write(*,*) "Done my calculations."
  open(unit=89, file='IAmHere.txt', status='replace', action='write')
  write(89,*)x

  write(*,*) "Results successfully written."

end program HelloAgainWorldF90
the guts here do a basic multiplication on a list of real (decimal) values in a file:
!do something to the array, like loop over it and multiply by 2
  do i=0,n
   x(i) = x(i) * 2
  end do
Pipeline
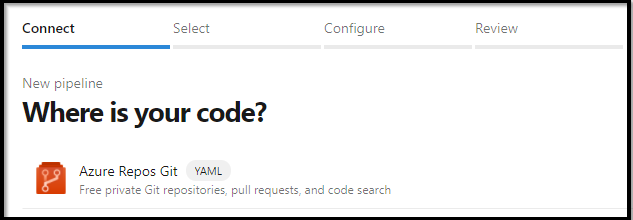
In pipelines, create a pipeline:
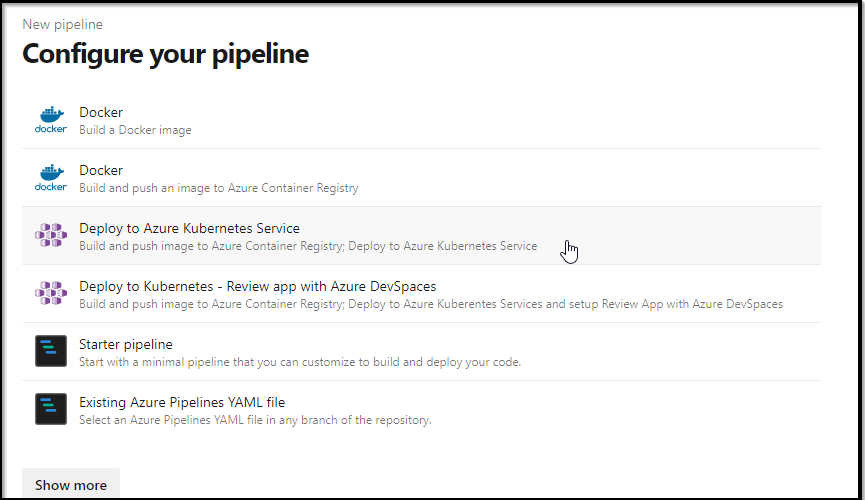
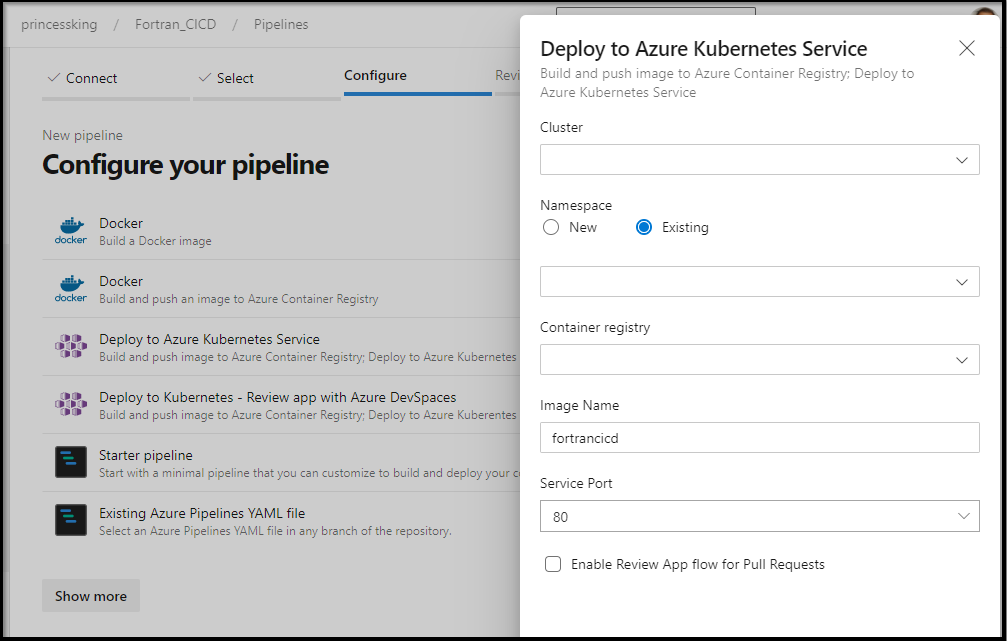
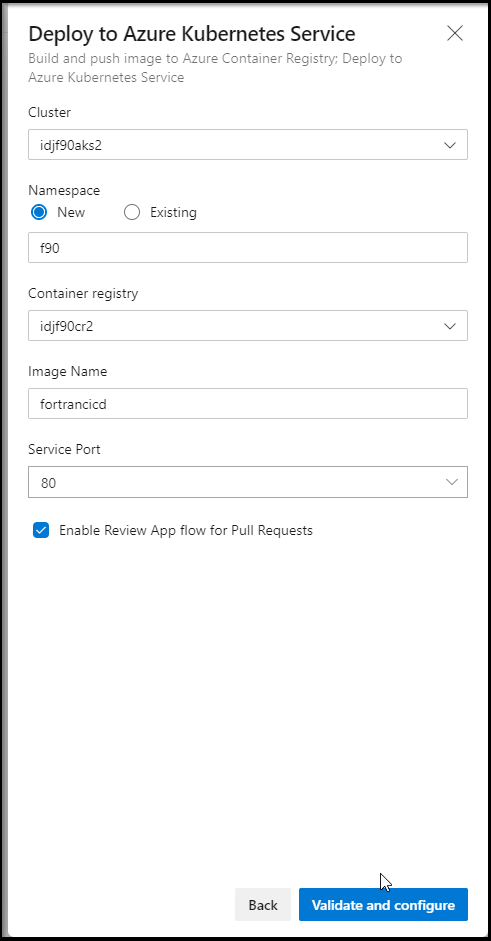
Now here is where we are a tad stuck. I really want to build and deploy to k8s. However, in the next window, it’s going to want to know what the ACR and AKS cluster is we plan to use.
Cloud Pre-req's
First, let me create a group and service principal to use
$ az group create --name idjf90aks --location centralus
{
  "id": "/subscriptions/772efc21c-1b31-4d73-9696-95f6ba2341da/resourceGroups/idjf90aks",
  "location": "centralus",
  "managedBy": null,
  "name": "idjf90aks",
  "properties": {
    "provisioningState": "Succeeded"
  },
  "tags": null,
  "type": "Microsoft.Resources/resourceGroups"
}

$ cat my_sp.json | jq -r .appId
03d65f82-dabf-462b-b294-ede24153e2d4

$ export SP_PASS=`cat my_sp.json | jq -r .password`
$ export SP_ID=`cat my_sp.json | jq -r .appId`
We can use managed identities on the ACR. That requires creating an identity then a vault then new policies for keys on a vault and customer managed keys. We can follow this guide here.
Quick Note: You don't need to do this for our project. But I wanted to show how if interested.
[1] Create Identity
$ az identity create --name acrid --resource-group idjf90aks --location centralus
{
  "clientId": "3297b46d-3448-4db0-9063-cd99dfe5f189",
  "clientSecretUrl": "https://control-centralus.identity.azure.net/subscriptions/72efc21c-1b31-4d73-9696-95f6ba2341da/resourcegroups/idjf90aks/providers/Microsoft.ManagedIdentity/userAssignedIdentities/acrid/credentials?tid=d73a39db-6eda-495d-8000-7579f56d68b7&oid=31ac88de-ee83-4dc1-bdac-8426731ef226&aid=3297b46d-3448-4db0-9063-cd99dfe5f189",
  "id": "/subscriptions/72efc21c-1b31-4d73-9696-95f6ba2341da/resourcegroups/idjf90aks/providers/Microsoft.ManagedIdentity/userAssignedIdentities/acrid",
  "location": "centralus",
  "name": "acrid",
  "principalId": "31ac88de-ee83-4dc1-bdac-8426731ef226",
  "resourceGroup": "idjf90aks",
  "tags": {},
  "tenantId": "d73a39db-6eda-495d-8000-7579f56d68b7",
  "type": "Microsoft.ManagedIdentity/userAssignedIdentities"
}
[2] Create Key Vault
$ az keyvault create --name idjf90acrkey --resource-group idjf
90aks --enable-soft-delete true --enable-purge-protection true
{
  "id": "/subscriptions/72efc21c-1b31-4d73-9696-95f6ba2341da/resourceGroups/idjf90aks/providers/Microsoft.KeyVault/vaults/idjf90acrkey",
  "location": "centralus",
  "name": "idjf90acrkey",
  "properties": {
    "accessPolicies": [
      {
        "applicationId": null,
        "objectId": "170d4247-9bca-4e26-82f9-919c7ec00101",
        "permissions": {
          "certificates": [
            "get",
            "list",
            "delete",
            "create",
            "import",
            "update",
            "managecontacts",
            "getissuers",
            "listissuers",
            "setissuers",
            "deleteissuers",
            "manageissuers",
            "recover"
          ],
          "keys": [
            "get",
            "create",
            "delete",
            "list",
            "update",
            "import",
            "backup",
            "restore",
            "recover"
          ],
          "secrets": [
            "get",
            "list",
            "set",
            "delete",
            "backup",
            "restore",
            "recover"
          ],
          "storage": [
            "get",
            "list",
            "delete",
            "set",
            "update",
            "regeneratekey",
            "setsas",
            "listsas",
            "getsas",
            "deletesas"
          ]
        },
        "tenantId": "d73a39db-6eda-495d-8000-7579f56d68b7"
      }
    ],
    "createMode": null,
    "enablePurgeProtection": true,
    "enableSoftDelete": true,
    "enabledForDeployment": false,
    "enabledForDiskEncryption": null,
    "enabledForTemplateDeployment": null,
    "networkAcls": null,
    "privateEndpointConnections": null,
    "provisioningState": "Succeeded",
    "sku": {
      "name": "standard"
    },
    "tenantId": "d73a39db-6eda-495d-8000-7579f56d68b7",
    "vaultUri": "https://idjf90acrkey.vault.azure.net/"
  },
  "resourceGroup": "idjf90aks",
  "tags": {},
  "type": "Microsoft.KeyVault/vaults"
}
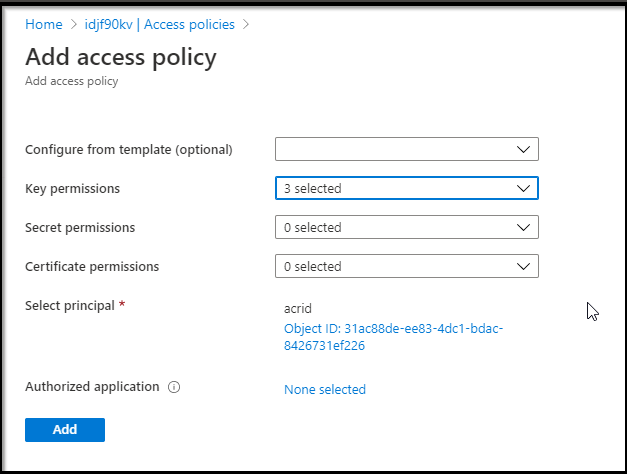
[3] Assign Access Policy
$ az keyvault set-policy --resource-group idjf90aks --name idjf90kv --object-id 31ac88de-ee83-4dc1-bdac-8426731ef226 --key-permissions get wrapKey unwrapKey
{
  "id": "/subscriptions/72efc21c-1b31-4d73-9696-95f6ba2341da/resourceGroups/idjf90aks/providers/Microsoft.KeyVault/vaults/idjf90kv",
  "location": "centralus",
  "name": "idjf90kv",
  "properties": {
    "accessPolicies": [
      {
        "applicationId": null,
        "objectId": "31ac88de-ee83-4dc1-bdac-8426731ef226",
        "permissions": {
          "certificates": [],
          "keys": [
            "get",
            "wrapKey",
            "unwrapKey"
          ],
          "secrets": [],
          "storage": null
        },
        "tenantId": "d73a39db-6eda-495d-8000-7579f56d68b7"
      },
      {
        "applicationId": null,
        "objectId": "170d4247-9bca-4e26-82f9-919c7ec00101",
        "permissions": {
          "certificates": [
            "Get",
            "List",
            "Delete",
            "Create",
            "Import",
            "Update",
            "ManageContacts",
            "GetIssuers",
            "ListIssuers",
            "SetIssuers",
            "DeleteIssuers",
            "ManageIssuers",
            "Recover"
          ],
          "keys": [
            "Get",
            "Create",
            "Delete",
            "List",
            "Update",
            "Import",
            "Backup",
            "Restore",
            "Recover"
          ],
          "secrets": [
            "Get",
            "List",
            "Set",
            "Delete",
            "Backup",
            "Restore",
            "Recover"
          ],
          "storage": [
            "get",
            "list",
            "delete",
            "set",
            "update",
            "regeneratekey",
            "setsas",
            "listsas",
            "getsas",
            "deletesas"
          ]
        },
        "tenantId": "d73a39db-6eda-495d-8000-7579f56d68b7"
      },
      {
        "applicationId": null,
        "objectId": "3575e33b-34d1-40f0-a46d-a94219f55859",
        "permissions": {
          "certificates": null,
          "keys": [
            "get",
            "wrapKey",
            "unwrapKey"
          ],
          "secrets": [
            "get",
            "list",
            "set",
            "delete"
          ],
          "storage": null
        },
        "tenantId": "d73a39db-6eda-495d-8000-7579f56d68b7"
      }
    ],
    "createMode": null,
    "enablePurgeProtection": null,
    "enableRbacAuthorization": false,
    "enableSoftDelete": true,
    "enabledForDeployment": false,
    "enabledForDiskEncryption": false,
    "enabledForTemplateDeployment": false,
    "networkAcls": null,
    "privateEndpointConnections": null,
    "provisioningState": "Succeeded",
    "sku": {
      "name": "standard"
    },
    "tenantId": "d73a39db-6eda-495d-8000-7579f56d68b7",
    "vaultUri": "https://idjf90kv.vault.azure.net/"
  },
  "resourceGroup": "idjf90aks",
  "tags": {},
  "type": "Microsoft.KeyVault/vaults"
}
I can assign the Access Policy to the AppID we will use for the cluster just fine (and in fact, i’ll want to add secret access this way later)
$ az keyvault set-policy --resource-group idjf90aks --name idjf90acrkey --spn 03d65f82-dabf-462b-b294-ede24153e2d4 --key-permissions get wrapKey unwrapKey --secret-permissions get
 list set delete
{
  "id": "/subscriptions/72efc21c-1b31-4d73-9696-95f6ba2341da/resourceGroups/idjf90aks/providers/Microsoft.KeyVault/vaults/idjf90acrkey",
  "location": "centralus",
  "name": "idjf90acrkey",
  "properties": {
    "accessPolicies": [
      {
        "applicationId": null,
        "objectId": "170d4247-9bca-4e26-82f9-919c7ec00101",
        "permissions": {
          "certificates": [
            "get",
            "list",
            "delete",
            "create",
            "import",
            "update",
            "managecontacts",
            "getissuers",
            "listissuers",
            "setissuers",
            "deleteissuers",
            "manageissuers",
            "recover"
          ],
          "keys": [
            "get",
            "create",
            "delete",
            "list",
            "update",
            "import",
            "backup",
            "restore",
            "recover"
          ],
          "secrets": [
            "get",
            "list",
            "set",
            "delete",
            "backup",
            "restore",
            "recover"
          ],
          "storage": [
            "get",
            "list",
            "delete",
            "set",
            "update",
            "regeneratekey",
            "setsas",
            "listsas",
            "getsas",
            "deletesas"
          ]
        },
        "tenantId": "d73a39db-6eda-495d-8000-7579f56d68b7"
      },
      {
        "applicationId": null,
        "objectId": "3575e33b-34d1-40f0-a46d-a94219f55859",
        "permissions": {
          "certificates": null,
          "keys": [
            "get",
            "wrapKey",
            "unwrapKey"
          ],
          "secrets": [
            "get",
            "list",
            "set",
            "delete"
          ],
          "storage": null
        },
        "tenantId": "d73a39db-6eda-495d-8000-7579f56d68b7"
      }
    ],
    "createMode": null,
    "enablePurgeProtection": true,
    "enableSoftDelete": true,
    "enabledForDeployment": false,
    "enabledForDiskEncryption": null,
    "enabledForTemplateDeployment": null,
    "networkAcls": null,
    "privateEndpointConnections": null,
    "provisioningState": "Succeeded",
    "sku": {
      "name": "standard"
    },
    "tenantId": "d73a39db-6eda-495d-8000-7579f56d68b7",
    "vaultUri": "https://idjf90acrkey.vault.azure.net/"
  },
  "resourceGroup": "idjf90aks",
  "tags": {},
  "type": "Microsoft.KeyVault/vaults"
}
You can also do this via the Azure Portal
I can now view the permissions (validation):
$ az keyvault show --resource-group idjf90aks --name idjf90acrkey --query "properties.accessPolicies"
[
  {
    "applicationId": null,
    "objectId": "31ac88de-ee83-4dc1-bdac-8426731ef226",
    "permissions": {
      "certificates": [],
      "keys": [
        "Get",
        "UnwrapKey",
        "WrapKey"
      ],
      "secrets": [],
      "storage": null
    },
    "tenantId": "d73a39db-6eda-495d-8000-7579f56d68b7"
  },
  {
    "applicationId": null,
    "objectId": "170d4247-9bca-4e26-82f9-919c7ec00101",
    "permissions": {
      "certificates": [
        "Get",
        "List",
        "Delete",
        "Create",
        "Import",
        "Update",
        "ManageContacts",
        "GetIssuers",
        "ListIssuers",
        "SetIssuers",
        "DeleteIssuers",
        "ManageIssuers",
        "Recover"
      ],
      "keys": [
        "Get",
        "Create",
        "Delete",
        "List",
        "Update",
        "Import",
        "Backup",
        "Restore",
        "Recover"
      ],
      "secrets": [
        "Get",
        "List",
        "Set",
        "Delete",
        "Backup",
        "Restore",
        "Recover"
      ],
      "storage": [
        "get",
        "list",
        "delete",
        "set",
        "update",
        "regeneratekey",
        "setsas",
        "listsas",
        "getsas",
        "deletesas"
      ]
    },
    "tenantId": "d73a39db-6eda-495d-8000-7579f56d68b7"
  },
  {
    "applicationId": null,
    "objectId": "3575e33b-34d1-40f0-a46d-a94219f55859",
    "permissions": {
      "certificates": [],
      "keys": [
        "Get",
        "WrapKey",
        "UnwrapKey"
      ],
      "secrets": [
        "Get",
        "List",
        "Set",
        "Delete"
      ],
      "storage": null
    },
    "tenantId": "d73a39db-6eda-495d-8000-7579f56d68b7"
  }
]
Next we need a Key in the Vault and it’s URI for the ACR create step:
$ az keyvault key create --name idjf90acrkey --vault-name idjf90acrkey
{
  "attributes": {
    "created": "2020-08-16T21:14:00+00:00",
    "enabled": true,
    "expires": null,
    "notBefore": null,
    "recoveryLevel": "Recoverable",
    "updated": "2020-08-16T21:14:00+00:00"
  },
  "key": {
    "crv": null,
    "d": null,
    "dp": null,
    "dq": null,
    "e": "AQAB",
    "k": null,
    "keyOps": [
      "encrypt",
      "decrypt",
      "sign",
      "verify",
      "wrapKey",
      "unwrapKey"
    ],
    "kid": "https://idjf90acrkey.vault.azure.net/keys/idjf90acrkey/ebaad24bc182457096746dc534f39442",
    "kty": "RSA",
    "n": "5SPsZnynJvNmeyLY+oGHQfJrAhayv0bLjVh6KnjkjzaRgW7UOWeHWqtarzz+s591QvQpfoyoAMWwpK8StMhicrMQ4rBvha5z13yk8fLG3KGsBkVE8QTcUH5TaczERxGjiKAwdyskR363xEeXJ68jIlv7gvZSwbdsmG0yzR7MzASDFASDFASDFAFDASDASFADASDASFASDASAFASDASDAFASASFASFubkdFqGcCYfNZSO6XUUGZ3ygTC+KBPGaNYMdcuU2uNsR728VYwPqhlCC6P3rKJSHd6r5lxJeRCBp+W8UKQ==",
    "p": null,
    "q": null,
    "qi": null,
    "t": null,
    "x": null,
    "y": null
  },
  "managed": null,
  "tags": null
}

$ az keyvault key show --name idjf90acrkey --vault-name idjf90acrkey --query 'key.kid' --output tsv

https://idjf90acrkey.vault.azure.net/keys/idjf90acrkey/ebaadasdfasdfasdfadf46dc534f39442
[2020-08-21 update: did not show how to use MSI and CMK]
While I won't be using this cluster, here is now how we create the AKS with a managed identity and customer managed key:
az acr create --name idjf90crmsi1 --resource-group idjf90aks --sku Premium --admin-enabled true --identity /subscriptions/70b42e6a-6faf-4fed-bcec-9f3995b1aca8/resourcegroups/idjf90aks/providers/Microsoft.ManagedIdentity/userAssignedIdentities/acrid --key-encryption-key https://idjf90acrkey.vault.azure.net/keys/idjf90acrkey/ebaad24bc182457096746dc534f39442As an aside, you can just create a basic ACR as well (which is what i used for the demo)
$ az acr create --name idjf90cr --resource-group idjf90aks --sku Basic --admin-enabled true
{
  "adminUserEnabled": true,
  "creationDate": "2020-08-16T13:56:56.787373+00:00",
  "dataEndpointEnabled": false,
  "dataEndpointHostNames": [],
  "encryption": {
    "keyVaultProperties": null,
    "status": "disabled"
  },
  "id": "/subscriptions/72efc21c-1b31-4d73-9696-95f6ba2341da/resourceGroups/idjf90aks/providers/Microsoft.ContainerRegistry/registries/idjf90cr",
  "identity": null,
  "location": "centralus",
  "loginServer": "idjf90cr.azurecr.io",
  "name": "idjf90cr",
  "networkRuleSet": null,
  "policies": {
    "quarantinePolicy": {
      "status": "disabled"
    },
    "retentionPolicy": {
      "days": 7,
      "lastUpdatedTime": "2020-08-16T13:56:57.469518+00:00",
      "status": "disabled"
    },
    "trustPolicy": {
      "status": "disabled",
      "type": "Notary"
    }
  },
  "privateEndpointConnections": [],
  "provisioningState": "Succeeded",
  "resourceGroup": "idjf90aks",
  "sku": {
    "name": "Basic",
    "tier": "Basic"
  },
  "status": null,
  "storageAccount": null,
  "tags": {},
  "type": "Microsoft.ContainerRegistry/registries"
}
So at this point we have two ACRs to experiment with. Next is to create the AKS.
We’ll create the AKS cluster using the CLI as well:
$ az aks create --resource-group idjf90aks --name idjf90aks --
location centralus --node-count 3 --enable-cluster-autoscaler --min-count 2 --max-count 4 --generate-ssh-keys --netwo
rk-plugin azure --network-policy azure --service-principal $SP_ID --client-secret $SP_PASS
{
  "aadProfile": null,
  "addonProfiles": {
    "KubeDashboard": {
      "config": null,
      "enabled": true,
      "identity": null
    }
  },
  "agentPoolProfiles": [
    {
      "availabilityZones": null,
      "count": 3,
      "enableAutoScaling": true,
      "enableNodePublicIp": null,
      "maxCount": 4,
      "maxPods": 30,
      "minCount": 2,
      "name": "nodepool1",
      "nodeLabels": null,
      "nodeTaints": null,
      "orchestratorVersion": "1.16.13",
      "osDiskSizeGb": 128,
      "osType": "Linux",
      "provisioningState": "Succeeded",
      "scaleSetEvictionPolicy": null,
      "scaleSetPriority": null,
      "tags": null,
      "type": "VirtualMachineScaleSets",
      "vmSize": "Standard_DS2_v2",
      "vnetSubnetId": null
    }
  ],
  "apiServerAccessProfile": null,
  "dnsPrefix": "idjf90aks-idjf90aks-70b42e",
  "enablePodSecurityPolicy": null,
  "enableRbac": true,
  "fqdn": "idjf90aks-idjf90aks-70b42e-8f7459ed.hcp.centralus.azmk8s.io",
  "id": "/subscriptions/72efc21c-1b31-4d73-9696-95f6ba2341da/resourcegroups/idjf90aks/providers/Microsoft.ContainerService/managedClusters/idjf90aks",
  "identity": null,
  "identityProfile": null,
  "kubernetesVersion": "1.16.13",
  "linuxProfile": {
    "adminUsername": "azureuser",
    "ssh": {
      "publicKeys": [
        {
          "keyData": "ssh-rsa AAAAB3NzaC1yc2EAAAADAQABAAABAQDHZ3iOnMMLkiltuikXSjqudfCHmQvIjBGMOuGk6wedwG8Xai3uv0M/X3Z2LS6Ac8tComKEKg7Zje2KFBnvBJvU5JqkTwNHnmp682tXf15EYgn4tB7MDz5DUARpcUXJbYfUg8yPUDveYHw8PEm1n+1MvLJN0ftvdORG5CQQEl/m7jErbJJQI70xg7C8/HG5GmJpIQjDl7UVsJANKab/2/bbUlG1Sqp4cQ/LwxKxQ6/QK/HVauxDkudoTkFLqukLWVjHvNZD37MC/wygSsEVYF+yrkNJySlNbMk4ZNmMwva1yLX8Shhr8G4wWe8QI9Ska8B0keSIu8fzRWxXAv2gB3xB"
        }
      ]
    }
  },
  "location": "centralus",
  "maxAgentPools": 10,
  "name": "idjf90aks",
  "networkProfile": {
    "dnsServiceIp": "10.0.0.10",
    "dockerBridgeCidr": "172.17.0.1/16",
    "loadBalancerProfile": {
      "allocatedOutboundPorts": null,
      "effectiveOutboundIps": [
        {
          "id": "/subscriptions/72efc21c-1b31-4d73-9696-95f6ba2341da/resourceGroups/MC_idjf90aks_idjf90aks_centralus/providers/Microsoft.Network/publicIPAddresses/c4c64e13-c8d3-4b77-8b81-b789878248d4",
          "resourceGroup": "MC_idjf90aks_idjf90aks_centralus"
        }
      ],
      "idleTimeoutInMinutes": null,
      "managedOutboundIps": {
        "count": 1
      },
      "outboundIpPrefixes": null,
      "outboundIps": null
    },
    "loadBalancerSku": "Standard",
    "networkPlugin": "azure",
    "networkPolicy": "azure",
    "outboundType": "loadBalancer",
    "podCidr": null,
    "serviceCidr": "10.0.0.0/16"
  },
  "nodeResourceGroup": "MC_idjf90aks_idjf90aks_centralus",
  "privateFqdn": null,
  "provisioningState": "Succeeded",
  "resourceGroup": "idjf90aks",
  "servicePrincipalProfile": {
    "clientId": "03d65f82-dabf-462b-b294-ede24153e2d4",
    "secret": null
  },
  "tags": null,
  "type": "Microsoft.ContainerService/ManagedClusters",
  "windowsProfile": {
    "adminPassword": null,
    "adminUsername": "azureuser"
  }


}
We now should have ACRs and an AKS we can use in the onboarding steps:
$ az acr list -o table
NAME          RESOURCE GROUP    LOCATION    SKU      LOGIN SERVER             CREATION DATE         ADMIN ENABLED
------------  ----------------  ----------  -------  -----------------------  --------------------  ---------------
idjf90cr      idjf90aks         centralus   Basic    idjf90cr.azurecr.io      2020-08-16T13:56:56Z  True
idjf90crmsi1  idjf90aks         centralus   Premium  idjf90crmsi1.azurecr.io  2020-08-16T21:15:25Z  True

$ az aks list -o table
Name       Location    ResourceGroup    KubernetesVersion    ProvisioningState    Fqdn
---------  ----------  ---------------  -------------------  -------------------  -----------------------------------------------------------
idjf90aks  centralus   idjf90aks        1.16.13              Succeeded            idjf90aks-idjf90aks-70b42e-8f7459ed.hcp.centralus.azmk8s.io
.. Back to our Azure DevOps wizard
At this point, when we build and deploy, it will launch a container, however it runs the fortran and closes. Kubernetes sees this as a crash as containers are supposed to have persistently running services to handle traffic.
$ kubectl get pods --all-namespaces
NAMESPACE NAME READY STATUS RESTARTS AGE
f90 fortrancicd-5c5b7697f9-5zmhs 0/1 CrashLoopBackOff 5 4m35s
kube-system azure-cni-networkmonitor-tqtbw 1/1 Running 0 36m
kube-system azure-cni-networkmonitor-tsl59 1/1 Running 0 36m
kube-system azure-ip-masq-agent-mvwsg 1/1 Running 0 36m
kube-system azure-ip-masq-agent-s552b 1/1 Running 0 36m
kube-system azure-npm-scfqv 1/1 Running 0 35m
kube-system azure-npm-xx48k 1/1 Running 0 36m
kube-system coredns-869cb84759-5pkkh 1/1 Running 0 36m
kube-system coredns-869cb84759-tnx4f 1/1 Running 0 38m
kube-system coredns-autoscaler-5b867494f-f2v7t 1/1 Running 0 38m
kube-system dashboard-metrics-scraper-566c858889-lmbn4 1/1 Running 0 38m
kube-system kube-proxy-9hgt5 1/1 Running 0 36m
kube-system kube-proxy-9wkqb 1/1 Running 0 36m
kube-system kubernetes-dashboard-7f7d6bbd7f-wqh7d 1/1 Running 0 38m
kube-system metrics-server-6cd7558856-mvdcm 1/1 Running 0 38m
kube-system tunnelfront-56bd557fb5-8kfgp 2/2 Running 0 38m
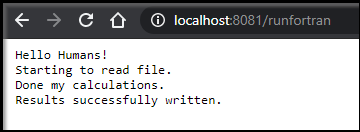
builder@DESKTOP-2SQ9NQM:~/Workspaces/Fortran_CICD/manifests$ kubectl logs fortrancicd-5c5b7697f9-5zmhs -n f90
running fortran
Hello Humans!
Starting to read file.
Done my calculations.
Results successfully written.
fortran complete
print output file
20.0000000 18.0000000 16.0000000 14.0000000 12.0000000 12.0000000 14.0000000 16.0000000 18.0000000 20.0000000
Using NodeJS to wrap Fortran
We can wrap the Fortran code with nodejs. Here is a basic server.js and users.json:
$ cat server.js
var express = require('express');
var app = express();
var fs = require("fs");
app.get('/listUsers', function (req, res) {
fs.readFile( __dirname + "/" + "users.json", 'utf8', function (err, data) {
console.log( data );
res.end( data );
});
})
var server = app.listen(8081, function () {
var host = server.address().address
var port = server.address().port
console.log("Example app listening at http://%s:%s", host, port)
})
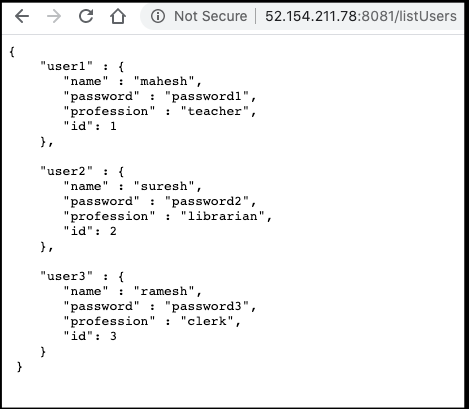
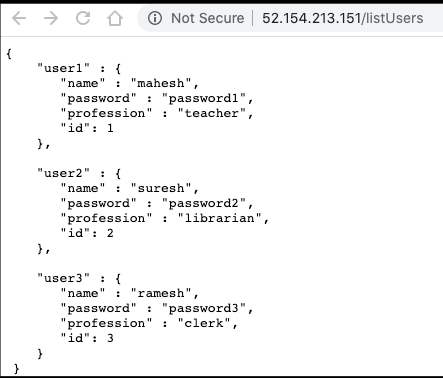
$ cat users.json
{
"user1" : {
"name" : "mahesh",
"password" : "password1",
"profession" : "teacher",
"id": 1
},
"user2" : {
"name" : "suresh",
"password" : "password2",
"profession" : "librarian",
"id": 2
},
"user3" : {
"name" : "ramesh",
"password" : "password3",
"profession" : "clerk",
"id": 3
}
}
Next we'll need a package.json
{
  "name": "fortran_cicd",
  "version": "1.0.0",
  "description": "Basic RESTful wrapper",
  "main": "server.js",
  "scripts": {
    "test": "echo \"Error: no test specified\" && exit 1",
    "start": "node server.js"
  },
  "repository": {
    "type": "git",
    "url": "https://princessking.visualstudio.com/Fortran_CICD/_git/Fortran_CICD"
  },
  "author": "Isaac Johnson",
  "license": "MIT",
  "dependencies": {
    "express": "^4.17.1"
  }
}
We can add the npm start statement into the run_fortran.sh
#!/bin/bash
echo "running fortran"
./HelloWorld
echo "fortran complete"
echo "print output file"
cat IAmHere.txt

npm start
We then update the Dockerfile to include this basic server.js
#HelloWorld_Fortran

# start by building the basic container
FROM centos:latest
MAINTAINER Jessica Kelly <jkelly@urban.org>
RUN yum update -y
RUN yum install -y gcc-gfortran gdb make curl

# build the hello world code
COPY Makefile run_fortran.sh HelloWorld.f90 HelloAgainInput.txt /fortran/
WORKDIR /fortran/
RUN make HelloWorld

# NodeJs
RUN curl -sL https://rpm.nodesource.com/setup_10.x | bash -
RUN yum install -y nodejs

COPY package.json package-lock.json server.js users.json ./
RUN npm install

# configure the container to run the hello world executable by default
# CMD ["./HelloWorld"]
ENTRYPOINT ["./run_fortran.sh"]
Testing
Get logs:
$ kubectl logs fortrancicd-66df887fbd-qv974
running fortran
 Hello Humans!
 Starting to read file.
 Done my calculations.
 Results successfully written.
fortran complete
print output file
   20.0000000       18.0000000       16.0000000       14.0000000       12.0000000       12.0000000       14.0000000       16.0000000       18.0000000       20.0000000

> fortran_cicd@1.0.0 start /fortran
> node server.js

Example app listening at http://:::8081
We can also port-forward to access the pod directly
$ kubectl port-forward fortrancicd-66df887fbd-qv974 8081:8081
Forwarding from 127.0.0.1:8081 -> 8081
Forwarding from [::1]:8081 -> 8081
Handling connection for 8081
Exposing as a Microservice
This is great, but what we really want is to expose Fortran. We can expose the app via express.js
var express = require('express');
var app = express();
var fs = require("fs");

const { exec } = require("child_process");

app.get('/listUsers', function (req, res) {
   fs.readFile( __dirname + "/" + "users.json", 'utf8', function (err, data) {
      console.log( data );
      res.end( data );
   });
})

app.get('/runfortran', function (req, res) {
    exec("./HelloWorld", (error, stdout, stderr) => {
        if (error) {
            console.log(`error: ${error.message}`);
            res.end( `error: ${error.message}` );
        }
        if (stderr) {
            console.log(`stderr: ${stderr}`);
            res.end( `error: ${stderr}` );
        }
        console.log(`stdout: ${stdout}`);
        res.end( `${stdout}` );
    });
})

app.get('/runls', function (req, res) {
    exec("ls -la", (error, stdout, stderr) => {
        if (error) {
            console.log(`error: ${error.message}`);
            res.end( `error: ${error.message}` );
        }
        if (stderr) {
            console.log(`stderr: ${stderr}`);
            res.end( `error: ${stderr}` );
        }
        console.log(`stdout: ${stdout}`);
        res.end( `${stdout}` );
    });
})

var server = app.listen(8081, function () {
   var host = server.address().address
   var port = server.addressvar express = require('express');
Once launched with npm start we can run and then show results..

But perhaps we can do better. Let’s run and show the results file:
var express = require('express');
var app = express();
var fs = require("fs");

const { exec } = require("child_process");

var execfortran = function(appres, callback) {
    exec("./HelloWorld", (error, stdout, stderr) => {
        if (error) {
            console.log(`error: ${error.message}`);
        }
        if (stderr) {
            console.log(`stderr: ${stderr}`);
        }
        console.log(`stdout: ${stdout}`);
        callback (appres);
    });
}

app.get('/listUsers', function (req, res) {
   fs.readFile( __dirname + "/" + "users.json", 'utf8', function (err, data) {
      console.log( data );
      res.end( data );
   });
})

app.get('/showresults', function (req, res) {
    fs.readFile( __dirname + "/" + "IAmHere.txt", 'utf8', function (err, data) {
       console.log( data );
       res.end( data );
    });
 })

app.get('/runandshowresults', function (req, res) {
    execfortran(res, (res) => {
        fs.readFile( __dirname + "/" + "IAmHere.txt", 'utf8', function (err, data) {
           console.log( data );
           res.end( data );
        });
    })
})

app.get('/runfortran', function (req, res) {
    exec("./HelloWorld", (error, stdout, stderr) => {
        if (error) {
            console.log(`error: ${error.message}`);
            res.end( `error: ${error.message}` );
        }
        if (stderr) {
            console.log(`stderr: ${stderr}`);
            res.end( `error: ${stderr}` );
        }
        console.log(`stdout: ${stdout}`);
        res.end( `${stdout}` );
    });
})

app.get('/runls', function (req, res) {
    exec("ls -la", (error, stdout, stderr) => {
        if (error) {
            console.log(`error: ${error.message}`);
            res.end( `error: ${error.message}` );
        }
        if (stderr) {
            console.log(`stderr: ${stderr}`);
            res.end( `error: ${stderr}` );
        }
        console.log(`stdout: ${stdout}`);
        res.end( `${stdout}` );

        IAmHere.txt
    });
})

var server = app.listen(8081, function () {
   var host = server.address().address
   var port = server.address().port
   console.log("Example app listening at http://%s:%s", host, port)
})

You can be certain it’s running by live tailing logs kubectl logs --follow:

We are on a role! However, this isn’t quite useful yet. We need to add new data to our service so the Fortran code can compile different lists of decimal values.
app.get('/updateInput', function (req, res) {
    fs.writeFileSync("HelloAgainInput.txt", Object.keys(req.query).length + "\n");
    console.log(Object.keys(req.query).length)
    for (const key in req.query) {
        console.log(req.query[key])
        fs.appendFileSync("HelloAgainInput.txt", req.query[key] + " ");
    }
});
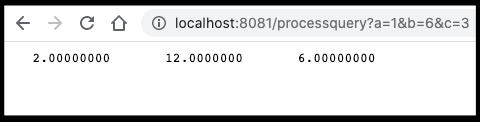
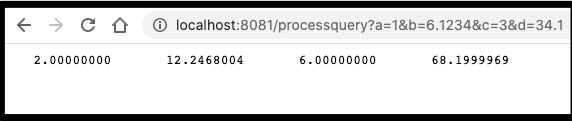
This will let use use /updateInput?first=10.0&second=11.1 .. etc. The key names themselves are ignored and the array length is computed dynamically.
var execfortran = function(appres, callback) {
   exec("./HelloWorld", (error, stdout, stderr) => {
       if (error) {
           console.log(`error: ${error.message}`);
       }
       if (stderr) {
           console.log(`stderr: ${stderr}`);
       }
       console.log(`stdout: ${stdout}`);
       callback (appres);
   });
}

var writeinput = function(req, appres, cb) {

   fs.writeFileSync("HelloAgainInput.txt", Object.keys(req.query).length + "\n");
   console.log(Object.keys(req.query).length)
   for (const key in req.query) {
       console.log(req.query[key])
       fs.appendFileSync("HelloAgainInput.txt", req.query[key] + " ");
   }

   cb (appres);
}


app.get('/processquery', function (req, res) {
   writeinput(req, res, function (res) {
   execfortran(res, (res) => {
       fs.readFile( __dirname + "/" + "IAmHere.txt", 'utf8', function (err, data) {
          console.log( data );
          res.end( data );
       });
   })
})});
But we can do better! Let’s put it all together:
An available service
I was ready now to expose my service to the world.
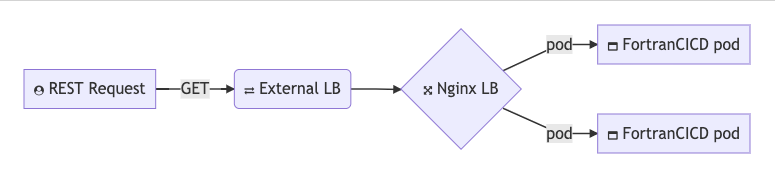
However I had troubles accessing the service and couldn't see why so I at first used a simple expose on the deployment: kubectl expose deployment fortrancicd --port=8081 --target-port=8081 --name=f90lb --type=LoadBalancer
$ kubectl get svc --all-namespaces
NAMESPACE     NAME                        TYPE           CLUSTER-IP     EXTERNAL-IP      PORT(S)          AGE
default       f90lb                       LoadBalancer   10.0.123.107   52.154.211.78    8081:32092/TCP   4m15s
This worked
However after some testing, I realized the real issue was the default service.yaml in our manifests assumed port 80 on our container (not 8081 as our nodejs used). Once i correct that:
apiVersion: v1
kind: Service
metadata:
   name: fortrancicd
spec:
   type: LoadBalancer
   ports:
      - protocol: TCP
        port: 80
        targetPort: 8081
   selector:
       app: fortrancicd
Then i was able to access via the provided service LB path:
$ kubectl get svc --all-namespaces | grep fortrancicd
default       fortrancicd                 LoadBalancer   10.0.157.99    52.154.213.151   80:31640/TCP     10m

Next Steps
So what would be the next steps?
We would likely want to get a domain name and proper SSL certs for our ingress controller. Once in production, we might wish to scale out deployment, perhaps with a horizontal pod autoscaler or just add some replicas to the deployment.
We might also wish to add some unit tests to the system. This could easily be added to our nodejs with mocha and super tests (see this blog writeup)
Another point to make is during this blog, to save on costs, i periodically remove AKS and ACRs. When i did this, I needed to figure out how to add them back.
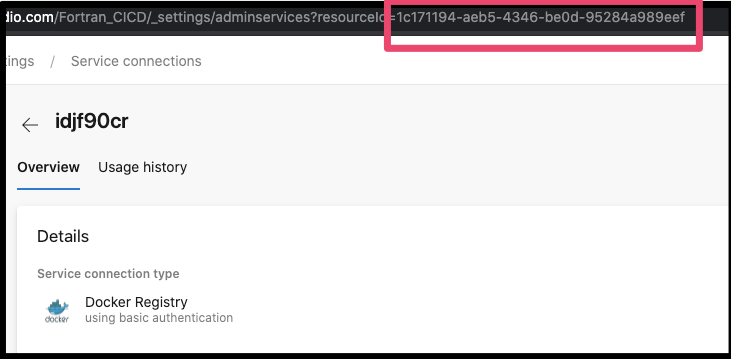
First, when adding in a docker service registry connection (and you can use any CR), you’ll want to refer the ID of the service connection in the azure-pipelines.yaml. e.g.
dockerRegistryServiceConnection: '1c171194-aeb5-4346-be0d-95284a989eef'Points to the resource id here:
Next, the “FortranCICD” Environment was pointed to a k8s cluster i had removed, so i needed to create a new one with a proper service connection. Try as i might, I couldn't figure out the magic they assumed for having a service user in namespace also create the namespace (tried various CRBs). In the end, to save on headaches, i used the default namespace:

You can follow the guide in the “Add Resource”, but this snippet i used might help jump start you:
$ cat newazdo.yaml
apiVersion: v1
kind: ServiceAccount
metadata:
 name: mainazdo
 namespace: default
 selfLink: /api/v1/namespaces/default/serviceaccounts/mainazdo
---
apiVersion: rbac.authorization.k8s.io/v1
kind: RoleBinding
metadata:
 name: mainazdo-sa-rolebinding
 namespace: default
roleRef:
 apiGroup: rbac.authorization.k8s.io
 kind: ClusterRole
 name: my-cluster-admin
subjects:
- kind: ServiceAccount
 name: mainazdo
 namespace: default
- kind: User
 name: system:serviceaccount:default:mainazdo
 apiGroup: ""
Then you’ll apply and use the token to get the config parts that the AzDO needs.
$ kubectl apply -f newazdo.yaml
$ kubectl get serviceAccounts mainazdo -n default -o=jsonpath={.secrets[*].name}
$  kubectl get secret mainazdo-token-n6lrd  -n default -o json
$  kubectl config view --minify -o jsonpath={.clusters[0].cluster.server}
Summary
In this blog we took a legacy 3rd Generation language, like Fortran and using Azure DevOps and Kubernetes turned it into a cloud based available microservice. We used ExpressJS to expose the app and lastly suggested next steps to making this a HADR service.
There was a part of me that did this because I have very fond memories of F77 and F90 from the start of my career working on ICEM DDN at Control Data. I worked with great people and it was a foundational part of my life.
But that was not the only time I would see the use of legacy code. At GMAC-RFC prior to the 2008 bust, we had a mainframe that cranked hundreds of thousands of dollars of mortgage processing through it written in COBOL. Every attempt to convert the COBOL to the cutting edge (at the time) .NET code failed. In the end, i had the distinct pleasure of working on COBOL .NET (then owned by Fujtisu) to create .NET bindings on existing COBOL files. (COBOL .NET still exists).
The fact is, there are a vast number of giant financial (and likely medical and military) institutions with troves of COBOL and FORTRAN code. They likely pay a king's ransom to hire maintainers and if the code runs on mainframes, they pray to the gods of Ebay they can find replacement parts for their dated hosts.
Having a method to take classic computational code and move it to the cloud eliminates the risk of hard-to-maintain legacy hardware. Having a method to easily build and deploy allows for rapid experimentation by new developers (and enables the slow replacement into newer more supportable languages).
So yeah, FORTRAN microservices may seem a bit nutty, but then again, the person reading this may be a panicked regional bank manager realizing you aren’t totally hosed when the single contractor or IT person handling the code retires.