While i’ve been using Mermaid diagrams for some time, i realize not everyone knows what they are or how best to use them. I’ll work through how you can have diagrams as code, expose via Azure DevOps Wiki and even show how to compile images for distribution in a pipeline as well as autogenerate word docs you can use in other tooling (for instance, uploading into sharepoint or google drive).
Mermaid : A Primer
Mermaid is a an opensource javascript based diagram tool. The formatting was adopted by many tools including Azure DevOps.
Let’s just look at some examples (you can follow along in the live editor).
graph TD
  A[User Request : $UR ] -->|New | B(Process Request)
  B --> C{parse and trigger}
  C -->|when done | E[comment on $WI]
  C -->|parse | D(Insert Request into Table)
  D -->|something else | F(System B)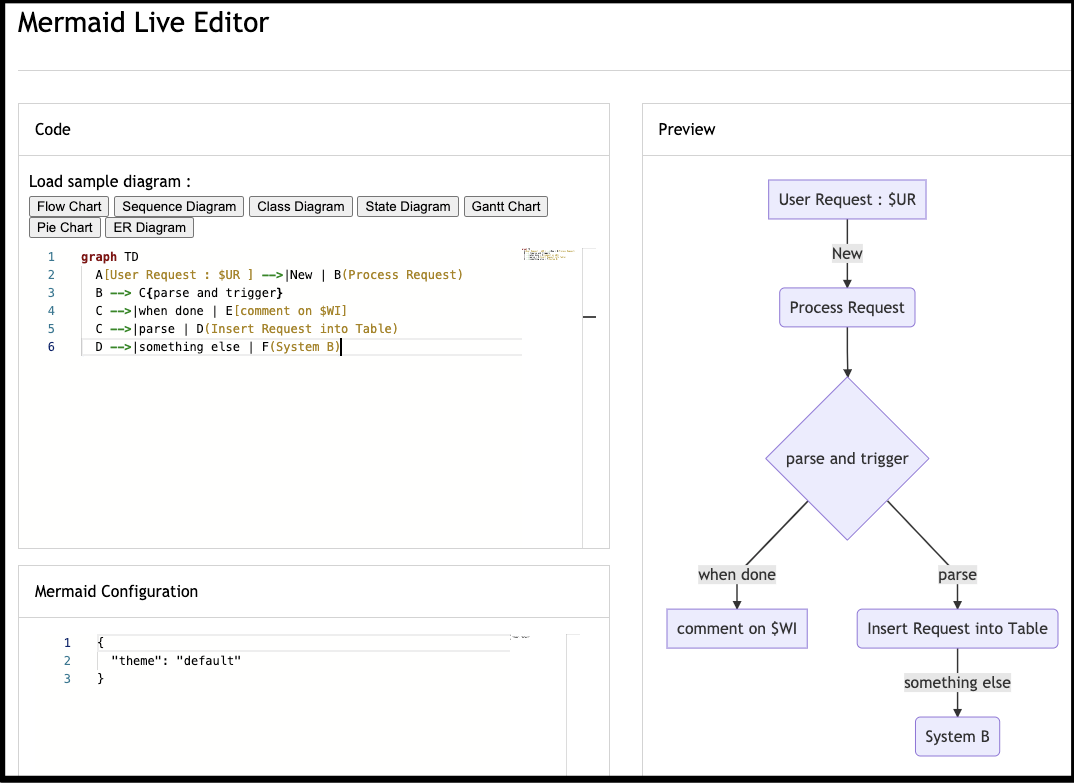
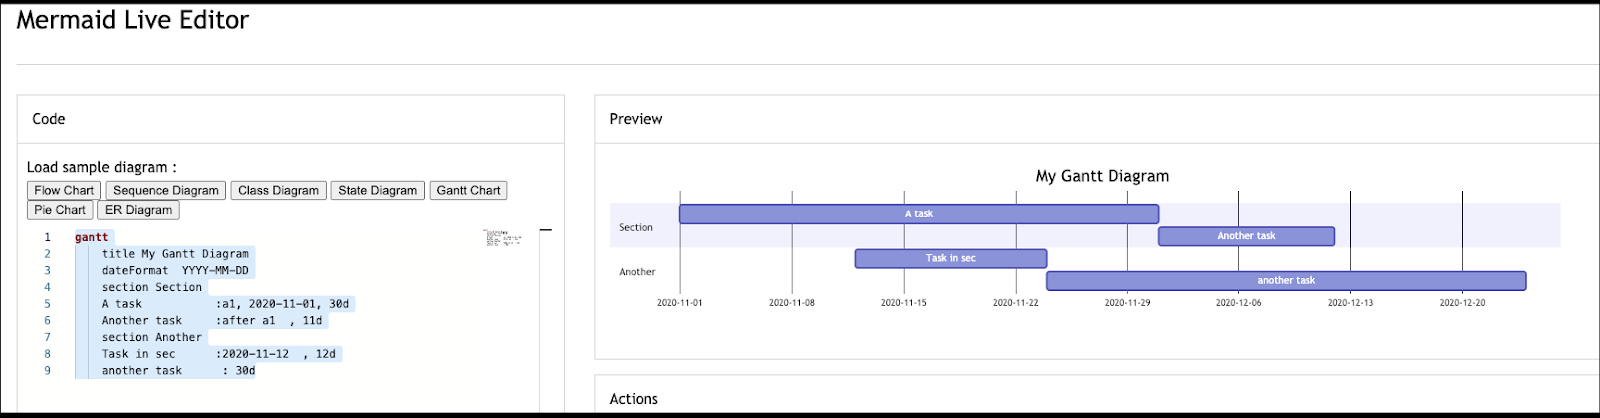
Gantt:
Here is another example:
gantt
    title My Gantt Diagram
    dateFormat  YYYY-MM-DD
    section Section
    A task           :a1, 2020-11-01, 30d
    Another task     :after a1  , 11d
    section Another
    Task in sec      :2020-11-12  , 12d
    another task      : 30d
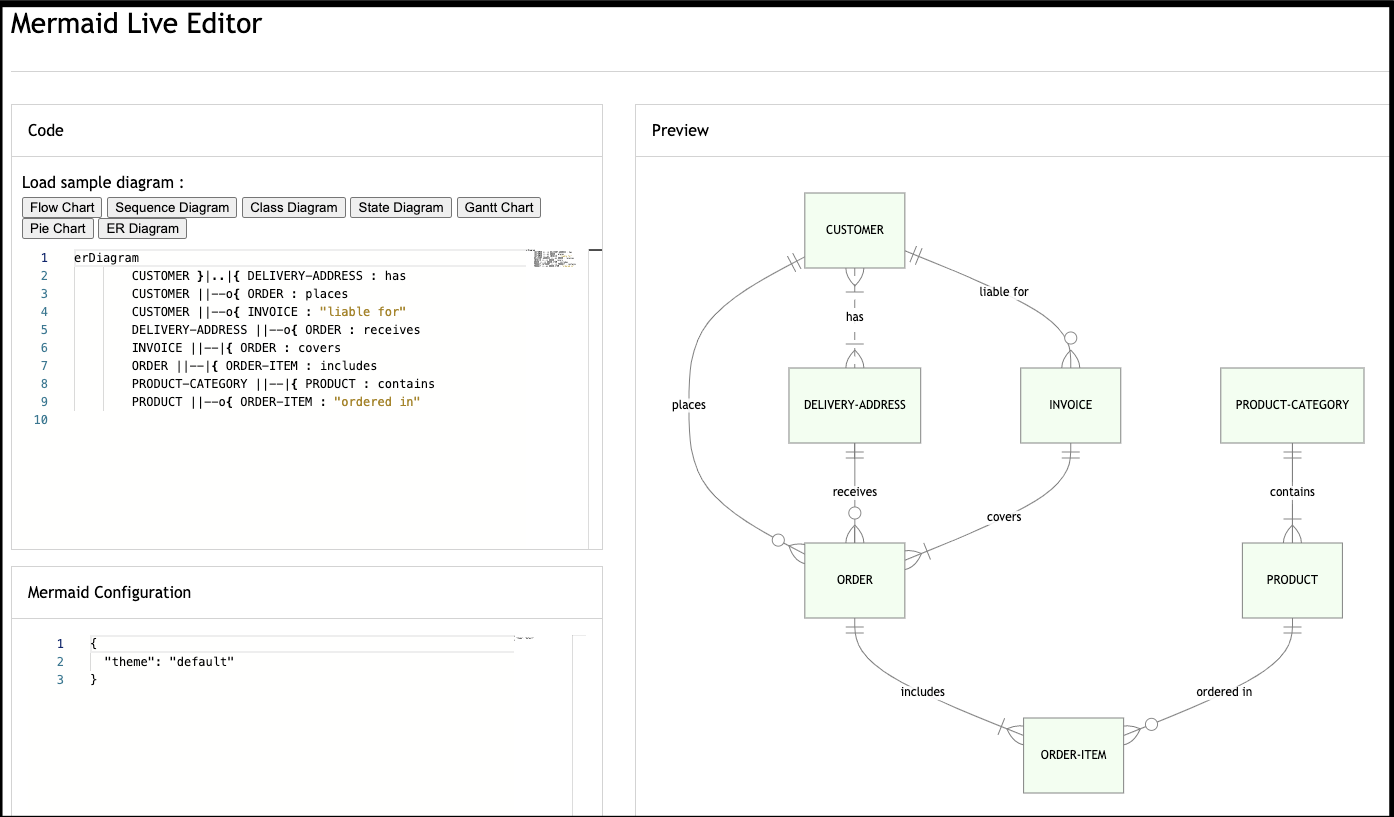
And clearly they have examples for: Flow Charts, Sequence Diagrams, Class Diagrams, State Diagrams, Gantt Charts, Pie Charts and Entity Relationship (ER) Diagrams.
Adding to Azure Repos:
Let's create a markdown file and add the following diagram:
graph TD
	A[Create Branch] -->|Push| B(Create PR)
	B --> C{Trigger Build}
	C -->|Passes | E{Release branch}
    E -->|Pr/feature | F[s3 demo bucket]
    E -->|master | G[s3 prod bucket]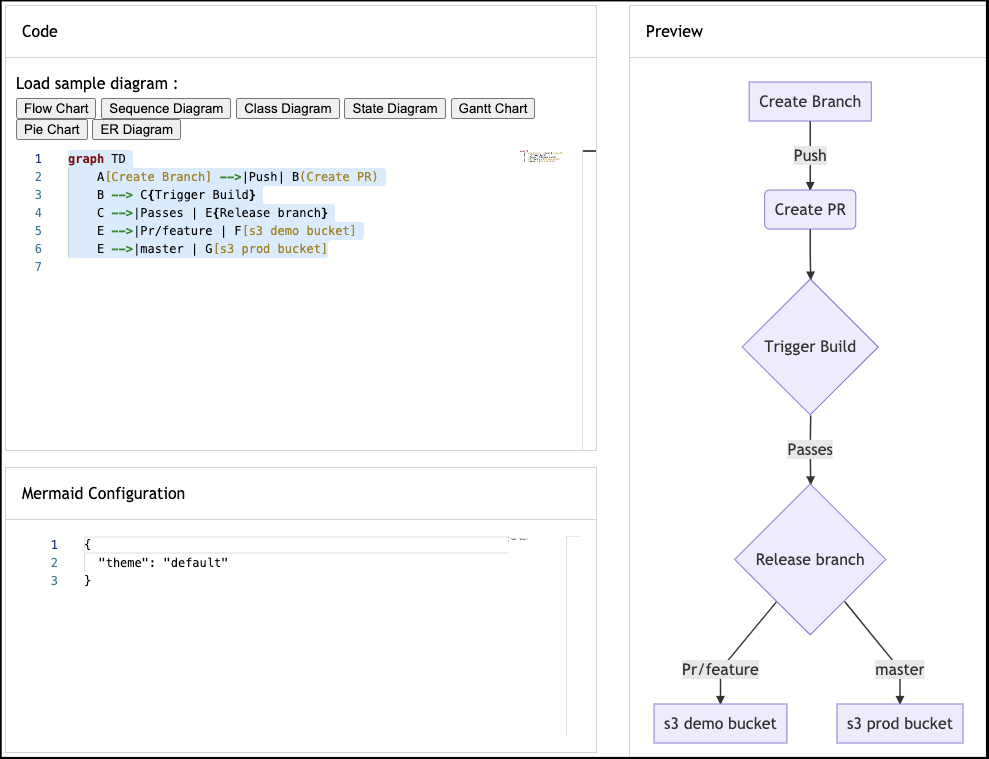
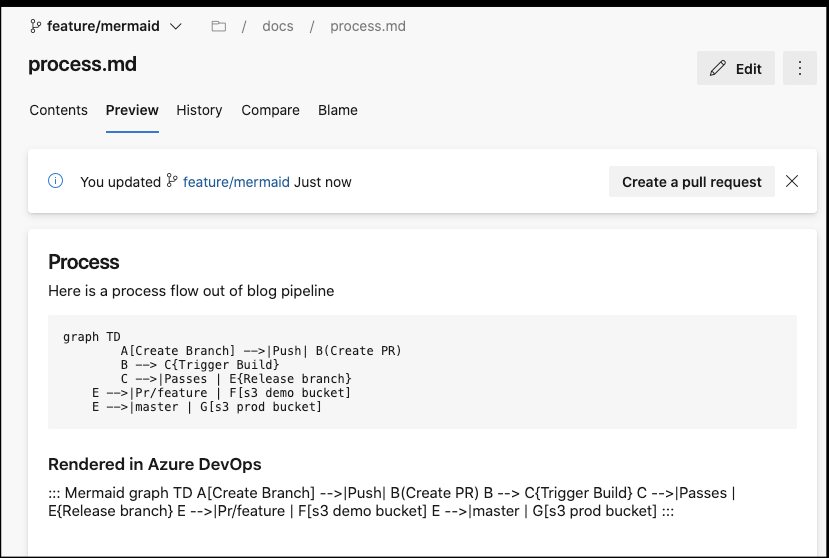
Here is where we have a bit of a delta we need to manage. The Mermaid JS plugin in Visual Studio Code likes the 3 backticks way and Azure Repos uses 3 colons.
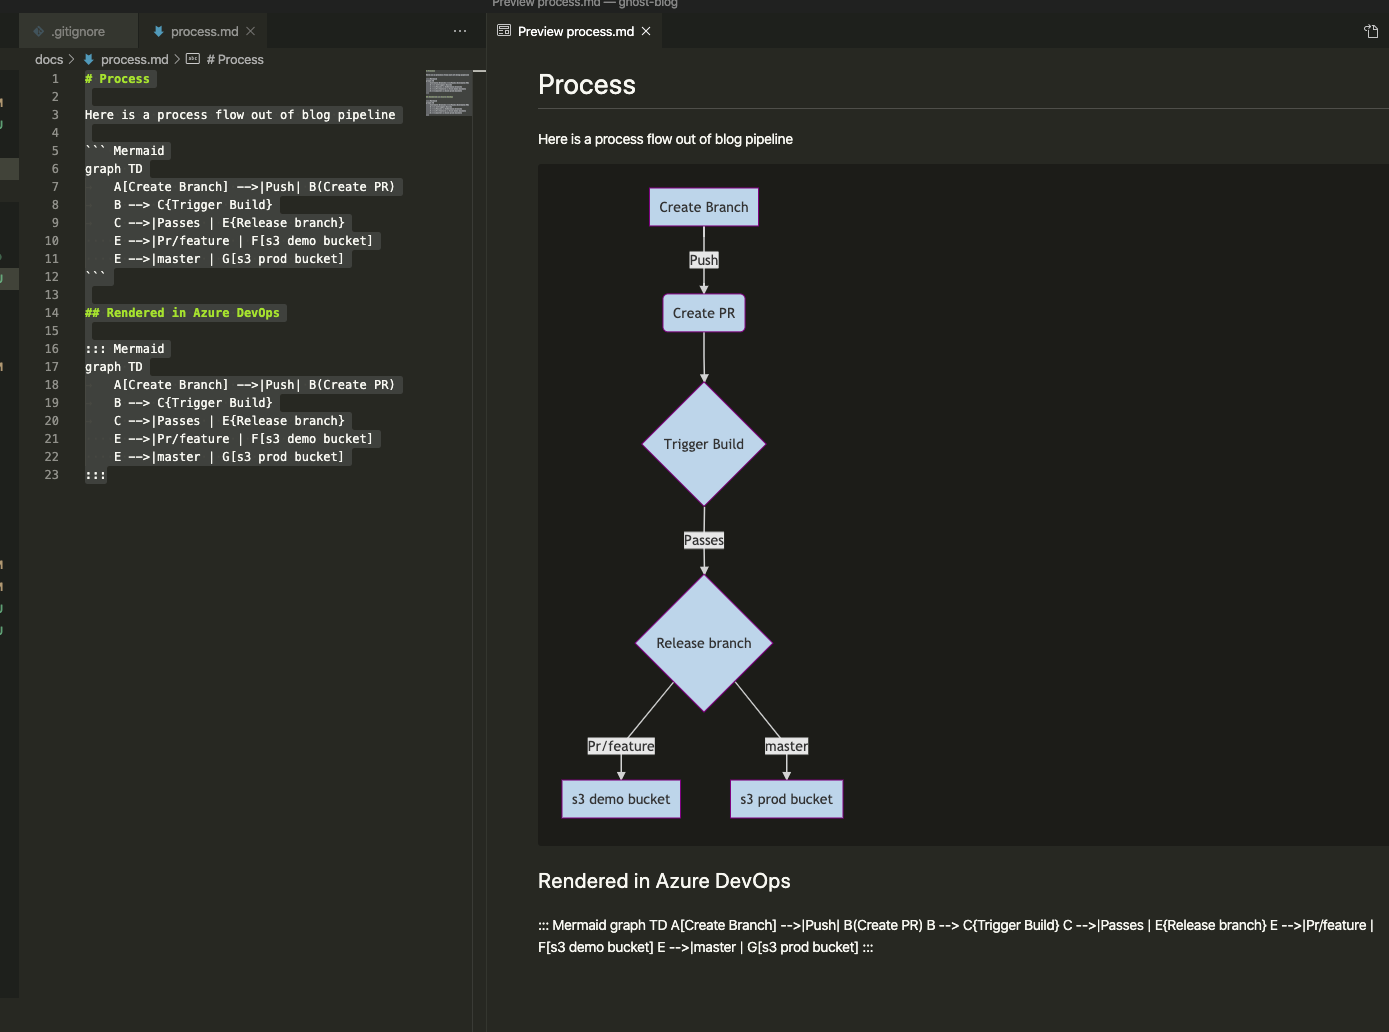
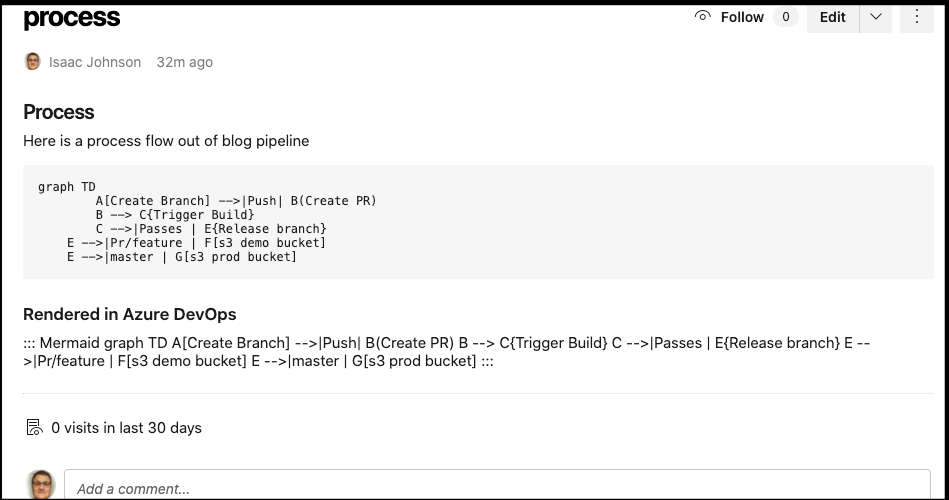
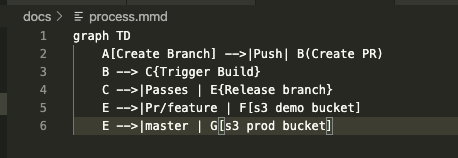
# Process

Here is a process flow out of blog pipeline

``` Mermaid
graph TD
	A[Create Branch] -->|Push| B(Create PR)
	B --> C{Trigger Build}
	C -->|Passes | E{Release branch}
    E -->|Pr/feature | F[s3 demo bucket]
    E -->|master | G[s3 prod bucket]
```

## Rendered in Azure DevOps

::: Mermaid
graph TD
	A[Create Branch] -->|Push| B(Create PR)
	B --> C{Trigger Build}
	C -->|Passes | E{Release branch}
    E -->|Pr/feature | F[s3 demo bucket]
    E -->|master | G[s3 prod bucket]
:::
We'll leave both in so you can see how Azure DevOps responds:
$ git add docs
$ git commit -m "first draft on mermaid docs"
[feature/mermaid 4343f2c8] first draft on mermaid docs
 1 file changed, 23 insertions(+)
 create mode 100644 docs/process.md
JOHNSI10-M1:ghost-blog johnsi10$ git push
fatal: The current branch feature/mermaid has no upstream branch.
To push the current branch and set the remote as upstream, use

    git push --set-upstream origin feature/mermaid

$ darf
git push --set-upstream origin feature/mermaid [enter/↑/↓/ctrl+c]
Enumerating objects: 5, done.
Counting objects: 100% (5/5), done.
Delta compression using up to 12 threads
Compressing objects: 100% (3/3), done.
Writing objects: 100% (4/4), 552 bytes | 552.00 KiB/s, done.
Total 4 (delta 1), reused 0 (delta 0)
remote: Analyzing objects... (4/4) (78 ms)
remote: Storing packfile... done (48 ms)
remote: Storing index... done (50 ms)
To https://princessking.visualstudio.com/ghost-blog/_git/ghost-blog
 * [new branch]        feature/mermaid -> feature/mermaid
Branch 'feature/mermaid' set up to track remote branch 'feature/mermaid' from 'origin'.
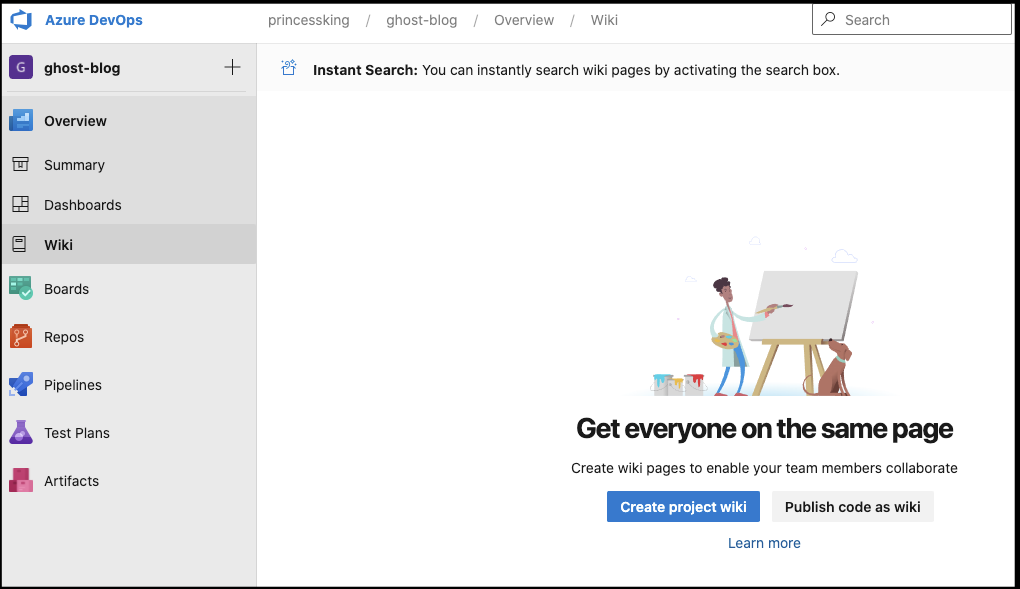
Exposing via Wiki
I did indicate Azure DevOps can render these, but only via the Wiki area (for now).
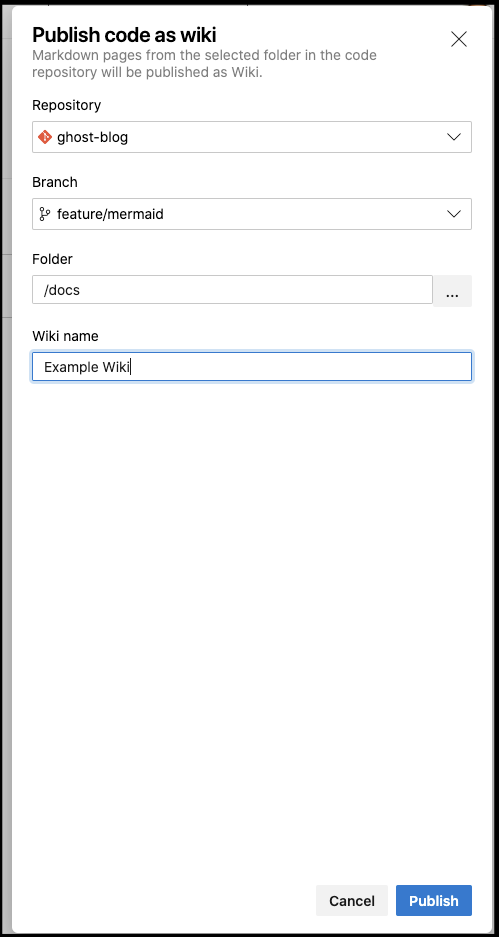
Let's do that now, go to Wiki and "Publish code as wiki" if you haven't already:
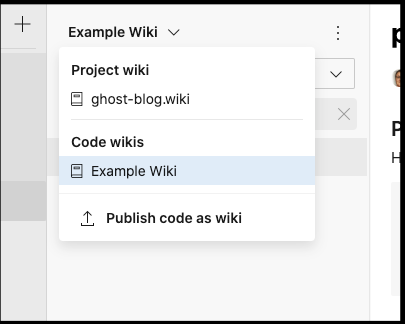
If you made a non-code wiki or already have other wikis from code, you can use the drop down to add another "Publish code as wiki":

Usually I would only publish wiki from the constrained (master) branch, but for this demo, i'll use the feature branch:
We can now select it from drop down:
Note: Azure DevOps will translate underscores as spaces in wiki file names (e.g. "My_Process.md" would show up as "My Process"
At first i got worried as the chart didnt render:
but then i realized i errantly used "Mermaid" instead of "mermaid" (casing matters)
$ git diff docs/
diff --git a/docs/process.md b/docs/process.md
index dfdfa3c9..066896f0 100644
--- a/docs/process.md
+++ b/docs/process.md
@@ -2,7 +2,7 @@

 Here is a process flow out of blog pipeline

-``` Mermaid
+``` mermaid
 graph TD
        A[Create Branch] -->|Push| B(Create PR)
        B --> C{Trigger Build}
@@ -13,7 +13,7 @@ graph TD

 ## Rendered in Azure DevOps

-::: Mermaid
+::: mermaid
 graph TD
        A[Create Branch] -->|Push| B(Create PR)
        B --> C{Trigger Build}

$ git add docs
$ git commit -m "lowercase mermaid"
[feature/mermaid 78ca29fb] lowercase mermaid
 1 file changed, 2 insertions(+), 2 deletions(-)
JOHNSI10-M1:ghost-blog johnsi10$ git push
Enumerating objects: 7, done.
Counting objects: 100% (7/7), done.
Delta compression using up to 12 threads
Compressing objects: 100% (3/3), done.
Writing objects: 100% (4/4), 357 bytes | 357.00 KiB/s, done.
Total 4 (delta 2), reused 0 (delta 0)
remote: Analyzing objects... (4/4) (5 ms)
remote: Storing packfile... done (49 ms)
remote: Storing index... done (40 ms)
To https://princessking.visualstudio.com/ghost-blog/_git/ghost-blog
   4343f2c8..78ca29fb  feature/mermaid -> feature/mermaid
Now we have a proper diagram automatically updated on pushes:
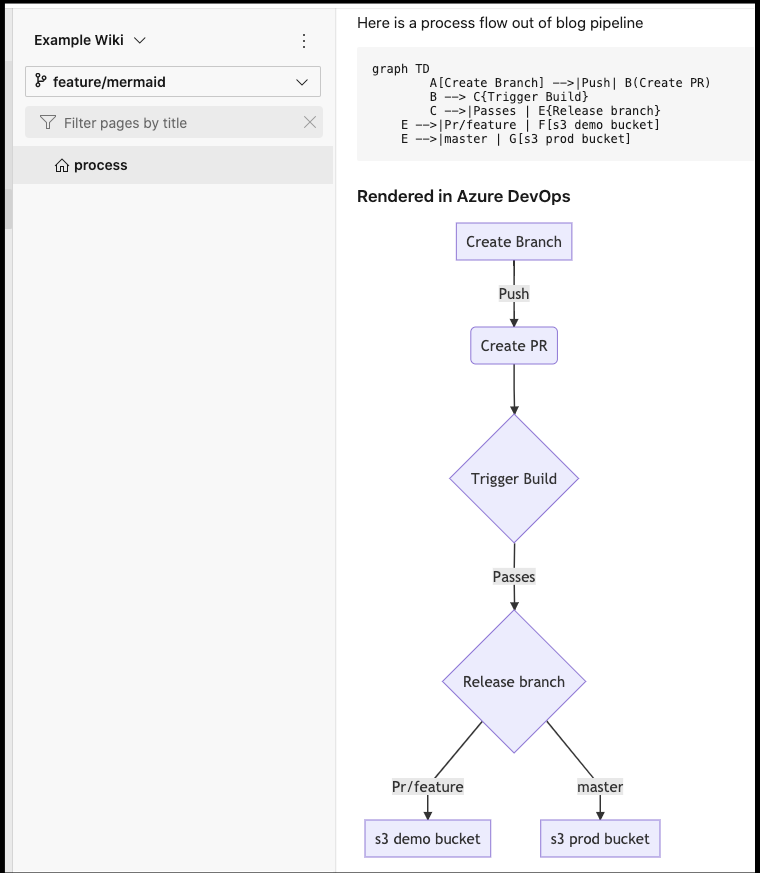
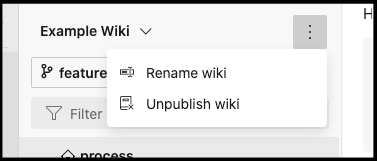
Note, I will eventually want to remove this as i'll point the wiki to the docs under "master" later (and i like my PRs to remove the source branch). You can remove a code-based wiki from "Unpublish".
Rendering Markdown and Images
So now we have a wiki, perhaps there are some users who really want an image that can be put in private wiki, or a rendered PDF or Word Doc. We can handle that too.
$ npm install --save-dev docxify-node execa mermaid.cli showdown

> puppeteer@1.20.0 install /Users/johnsi10/Workspaces/ghost-blog/node_modules/puppeteer
> node install.js

Downloading Chromium r686378 - 110.2 Mb [====================] 100% 0.0s
Chromium downloaded to /Users/johnsi10/Workspaces/ghost-blog/node_modules/puppeteer/.local-chromium/mac-686378

> docxify-node@1.3.2 postinstall /Users/johnsi10/Workspaces/ghost-blog/node_modules/docxify-node
> script/setup

✔ running setup
npm WARN ajv-keywords@2.1.1 requires a peer of ajv@^5.0.0 but none is installed. You must install peer dependencies yourself.

+ showdown@1.9.1
+ execa@4.0.3
+ mermaid.cli@0.5.1
+ docxify-node@1.3.2
added 87 packages from 45 contributors, updated 2 packages and audited 1548 packages in 21.412s
found 635 vulnerabilities (427 low, 18 moderate, 185 high, 5 critical)
  run `npm audit fix` to fix them, or `npm audit` for details
We need to move the memaid markdown to something i can process. I could probably get smart and do some sed/awk on the main md file, but we can save that as an optimization for later.
I also need to add some steps to the package.json:
   "gendiagram": "mmdc -i docs/process.mmd -o docs/process.png",
   "gendocs": "showdown makehtml -i docs/process.md -o process.html",
   "cleandocs": "rm -f ./*.html && rm -f ./*.docx",
   "gendocx": "cd docs && docxify process.md ../process.docx"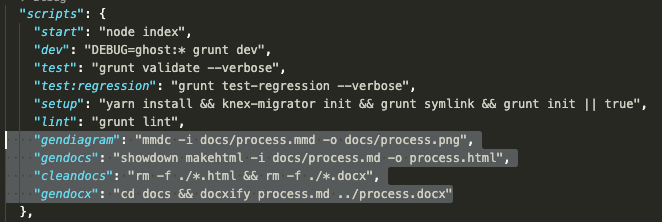
Now, we are almost done, we need to update our pipeline to invoke these steps:
- bash: |
rm -rf ./gendocs || true
mkdir ./gendocs
displayName: 'create gendocs folder'
- bash: |
npm install
sudo apt-get -y install pandoc
displayName: 'npm install and install pandoc'
- bash: |
npm run gendiagram
cat docs/process.md | sed -n '1h; 1!H; ${g; s/:::[^!]*::://g; p;}' > docs/process.md
cp -f docs/process.png ./gendocs
npm run gendocx
cp -f *.docx ./gendocs
npm run gendocs
cp -f *.html ./gendocs
displayName: 'npm run'
- task: PublishBuildArtifacts@1
displayName: 'Publish Artifact: gendocs'
inputs:
PathtoPublish: '$(Build.SourcesDirectory)/gendocs'
ArtifactName: gendocsLet me explain that a bit. The first block cleans up if a gendocs folder is there. The next installs any missing libraries and adds pandoc. Then we go ahead and run our npm tasks and copy the output to ./gendocs. Lastly we publish those as build artifacts.
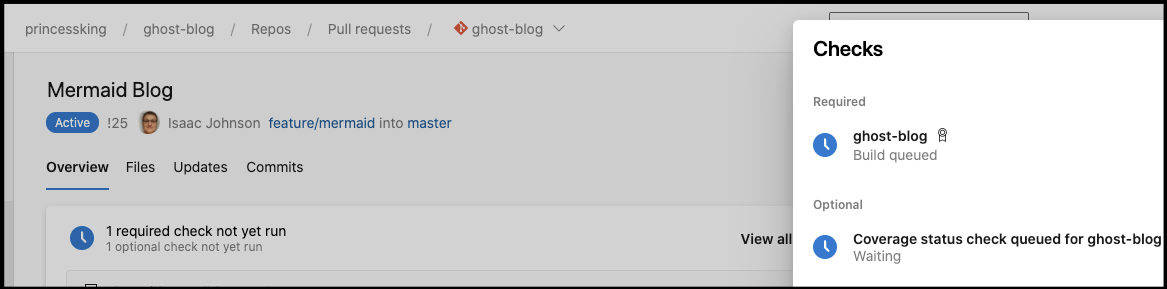
Once I create a PR, the build will kick in:
Quick pivot:
Because my existing blog is rather finicky on which version of nodejs, I found some dependency issues between 8 and 10. Therefore, I moved all the documentation steps into it’s own package.json in docs. This means i have effectively two node projects to build, the main “blog” and the “docs” subfolder.
- task: UseNode@1
displayName: 'Use Node 10.x'
inputs:
checkLatest: true
- task: Bash@3
displayName: 'npm install and install pandoc'
inputs:
targetType: 'inline'
script: |
npm install
sudo apt-get -y install pandoc
workingDirectory: 'docs'
- bash: |
rm -rf ./gendocs || true
mkdir ./gendocs
displayName: 'create gendocs folder'
- task: Bash@3
displayName: 'npm run'
inputs:
targetType: 'inline'
script: |
npm run gendiagram
cat process.md | sed -n '1h; 1!H; ${g; s/:::[^!]*::://g; p;}' > process2.md
mv -f process2.md process.md
cp -f process.png ../gendocs
npm run gendocx
cp -f ../*.docx ../gendocs
npm run gendocs
cp -f ../*.html ../gendocs
workingDirectory: 'docs'
- task: PublishBuildArtifacts@1
displayName: 'Publish Artifact: gendocs'
inputs:
PathtoPublish: '$(Build.SourcesDirectory)/gendocs'
ArtifactName: gendocsAnd then the “docs” project itself:
{
  "name": "GhostBlogDocs",
  "version": "1.0.0",
  "description": "Documentation and Publications",
  "main": "index.js",
  "directories": {
    "doc": "docs",
    "example": "examples"
  },
  "scripts": {
    "test": "echo \"Error: no test specified\" && exit 1",
    "gendiagram": "mmdc -i process.mmd -o process.png",
    "gendocs": "showdown makehtml -i process.md -o ../process.html",
    "cleandocs": "rm -f ../*.html && rm -f ../*.docx",
    "gendocx": "docxify process.md ../process.docx"
  },
  "repository": {
    "type": "git",
    "url": "git://github.com/TryGhost/Ghost.git"
  },
  "keywords": [
    "AZDO"
  ],
  "author": "Isaac Johnson",
  "license": "MIT",
  "devDependencies": {
    "docxify-node": "^1.3.2",
    "execa": "^4.0.2",
    "mermaid.cli": "^0.5.1",
    "showdown": "^1.9.0"
  },
  "dependencies": {}
}
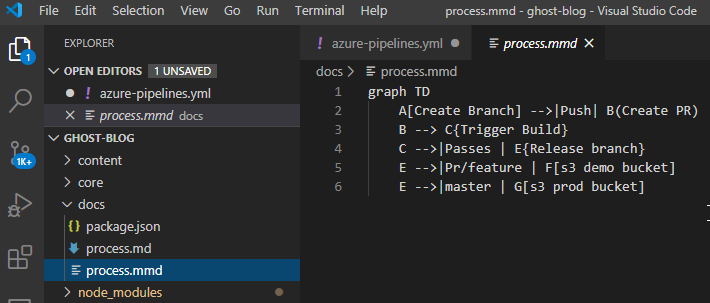
Then lastly the graph itself (process.mmd):
graph TD
	A[Create Branch] -->|Push| B(Create PR)
	B --> C{Trigger Build}
	C -->|Passes | E{Release branch}
    E -->|Pr/feature | F[s3 demo bucket]
    E -->|master | G[s3 prod bucket]
Once we run the build, we should see the artifacts attached to the build run:

And the artifacts:
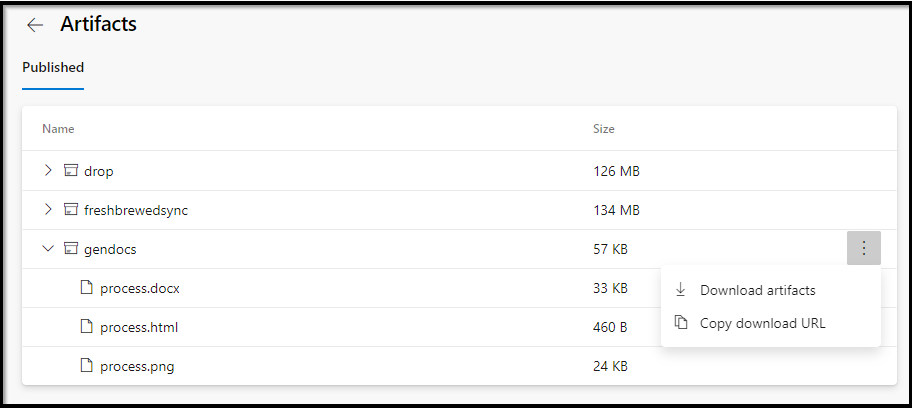
And as you can see, the process.md was rendered out to Word Doc and HTML.

Adding More formats : PDF
We could add another format as well. Perhaps our readers would like PDF. I actually find using the Ledger size in PDF useful in creating properly sized documents for wide tabular data. For PDF generation, we can use md-to-pdf.
First, add another call in the azure-pipelines yaml task step.
                 cp -f ../*.html ../gendocs
+                npm run gendocp
+                cp -f ../*.pdf ../gendocs
               workingDirectory: 'docs'
Then add steps in the package.json in /docs.
     "gendocs": "showdown makehtml -i process.md -o ../process.html",
-    "cleandocs": "rm -f ../*.html && rm -f ../*.docx",
-    "gendocx": "docxify process.md ../process.docx"
+    "cleandocs": "rm -f ../*.html && rm -f ../*.docx && rm -f ../*.pdf",
+    "gendocx": "docxify process.md ../process.docx",
+    "gendocp": "md-to-pdf --pdf-options '{ \"format\": \"Ledger\", \"margin\": \"20mm\", \"printBackground\": true }' process.md ../process-ledger.pdf && md-to-pdf process.md ../process.pdf && md-to-pdf --pdf-options '{ \"format\": \"Letter\" }' process.md ../process-letter.pdf && md-to-pdf --pdf-options '{ \"format\": \"A5\", \"margin\": \"10mm 10mm\"}' process.md ../process-A5.pdf"
   },
   "repository": {
     "type": "git",
@@ -29,6 +31,8 @@
     "mermaid.cli": "^0.5.1",
     "showdown": "^1.9.0"
   },
-  "dependencies": {}
+  "dependencies": {
+    "md-to-pdf": "^2.8.2"
+  }
 }
When run, this generated new PDF files:

It’s hard to show all the formats, but here is an attempt to compare the PDF sizes:

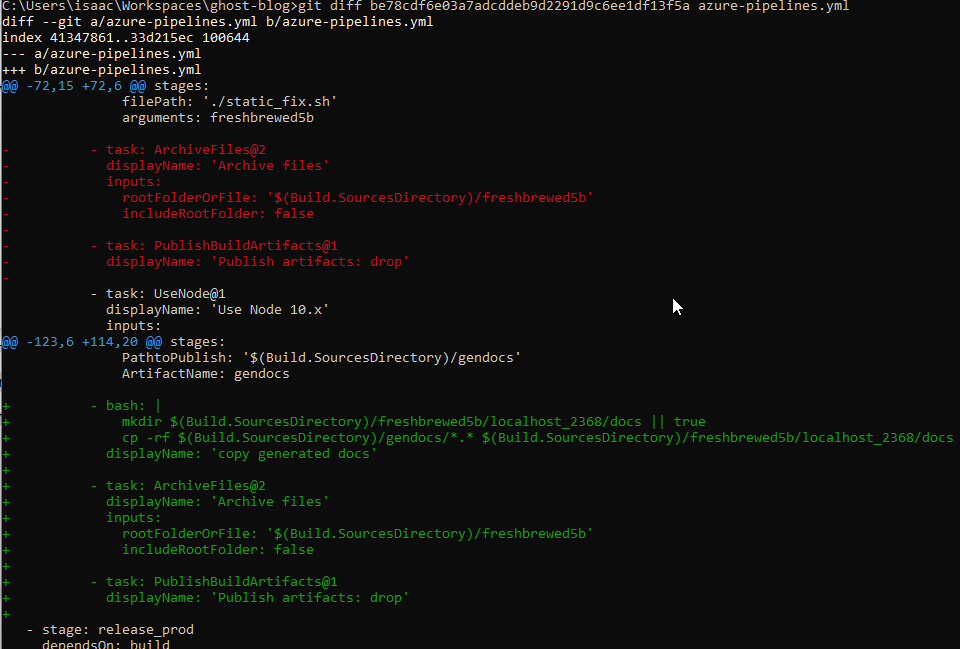
This is fine, but what if we want to deploy to our website? I grant you this is unique to my blog deployment, but these docs could just be bundled into our releasable folders for deployment.
I merely moved the package steps after our docs generation and added a step to copy into a “docs” subfolder:
testing:
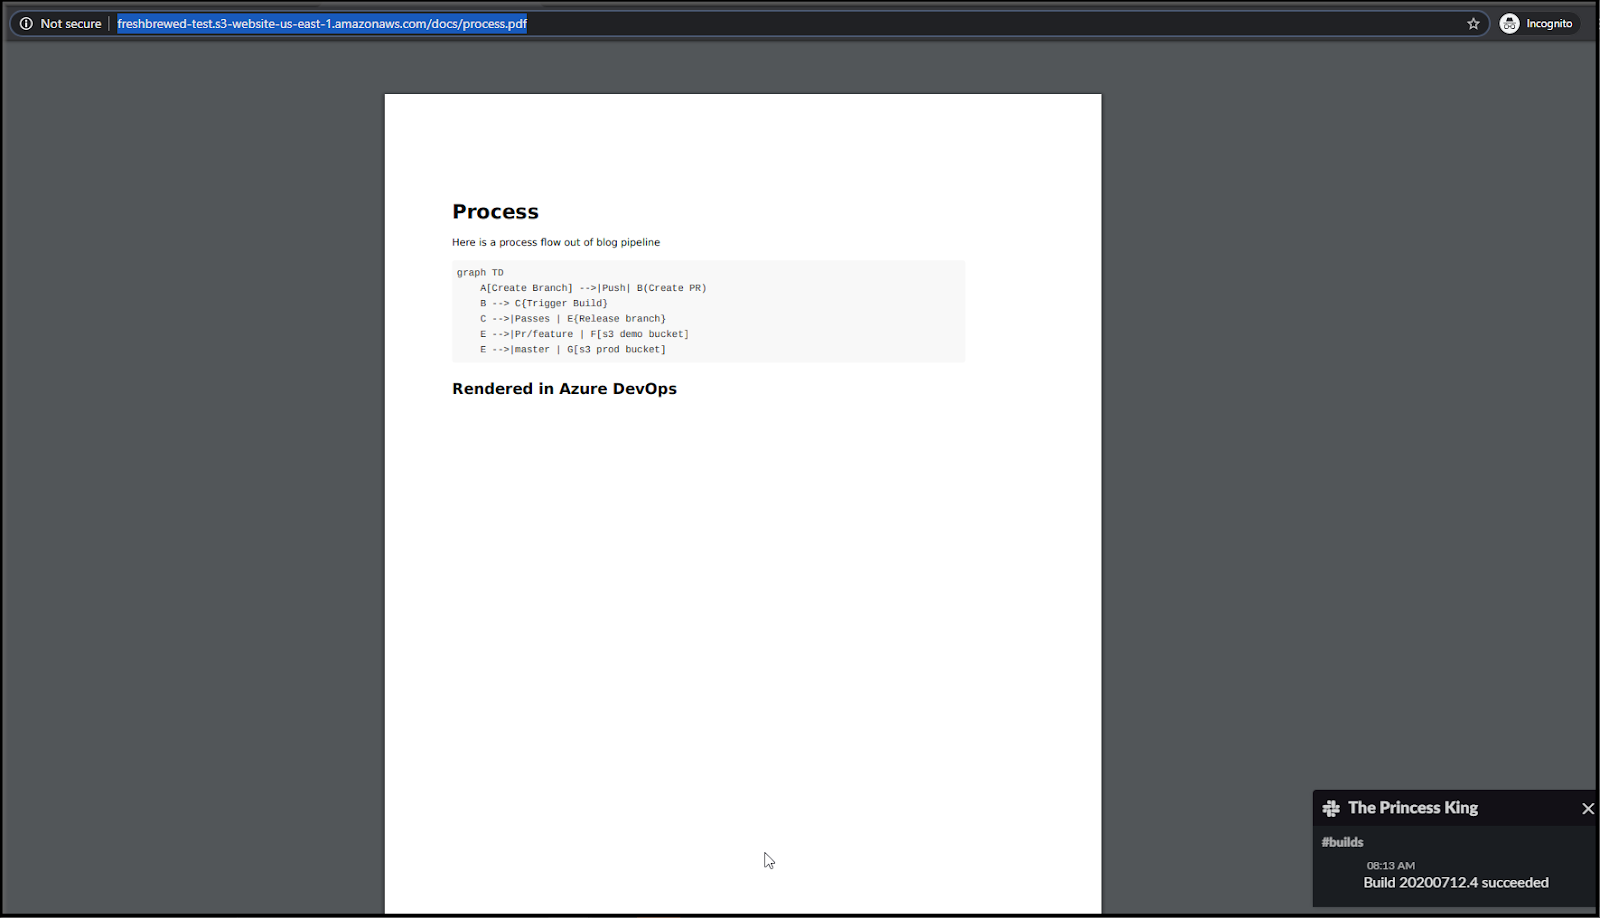
Expect to see current versions now here: https://freshbrewed.science/docs/process.pdf and https://freshbrewed.science/docs/process.docx.
Summary
While we started by talking about Mermaid as a diagram format we really dug into Markdown as a documentation format. We demonstrated how we can generate PDF, Word and HTML. We also showed generating PNG images from Mermaid Markdown (MMD) and bundling them in the aforementioned docs. We showed how markdown with mermaid can be viewed and used in Azure Repos and Azure DevOps Wiki. Lastly we demonstrated both building and bundling these files in Azure Pipelines and publishing to our website.
This is a topic of great interest to me. A fantastic team of which I was a part of at Intuit, in particular our manager Thom Whitcomb, really converted me to the markdown format. Before VSCode had native md preview, we used MacDown.
In my current role I often do my documentation as code and in order to comply with publishing to the internal wiki, I add curl steps to upload the generated docx into the tool. This allows me to maintain documentation as code.
curl -k --max-filesize 10000000000 -u '$(username):$(password)' -X POST -H "X-Atlassian-Token: no-check" -F "file=@setup.docx" -F "comment=My Setup Doc" "https://confluence.mycompany.com/rest/api/content/12345678/child/attachment" Going back to that amazing team at Intuit; Tommy, our architect at that time converted me to the notion of “pubs” versus “docs”. The idea being your customer/consumer facing documentation is stored in “pubs” (or publications) and your internal facing documentation, such as contributing, compiling and debugging guides go into “docs”. Today i often use prefixes for things like “runbooks”.
Lastly, as a future blog topic, I would love to dig into a pattern to which my colleague Gaurav Makin won me over wherein all REST based services have Swagger YAML documentation. We use this to auto-generate .NET and Java bindings and lastly we orchestrate, via Azure Pipelines, deployment of that swagger yaml to a configmap mounted by an off-the-shelf dockerized swagger webapp. This means our Swagger YAML is not only a documentation source-of-truth, but is used to create client bindings and render into a live actionable swagger documentation service. Not to put too fine a point on that, but that means our Swagger service is what is current and live to a particular environment (so it lines up with our deployment - if Dev has a newer version than say Prod - the swagger documentation reflects that which is deployed to said environment at that point in time),