Another fantastic public cloud provider outside the big three is DigitalOcean. Known for high speeds and low costs, they’ve been around for 7 years and have quite a fan base. According to Hackernoon “Their network speed is 1Gbps; all hard disks are SSD and an incredible start-up time of only 55 secs. DigitalOcean nodes are placed at the top by independent performance tests, way far above Amazon machines.”
In our pursuit of a great k8s host, how does DO stack up? Let’s cast a line and sea. We'll look into 3 different ways to create and manage k8s clusters: The web dashboard, Terraform and Doctl.
Using the Dashboard:
We can create a cluster from the “Create” menu. Just choose clusters, a k8s version and your datacenter region.

Next step is to pick our machine type for the cluster pool and how many nodes. This is our one chance to get a sense of total cost.

Next we work through the wizard.
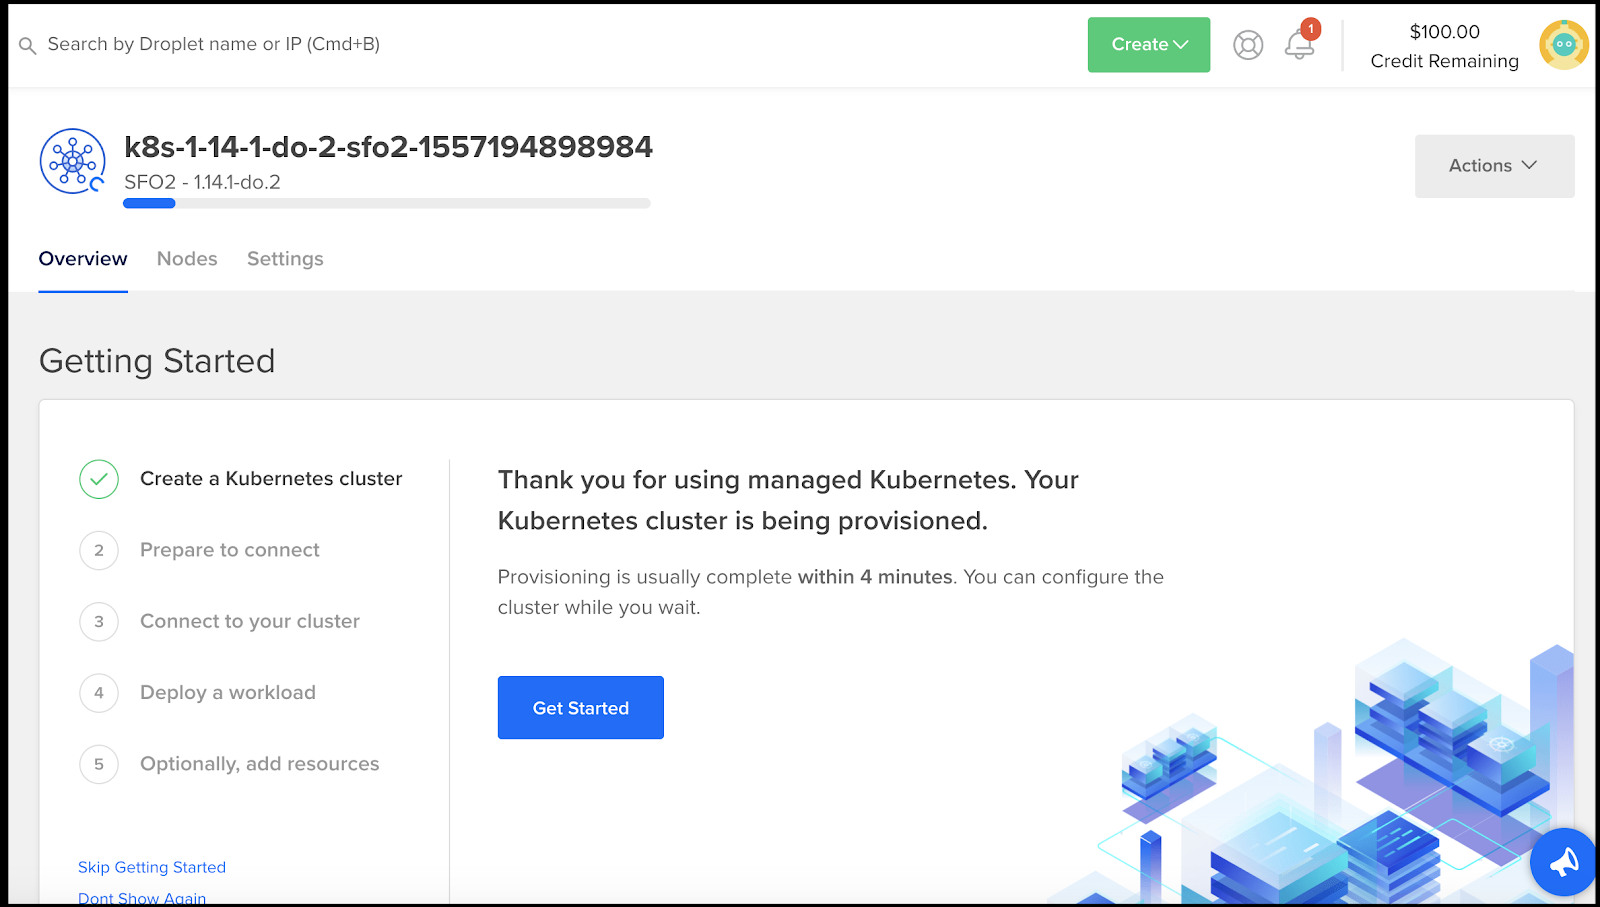
Go to Actions and download the config. Then copy it to ~/.kube:
$ mv ~/Downloads/k8s-1-14-1-do-2-sfo2-1557194898984-kubeconfig.yaml ~/.kube
Let’s check out how many nodes our cluster has (from the cluster).
$ cd ~/.kube && kubectl --kubeconfig="k8s-1-14-1-do-2-sfo2-1557194898984-kubeconfig.yaml" get nodes
NAME                  STATUS   ROLES    AGE     VERSION
pool-sle63apae-f8mb   Ready    <none>   8m58s   v1.14.1
pool-sle63apae-f8mg   Ready    <none>   8m13s   v1.14.1
pool-sle63apae-f8mw   Ready    <none>   8m56s   v1.14.1
Installing Helm
$ helm init
$HELM_HOME has been configured at /Users/isaac.johnson/.helm.

Tiller (the Helm server-side component) has been installed into your Kubernetes Cluster.

Please note: by default, Tiller is deployed with an insecure 'allow unauthenticated users' policy.
To prevent this, run `helm init` with the --tiller-tls-verify flag.
For more information on securing your installation see: https://docs.helm.sh/using_helm/#securing-your-helm-installation
Happy Helming!
RBAC setup for Helm
$ kubectl create serviceaccount --namespace kube-system tiller
serviceaccount/tiller created

$ kubectl create clusterrolebinding tiller-cluster-rule --clusterrole=cluster-admin --serviceaccount=kube-system:tiller
clusterrolebinding.rbac.authorization.k8s.io/tiller-cluster-rule created

$ kubectl patch deploy --namespace kube-system tiller-deploy -p '{"spec":{"template":{"spec":{"serviceAccount":"tiller"}}}}'
deployment.extensions/tiller-deploy patched
Testing
Installing Sonarqube to test
$ helm install stable/sonarqube --tiller-namespace kube-system
NAME: historical-sabertooth
LAST DEPLOYED: Mon May 6 21:29:37 2019
NAMESPACE: default
STATUS: DEPLOYED
RESOURCES:
==> v1/ConfigMap
NAME DATA AGE
historical-sabertooth-sonarqube-config 0 1s
historical-sabertooth-sonarqube-copy-plugins 1 1s
historical-sabertooth-sonarqube-install-plugins 1 1s
historical-sabertooth-sonarqube-tests 1 1s
==> v1/PersistentVolumeClaim
NAME STATUS VOLUME CAPACITY ACCESS MODES STORAGECLASS AGE
historical-sabertooth-postgresql Pending do-block-storage 1s
==> v1/Pod(related)
NAME READY STATUS RESTARTS AGE
historical-sabertooth-postgresql-9cbd8bbd7-hkkpw 0/1 Pending 0 0s
historical-sabertooth-sonarqube-7d89cb8698-c5687 0/1 ContainerCreating 0 0s
==> v1/Secret
NAME TYPE DATA AGE
historical-sabertooth-postgresql Opaque 1 1s
==> v1/Service
NAME TYPE CLUSTER-IP EXTERNAL-IP PORT(S) AGE
historical-sabertooth-postgresql ClusterIP 10.245.203.154 <none> 5432/TCP 1s
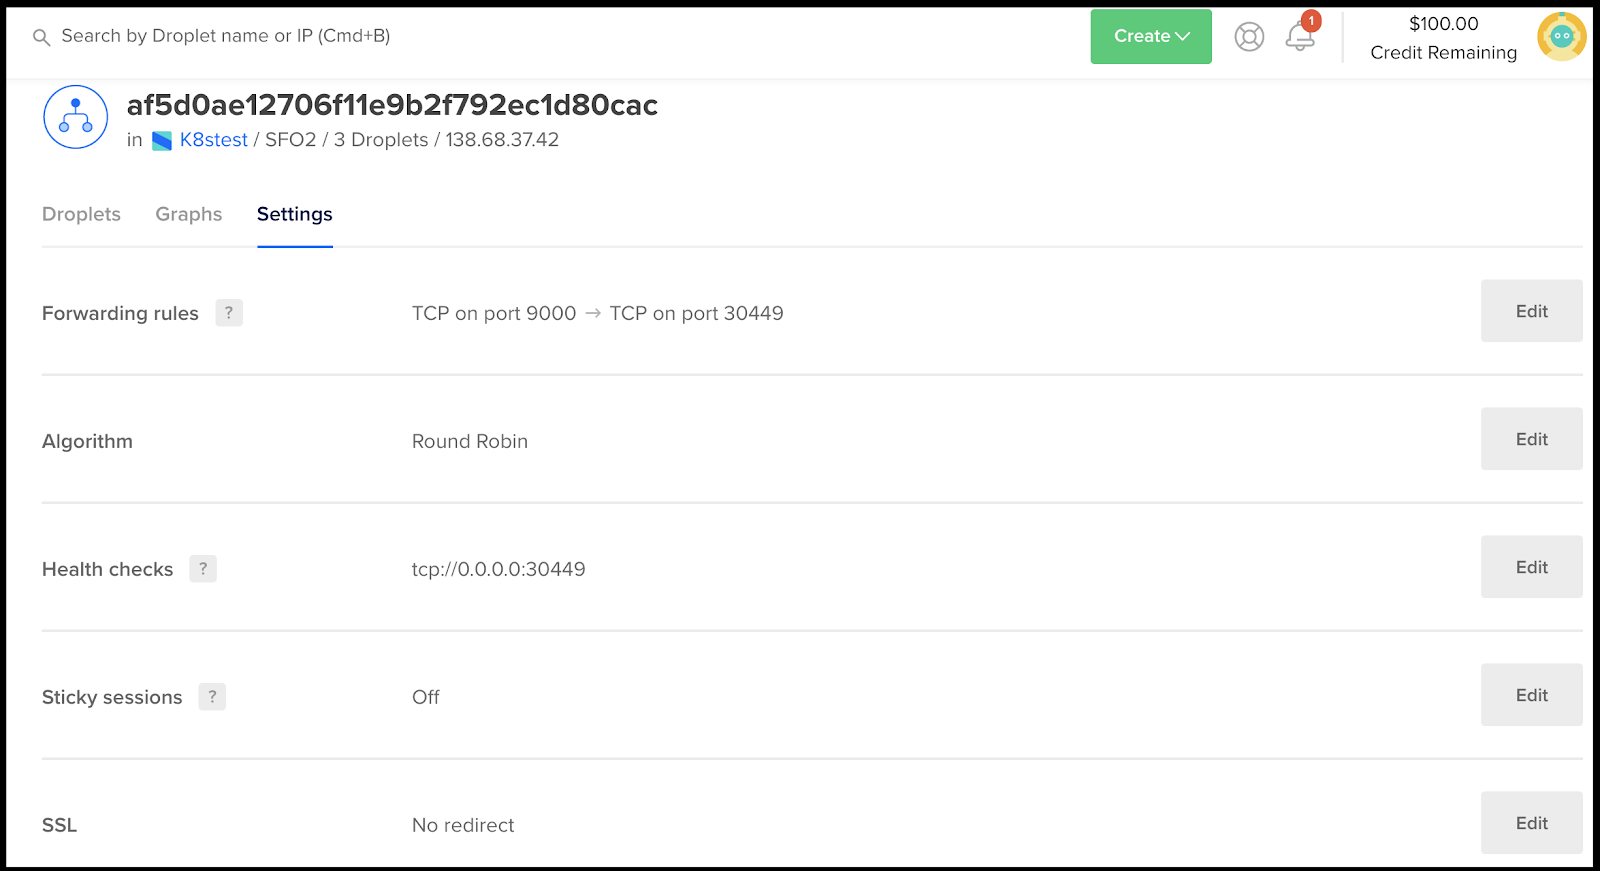
historical-sabertooth-sonarqube LoadBalancer 10.245.209.133 <pending> 9000:30449/TCP 1s
==> v1beta1/Deployment
NAME READY UP-TO-DATE AVAILABLE AGE
historical-sabertooth-postgresql 0/1 1 0 1s
historical-sabertooth-sonarqube 0/1 1 0 1s
NOTES:
1. Get the application URL by running these commands:
NOTE: It may take a few minutes for the LoadBalancer IP to be available.
You can watch the status of by running 'kubectl get svc -w historical-sabertooth-sonarqube'
export SERVICE_IP=$(kubectl get svc --namespace default historical-sabertooth-sonarqube -o jsonpath='{.status.loadBalancer.ingress[0].ip}')
echo http://$SERVICE_IP:9000
Get the public IP
$ kubectl get svc --namespace default historical-sabertooth-sonarqube -o jsonpath='{.status.loadBalancer.ingress[0].ip}'
138.68.37.42

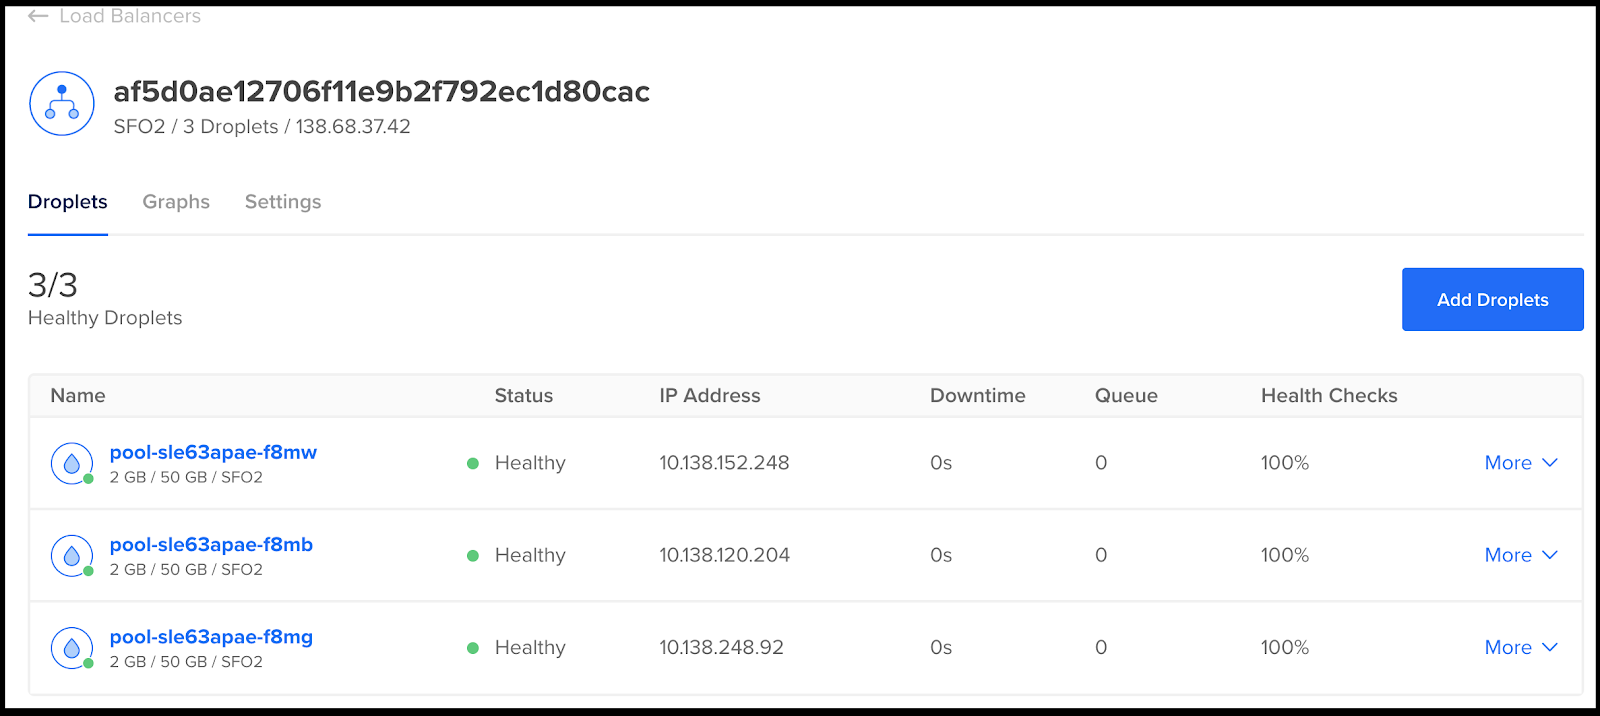
We can also see details about the created loadbalancer in the DO LB panel:

The droplets dashboard is also where we can see the states of our worker nodes:
Scaling
From the Nodes page on the Cluster we can clip the ellipse menu and choose “resize” to scale horizontally

We can also go into each droplet to resize (vertically scale):

We can also access some advanced cluster settings in the Kubernetes cluster dashboard. If your cluster, for instance, serves http and https, you can have it auto-redirect http to https by changing a quick toggle:
Cleaning up:
First we will want to clean up things we deployed with helm:
$ helm list
NAME                 	REVISION	UPDATED                 	STATUS  	CHART          	APP VERSION	NAMESPACE
historical-sabertooth	1       	Mon May  6 21:29:37 2019	DEPLOYED	sonarqube-1.0.0	7.7        	default
$ kubectl get pods --all-namespaces
NAMESPACE     NAME                                               READY   STATUS    RESTARTS   AGE
default       historical-sabertooth-postgresql-9cbd8bbd7-hkkpw   1/1     Running   0          23m
default       historical-sabertooth-sonarqube-7d89cb8698-c5687   1/1     Running   0          23m
kube-system   cilium-fw6wd                                       1/1     Running   0          36m
kube-system   cilium-operator-5469488bbb-ktrlc                   1/1     Running   0          38m
kube-system   cilium-rmqqb                                       1/1     Running   0          37m
kube-system   cilium-xj7tb                                       1/1     Running   0          37m
kube-system   coredns-5f44b47f5f-599lk                           1/1     Running   0          38m
kube-system   coredns-5f44b47f5f-pb428                           1/1     Running   0          38m
kube-system   csi-do-node-5rwhp                                  2/2     Running   0          36m
kube-system   csi-do-node-jwngx                                  2/2     Running   0          36m
kube-system   csi-do-node-zfdm8                                  2/2     Running   0          35m
kube-system   do-node-agent-cn5v6                                1/1     Running   0          36m
kube-system   do-node-agent-sc4w4                                1/1     Running   0          35m
kube-system   do-node-agent-txdc6                                1/1     Running   0          36m
kube-system   kube-proxy-hk7f6                                   1/1     Running   0          37m
kube-system   kube-proxy-jr8g2                                   1/1     Running   0          37m
kube-system   kube-proxy-qnzsc                                   1/1     Running   0          36m
kube-system   tiller-deploy-8458f6c667-zfh7z                     1/1     Running   0          23m


$ helm delete historical-sabertooth
release "historical-sabertooth" deleted

$ kubectl get pods --all-namespaces
NAMESPACE     NAME                               READY   STATUS    RESTARTS   AGE
kube-system   cilium-fw6wd                       1/1     Running   0          37m
kube-system   cilium-operator-5469488bbb-ktrlc   1/1     Running   0          39m
kube-system   cilium-rmqqb                       1/1     Running   0          38m
kube-system   cilium-xj7tb                       1/1     Running   0          38m
kube-system   coredns-5f44b47f5f-599lk           1/1     Running   0          39m
kube-system   coredns-5f44b47f5f-pb428           1/1     Running   0          39m
kube-system   csi-do-node-5rwhp                  2/2     Running   0          37m
kube-system   csi-do-node-jwngx                  2/2     Running   0          37m
kube-system   csi-do-node-zfdm8                  2/2     Running   0          36m
kube-system   do-node-agent-cn5v6                1/1     Running   0          37m
kube-system   do-node-agent-sc4w4                1/1     Running   0          36m
kube-system   do-node-agent-txdc6                1/1     Running   0          37m
kube-system   kube-proxy-hk7f6                   1/1     Running   0          38m
kube-system   kube-proxy-jr8g2                   1/1     Running   0          38m
kube-system   kube-proxy-qnzsc                   1/1     Running   0          37m
kube-system   tiller-deploy-8458f6c667-zfh7z     1/1     Running   0          25m
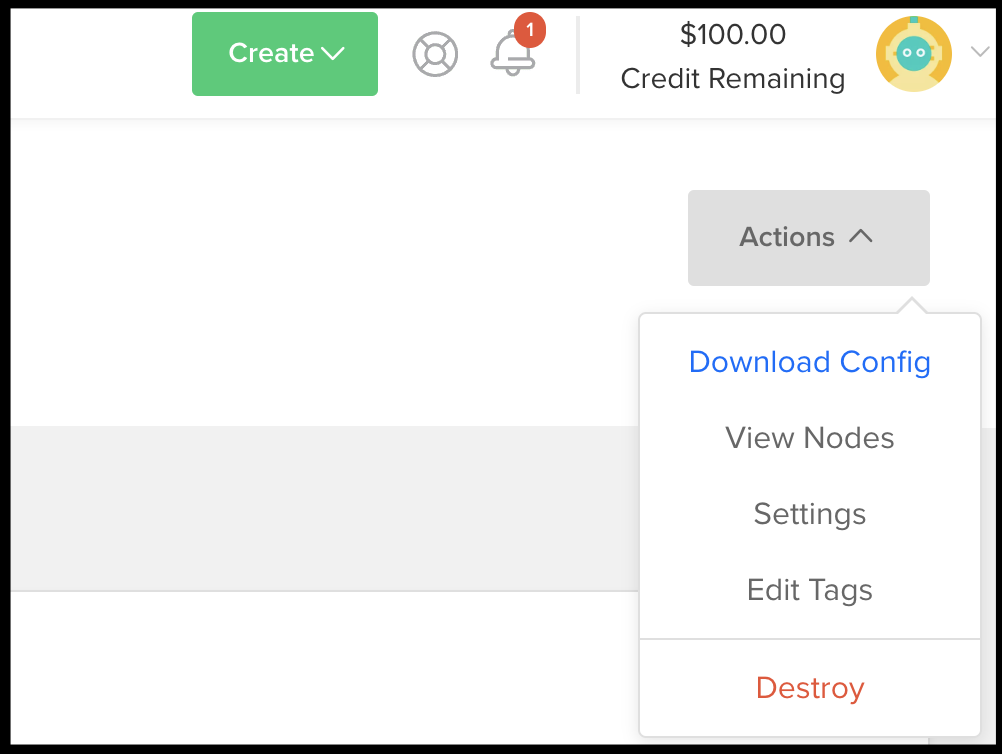
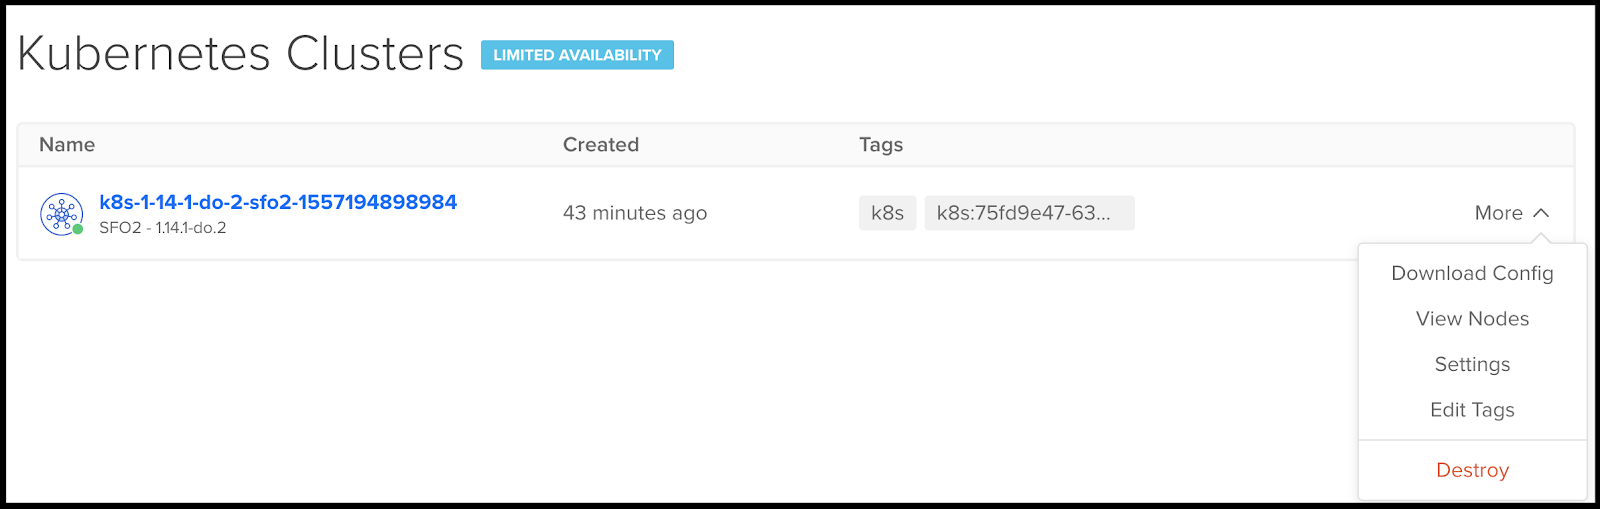
Then we can destroy the cluster from the dashboard menu. Choose Destroy from the More menu:
You can then check for droplets (it deletes pretty fast):

Terraform
Another way we can launch and manage a cluster is with Hashicorp Terraform. You can download from here. See our other guides or their quick start guide on installing TF.
Go to an empty directory and do a TF init:
$ terraform init

Initializing provider plugins...
- Checking for available provider plugins on https://releases.hashicorp.com...
- Downloading plugin for provider "digitalocean" (1.2.0)...
- Downloading plugin for provider "kubernetes" (1.6.2)...

The following providers do not have any version constraints in configuration,
so the latest version was installed.

To prevent automatic upgrades to new major versions that may contain breaking
changes, it is recommended to add version = "..." constraints to the
corresponding provider blocks in configuration, with the constraint strings
suggested below.

* provider.digitalocean: version = "~> 1.2"
* provider.kubernetes: version = "~> 1.6"

Terraform has been successfully initialized!

You may now begin working with Terraform. Try running "terraform plan" to see
any changes that are required for your infrastructure. All Terraform commands
should now work.

If you ever set or change modules or backend configuration for Terraform,
rerun this command to reinitialize your working directory. If you forget, other
commands will detect it and remind you to do so if necessary.
Next we need our DO API key. You can get that from Manage/API if you don’t have it already:

Create a main.tf to describe our cluster:
Main.tf:
# Set the variable value in *.tfvars file
# or using -var="do_token=..." CLI option
variable "do_token" {}

# Configure the DigitalOcean Provider
provider "digitalocean" {
  token = "${var.do_token}"
}

# Create a cluster
resource "digitalocean_kubernetes_cluster" "foo" {
  name    = "foo"
  region  = "nyc1"
  version = "1.14.1-do.2"
  tags    = ["staging"]

  node_pool {
    name       = "worker-pool"
    size       = "s-2vcpu-2gb"
    node_count = 3
  }
}

provider "kubernetes" {
  host = "${digitalocean_kubernetes_cluster.foo.endpoint}"

  client_certificate     = "${base64decode(digitalocean_kubernetes_cluster.foo.kube_config.0.client_certificate)}"
  client_key             = "${base64decode(digitalocean_kubernetes_cluster.foo.kube_config.0.client_key)}"
  cluster_ca_certificate = "${base64decode(digitalocean_kubernetes_cluster.foo.kube_config.0.cluster_ca_certificate)}"
}

output "cluster-id" {
  value = "${digitalocean_kubernetes_cluster.foo.id}"
}
Next we need to do a TF plan (and pass in our key). If we plan to do this a few times, we can use a tfvars file.
$ terraform plan -var="do_token=73e32d*************************************************4a221ba1" -out tfplan
Refreshing Terraform state in-memory prior to plan...
The refreshed state will be used to calculate this plan, but will not be
persisted to local or remote state storage.


------------------------------------------------------------------------

An execution plan has been generated and is shown below.
Resource actions are indicated with the following symbols:
  + create

Terraform will perform the following actions:

  + digitalocean_kubernetes_cluster.foo
      id:                     <computed>
      cluster_subnet:         <computed>
      created_at:             <computed>
      endpoint:               <computed>
      ipv4_address:           <computed>
      kube_config.#:          <computed>
      name:                   "foo"
      node_pool.#:            "1"
      node_pool.0.id:         <computed>
      node_pool.0.name:       "worker-pool"
      node_pool.0.node_count: "3"
      node_pool.0.nodes.#:    <computed>
      node_pool.0.size:       "s-2vcpu-2gb"
      region:                 "nyc1"
      service_subnet:         <computed>
      status:                 <computed>
      tags.#:                 "1"
      tags.3176302885:        "staging"
      updated_at:             <computed>
      version:                "1.14.1-do.2"


Plan: 1 to add, 0 to change, 0 to destroy.

------------------------------------------------------------------------

This plan was saved to: tfplan

To perform exactly these actions, run the following command to apply:
    terraform apply "tfplan"
If we are satisfied, we can execute our plan
$ terraform apply -input=false -auto-approve ./tfplan
digitalocean_kubernetes_cluster.foo: Creating...
  cluster_subnet:         "" => "<computed>"
  created_at:             "" => "<computed>"
  endpoint:               "" => "<computed>"
  ipv4_address:           "" => "<computed>"
  kube_config.#:          "" => "<computed>"
  name:                   "" => "foo"
  node_pool.#:            "" => "1"
  node_pool.0.id:         "" => "<computed>"
  node_pool.0.name:       "" => "worker-pool"
  node_pool.0.node_count: "" => "3"
  node_pool.0.nodes.#:    "" => "<computed>"
  node_pool.0.size:       "" => "s-2vcpu-2gb"
  region:                 "" => "nyc1"
  service_subnet:         "" => "<computed>"
  status:                 "" => "<computed>"
  tags.#:                 "" => "1"
  tags.3176302885:        "" => "staging"
  updated_at:             "" => "<computed>"
  version:                "" => "1.14.1-do.2"
digitalocean_kubernetes_cluster.foo: Still creating... (10s elapsed)
digitalocean_kubernetes_cluster.foo: Still creating... (20s elapsed)
digitalocean_kubernetes_cluster.foo: Still creating... (30s elapsed)
digitalocean_kubernetes_cluster.foo: Still creating... (40s elapsed)
digitalocean_kubernetes_cluster.foo: Still creating... (50s elapsed)
digitalocean_kubernetes_cluster.foo: Still creating... (1m0s elapsed)
digitalocean_kubernetes_cluster.foo: Still creating... (1m10s elapsed)
digitalocean_kubernetes_cluster.foo: Still creating... (1m20s elapsed)
digitalocean_kubernetes_cluster.foo: Still creating... (1m30s elapsed)
digitalocean_kubernetes_cluster.foo: Still creating... (1m40s elapsed)
digitalocean_kubernetes_cluster.foo: Still creating... (1m50s elapsed)
digitalocean_kubernetes_cluster.foo: Still creating... (2m0s elapsed)
digitalocean_kubernetes_cluster.foo: Still creating... (2m10s elapsed)
digitalocean_kubernetes_cluster.foo: Still creating... (2m20s elapsed)
digitalocean_kubernetes_cluster.foo: Still creating... (2m30s elapsed)
digitalocean_kubernetes_cluster.foo: Still creating... (2m40s elapsed)
digitalocean_kubernetes_cluster.foo: Still creating... (2m50s elapsed)
digitalocean_kubernetes_cluster.foo: Creation complete after 2m52s (ID: 930d90e1-11c3-4284-a280-f8de949e3938)

Apply complete! Resources: 1 added, 0 changed, 0 destroyed.
This next step is my only real gripe with the current TF outputs available. They should just make the kubeconfig a standard out, but unfortunately it's been broken down into a few keys so we'll do the following to produce a usable kubeconfig:
export TF_VAR_do_token=73e32d*************************************************4a221ba1
export TF_VAR_do_cluster_name=foo
Git_config (from ponderosa-io/tf-digital-ocean-cluster):
CLUSTER_ID=$(terraform output cluster-id)
OUTFILE="config"
echo "getting cluster config for $CLUSTER_ID"
curl -X GET -H "Content-Type: application/json" -H "Authorization: Bearer ${TF_VAR_do_token}" "https://api.digitalocean.com/v2/kubernetes/clusters/$CLUSTER_ID/kubeconfig" > $OUTFILE
We can run the above and copy the kubeconfig over:
./get_config
getting cluster config for 930d90e1-11c3-4284-a280-f8de949e3938
  % Total    % Received % Xferd  Average Speed   Time    Time     Time  Current
                                 Dload  Upload   Total   Spent    Left  Speed
100  5970    0  5970    0     0   8602      0 --:--:-- --:--:-- --:--:--  8602

$ cp config ~/.kube/config
Now let's check our pods to see that kubeconfig works
$ kubectl get pods --all-namespaces
NAMESPACE     NAME                               READY   STATUS    RESTARTS   AGE
kube-system   cilium-82x69                       1/1     Running   0          30m
kube-system   cilium-operator-5469488bbb-zjlv6   1/1     Running   0          31m
kube-system   cilium-s6mpc                       1/1     Running   0          30m
kube-system   cilium-s9g99                       1/1     Running   0          30m
kube-system   coredns-5f44b47f5f-4pv5x           1/1     Running   0          31m
kube-system   coredns-5f44b47f5f-qxccm           1/1     Running   0          31m
kube-system   csi-do-node-5nh8f                  2/2     Running   0          29m
kube-system   csi-do-node-bm4h7                  2/2     Running   0          29m
kube-system   csi-do-node-s9p65                  2/2     Running   0          29m
kube-system   do-node-agent-65rwt                1/1     Running   0          29m
kube-system   do-node-agent-dchjv                1/1     Running   0          29m
kube-system   do-node-agent-f5692                1/1     Running   0          29m
kube-system   kube-proxy-5w8vk                   1/1     Running   0          30m
kube-system   kube-proxy-fh2v6                   1/1     Running   0          30m
kube-system   kube-proxy-mfqgr                   1/1     Running   0          30m
Deleting the cluster with TF is just as easy:
$ terraform destroy
digitalocean_kubernetes_cluster.foo: Refreshing state... (ID: 930d90e1-11c3-4284-a280-f8de949e3938)

An execution plan has been generated and is shown below.
Resource actions are indicated with the following symbols:
  - destroy

Terraform will perform the following actions:

  - digitalocean_kubernetes_cluster.foo


Plan: 0 to add, 0 to change, 1 to destroy.

Do you really want to destroy?
  Terraform will destroy all your managed infrastructure, as shown above.
  There is no undo. Only 'yes' will be accepted to confirm.

  Enter a value: yes

digitalocean_kubernetes_cluster.foo: Destroying... (ID: 930d90e1-11c3-4284-a280-f8de949e3938)
digitalocean_kubernetes_cluster.foo: Destruction complete after 0s

Destroy complete! Resources: 1 destroyed.
Doctl
We have one more way to easily create and manage clusters and that is with Doctl, the DigitalOcean command line client.
First we install with brew:
$ brew install doctl
Updating Homebrew...
==> Auto-updated Homebrew!
Updated 3 taps (homebrew/core, homebrew/cask and caskroom/versions).
==> New Formulae
gcc@8                      imapsync                   proteinortho
==> Updated Formulae
azure-cli ✔         dungeon             kotlin              phpunit
gcc ✔               dynare              kubeprod            plplot
abyss               easyengine          lapack              postgresql@9.6
agda                eccodes             leveldb             pulumi
aliyun-cli          fastme              libdazzle           qpdf
allure              fftw                libgda              qrupdate
ant                 flow                libgsf              r
apache-spark        fn                  libomp              reprepro
argyll-cms          geos                libxc               root
armadillo           ghq                 logstash            roswell
arpack              gjs                 logtalk             scalapack
asciidoctor         glooctl             lxc                 scipy
basex               go                  lysp                serverless
bazel               godep               mmseqs2             simple-scan
binwalk             gomplate            mpich               skaffold
bitcoin             grib-api            mvnvm               socat
buildkit            gst-validate        netcdf              spades
bwfmetaedit         gtk-doc             nethack             syncthing
bzt                 gtksourceview3      nwchem              terraforming
calicoctl           hdf5                octave              travis
cargo-completion    hdf5@1.8            open-mpi            ttyd
ccache              i2pd                openblas            ucloud
cfn-lint            imake               opencoarrays        vegeta
cp2k                istioctl            osmosis             velero
crosstool-ng        jenkins             packmol             vim
dep                 joplin              percona-xtrabackup  vte3
docker              json-fortran        petsc               yarn
docker-completion   juju                petsc-complex       yelp-tools
doctl               kahip               pgplot              youtube-dl
==> Deleted Formulae
minisat

==> Downloading https://homebrew.bintray.com/bottles/doctl-1.17.0.mojave.bottle.
==> Downloading from https://akamai.bintray.com/a8/a81286aa76b8c9dccdf87d29aa6c0
######################################################################## 100.0%
==> Pouring doctl-1.17.0.mojave.bottle.tar.gz
==> Caveats
Bash completion has been installed to:
  /usr/local/etc/bash_completion.d

zsh functions have been installed to:
  /usr/local/share/zsh/site-functions
==> Summary
🍺  /usr/local/Cellar/doctl/1.17.0: 8 files, 21.7MB
Next, set the experimental features to enable kubernetes management:
$ export DIGITALOCEAN_ENABLE_BETA=1
Login using your token:
$ doctl auth init
DigitalOcean access token:
Validating token... OK
Creating a cluster:
$ doctl k8s cluster create mycluster --count 3
Notice: cluster is provisioning, waiting for cluster to be running
........................................
Notice: cluster created, fetching credentials
Notice: adding cluster credentials to kubeconfig file found in "/Users/isaac.johnson/.kube/config"
ID                                      Name         Region    Version        Status     Node Pools
596cfd5a-d376-4836-9815-5bdfb6a60575    mycluster    nyc1      1.14.1-do.2    running    mycluster-default-pool
$ kubectl get pods --all-namespaces --kubeconfig=kubeconfig.dctl
NAMESPACE     NAME                               READY   STATUS    RESTARTS   AGE
kube-system   cilium-26n4n                       1/1     Running   0          7m12s
kube-system   cilium-cx9wt                       1/1     Running   0          7m31s
kube-system   cilium-m2gb6                       1/1     Running   0          7m19s
kube-system   cilium-operator-5469488bbb-86lj5   1/1     Running   0          8m49s
kube-system   coredns-5f44b47f5f-fqrn2           1/1     Running   0          8m49s
kube-system   coredns-5f44b47f5f-pk5hf           1/1     Running   0          8m49s
kube-system   csi-do-node-9phkc                  2/2     Running   0          6m29s
kube-system   csi-do-node-j7tn8                  2/2     Running   0          6m10s
kube-system   csi-do-node-qlgsv                  2/2     Running   0          6m31s
kube-system   do-node-agent-4g6z5                1/1     Running   0          6m31s
kube-system   do-node-agent-6jcjh                1/1     Running   0          6m29s
kube-system   do-node-agent-ftr9v                1/1     Running   0          6m10s
kube-system   kube-proxy-6lsgr                   1/1     Running   0          7m19s
kube-system   kube-proxy-q2cfh                   1/1     Running   0          7m31s
kube-system   kube-proxy-s7d9w                   1/1     Running   0          7m12s
Listing details on our running cluster:
$ doctl k8s cluster node-pool list 596cfd5a-d376-4836-9815-5bdfb6a60575
ID                                      Name                      Size           Count    Tags                                                       Nodes
63cdafcb-2b11-4f9f-b1fc-508881cee472    mycluster-default-pool    s-1vcpu-2gb    3        k8s,k8s:596cfd5a-d376-4836-9815-5bdfb6a60575,k8s:worker    [mycluster-default-pool-fb04 mycluster-default-pool-fb0i mycluster-default-pool-fb0v]
Scaling
We can easily scale out, for instance, from 3 to 4 nodes:
$ doctl k8s cluster node-pool update 596cfd5a-d376-4836-9815-5bdfb6a60575 mycluster-default-pool --count 4 --name mycluster-default-pool
ID                                      Name                      Size           Count    Tags                                                       Nodes
63cdafcb-2b11-4f9f-b1fc-508881cee472    mycluster-default-pool    s-1vcpu-2gb    4        k8s,k8s:596cfd5a-d376-4836-9815-5bdfb6a60575,k8s:worker    [mycluster-default-pool-fb04 mycluster-default-pool-fb0i mycluster-default-pool-fb0v]
And see that a new droplet is being created for us:


We can scale in just as easily
$ doctl k8s cluster node-pool update 596cfd5a-d376-4836-9815-5bdfb6a60575 mycluster-default-pool --count 2 --name mycluster-default-pool
ID                                      Name                      Size           Count    Tags                                                       Nodes
63cdafcb-2b11-4f9f-b1fc-508881cee472    mycluster-default-pool    s-1vcpu-2gb    2        k8s,k8s:596cfd5a-d376-4836-9815-5bdfb6a60575,k8s:worker    [mycluster-default-pool-fb04 mycluster-default-pool-fb0i mycluster-default-pool-fb0v mycluster-default-pool-fb1o]

To vertically scale you can use the UI or the REST API (but sadly not the doctl compute droplet nor doctl k8s in the CLI - at least for what i see at the moment)
curl -X POST -H 'Content-Type: application/json' \
    -H 'Authorization: Bearer EXAMPLE947b217efb6f3ec3bdEXAMPLE' \
    -d '{"type":"resize","size": s-2vcpu-4gb","disk":true}'  \
    "https://api.digitalocean.com/v2/droplets/droplet_id/actions"
Deleting
$ doctl k8s cluster delete 596cfd5a-d376-4836-9815-5bdfb6a60575
Warning: Are you sure you want to delete this Kubernetes cluster (y/N) ? y
Notice: cluster deleted, removing credentials
Notice: removing cluster credentials from kubeconfig file found in "/Users/isaac.johnson/.kube/config"
I thought it was a nice touch that the doctl delete takes care of the default kubernetes config file as well.

Summary
In our last blog post we explored Linode and that had a perfectly sufficient offering. However if we priced it out, Linode was pretty close to AKS in price. DigitalOcean, on the other hand, is a very compelling offering. Some of the best features:
- Three ways to manage clusters - A web based wizard, Terraform and Doctl (CLI)
- Fast launching of clusters
- Exceptional pricing
In fact, for the demos above, i expected a spend of a couple of bucks. After all, i had launched a few clusters and an app and in AKS and Linode, that was usually in the range of $1-3.
So imagine my surprise when I checked and my total spend was 5 cents.

In fact, for all hammering I've done so far I've managed to burn 15 cents of my $100 credit. I'm tempted to DO for my next personal cluster as it's performance has been just fantastic for a stellar price.
plug: if you want to get the same $100 credit deal, use this referral link.