
I love exploring alternative cloud providers. A new one I had not been aware of until recently is CIVO. They are a smaller cloud company focused on DevOps based out of Stevenage, Hertfordshire in England.
While they are new, they aren’t necessarily new to the hosting game. It’s one of the companies spearheaded by Mark Boost who started LCN and grew it to be one of the leading hosting providers in the UK, then did the same with ServerChoice. They now have a native Kubernetes Offering based on k3s and since they offer some free cloud credit I was interested in checking out their beta of k8s (#kube100).
For more information on k8s vs k3s, check out this writeup from Andy Jeffries, CTO of CIVO.
Getting started, get the CLI
You can start by downloading the CLI which you can find on their Github page: https://github.com/civo/cli
Setup:
First, ensure Ruby is installed:
$ brew install ruby
Updating Homebrew...
==> Auto-updated Homebrew!
Updated 2 taps (homebrew/core and homebrew/bundle).
==> New Formulae
apollo-cli                 eureka                     helib
asymptote                  faiss                      keydb
… snip …
==> Installing dependencies for ruby: libyaml
==> Installing ruby dependency: libyaml
==> Downloading https://homebrew.bintray.com/bottles/libyaml-0.2.2.catalina.bott
######################################################################## 100.0%
==> Pouring libyaml-0.2.2.catalina.bottle.tar.gz
🍺  /usr/local/Cellar/libyaml/0.2.2: 9 files, 311.3KB
==> Installing ruby
==> Downloading https://homebrew.bintray.com/bottles/ruby-2.6.5.catalina.bottle.
==> Downloading from https://akamai.bintray.com/74/74304ae76b81629a80edb0655c348
######################################################################## 100.0%
==> Pouring ruby-2.6.5.catalina.bottle.1.tar.gz
==> Caveats
By default, binaries installed by gem will be placed into:
  /usr/local/lib/ruby/gems/2.6.0/bin

You may want to add this to your PATH.

ruby is keg-only, which means it was not symlinked into /usr/local,
because macOS already provides this software and installing another version in
parallel can cause all kinds of trouble.

If you need to have ruby first in your PATH run:
  echo 'export PATH="/usr/local/opt/ruby/bin:$PATH"' >> ~/.bash_profile

For compilers to find ruby you may need to set:
  export LDFLAGS="-L/usr/local/opt/ruby/lib"
  export CPPFLAGS="-I/usr/local/opt/ruby/include"

==> Summary
🍺  /usr/local/Cellar/ruby/2.6.5: 19,390 files, 31.5MB
==> Caveats
==> ruby
By default, binaries installed by gem will be placed into:
  /usr/local/lib/ruby/gems/2.6.0/bin

You may want to add this to your PATH.

ruby is keg-only, which means it was not symlinked into /usr/local,
because macOS already provides this software and installing another version in
parallel can cause all kinds of trouble.

If you need to have ruby first in your PATH run:
  echo 'export PATH="/usr/local/opt/ruby/bin:$PATH"' >> ~/.bash_profile

For compilers to find ruby you may need to set:
  export LDFLAGS="-L/usr/local/opt/ruby/lib"
  export CPPFLAGS="-I/usr/local/opt/ruby/include"
Then we can gem install CIVO:
$ sudo gem install civo_cli
Password:
Fetching terminal-table-1.8.0.gem
Fetching thor-1.0.1.gem
Fetching colorize-0.8.1.gem
Fetching mime-types-data-3.2019.1009.gem
Fetching mime-types-3.3.1.gem
Fetching unicode-display_width-1.6.1.gem
Fetching multi_json-1.14.1.gem
Fetching safe_yaml-1.0.5.gem
Fetching crack-0.4.3.gem
Fetching multipart-post-2.1.1.gem
Fetching faraday-1.0.0.gem
Fetching concurrent-ruby-1.1.5.gem
Fetching i18n-1.8.2.gem
Fetching thread_safe-0.3.6.gem
Fetching tzinfo-1.2.6.gem
Fetching zeitwerk-2.2.2.gem
Fetching activesupport-6.0.2.1.gem
Fetching flexirest-1.8.9.gem
Fetching parslet-1.8.2.gem
Fetching toml-0.2.0.gem
Fetching highline-2.0.3.gem
Fetching commander-4.5.0.gem
Fetching civo-1.2.9.gem
Fetching civo_cli-0.5.7.gem
Successfully installed unicode-display_width-1.6.1
Successfully installed terminal-table-1.8.0
Successfully installed thor-1.0.1
Successfully installed colorize-0.8.1
Successfully installed mime-types-data-3.2019.1009
Successfully installed mime-types-3.3.1
Successfully installed multi_json-1.14.1
Successfully installed safe_yaml-1.0.5
Successfully installed crack-0.4.3
Successfully installed multipart-post-2.1.1
Successfully installed faraday-1.0.0
Successfully installed concurrent-ruby-1.1.5

HEADS UP! i18n 1.1 changed fallbacks to exclude default locale.
But that may break your application.

If you are upgrading your Rails application from an older version of Rails:

Please check your Rails app for 'config.i18n.fallbacks = true'.
If you're using I18n (>= 1.1.0) and Rails (< 5.2.2), this should be
'config.i18n.fallbacks = [I18n.default_locale]'.
If not, fallbacks will be broken in your app by I18n 1.1.x.

If you are starting a NEW Rails application, you can ignore this notice.

For more info see:
https://github.com/svenfuchs/i18n/releases/tag/v1.1.0

Successfully installed i18n-1.8.2
Successfully installed thread_safe-0.3.6
Successfully installed tzinfo-1.2.6
Successfully installed zeitwerk-2.2.2
Successfully installed activesupport-6.0.2.1
Successfully installed flexirest-1.8.9
Successfully installed parslet-1.8.2
Successfully installed toml-0.2.0
Successfully installed highline-2.0.3
Successfully installed commander-4.5.0
Successfully installed civo-1.2.9
Successfully installed civo_cli-0.5.7
Parsing documentation for unicode-display_width-1.6.1
Installing ri documentation for unicode-display_width-1.6.1
Parsing documentation for terminal-table-1.8.0
Installing ri documentation for terminal-table-1.8.0
Parsing documentation for thor-1.0.1
Installing ri documentation for thor-1.0.1
Parsing documentation for colorize-0.8.1
Installing ri documentation for colorize-0.8.1
Parsing documentation for mime-types-data-3.2019.1009
Installing ri documentation for mime-types-data-3.2019.1009
Parsing documentation for mime-types-3.3.1
Installing ri documentation for mime-types-3.3.1
Parsing documentation for multi_json-1.14.1
Installing ri documentation for multi_json-1.14.1
Parsing documentation for safe_yaml-1.0.5
Installing ri documentation for safe_yaml-1.0.5
Parsing documentation for crack-0.4.3
Installing ri documentation for crack-0.4.3
Parsing documentation for multipart-post-2.1.1
Installing ri documentation for multipart-post-2.1.1
Parsing documentation for faraday-1.0.0
Installing ri documentation for faraday-1.0.0
Parsing documentation for concurrent-ruby-1.1.5
Installing ri documentation for concurrent-ruby-1.1.5
Parsing documentation for i18n-1.8.2
Installing ri documentation for i18n-1.8.2
Parsing documentation for thread_safe-0.3.6
Installing ri documentation for thread_safe-0.3.6
Parsing documentation for tzinfo-1.2.6
Installing ri documentation for tzinfo-1.2.6
Parsing documentation for zeitwerk-2.2.2
Installing ri documentation for zeitwerk-2.2.2
Parsing documentation for activesupport-6.0.2.1
Installing ri documentation for activesupport-6.0.2.1
Parsing documentation for flexirest-1.8.9
Installing ri documentation for flexirest-1.8.9
Parsing documentation for parslet-1.8.2
Installing ri documentation for parslet-1.8.2
Parsing documentation for toml-0.2.0
Installing ri documentation for toml-0.2.0
Parsing documentation for highline-2.0.3
Installing ri documentation for highline-2.0.3
Parsing documentation for commander-4.5.0
Installing ri documentation for commander-4.5.0
Parsing documentation for civo-1.2.9
Installing ri documentation for civo-1.2.9
Parsing documentation for civo_cli-0.5.7
Installing ri documentation for civo_cli-0.5.7
Done installing documentation for unicode-display_width, terminal-table, thor, colorize, mime-types-data, mime-types, multi_json, safe_yaml, crack, multipart-post, faraday, concurrent-ruby, i18n, thread_safe, tzinfo, zeitwerk, activesupport, flexirest, parslet, toml, highline, commander, civo, civo_cli after 15 seconds
24 gems installed
Lastly, let's verify it runs:
$ civo help
Commands:
  civo apikey          # manage API keys stored in the client
  civo applications    # list and add marketplace applications to Kubernetes clusters. Alias: apps, addons, marketplace, k8s-apps, k3s-apps
  civo blueprint       # manage blueprints
  civo domain          # manage DNS domains
  civo domainrecord    # manage domain name DNS records for a domain
  civo firewall        # manage firewalls
  civo help [COMMAND]  # Describe available commands or one specific command
  civo instance        # manage instances
  civo kubernetes      # manage Kubernetes. Aliases: k8s, k3s
  civo loadbalancer    # manage load balancers
  civo network         # manage networks
  civo quota           # view the quota for the active account
  civo region          # manage regions
  civo size            # manage sizes
  civo snapshot        # manage snapshots
  civo sshkey          # manage uploaded SSH keys
  civo template        # manage templates
  civo update          # update to the latest Civo CLI
  civo version         # show the version of Civo CLI used
  civo volume          # manage volumes
I actually find this fascinating; which providers use which languages. E.g. Microsoft moved from NodeJS to Python (not a smart move imho), Linode uses python, Google is golang (obviously) and AWS CLI moved from Python to something unknown (i would gamble on golang though).
Next we need to create an API key in the CIVO web console so we can use the CIVO CLI. Note, akin to AWS, we can have multiple accounts and set an active context.

Just use civo apikey add:
$ civo apikey add K8STest xxxxxxxxxxxxxxxxxxxxxxxxxxxxxxxxxxxxxxxxxx
Saved the API Key xxxxxxxxxxxxxxxxxxxxxxxxxxxxxxxxxxxxxxxxxx as K8STest
The current API Key is now K8STest
e.g.

Before we move forward, let’s get an idea of what size cluster we want.
We can use “civo sizes” to see our options:
$ civo sizes
+------------+----------------------------------------------------+-----+----------+-----------+
| Name       | Description                                        | CPU | RAM (MB) | Disk (GB) |
+------------+----------------------------------------------------+-----+----------+-----------+
| g2.xsmall  | Extra Small - 1GB RAM, 1 CPU Core, 25GB SSD Disk   | 1   | 1024     | 25        |
| g2.small   | Small - 2GB RAM, 1 CPU Core, 25GB SSD Disk         | 1   | 2048     | 25        |
| g2.medium  | Medium - 4GB RAM, 2 CPU Cores, 50GB SSD Disk       | 2   | 4096     | 50        |
| g2.large   | Large - 8GB RAM, 4 CPU Cores, 100GB SSD Disk       | 4   | 8192     | 100       |
| g2.xlarge  | Extra Large - 16GB RAM, 6 CPU Core, 150GB SSD Disk | 6   | 16386    | 150       |
| g2.2xlarge | 2X Large - 32GB RAM, 8 CPU Core, 200GB SSD Disk    | 8   | 32768    | 200       |
+------------+----------------------------------------------------+-----+----------+-----------+
The CLI doesn’t really explain how that translates to cost. So let’s consider the defaults - g2.medium and a 3 node cluster.. That would translate to about $60/mo.

Or roughly $0.09/hour. This seems reasonable, so we will use that. Next, we should decide which version of kubernetes version..
If you are in the Beta, you can see the version:
$ civo kubernetes versions
+---------+------------+---------+
| Version | Type       | Default |
+---------+------------+---------+
| 1.0.0   | stable     | <=====  |
| 0.10.2  | deprecated |         |
| 0.10.0  | deprecated |         |
| 0.9.1   | deprecated |         |
| 0.8.1   | legacy     |         |
+---------+------------+---------+
Otherwise, you will get the following message for versions and applications:
$ civo kubernetes versions
Sorry, this functionality is currently in closed beta and not available to the public yet
For our first pass, let’s see what version they give us (what 1.0.0 really is)
They also have the idea of preloading apps (i got a feeling there is Rancher on the other side of this API).
$ civo applications list
+---------------------+-------------+--------------+-----------------+--------------+
| Name                | Version     | Category     | Plans           | Dependencies |
+---------------------+-------------+--------------+-----------------+--------------+
| cert-manager        | v0.11.0     | architecture | Not applicable  | Helm         |
| Helm                | 2.14.3      | management   | Not applicable  |              |
| Jenkins             | 2.190.1     | ci_cd        | 5GB, 10GB, 20GB | Longhorn     |
| Klum                | 2019-08-29  | management   | Not applicable  |              |
| KubeDB              | v0.12.0     | database     | Not applicable  | Longhorn     |
| Kubeless            | 1.0.5       | architecture | Not applicable  |              |
| Linkerd             | 2.5.0       | architecture | Not applicable  |              |
| Longhorn            | 0.7.0       | storage      | Not applicable  |              |
| Maesh               | Latest      | architecture | Not applicable  | Helm         |
| MariaDB             | 10.4.7      | database     | 5GB, 10GB, 20GB | Longhorn     |
| metrics-server      | Latest      | architecture | Not applicable  | Helm         |
| MinIO               | 2019-08-29  | storage      | 5GB, 10GB, 20GB | Longhorn     |
| MongoDB             | 4.2.0       | database     | 5GB, 10GB, 20GB | Longhorn     |
| OpenFaaS            | 0.18.0      | architecture | Not applicable  | Helm         |
| PostgreSQL          | 11.5        | database     | 5GB, 10GB, 20GB | Longhorn     |
| prometheus-operator | 0.34.0      | monitoring   | Not applicable  | Helm         |
| Rancher             | v2.3.0      | management   | Not applicable  |              |
| Redis               | 3.2         | database     | Not applicable  |              |
| Selenium            | 3.141.59-r1 | ci_cd        | Not applicable  |              |
| Traefik             | (default)   | architecture | Not applicable  |              |
+---------------------+-------------+--------------+-----------------+--------------+
Create the cluster
If you are not in the beta, you will get an error trying to create:
$ civo kubernetes create MyFirstCluster --size=g2.medium --nodes=3 --wait --save
Traceback (most recent call last):
	22: from /usr/local/bin/civo:23:in `<main>'
	21: from /usr/local/bin/civo:23:in `load'
	20: from /Library/Ruby/Gems/2.6.0/gems/civo_cli-0.5.7/exe/civo:6:in `<top (required)>'
	19: from /Library/Ruby/Gems/2.6.0/gems/thor-1.0.1/lib/thor/base.rb:485:in `start'
	18: from /Library/Ruby/Gems/2.6.0/gems/thor-1.0.1/lib/thor.rb:392:in `dispatch'
	17: from /Library/Ruby/Gems/2.6.0/gems/thor-1.0.1/lib/thor/invocation.rb:127:in `invoke_command'
	16: from /Library/Ruby/Gems/2.6.0/gems/thor-1.0.1/lib/thor/command.rb:27:in `run'
	15: from /Library/Ruby/Gems/2.6.0/gems/thor-1.0.1/lib/thor.rb:243:in `block in subcommand'
	14: from /Library/Ruby/Gems/2.6.0/gems/thor-1.0.1/lib/thor/invocation.rb:116:in `invoke'
	13: from /Library/Ruby/Gems/2.6.0/gems/thor-1.0.1/lib/thor.rb:392:in `dispatch'
	12: from /Library/Ruby/Gems/2.6.0/gems/thor-1.0.1/lib/thor/invocation.rb:127:in `invoke_command'
	11: from /Library/Ruby/Gems/2.6.0/gems/thor-1.0.1/lib/thor/command.rb:27:in `run'
	10: from /Library/Ruby/Gems/2.6.0/gems/civo_cli-0.5.7/lib/kubernetes.rb:225:in `create'
	 9: from /Library/Ruby/Gems/2.6.0/gems/flexirest-1.8.9/lib/flexirest/mapping.rb:28:in `block in _map_call'
	 8: from /Library/Ruby/Gems/2.6.0/gems/flexirest-1.8.9/lib/flexirest/mapping.rb:46:in `_call'
	 7: from /Library/Ruby/Gems/2.6.0/gems/flexirest-1.8.9/lib/flexirest/request.rb:189:in `call'
	 6: from /Library/Ruby/Gems/2.6.0/gems/activesupport-6.0.2.1/lib/active_support/notifications.rb:180:in `instrument'
	 5: from /Library/Ruby/Gems/2.6.0/gems/activesupport-6.0.2.1/lib/active_support/notifications/instrumenter.rb:24:in `instrument'
	 4: from /Library/Ruby/Gems/2.6.0/gems/activesupport-6.0.2.1/lib/active_support/notifications.rb:180:in `block in instrument'
	 3: from /Library/Ruby/Gems/2.6.0/gems/flexirest-1.8.9/lib/flexirest/request.rb:237:in `block in call'
	 2: from /Library/Ruby/Gems/2.6.0/gems/faraday-1.0.0/lib/faraday/response.rb:62:in `on_complete'
	 1: from /Library/Ruby/Gems/2.6.0/gems/flexirest-1.8.9/lib/flexirest/request.rb:264:in `block (2 levels) in call'
/Library/Ruby/Gems/2.6.0/gems/flexirest-1.8.9/lib/flexirest/request.rb:611:in `handle_response': The POST to '/v2/kubernetes/clusters' returned a 403 status, which raised a Flexirest::HTTPForbiddenClientException with a body of: {"result":"forbidden","status":403,"reason":"Sorry, this feature is not enabled"} (Flexirest::HTTPForbiddenClientException)
	13: from /usr/local/bin/civo:23:in `<main>'
	12: from /usr/local/bin/civo:23:in `load'
	11: from /Library/Ruby/Gems/2.6.0/gems/civo_cli-0.5.7/exe/civo:6:in `<top (required)>'
	10: from /Library/Ruby/Gems/2.6.0/gems/thor-1.0.1/lib/thor/base.rb:485:in `start'
	 9: from /Library/Ruby/Gems/2.6.0/gems/thor-1.0.1/lib/thor.rb:392:in `dispatch'
	 8: from /Library/Ruby/Gems/2.6.0/gems/thor-1.0.1/lib/thor/invocation.rb:127:in `invoke_command'
	 7: from /Library/Ruby/Gems/2.6.0/gems/thor-1.0.1/lib/thor/command.rb:27:in `run'
	 6: from /Library/Ruby/Gems/2.6.0/gems/thor-1.0.1/lib/thor.rb:243:in `block in subcommand'
	 5: from /Library/Ruby/Gems/2.6.0/gems/thor-1.0.1/lib/thor/invocation.rb:116:in `invoke'
	 4: from /Library/Ruby/Gems/2.6.0/gems/thor-1.0.1/lib/thor.rb:392:in `dispatch'
	 3: from /Library/Ruby/Gems/2.6.0/gems/thor-1.0.1/lib/thor/invocation.rb:127:in `invoke_command'
	 2: from /Library/Ruby/Gems/2.6.0/gems/thor-1.0.1/lib/thor/command.rb:27:in `run'
	 1: from /Library/Ruby/Gems/2.6.0/gems/civo_cli-0.5.7/lib/kubernetes.rb:185:in `create'
/Library/Ruby/Gems/2.6.0/gems/civo_cli-0.5.7/lib/kubernetes.rb:253:in `rescue in create': undefined method `reason' for #<String:0x00007f869ac69698> (NoMethodError)
Also, noe that if you run create bare, it will create a basic cluster!
$ civo kubernetes create
Created Kubernetes cluster quiz-philips.
Let’s create a cluster and set a version as well as add a storage provider:
$ civo kubernetes create --version=0.8.1 --applications=Longhorn --wait=true --save
Building new Kubernetes cluster south-cloud: /
\
 Done
Created Kubernetes cluster south-cloud in 17 min 59 sec
We can get a list while our clusters create.. For instance, i created two and one finished before the other:

We can then download and use the config:
$ civo kubernetes config quiz-philips --save
Merged config into ~/.kube/config
$ kubectl config get-contexts
CURRENT   NAME              CLUSTER           AUTHINFO                                       NAMESPACE
          quiz-philips      quiz-philips      quiz-philips
          xxxx-xxx-aks     xxxx-xxx-aks     clusterUser_xxxx-xxx-rg_xxxx-xxx-aks
*         xxxx-xxx-aks   xxxx-xxx-aks   clusterUser_xxxx-xxx-rg_xxxx-xxx-aks
$ kubectl config use-context quiz-philips
Switched to context "quiz-philips".
$ kubectl get nodes
NAME               STATUS   ROLES    AGE   VERSION
kube-master-1e95   Ready    master   39m   v1.16.3-k3s.2
kube-node-fd06     Ready    <none>   39m   v1.16.3-k3s.2
kube-node-d292     Ready    <none>   37m   v1.16.3-k3s.2
So this tells us that the default is 1.16.
Since i suspect this is either RKE or K3S, let’s see if we have a default storage class:
$ kubectl get sc
NAME                   PROVISIONER             AGE
local-path (default)   rancher.io/local-path   42m

There is no default tiller.. Let’s check on RBAC…
$ helm init
$HELM_HOME has been configured at /Users/johnsi10/.helm.
Error: error installing: the server could not find the requested resource
Seems this is more about helm 2 and k8s 1.16 (see bug).
helm init --output yaml | sed 's@apiVersion: extensions/v1beta1@apiVersion: apps/v1@' > tiller.yaml
Then add a selector block near the top:

$ helm list
Error: configmaps is forbidden: User "system:serviceaccount:kube-system:default" cannot list resource "configmaps" in API group "" in the namespace "kube-system"
This makes it clear RBAC is on (which is I suppose a safe assumption.
Let's enable that
$ cat ~/Documents/rbac-config.yaml
apiVersion: v1
kind: ServiceAccount
metadata:
  name: tiller
  namespace: kube-system
---
apiVersion: rbac.authorization.k8s.io/v1
kind: ClusterRoleBinding
metadata:
  name: tiller
roleRef:
  apiGroup: rbac.authorization.k8s.io
  kind: ClusterRole
  name: cluster-admin
subjects:
  - kind: ServiceAccount
    name: tiller
    namespace: kube-system
$ kubectl apply -f ~/Documents/rbac-config.yaml
serviceaccount/tiller created
clusterrolebinding.rbac.authorization.k8s.io/tiller created
$ kubectl delete -f tiller.yaml
deployment.apps "tiller-deploy" deleted
service "tiller-deploy" deleted
$ kubectl apply -f tiller.yaml
deployment.apps/tiller-deploy created
service/tiller-deploy created

$ helm version
Client: &version.Version{SemVer:"v2.14.3", GitCommit:"0e7f3b6637f7af8fcfddb3d2941fcc7cbebb0085", GitTreeState:"clean"}
Server: &version.Version{SemVer:"v2.14.3", GitCommit:"0e7f3b6637f7af8fcfddb3d2941fcc7cbebb0085", GitTreeState:"clean"}
Now, let’s add the stable repo, update and attempt sonarqube;
$ helm repo add stable https://kubernetes-charts.storage.googleapis.com
"stable" has been added to your repositories
$ helm repo update
Hang tight while we grab the latest from your chart repositories...
...Skip local chart repository
...Successfully got an update from the "adwerx" chart repository
...Successfully got an update from the "cetic" chart repository
...Successfully got an update from the "incubator" chart repository
...Successfully got an update from the "jfrog" chart repository
...Successfully got an update from the "jetstack" chart repository
...Successfully got an update from the "bitnami" chart repository
...Successfully got an update from the "stable" chart repository
Update Complete.
$ helm install --name mysonarrelease stable/sonarqube
Error: release mysonarrelease failed: namespaces "default" is forbidden: User "system:serviceaccount:kube-system:default" cannot get resource "namespaces" in API group "" in the namespace "default"
This was a minor issue. My deployment yaml missed adding the tiller service account name.
Let's fix that:
$ cat ~/Documents/helm_init.yaml
---
apiVersion: apps/v1
kind: Deployment
metadata:
  creationTimestamp: null
  labels:
    app: helm
    name: tiller
  name: tiller-deploy
  namespace: kube-system
spec:
  replicas: 1
  strategy: {}
  selector:
    matchLabels:
      app: helm
      name: tiller
  template:
    metadata:
      creationTimestamp: null
      labels:
        app: helm
        name: tiller
    spec:
      automountServiceAccountToken: true
      containers:
      - env:
        - name: TILLER_NAMESPACE
          value: kube-system
        - name: TILLER_HISTORY_MAX
          value: "200"
        image: gcr.io/kubernetes-helm/tiller:v2.14.3
        imagePullPolicy: IfNotPresent
        livenessProbe:
          httpGet:
            path: /liveness
            port: 44135
          initialDelaySeconds: 1
          timeoutSeconds: 1
        name: tiller
        ports:
        - containerPort: 44134
          name: tiller
        - containerPort: 44135
          name: http
        readinessProbe:
          httpGet:
            path: /readiness
            port: 44135
          initialDelaySeconds: 1
          timeoutSeconds: 1
        resources: {}
      serviceAccountName: tiller
status: {}

---
apiVersion: v1
kind: Service
metadata:
  creationTimestamp: null
  labels:
    app: helm
    name: tiller
  name: tiller-deploy
  namespace: kube-system
spec:
  ports:
  - name: tiller
    port: 44134
    targetPort: tiller
  selector:
    app: helm
    name: tiller
  type: ClusterIP
status:
  loadBalancer: {}

$ kubectl apply -f ~/Documents/helm_init.yaml
deployment.apps/tiller-deploy configured
service/tiller-deploy configured
Now that should work:
$ helm install --name mysonarrelease stable/sonarqube
NAME:   mysonarrelease
LAST DEPLOYED: Thu Feb  6 15:10:00 2020
NAMESPACE: default
STATUS: DEPLOYED

RESOURCES:
==> v1/ConfigMap
NAME                                      DATA  AGE
mysonarrelease-sonarqube-config           0     1s
mysonarrelease-sonarqube-copy-plugins     1     1s
mysonarrelease-sonarqube-install-plugins  1     1s
mysonarrelease-sonarqube-tests            1     1s

==> v1/Deployment
NAME                      READY  UP-TO-DATE  AVAILABLE  AGE
mysonarrelease-sonarqube  0/1    1           0          1s

==> v1/Pod(related)
NAME                                       READY  STATUS    RESTARTS  AGE
mysonarrelease-postgresql-0                0/1    Pending   0         1s
mysonarrelease-sonarqube-7b86975b78-w4b8r  0/1    Init:0/2  0         1s

==> v1/Secret
NAME                       TYPE    DATA  AGE
mysonarrelease-postgresql  Opaque  1     1s

==> v1/Service
NAME                                TYPE       CLUSTER-IP      EXTERNAL-IP  PORT(S)   AGE
mysonarrelease-postgresql           ClusterIP  192.168.172.46  <none>       5432/TCP  1s
mysonarrelease-postgresql-headless  ClusterIP  None            <none>       5432/TCP  1s
mysonarrelease-sonarqube            ClusterIP  192.168.131.61  <none>       9000/TCP  1s

==> v1/StatefulSet
NAME                       READY  AGE
mysonarrelease-postgresql  0/1    1s


NOTES:
1. Get the application URL by running these commands:
  export POD_NAME=$(kubectl get pods --namespace default -l "app=sonarqube,release=mysonarrelease" -o jsonpath="{.items[0].metadata.name}")
  echo "Visit http://127.0.0.1:8080 to use your application"
  kubectl port-forward $POD_NAME 8080:9000
First, let’s quick check on PVCs (which is always my struggle with k3s):
$ kubectl get pvc
NAME                               STATUS   VOLUME                                     CAPACITY   ACCESS MODES   STORAGECLASS   AGE
data-mysonarrelease-postgresql-0   Bound    pvc-5ccfdfa2-d679-4a37-b8f1-be450656758c   8Gi        RWO            local-path     32s
That looks good. And our pods?
$ kubectl get pods
NAME                                        READY   STATUS             RESTARTS   AGE
mysonarrelease-sonarqube-7b86975b78-w4b8r   0/1     Running            2          91s
mysonarrelease-postgresql-0                 0/1     CrashLoopBackOff   3          91s
Checking on the error:
$ kubectl logs mysonarrelease-postgresql-0
postgresql 21:11:24.53
postgresql 21:11:24.53 Welcome to the Bitnami postgresql container
postgresql 21:11:24.54 Subscribe to project updates by watching https://github.com/bitnami/bitnami-docker-postgresql
postgresql 21:11:24.54 Submit issues and feature requests at https://github.com/bitnami/bitnami-docker-postgresql/issues
postgresql 21:11:24.54 Send us your feedback at containers@bitnami.com
postgresql 21:11:24.54
postgresql 21:11:24.56 INFO  ==> ** Starting PostgreSQL setup **
postgresql 21:11:24.63 INFO  ==> Validating settings in POSTGRESQL_* env vars..
postgresql 21:11:24.64 INFO  ==> Loading custom pre-init scripts...
postgresql 21:11:24.64 INFO  ==> Initializing PostgreSQL database...
postgresql 21:11:24.66 INFO  ==> postgresql.conf file not detected. Generating it...
postgresql 21:11:24.67 INFO  ==> pg_hba.conf file not detected. Generating it...
postgresql 21:11:24.67 INFO  ==> Generating local authentication configuration
postgresql 21:11:24.68 INFO  ==> Deploying PostgreSQL with persisted data...
postgresql 21:11:24.68 INFO  ==> Configuring replication parameters
sed: can't read /opt/bitnami/postgresql/conf/postgresql.conf: Permission denied
Actually, this seems to be a known issue: https://github.com/helm/charts/issues/20369
I tried using mysql, but that isn’t up to date for 1.16 yet:
$ helm install --name anothertry3 stable/sonarqube --set postgresql.enabled=false --set mysql.enabled=true
Error: validation failed: unable to recognize "": no matches for kind "Deployment" in version "extensions/v1beta1"
Hows that other cluster doing?
Circling back on the clusters.. Checking if the other is ready shows it’s still in create:
$ civo kubernetes list
+--------------------------------------+--------------+---------+-----------+---------+-----------------+
| ID                                   | Name         | # Nodes | Size      | Version | Status          |
+--------------------------------------+--------------+---------+-----------+---------+-----------------+
| d0671b11-1eef-4484-8e3a-1bc7c8e131d5 | quiz-philips | 3       | g2.medium | 1.0.0   | ACTIVE          |
| e8ff8449-e861-402a-9797-fe1e8796464d | south-cloud  | 3       | g2.medium | 0.8.1 * | INSTANCE-CREATE |
+--------------------------------------+--------------+---------+-----------+---------+-----------------+

* An upgrade to v1.0.0 is available, use - civo k3s upgrade ID - to upgrade it
$ civo kubernetes config south-cloud --save
The cluster isn't ready yet, so the KUBECONFIG isn't available.
Cleaning up
$ civo kubernetes remove quiz-philips
Removing Kubernetes cluster quiz-philips
While this removed the first cluster, we can still see our active cluster in the web portal:

I need to pause here. I not only let the CIVO team know on slack, they let me know that it was likely due to a server fault they addressed that day. It’s a beta, but i loved getting that quick feedback. I also let them know about Sonarqube and 1.16 (and alter, as you’ll see, how it was addressed)
Using Helm 3
Let’s create a fresh cluster:
$ civo kubernetes create --wait=true --save
Building new Kubernetes cluster road-british: Done
Created Kubernetes cluster road-british in 04 min 15 sec
Saved config to ~/.kube/config

$ civo kubernetes list
+--------------------------------------+--------------+---------+-----------+---------+-----------------+
| ID                                   | Name         | # Nodes | Size      | Version | Status          |
+--------------------------------------+--------------+---------+-----------+---------+-----------------+
| e8ff8449-e861-402a-9797-fe1e8796464d | south-cloud  | 3       | g2.medium | 0.8.1 * | INSTANCE-CREATE |
| c812debb-35b0-49b4-88b1-4af698adfda0 | road-british | 3       | g2.medium | 1.0.0   | ACTIVE          |
+--------------------------------------+--------------+---------+-----------+---------+-----------------+
We can then verify it's up and running:
$ civo kubernetes show road-british
                ID : c812debb-35b0-49b4-88b1-4af698adfda0
              Name : road-british
           # Nodes : 3
              Size : g2.medium
            Status : ACTIVE
           Version : 1.0.0
      API Endpoint : https://91.211.153.176:6443
      DNS A record : c812debb-35b0-49b4-88b1-4af698adfda0.k8s.civo.com
                     *.c812debb-35b0-49b4-88b1-4af698adfda0.k8s.civo.com

Nodes:
+------------------+----------------+--------+
| Name             | IP             | Status |
+------------------+----------------+--------+
| kube-master-45ac | 91.211.153.176 | ACTIVE |
| kube-node-a353   |                | ACTIVE |
| kube-node-f88f   |                | ACTIVE |
+------------------+----------------+--------+

Installed marketplace applications:
+---------+-----------+-----------+--------------+
| Name    | Version   | Installed | Category     |
+---------+-----------+-----------+--------------+
| Traefik | (default) | Yes       | architecture |
+---------+-----------+-----------+--------------+
$ kubectl get nodes
NAME               STATUS   ROLES    AGE    VERSION
kube-master-45ac   Ready    master   109s   v1.16.3-k3s.2
kube-node-a353     Ready    <none>   56s    v1.16.3-k3s.2
kube-node-f88f     Ready    <none>   48s    v1.16.3-k3s.2
Next, we can add a repo and verify we can find sonar
$ helm version
version.BuildInfo{Version:"v3.0.2", GitCommit:"19e47ee3283ae98139d98460de796c1be1e3975f", GitTreeState:"clean", GoVersion:"go1.13.5"}
$ helm repo add bitnami https://charts.bitnami.com/bitnami
"bitnami" has been added to your repositories
$ helm repo add banzaicloud-stable https://kubernetes-charts.banzaicloud.com
"banzaicloud-stable" has been added to your repositories
$ helm repo update
Hang tight while we grab the latest from your chart repositories...
...Successfully got an update from the "banzaicloud-stable" chart repository
...Successfully got an update from the "bitnami" chart repository
$ helm search repo | grep sonar
banzaicloud-stable/sonarqube                    	0.8.0        	6.7.3                  	Sonarqube is an open sourced code quality scann...
Quick note, Helm2 and prior has a tiller pod that orchestrates deployments, but with Helm 3, we no longer need tiller (you can read more about why here).
Now we can install Sonarqube
$ helm install banzaicloud-stable/sonarqube --version 0.8.0 --generate-name
NAME: sonarqube-1581080411
LAST DEPLOYED: Fri Feb  7 07:00:13 2020
NAMESPACE: default
STATUS: deployed
REVISION: 1
NOTES:
1. Get the application URL by running these commands:
     NOTE: It may take a few minutes for the LoadBalancer IP to be available.
           You can watch the status of by running 'kubectl get svc -w sonarqube-1581080411-sonarqube'
  export SERVICE_IP=$(kubectl get svc --namespace default sonarqube-1581080411-sonarqube -o jsonpath='{.status.loadBalancer.ingress[0].ip}')
  echo http://$SERVICE_IP:9000
Pretty soon we see the pods are up as well as the service:
$ kubectl get pods
NAME                                              READY   STATUS    RESTARTS   AGE
svclb-sonarqube-1581080411-sonarqube-wpp5h        1/1     Running   0          3m13s
svclb-sonarqube-1581080411-sonarqube-6l74j        1/1     Running   0          3m13s
svclb-sonarqube-1581080411-sonarqube-zfkff        1/1     Running   0          3m13s
sonarqube-1581080411-postgresql-0                 1/1     Running   0          3m12s
sonarqube-1581080411-sonarqube-6f7b7bd86f-92h8r   1/1     Running   0          3m12s

$ kubectl get svc --namespace default sonarqube-1581080411-sonarqube -o jsonpath='{.status.loadBalancer.ingress[0].ip}'
91.211.153.176
Testing
Let’s try http://91.211.153.176:9000
Login and create a project;

we can use that sonar command to scan a local repo:
sonar-scanner \
  -Dsonar.projectKey=LOCT \
  -Dsonar.sources=. \
  -Dsonar.host.url=http://91.211.153.176:9000 \
  -Dsonar.login=b5ce448a1666560385b1443e93a98f555640eac0
Let's try it:
$ sonar-scanner   -Dsonar.projectKey=LOCT   -Dsonar.sources=./src/   -Dsonar.host.url=http://91.211.153.176:9000   -Dsonar.login=b5ce448a1666560385b1443e93a98f555640eac0 -Dsonar.java.binaries=/Users/johnsi10/Workspaces/MyWorkspace/xxx-scan-tool/
INFO: Scanner configuration file: /Users/johnsi10/Downloads/sonar-scanner-4.2.0.1873-macosx/conf/sonar-scanner.properties
INFO: Project root configuration file: NONE
INFO: SonarQube Scanner 4.2.0.1873
INFO: Java 11.0.3 AdoptOpenJDK (64-bit)
INFO: Mac OS X 10.15.2 x86_64
….snip….
INFO: ANALYSIS SUCCESSFUL, you can browse http://91.211.153.176:9000/dashboard/index/LOCT
INFO: Note that you will be able to access the updated dashboard once the server has processed the submitted analysis report
INFO: More about the report processing at http://91.211.153.176:9000/api/ce/task?id=AXAfxjcpYCdhFpfZ7Kbh
INFO: Task total time: 7.524 s
INFO: ------------------------------------------------------------------------
INFO: EXECUTION SUCCESS
INFO: ------------------------------------------------------------------------
INFO: Total time: 9.149s
INFO: Final Memory: 13M/54M
INFO: ------------------------------------------------------------------------
Results:
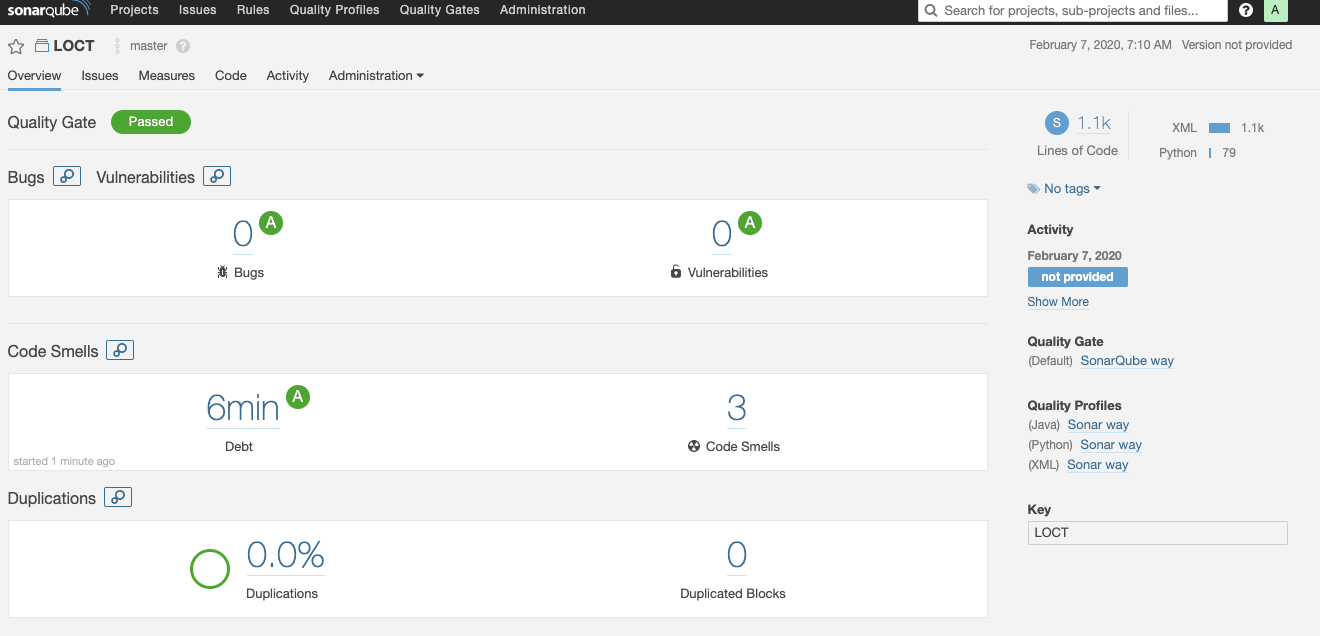
Now if you were going to really host this for a real org, you would want to setup an Nginx ingress with TLS (luckily we have a blog entry that covers that).. You would just expose the sonarqube service:
$ kubectl get svc
NAME                                       TYPE           CLUSTER-IP        EXTERNAL-IP      PORT(S)          AGE
kubernetes                                 ClusterIP      192.168.128.1     <none>           443/TCP          26m
sonarqube-1581080411-postgresql-headless   ClusterIP      None              <none>           5432/TCP         15m
sonarqube-1581080411-postgresql            ClusterIP      192.168.208.131   <none>           5432/TCP         15m
sonarqube-1581080411-sonarqube             LoadBalancer   192.168.187.129   91.211.153.176   9000:32479/TCP   15m
Note: you can also reach your ingress IP by the CIVO DNS entry that was created for you when spinning up the k8s cluster (from the “show” command):

Kubernetes Dashboard
A quick note on dashboard: if you are accustomed to the k8s dashboard deployed by default, it won’t be. You can install via kubectl:
$ kubectl apply -f https://raw.githubusercontent.com/kubernetes/dashboard/v2.0.0-beta8/aio/deploy/recommended.yaml
namespace/kubernetes-dashboard created
serviceaccount/kubernetes-dashboard created
service/kubernetes-dashboard created
secret/kubernetes-dashboard-certs created
secret/kubernetes-dashboard-csrf created
secret/kubernetes-dashboard-key-holder created
configmap/kubernetes-dashboard-settings created
role.rbac.authorization.k8s.io/kubernetes-dashboard created
clusterrole.rbac.authorization.k8s.io/kubernetes-dashboard created
rolebinding.rbac.authorization.k8s.io/kubernetes-dashboard created
clusterrolebinding.rbac.authorization.k8s.io/kubernetes-dashboard created
deployment.apps/kubernetes-dashboard created
service/dashboard-metrics-scraper created
deployment.apps/dashboard-metrics-scraper created
Fire the proxy to reach it:
$ kubectl proxyStarting to serve on 127.0.0.1:8001Which you can then access with http://localhost:8001/api/v1/namespaces/kubernetes-dashboard/services/https:kubernetes-dashboard:/proxy/#/node?namespace=default

You can use the dashboard token (as i did above) but it’s privs are too low to really do anything other than browse the dashboard:
$ kubectl get secret kubernetes-dashboard-token-k2h82 -n kubernetes-dashboard -o yaml
apiVersion: v1
data:
  ca.crt: LS0tLS1CRUdJTiBDRVJUSUZJQ0FURS0tLS0tCk1JSUJWakNCL3FBREFnRUNBZ0VBTUFvR0NDcUdTTTQ5QkFNQ01DTXhJVEFmQmdOVkJBTU1HR3N6Y3kxelpYSjIKWlhJdFkyRkFNVFU0TVRBM09UYzFOakFlRncweU1EQXlNRGN4TWpRNU1UWmFGdzB6TURBeU1EUXhNalE1TVRaYQpNQ014SVRBZkJnTlZCQU1NR0dzemN5MXpaWEoyWlhJdFkyRkFNVFU0TVRBM09UYzFOakJaTUJNR0J5cUdTTTQ5CkFnRUdDQ3FHU000OUF3RUhBMElBQkdia2VFMklMZXFOaUlsbGZhUTZOMCtLQkxMMFZSNU5leFFpMS82Vlh2eUkKQjRxVzJXRHpSM3ExUTU2UnIrUDR4WGNGLzA0U2xvUnR4Ym8zT0tzd1BYcWpJekFoTUE0R0ExVWREd0VCL3dRRQpBd0lDcERBUEJnTlZIUk1CQWY4RUJUQURBUUgvTUFvR0NDcUdTTTQ5QkFNQ0EwY0FNRVFDSUUrSnltS2VhUHd2CmxoeVFGSXNsME5RTXEySzZZNnN1cFJUaUlQVTF3RmJjQWlCK1h4YUxoYk8wT3VxUnhXQmRBbDZpdU0rOVFuUlIKMlM1aVZIS2k5Yld3OWc9PQotLS0tLUVORCBDRVJUSUZJQ0FURS0tLS0tCg==
  namespace: a3ViZXJuZXRlcy1kYXNoYm9hcmQ=
  token: ZXlKaGJHY2lPaUpTVXpJMU5pSXNJbXRwWkNJNklrazNka3Q1TVRKWFNXaDJla3h5YjBRNVNXRlhTMHRPV2pGRVUwTnRZVlZKTldWSGRrc3pYM0JhYVRRaWZRLmV5SnBjM01pT2lKcmRXSmxjbTVsZEdWekwzTmxjblpwWTJWaFkyTnZkVzUwSWl3aWEzVmlaWEp1WlhSbGN5NXBieTl6WlhKMmFXTmxZV05qYjNWdWRDOXVZVzFsYzNCaFkyVWlPaUpyZFdKbGNtNWxkR1Z6TFdSaGMyaGliMkZ5WkNJc0ltdDFZbVZ5Ym1WMFpYTXVhVzh2YzJWeWRtbGpaV0ZqWTI5MWJuUXZjMlZqY21WMExtNWhiV1VpT2lKcmRXSmxjbTVsZEdWekxXUmhjMmhpYjJGeVpDMTBiMnRsYmkxck1tZzRNaUlzSW10MVltVnlibVYwWlhNdWFXOHZjMlZ5ZG1salpXRmpZMjkxYm5RdmMyVnlkbWxqWlMxaFkyTnZkVzUwTG01aGJXVWlPaUpyZFdKbGNtNWxkR1Z6TFdSaGMyaGliMkZ5WkNJc0ltdDFZbVZ5Ym1WMFpYTXVhVzh2YzJWeWRtbGpaV0ZqWTI5MWJuUXZjMlZ5ZG1salpTMWhZMk52ZFc1MExuVnBaQ0k2SWpobU1XTTRaR1kyTFdVM05HRXROREkxTkMwNU5tWmtMV0psTVdSaE5qRTNOV0l4WlNJc0luTjFZaUk2SW5ONWMzUmxiVHB6WlhKMmFXTmxZV05qYjNWdWREcHJkV0psY201bGRHVnpMV1JoYzJoaWIyRnlaRHByZFdKbGNtNWxkR1Z6TFdSaGMyaGliMkZ5WkNKOS5JNlJJUGJQbFF4aEItVlNoenZXNUs2aVI2UHhRWjczMUFaYVdPOVJTa2poX3lsLU94ZkY2VkRvMWMyTnRWRDRCUWlrRjFoM3Q4UWJ2NnZTX09rSGNFdWUxaXlmOG10eUFNX3YyS1VsT0d5NnhJaEpnWTVKVUh0dzVrMXhlVThtWW1LR1hMV2N5VXRIc0NfSk1kRm5Cc1NRa1FNcTNOeWFpeFNFZ1ZleEFvWHl6UGxEUi10WHhwZTN2MW9LXy1Bdkp6ejBqMXhYR1FsZUJhaTl0amhZZmEtc0kzUDlha1dpUXdCcnFSbVhvWENzaHJtTDJubndSWGczN2paMzJ4aEhHZ3NmZGExUW9iUXN0RTJNdURpRmVJWWpPdmNwaW4tRkVkTS1jTkdzU0d6R19QT2JFM2ZqS0RKdlZCVnJZaTkzX2k0Y2NBQlJmNmZQQmhPSmw1WlA2cnc=
kind: Secret
metadata:
  annotations:
    kubernetes.io/service-account.name: kubernetes-dashboard
    kubernetes.io/service-account.uid: 8f1c8df6-e74a-4254-96fd-be1da6175b1e
  creationTimestamp: "2020-02-07T13:17:29Z"
  name: kubernetes-dashboard-token-k2h82
  namespace: kubernetes-dashboard
  resourceVersion: "2266"
  selfLink: /api/v1/namespaces/kubernetes-dashboard/secrets/kubernetes-dashboard-token-k2h82
  uid: 1c5e1119-8fb4-448e-bc70-fafc2050be7b
type: kubernetes.io/service-account-token
We can decode the token to use it:
$ echo ZXlKaGJHY2lPaUpTVXpJMU5pSXNJbXRwWkNJNklrazNka3Q1TVRKWFNXaDJla3h5YjBRNVNXRlhTMHRPV2pGRVUwTnRZVlZKTldWSGRrc3pYM0JhYVRRaWZRLmV5SnBjM01pT2lKcmRXSmxjbTVsZEdWekwzTmxjblpwWTJWaFkyTnZkVzUwSWl3aWEzVmlaWEp1WlhSbGN5NXBieTl6WlhKMmFXTmxZV05qYjNWdWRDOXVZVzFsYzNCaFkyVWlPaUpyZFdKbGNtNWxkR1Z6TFdSaGMyaGliMkZ5WkNJc0ltdDFZbVZ5Ym1WMFpYTXVhVzh2YzJWeWRtbGpaV0ZqWTI5MWJuUXZjMlZqY21WMExtNWhiV1VpT2lKcmRXSmxjbTVsZEdWekxXUmhjMmhpYjJGeVpDMTBiMnRsYmkxck1tZzRNaUlzSW10MVltVnlibVYwWlhNdWFXOHZjMlZ5ZG1salpXRmpZMjkxYm5RdmMyVnlkbWxqWlMxaFkyTnZkVzUwTG01aGJXVWlPaUpyZFdKbGNtNWxkR1Z6TFdSaGMyaGliMkZ5WkNJc0ltdDFZbVZ5Ym1WMFpYTXVhVzh2YzJWeWRtbGpaV0ZqWTI5MWJuUXZjMlZ5ZG1salpTMWhZMk52ZFc1MExuVnBaQ0k2SWpobU1XTTRaR1kyTFdVM05HRXROREkxTkMwNU5tWmtMV0psTVdSaE5qRTNOV0l4WlNJc0luTjFZaUk2SW5ONWMzUmxiVHB6WlhKMmFXTmxZV05qYjNWdWREcHJkV0psY201bGRHVnpMV1JoYzJoaWIyRnlaRHByZFdKbGNtNWxkR1Z6TFdSaGMyaGliMkZ5WkNKOS5JNlJJUGJQbFF4aEItVlNoenZXNUs2aVI2UHhRWjczMUFaYVdPOVJTa2poX3lsLU94ZkY2VkRvMWMyTnRWRDRCUWlrRjFoM3Q4UWJ2NnZTX09rSGNFdWUxaXlmOG10eUFNX3YyS1VsT0d5NnhJaEpnWTVKVUh0dzVrMXhlVThtWW1LR1hMV2N5VXRIc0NfSk1kRm5Cc1NRa1FNcTNOeWFpeFNFZ1ZleEFvWHl6UGxEUi10WHhwZTN2MW9LXy1Bdkp6ejBqMXhYR1FsZUJhaTl0amhZZmEtc0kzUDlha1dpUXdCcnFSbVhvWENzaHJtTDJubndSWGczN2paMzJ4aEhHZ3NmZGExUW9iUXN0RTJNdURpRmVJWWpPdmNwaW4tRkVkTS1jTkdzU0d6R19QT2JFM2ZqS0RKdlZCVnJZaTkzX2k0Y2NBQlJmNmZQQmhPSmw1WlA2cnc= | base64 --decode
eyJhbGciOiJSUzI1NiIsImtpZCI6Ikk3dkt5MTJXSWh2ekxyb0Q5SWFXS0tOWjFEU0NtYVVJNWVHdkszX3BaaTQifQ.eyJpc3MiOiJrdWJlcm5ldGVzL3NlcnZpY2VhY2NvdW50Iiwia3ViZXJuZXRlcy5pby9zZXJ2aWNlYWNjb3VudC9uYW1lc3BhY2UiOiJrdWJlcm5ldGVzLWRhc2hib2FyZCIsImt1YmVybmV0ZXMuaW8vc2VydmljZWFjY291bnQvc2VjcmV0Lm5hbWUiOiJrdWJlcm5ldGVzLWRhc2hib2FyZC10b2tlbi1rMmg4MiIsImt1YmVybmV0ZXMuaW8vc2VydmljZWFjY291bnQvc2VydmljZS1hY2NvdW50Lm5hbWUiOiJrdWJlcm5ldGVzLWRhc2hib2FyZCIsImt1YmVybmV0ZXMuaW8vc2VydmljZWFjY291bnQvc2VydmljZS1hY2NvdW50LnVpZCI6IjhmMWM4ZGY2LWU3NGEtNDI1NC05NmZkLWJlMWRhNjE3NWIxZSIsInN1YiI6InN5c3RlbTpzZXJ2aWNlYWNjb3VudDprdWJlcm5ldGVzLWRhc2hib2FyZDprdWJlcm5ldGVzLWRhc2hib2FyZCJ9.I6RIPbPlQxhB-VShzvW5K6iR6PxQZ731AZaWO9RSkjh_yl-OxfF6VDo1c2NtVD4BQikF1h3t8Qbv6vS_OkHcEue1iyf8mtyAM_v2KUlOGy6xIhJgY5JUHtw5k1xeU8mYmKGXLWcyUtHsC_JMdFnBsSQkQMq3NyaixSEgVexAoXyzPlDR-tXxpe3v1oK_-AvJzz0j1xXGQleBai9tjhYfa-sI3P9akWiQwBrqRmXoXCshrmL2nnwRXg37jZ32xhHGgsfda1QobQstE2MuDiFeIYjOvcpin-FEdM-cNGsSGzG_PObE3fjKDJvVBVrYi93_i4ccABRf6fPBhOJl5ZP6rw
We can make one of those pretty easy, however:
$ cat ~/cluster-admin.yaml
apiVersion: v1
kind: ServiceAccount
metadata:
  name: admin-user
  namespace: kube-system
---
apiVersion: rbac.authorization.k8s.io/v1
kind: ClusterRoleBinding
metadata:
  name: admin-user
roleRef:
  apiGroup: rbac.authorization.k8s.io
  kind: ClusterRole
  name: cluster-admin
subjects:
- kind: ServiceAccount
  name: admin-user
  namespace: kube-system
$ kubectl apply -f ~/cluster-admin.yaml
serviceaccount/admin-user created
clusterrolebinding.rbac.authorization.k8s.io/admin-user created
Now fetch that token:
$ kubectl -n kube-system describe secret $(kubectl -n kube-system get secret | grep admin-user | awk '{print $1}') | grep token:
token:      eyJhbGciOiJSUzI1NiIsImtpZCI6Ikk3dkt5MTJXSWh2ekxyb0Q5SWFXS0tOWjFEU0NtYVVJNWVHdkszX3BaaTQifQ.eyJpc3MiOiJrdWJlcm5ldGVzL3NlcnZpY2VhY2NvdW50Iiwia3ViZXJuZXRlcy5pby9zZXJ2aWNlYWNjb3VudC9uYW1lc3BhY2UiOiJrdWJlLXN5c3RlbSIsImt1YmVybmV0ZXMuaW8vc2VydmljZWFjY291bnQvc2VjcmV0Lm5hbWUiOiJhZG1pbi11c2VyLXRva2VuLWYyc2RoIiwia3ViZXJuZXRlcy5pby9zZXJ2aWNlYWNjb3VudC9zZXJ2aWNlLWFjY291bnQubmFtZSI6ImFkbWluLXVzZXIiLCJrdWJlcm5ldGVzLmlvL3NlcnZpY2VhY2NvdW50L3NlcnZpY2UtYWNjb3VudC51aWQiOiJlNjNjMzQ4NS00NjE3LTQ4N2EtYmM2Ny0yMWVkMjFhZDcxZmEiLCJzdWIiOiJzeXN0ZW06c2VydmljZWFjY291bnQ6a3ViZS1zeXN0ZW06YWRtaW4tdXNlciJ9.tcSGB0wz7E-YDUA0EYd3Noi5ioU6zvUA1I1xBeEyKADoN2Es66jvlN-Xkcz7z0AJRhc7zsxM5_lXIvEL2tnqkvjGZ62aevrbjxSjxHG19Lvtu7IZyqxO_a_QNDBHyct3h5wWjomvElFGlPXl7BNuuTmxD5eYAver9TBpRF9c5TXGDLTmDYR4UwGwDx-NSB255qRrxvN7SCXUU_ZN85HnNAAWJta6JHZ1SYTBZmi-cwKquwyPKCfizlDTV5P5dxb0oSy1uzK01_WL__2g2TaaZmViUmrbBoiyJKxczowIpBXW8HaSymTqFt0zyhCWeVmadiH8FCIDCQkj9HuCpRX8Qw
Signing in with that shows us a complete dashboard:

This is handy if you just want to quick find a pod and view it’s logs:
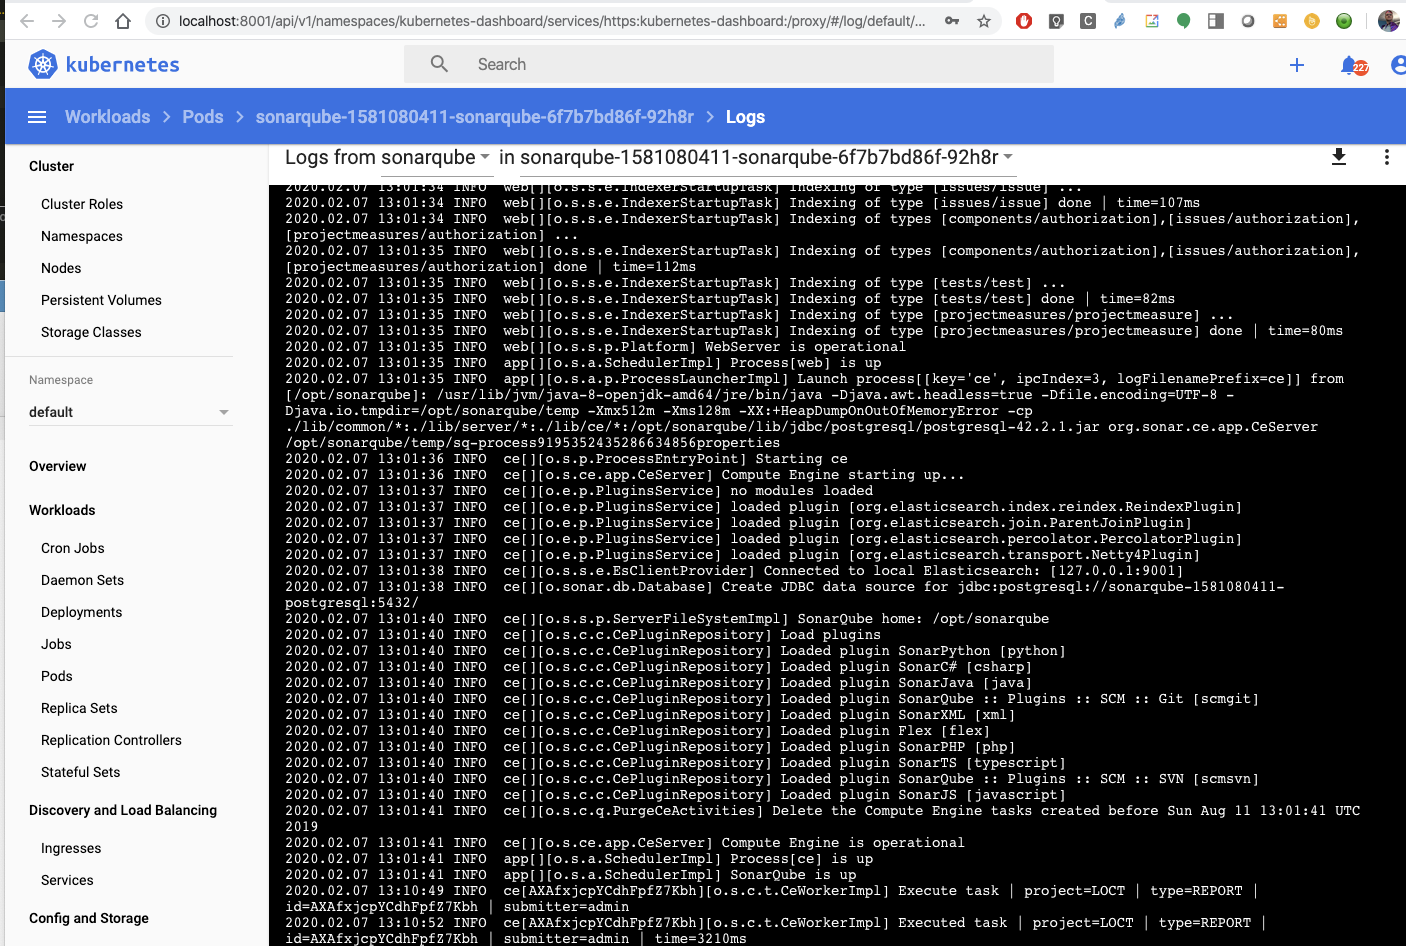
Or scale up a replicaset to really push your cluster:

This is often how i see what size/count nodes i have/need for horizontal and vertical scaling.
Cleanup
$ civo kubernetes list
+--------------------------------------+--------------+---------+-----------+---------+-----------------+
| ID                                   | Name         | # Nodes | Size      | Version | Status          |
+--------------------------------------+--------------+---------+-----------+---------+-----------------+
| e8ff8449-e861-402a-9797-fe1e8796464d | south-cloud  | 3       | g2.medium | 0.8.1 * | INSTANCE-CREATE |
| c812debb-35b0-49b4-88b1-4af698adfda0 | road-british | 3       | g2.medium | 1.0.0   | ACTIVE          |
+--------------------------------------+--------------+---------+-----------+---------+-----------------+

* An upgrade to v1.0.0 is available, use - civo k3s upgrade ID - to upgrade it

$ civo kubernetes delete c812debb-35b0-49b4-88b1-4af698adfda0
Removing Kubernetes cluster road-british
Summary
Civo’s kubernetes is still in Beta, but is surprisingly far more functional than i was first envisioning. I experienced a cluster fail to create, but they have a private slack where a CIVO engineer jumped right in to look into it as well as let us know if there were issues. You don’t see that level of attention from the big players and I was pretty impressed. The even have a suggestions area of the portal that let’s customers provide suggestions and feedback.
As far as K8s, the performance was quite good. I had clusters launch in 3 minutes to 17 minutes - my guess is the variability is because they are still working on it. In comparison, my usual experience with other vendors is 1 to 7 minutes so it was acceptable to me.