

Published: Dec 31, 2025 by Isaac Johnson
I wanted to come back to RustFS since writing about it last week. I ran it in docker locally then in Kubernetes, but how would I really run RustFS? What does a production instance look like?
Another option that got my attention was Garage which is a bit more command-line driven (but quite zippy). Since it runs on different ports than MinIO/RustFS I can actually run that side by side so we can see a bit of a comparison.
Lastly, can we expose it in Kubernetes? Let’s start with powering down Minio…
Replacing MinIO
We are going to start by retiring my MinIO which was not in active use. It has chugged along for years, but if I were to update, I would expect I would lose the WebUI I depend upon.
The last time I wrote on it was back in 2024 and at that time I put it on my newer Synology NAS.
Assuming it is largely unused (I fell back to NFS mounts for DB backups), I’ll check the containers
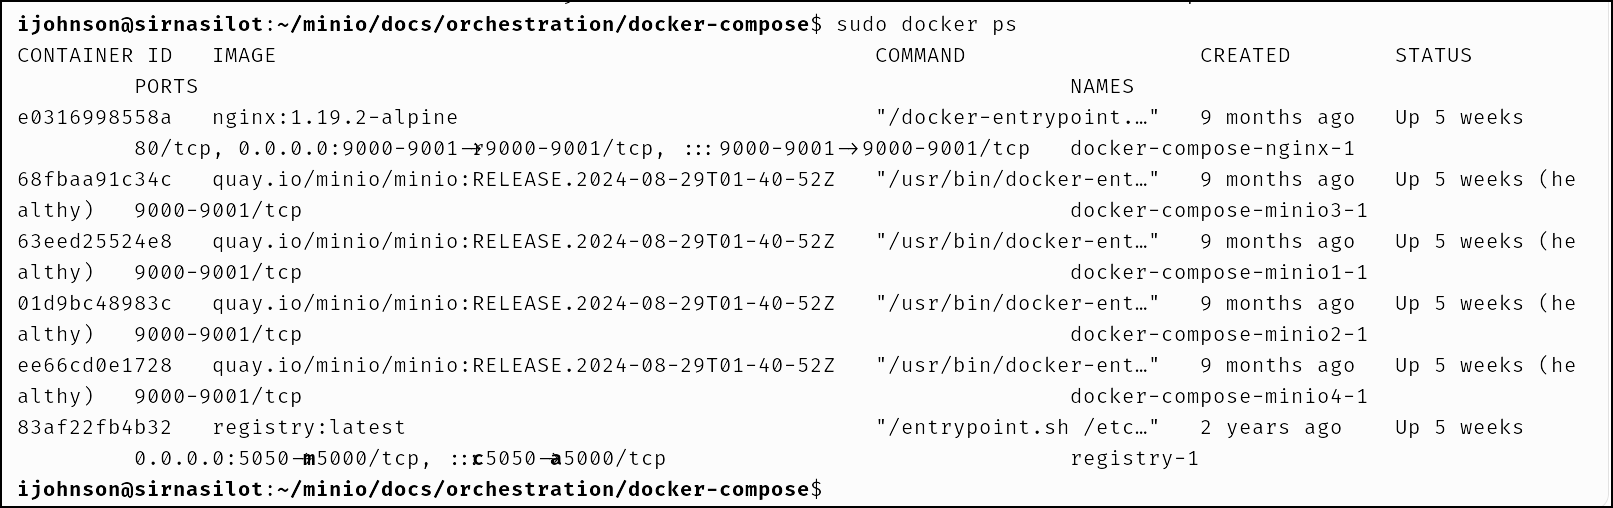
Minio
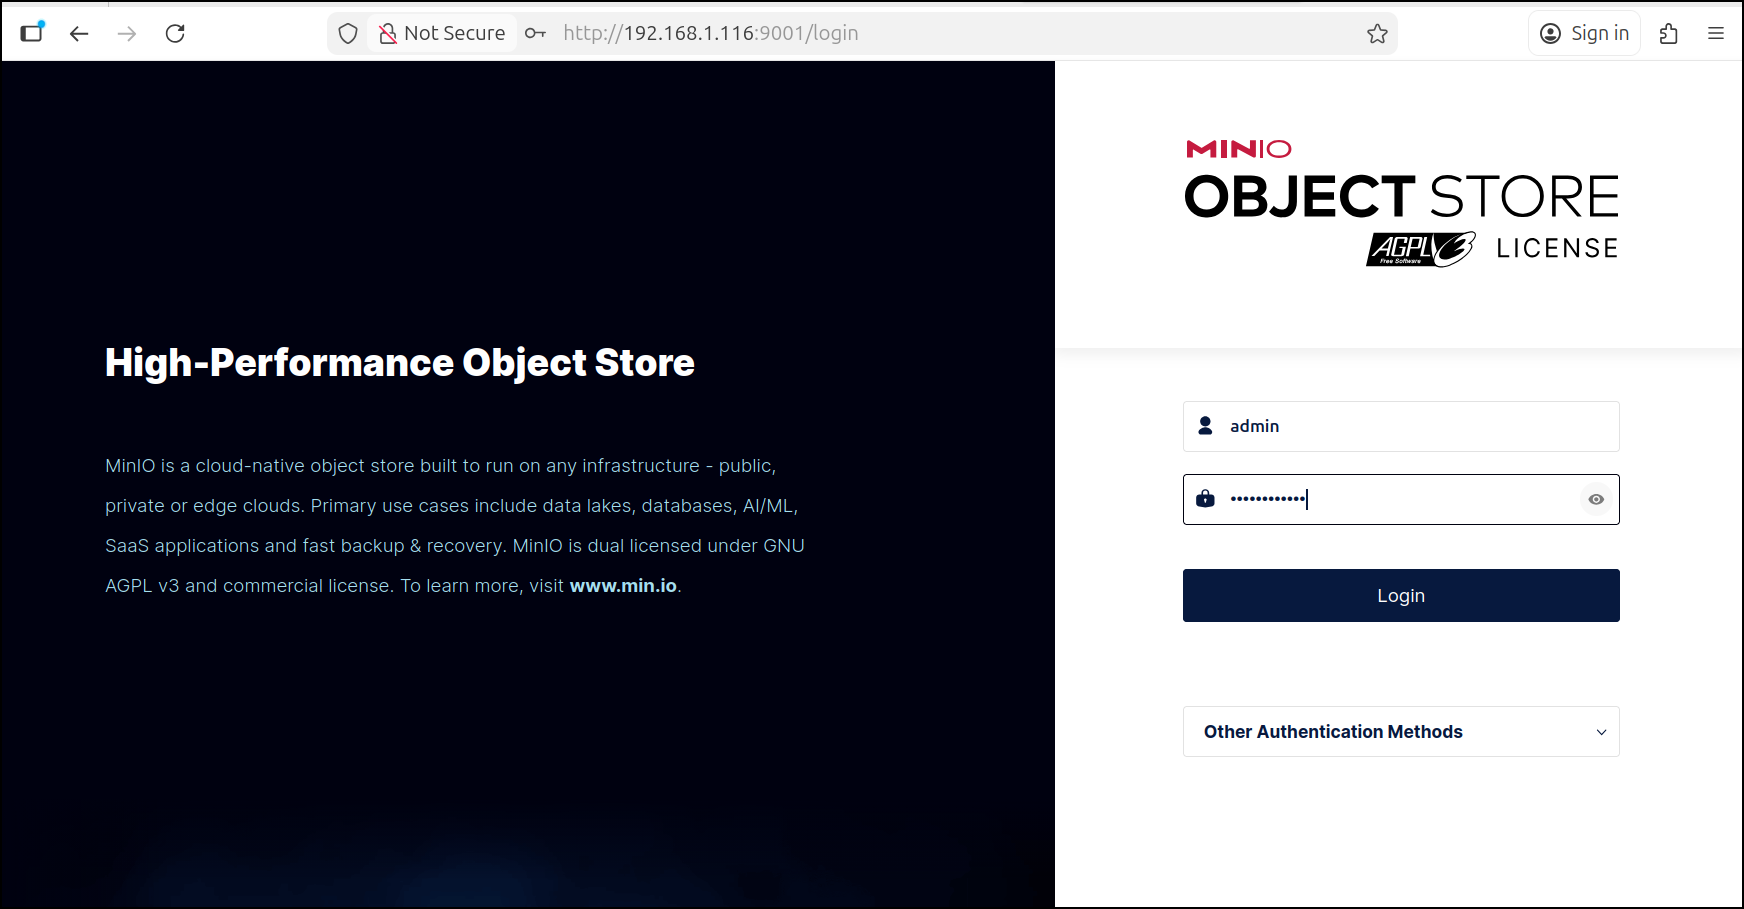
I can login to the MinIO
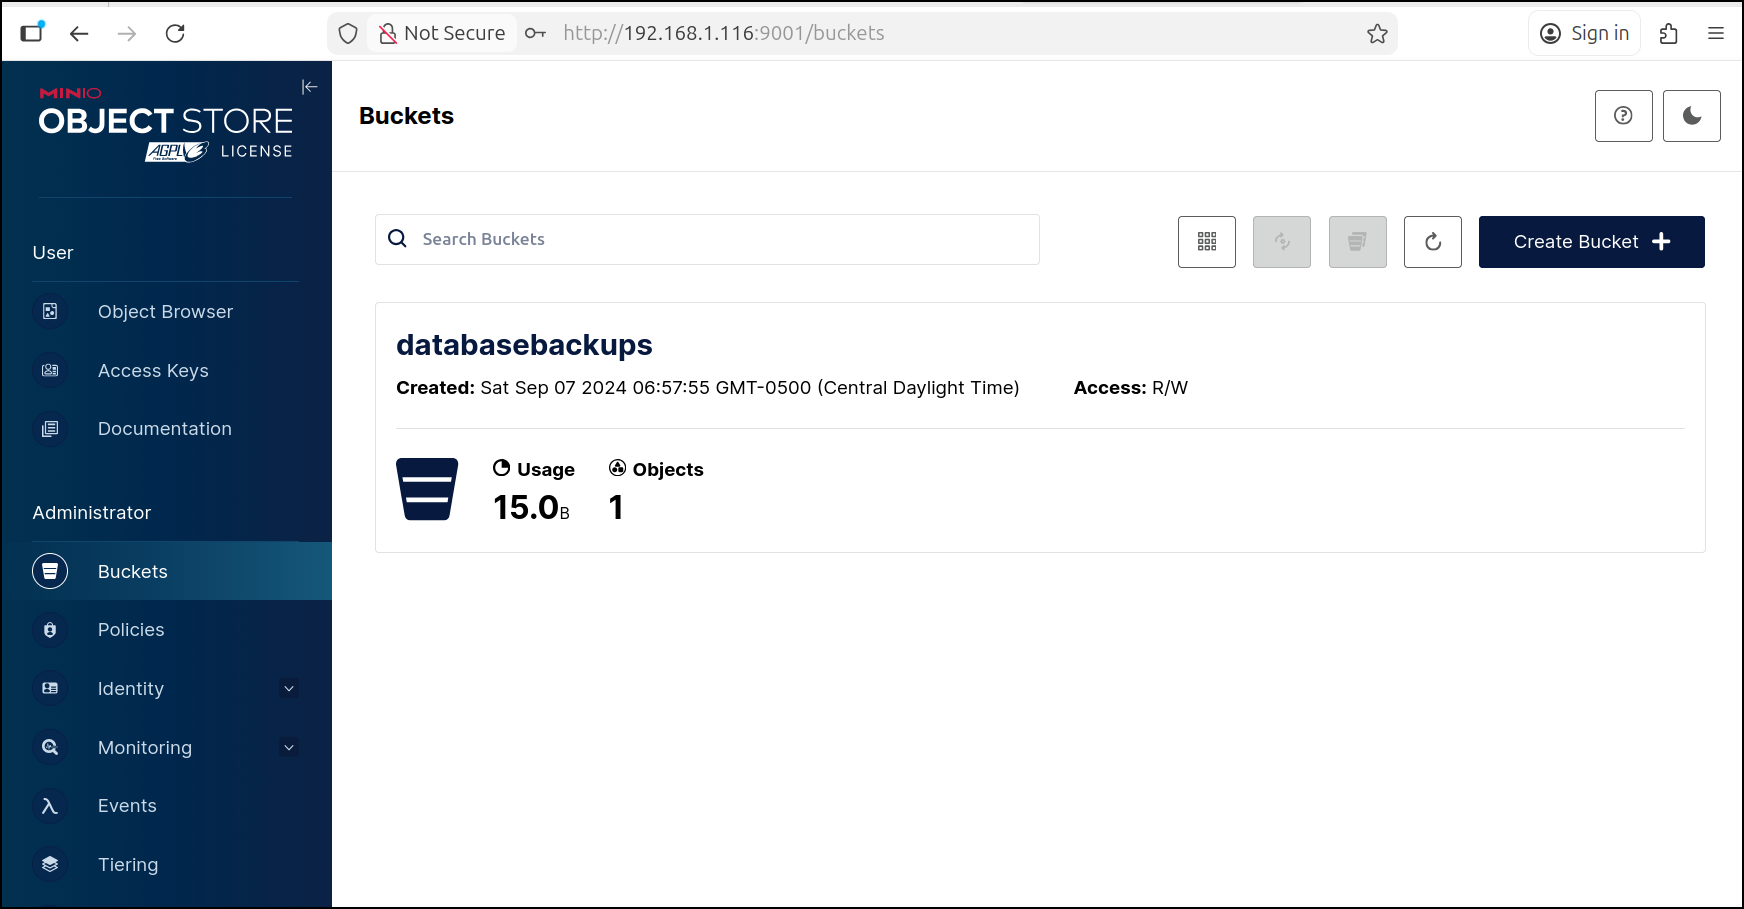
I can see it is largely unused
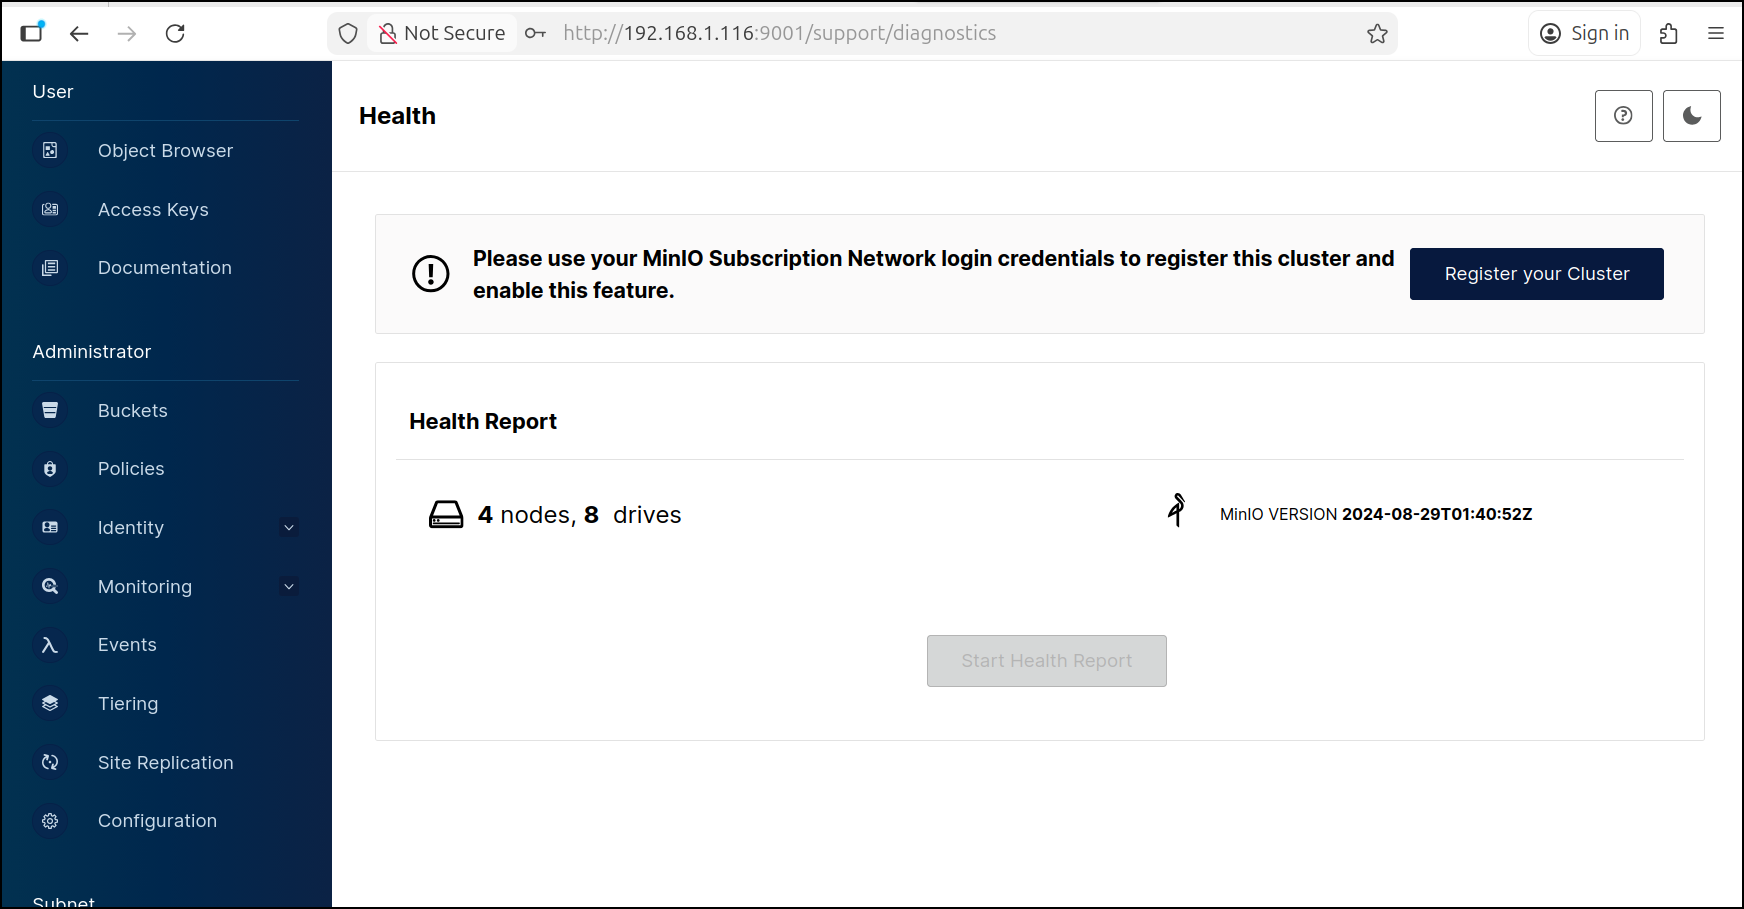
It is AGPL licensed and does have “4 nodes” but those are really just containers on the same host
We can see the docker image defined in the docker-compose.yaml
ijohnson@sirnasilot:~/minio/docs/orchestration/docker-compose$ cat docker-compose.yaml
version: '3.7'

# Settings and configurations that are common for all containers
x-minio-common: &minio-common
  image: quay.io/minio/minio:RELEASE.2024-08-29T01-40-52Z
  command: server --console-address ":9001" http://minio{1...4}/data{1...2}
  restart: always
  expose:
    - "9000"
    - "9001"
  environment:
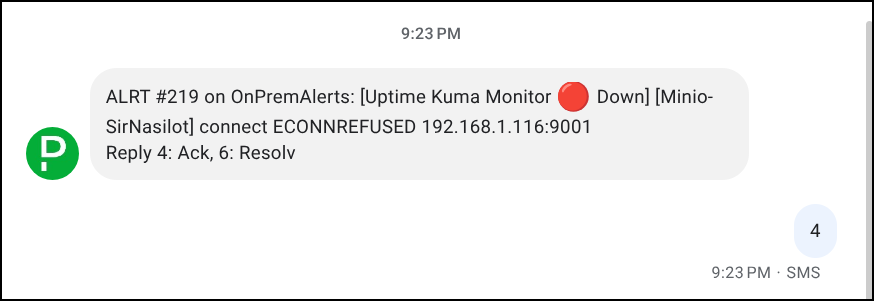
Let’s power it down
ijohnson@sirnasilot:~/minio/docs/orchestration/docker-compose$ sudo docker-compose down
[+] Running 6/6
 ⠿ Container docker-compose-nginx-1   Removed                                              4.4s
 ⠿ Container docker-compose-minio1-1  Removed                                              9.2s
 ⠿ Container docker-compose-minio2-1  Removed                                              6.9s
 ⠿ Container docker-compose-minio3-1  Removed                                              7.7s
 ⠿ Container docker-compose-minio4-1  Removed                                              8.6s
 ⠿ Network docker-compose_default     Removed                                              1.4s
I got pages right away of course:
RustFS on NAS
Let’s pull the image down to the Synology NAS
ijohnson@sirnasilot:~$ sudo docker pull rustfs/rustfs:latest
Password:
latest: Pulling from rustfs/rustfs
2d35ebdb57d9: Pull complete
bd3434f4360d: Pull complete
3a81e7928cfa: Pull complete
7b77576826dd: Pull complete
84437c3d7a3a: Pull complete
4f4fb700ef54: Pull complete
7bb03501e3a5: Pull complete
Digest: sha256:b4b638393079ce687546a51a70ecace3070a9cc5f1a4fce65056a6305e30b743
Status: Downloaded newer image for rustfs/rustfs:latest
docker.io/rustfs/rustfs:latest
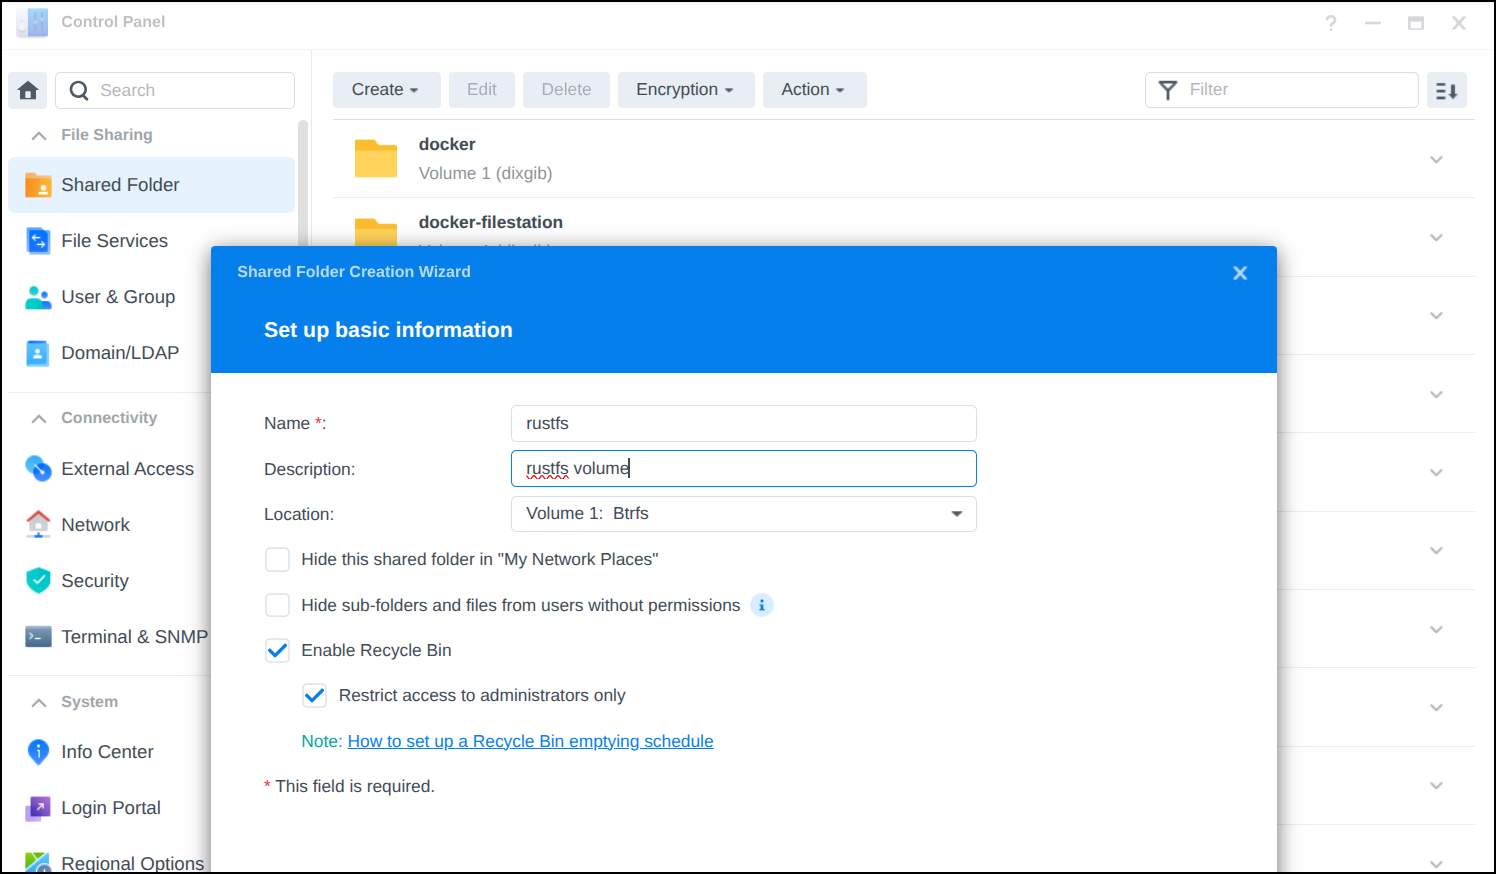
I want to use a real volume on the NAS
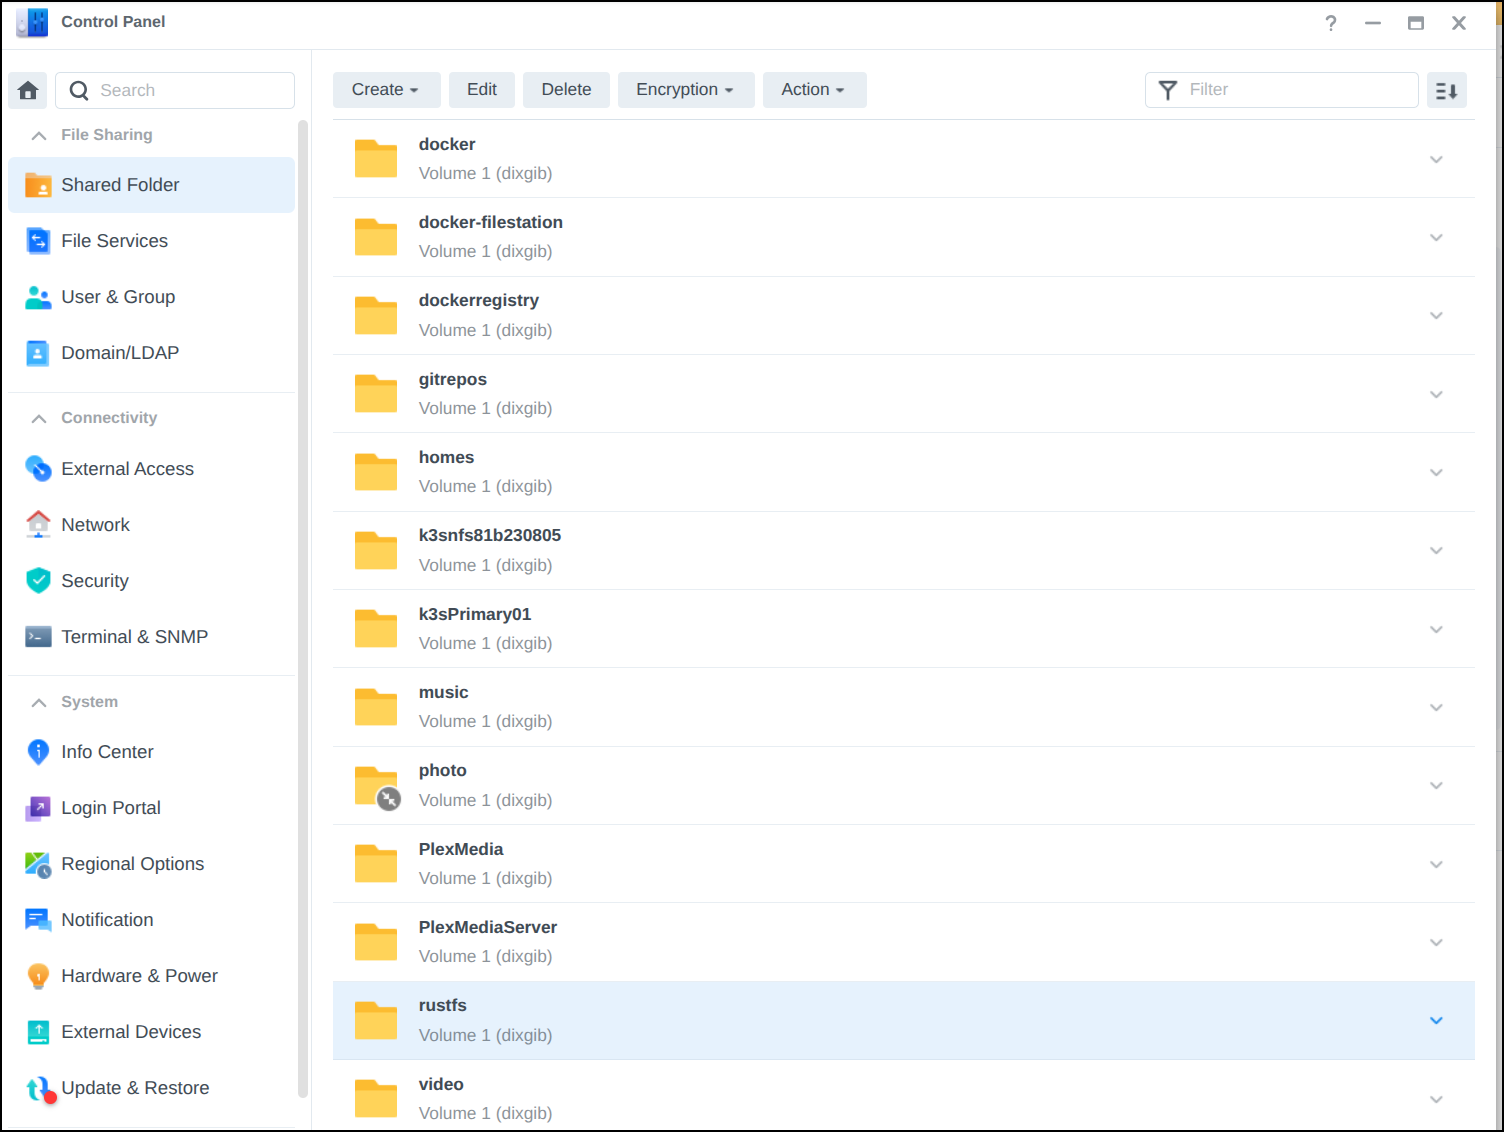
And I can now see it in shared folders
and then see it locally in the terminal
ijohnson@sirnasilot:~$ ls /volume1/rustfs/
 @eaDir  '#recycle'
So let’s now fire up RustFS
ijohnson@sirnasilot:~$ sudo docker run -d \
>   --name rustfs \
>   -p 9000:9000 \
>   -p 9001:9001 \
>   -v /volume1/rustfs:/data \
>   rustfs/rustfs:latest
Password:
I found the root volume didn’t mount properly and the container would crash.
But making a subfolder seemed to work just fine
ijohnson@sirnasilot:~$ sudo mkdir /volume1/rustfs/data
ijohnson@sirnasilot:~$ sudo chmod 777 /volume1/rustfs/data
ijohnson@sirnasilot:~$ sudo docker run -d   --name rustfs   -p 9000:9000   -p 9001:9001   -v /volume1/rustfs/data:/data   rustfs/rustfs:latest
004614a7c718f0490faf24915500a6a486b43a7582c2e151e83002d20498af31
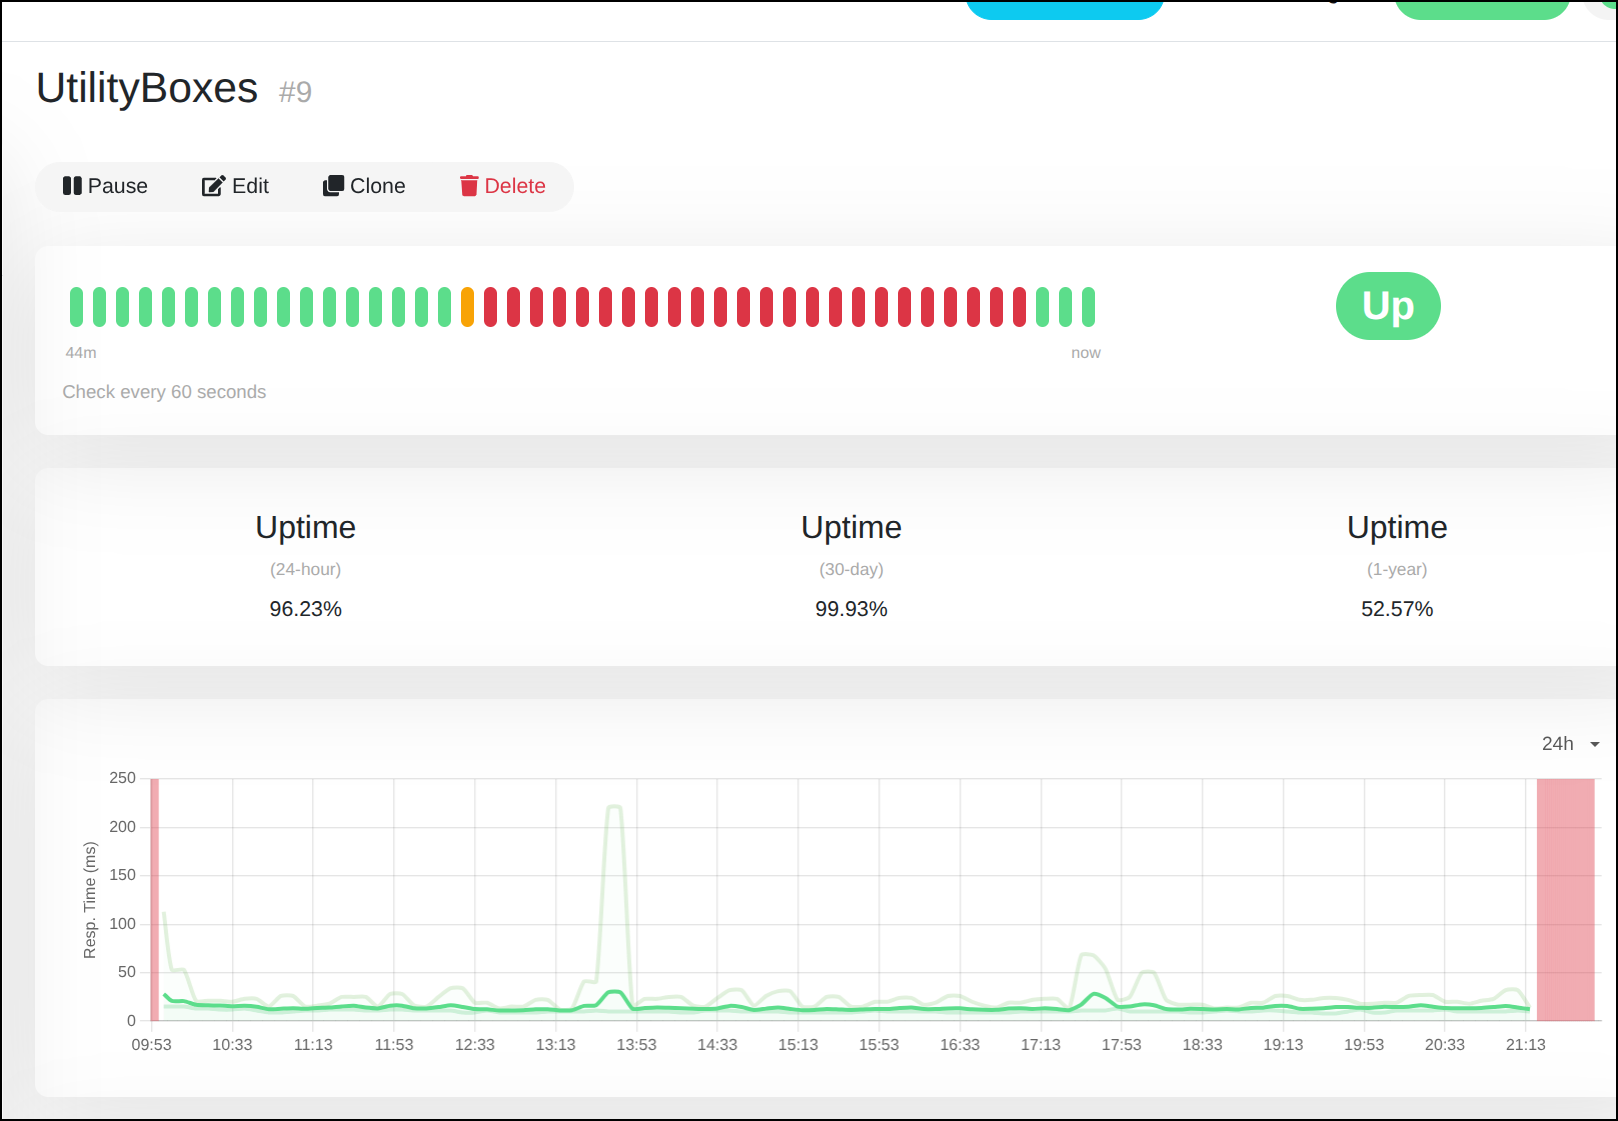
when the container came up, I noticed Uptime Kuma was happy again
After logging in I realized the “primary” user (rustfsadmin) has no ability to change the password.
So I removed the container and started it up again
ijohnson@sirnasilot:~$ sudo docker run -d   --name rustfs   -p 9000:9000   -p 9001:9001   -v /volume1/rustfs/data:/data -e RUSTFS_ACCESS_KEY=builder -e RUSTFS_SECRET_KEY=nottherealpassword  rustfs/rustfs:latest
537aef822dff2073c34d2804001b5d4feeb357d7cb1f88ef48aa273f87956937
I can now login and view the admin console
S3FS install
To use s3 locally we can leverage s3fs in linux
I’ll need to install with apt
$ sudo apt update
$ sudo apt install s3fs
I can now see the binary and get the version
$ which s3fs
/usr/bin/s3fs
$ s3fs --version
Amazon Simple Storage Service File System V1.95 with GnuTLS(gcrypt)
Copyright (C) 2010 Randy Rizun <rrizun@gmail.com>
License GPL2: GNU GPL version 2 <https://gnu.org/licenses/gpl.html>
This is free software: you are free to change and redistribute it.
There is NO WARRANTY, to the extent permitted by law.
To mount real buckets in S3, we can use our access key
$ echo "xxxxx:xxxxxxx" > ~/.passwd-s3fs
$ chmod 600 ~/.passwd-s3fs
Now I can make a local dir
$ sudo mkdir -p /mnt/freshbrewed-test
[sudo: authenticate] Password:
And mount my existing AWS S3 bucket
$ sudo s3fs freshbrewed-test /mnt/freshbrewed-test -o passwd_file=~/.passwd-s3fs -o allow_other
We can also use the fstab to mount it automatically when rebooted, e.g.
fbs-logs /mnt/bucket2 fuse.s3fs _netdev,allow_other,passwd_file=/home/builder/.passwd-s3fs,default_acl=public-read,uid=1000,gid=1000 0 0
Testing shows it works
$ ls /mnt/bucket2/
2024-08-30  index.html
Using Rust FS
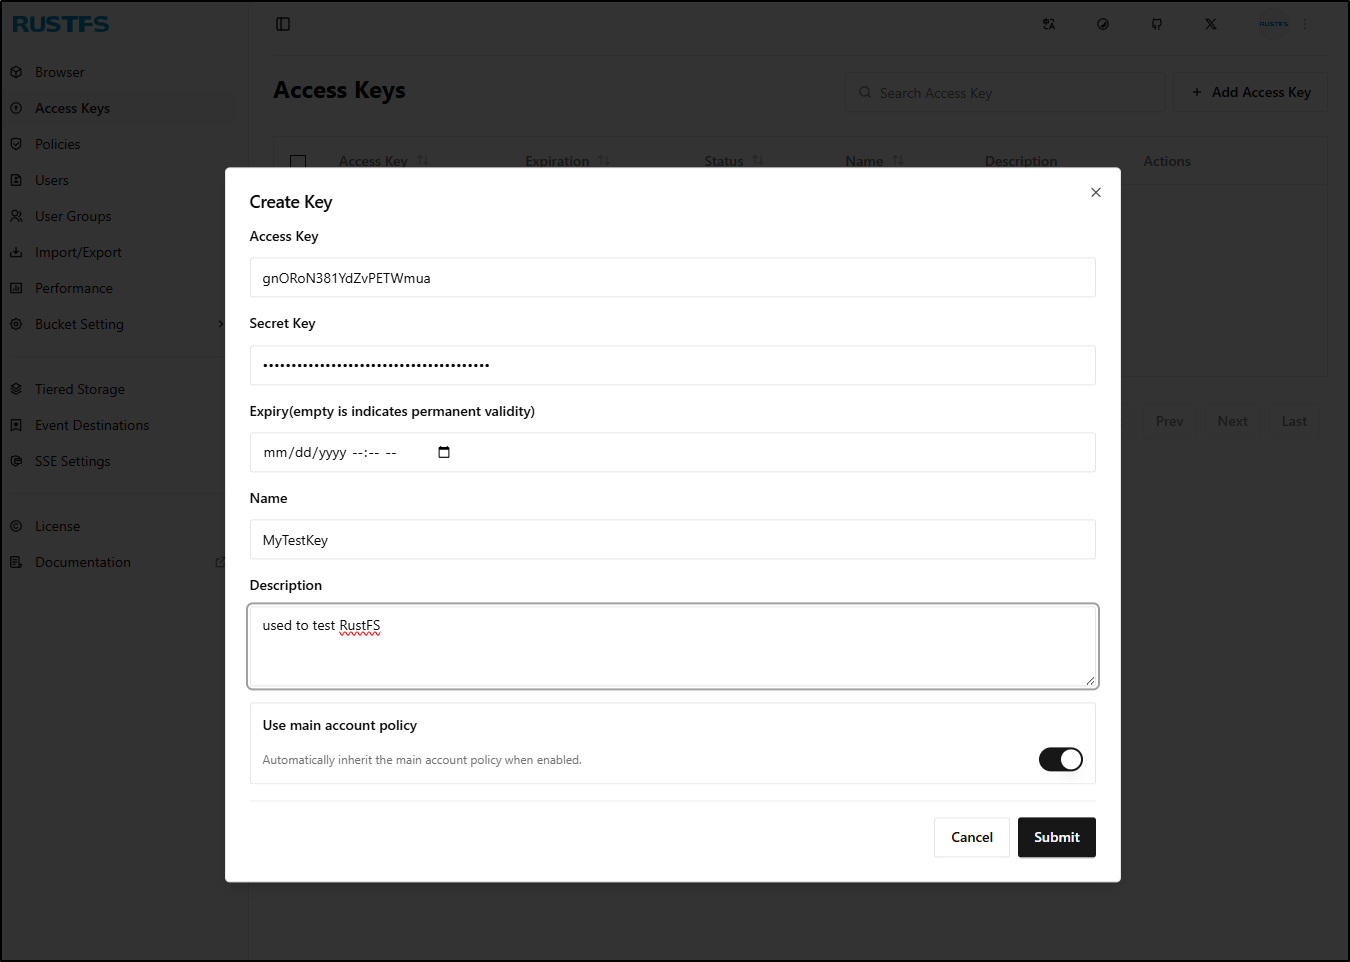
Let’s go to access keys and create an access key

I can optionally set an expiry, but for now I’ll leave persistent. At this step, we won’t see our Secret Key
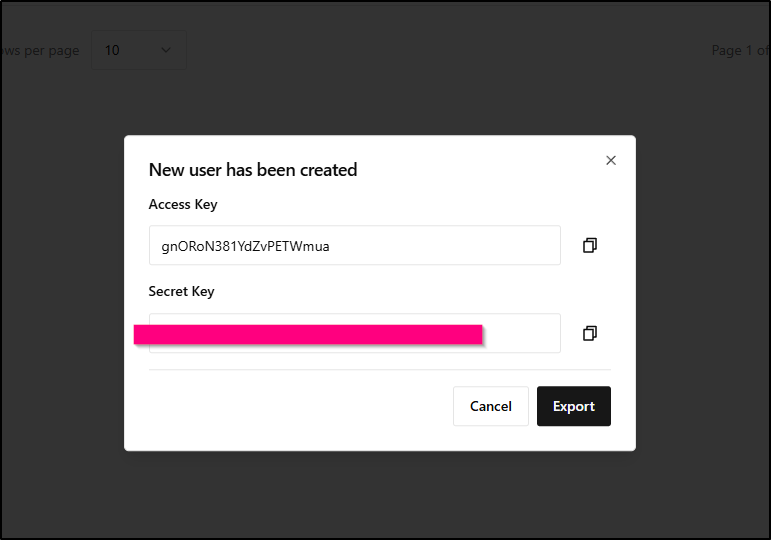
However, once we click add, it will show uses the Access Key and Secret Key and let us download them (export) which saves a “credentials.json” file
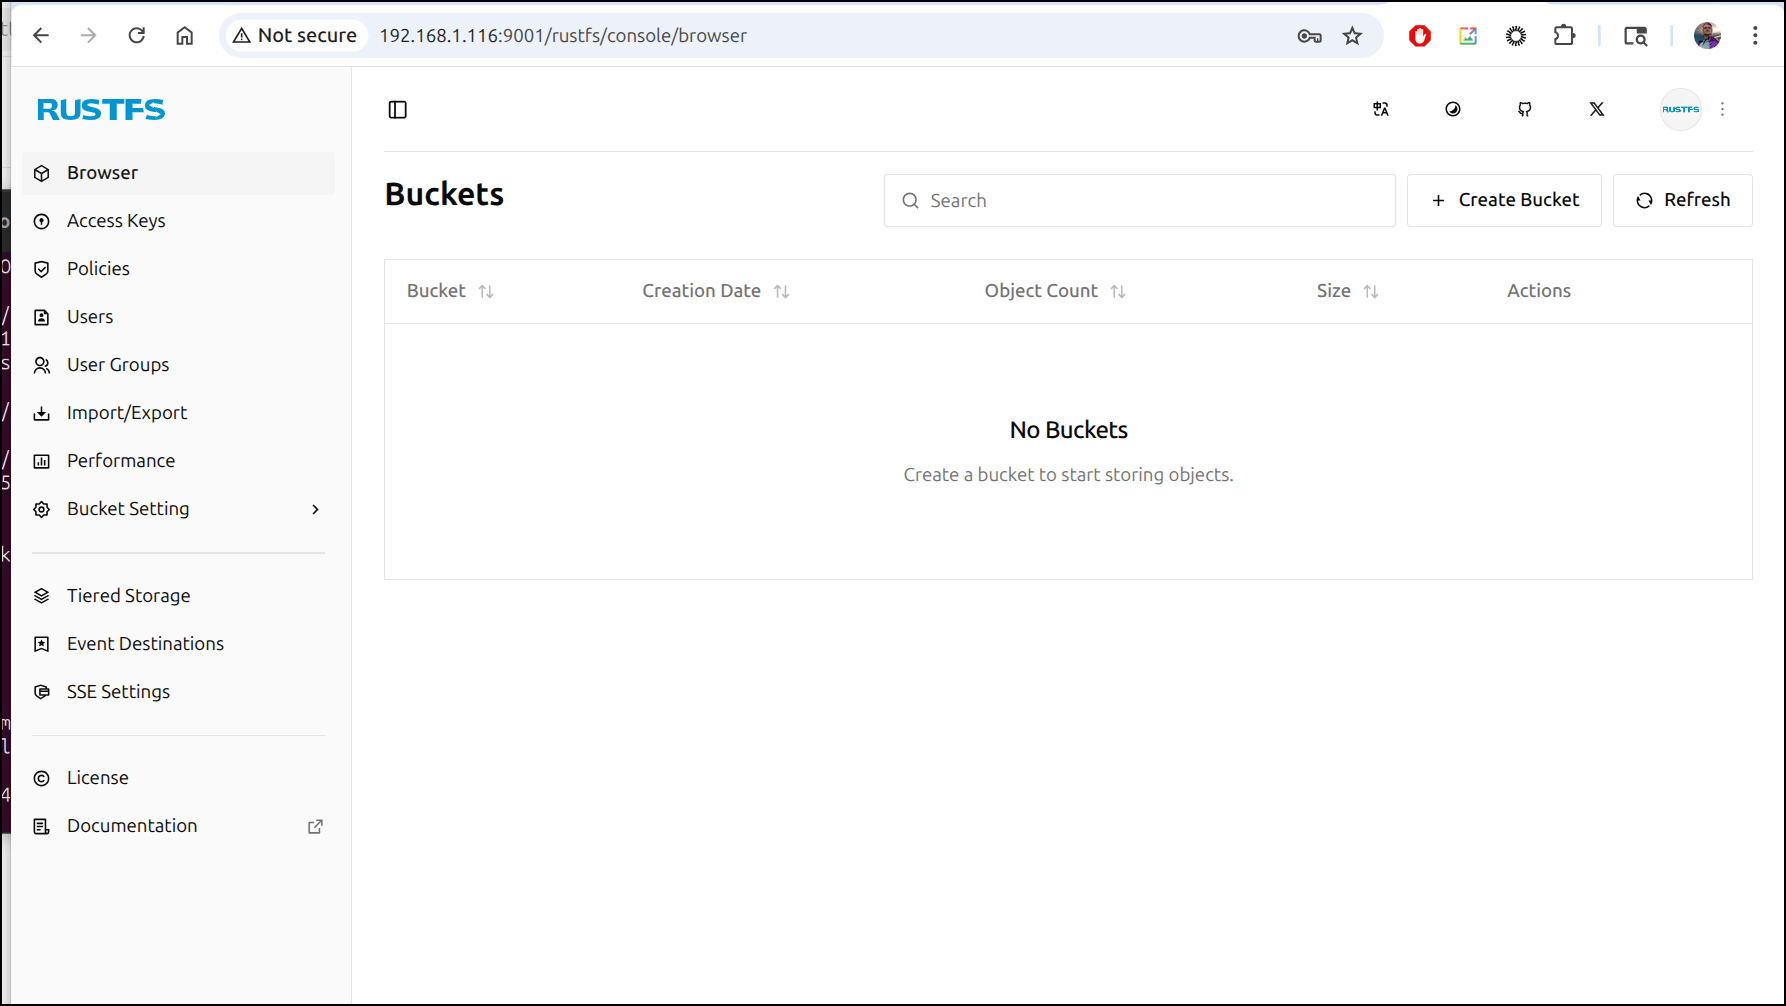
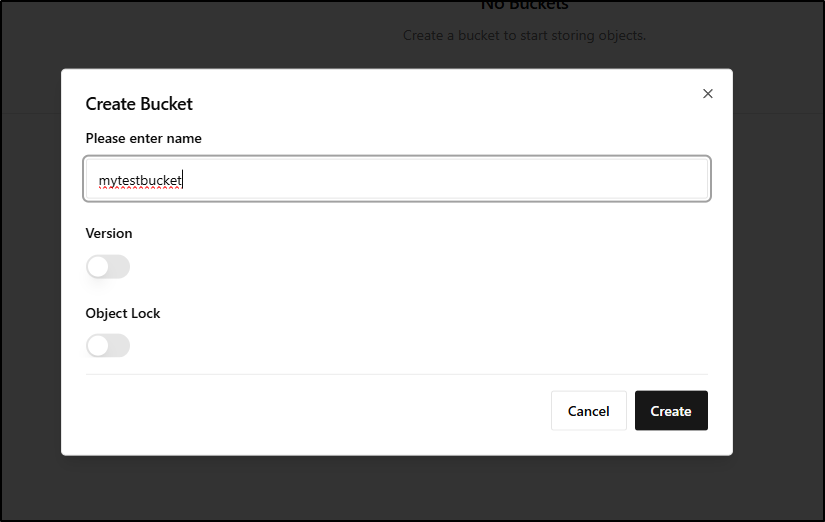
I’ll next create a bucket

We then give it a name and decide if we want Object Locks or versioning enabled
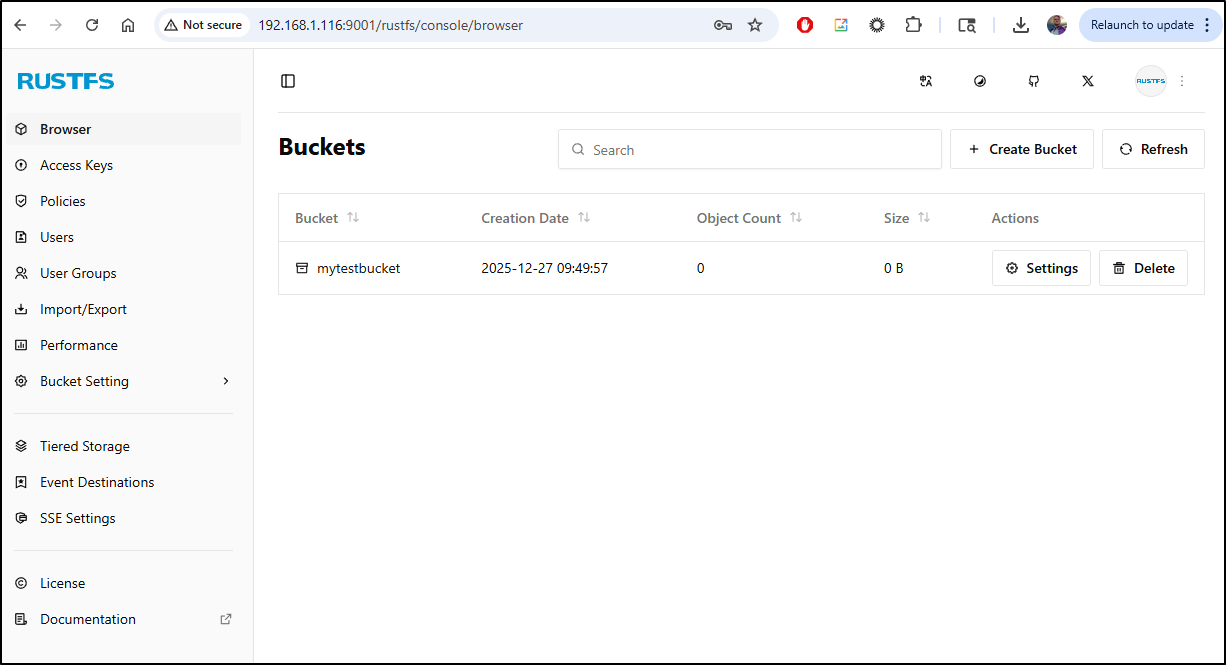
I can now see I have a nice test bucket
I’ll create a password file with my new RustFS credentials we made a moment ago
$ vi ~/.passwdlocal-s3fs
$ chmod 600 ~/.passwdlocal-s3fs
Then a mount point for my bucket
$ sudo mkdir /mnt/mytestbucket
I’ll then add a line
mytestbucket /mnt/mytestbucket fuse.s3fs _netdev,allow_other,passwd_file=/home/builder/.passwdlocal-s3fs,url=http://192.168.1.116:9000,default_acl=public-read,uid=1000,gid=1000 0 0
AWS s3 ls
We can use the AWS CLI to engage with our bucket as well:
I’ll add a block in my ~/.aws/credentials file
[rustfssirnasilot]
aws_access_key_id = asdfsafsadfsadf
aws_secret_access_key = asdfsadfsadfsadfsadfsadfsa
endpoint_url = http://192.168.1.116:9000
Then I can use that profile to list buckets
$ aws s3 ls --profile rustfssirnasilot
2025-12-27 09:49:57 mytestbucket
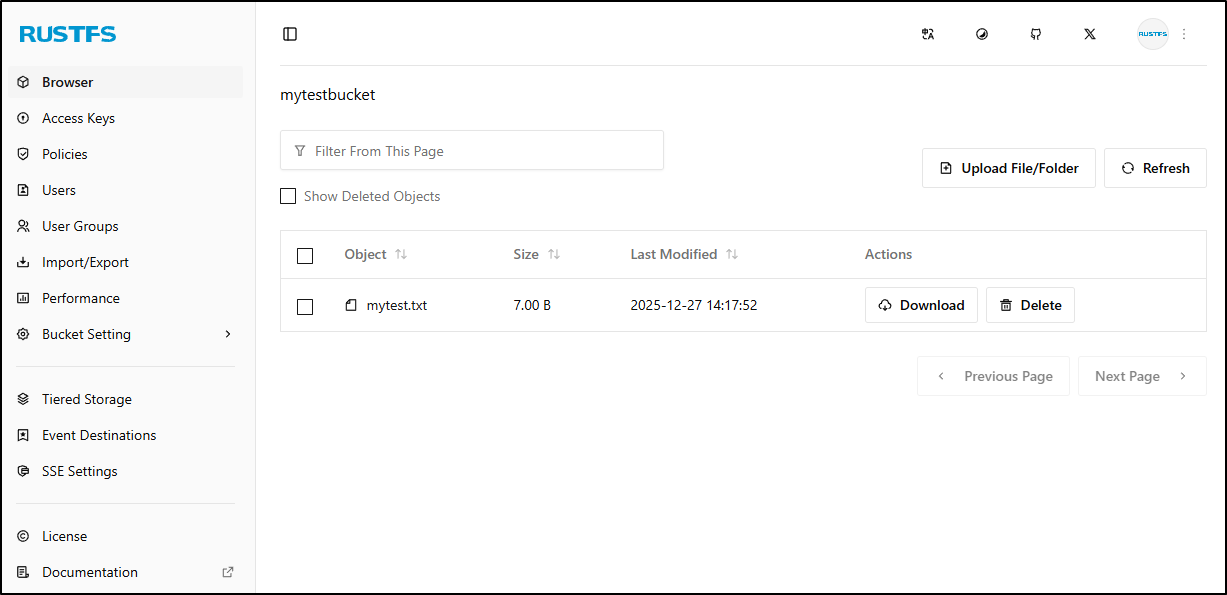
I can now use the same profile to copy a file into the RustFS bucket
$ echo "mytest" > mytest.txt
$ aws s3 cp ./mytest.txt s3://mytestbucket --profile rustfssirnasilot
upload: ./mytest.txt to s3://mytestbucket/mytest.txt
I can see the file in the RustFS bucket browser page
Clicking on the txt file shows details
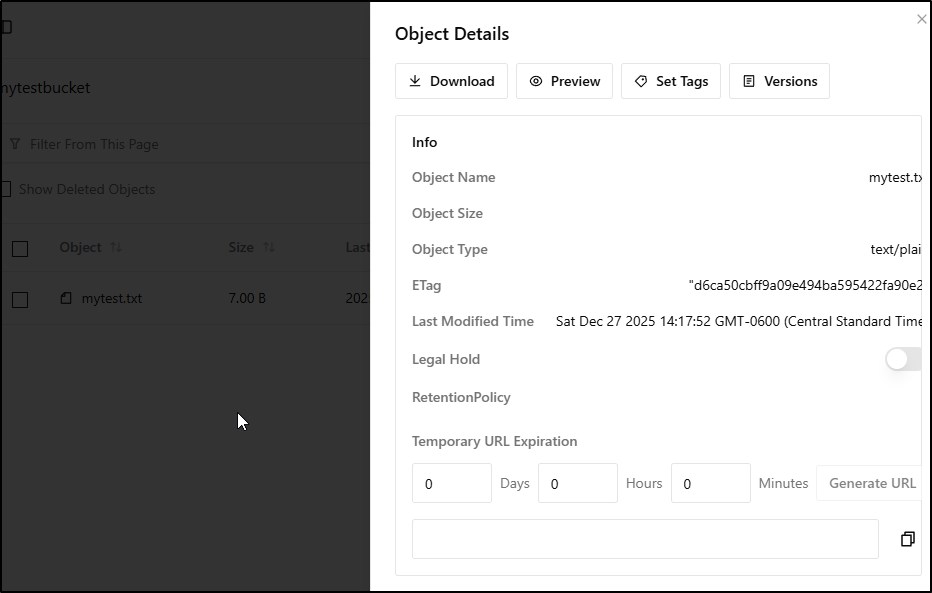
Since RustFS knows it’s just a text file, I can use Preview to see its contents

We can also “Generate URL” to create a temporary time bound URL
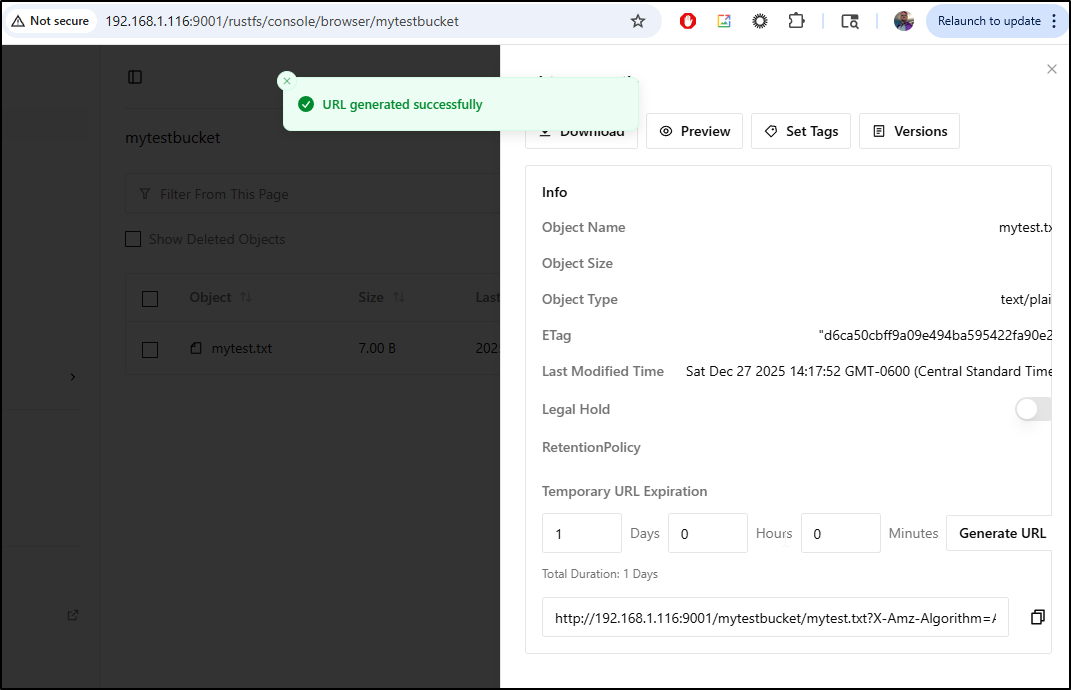
Be aware that this is tied to the URL you logged into (so if you expose RustFS via an ingress, you cannot just change the first part of the URL and have it work).
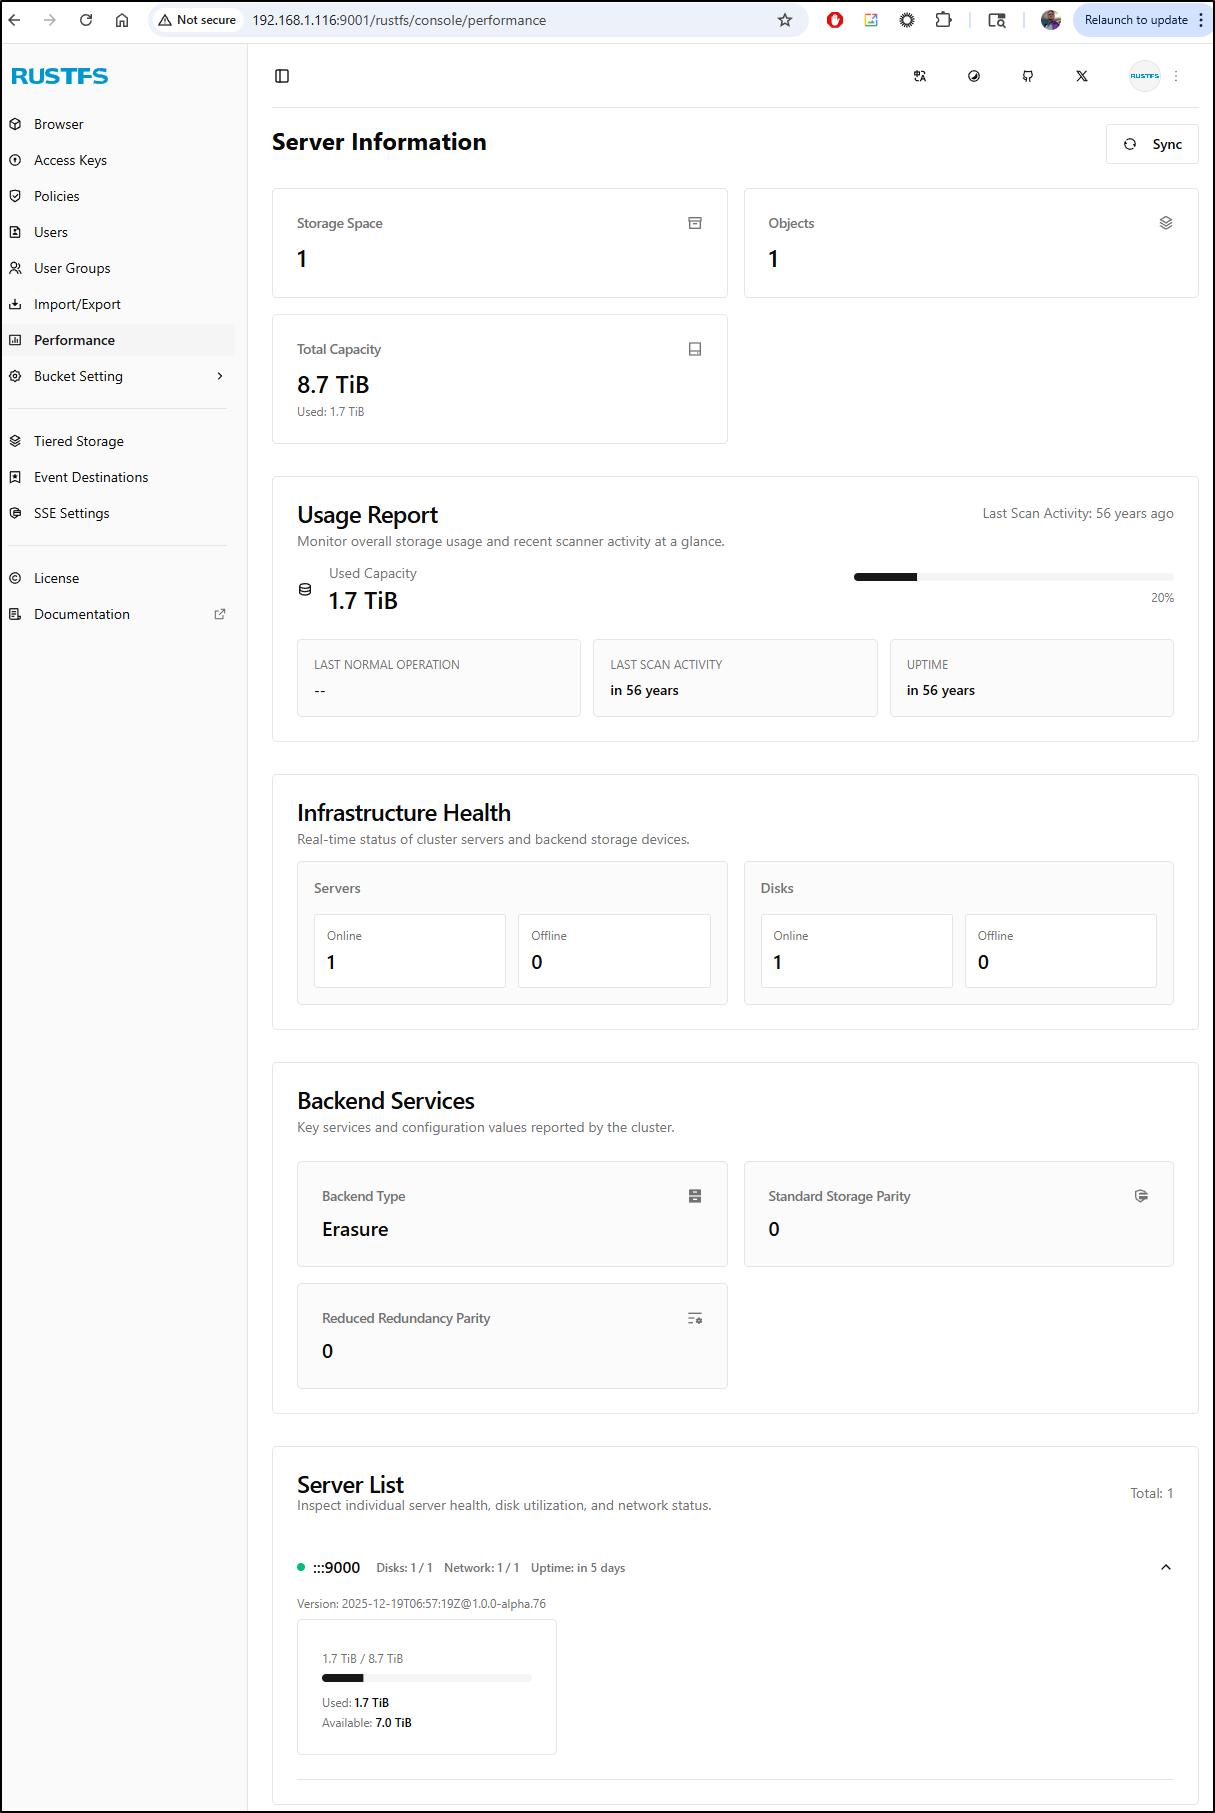
Server information
We can use the “Performance” section to view server stats including used storage and total capacity.
This will show used on the whole volume, not what we actually used in the buckets
Tiered storage
Let’s say we want to archive off old files to cloud storage with a lifecycle policy.
First, we would need to add a Storage tier under “Tiered Storage”
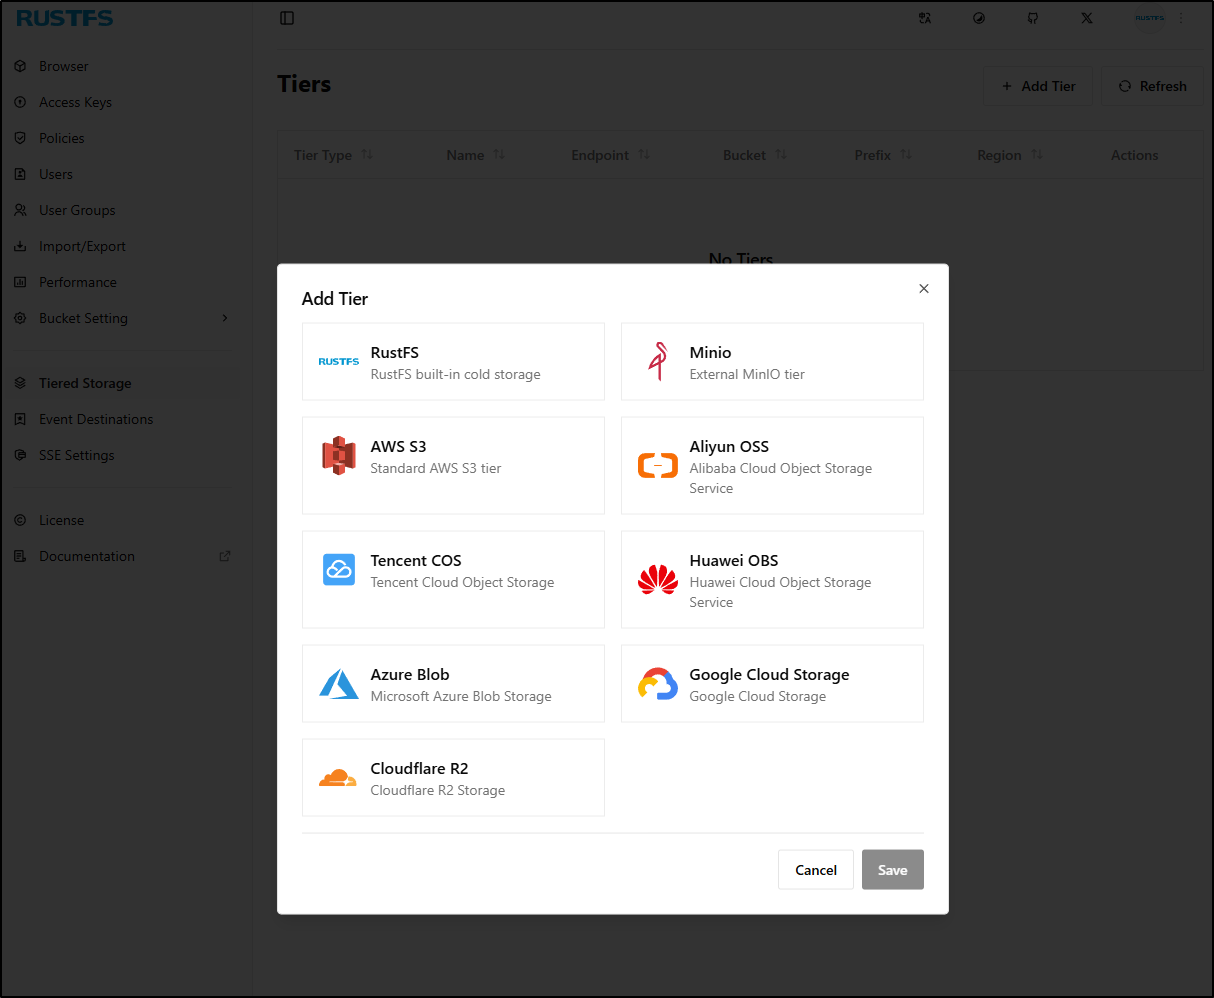
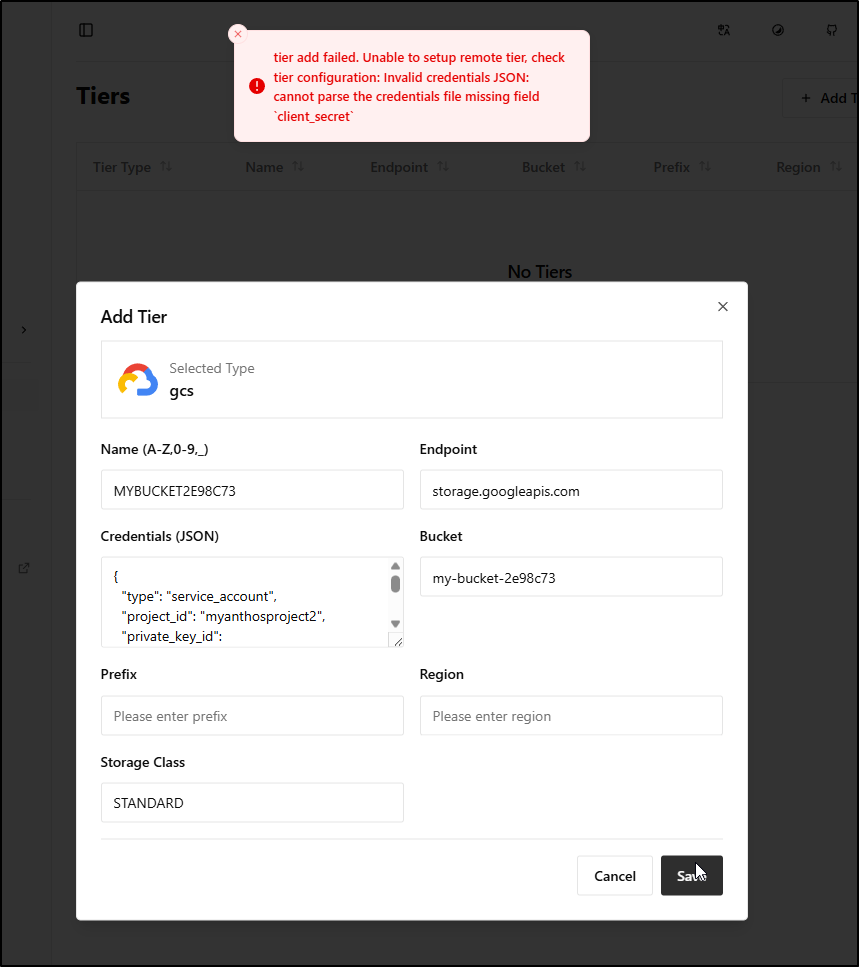
I’ll add a GCP storage bucket using my existing Minio Key, or creating a new one
What is odd is that it rejects the valid SA JSON because it wants a “client_secret” which would really be part of an OAUTH2 flow, not credentials. So I’m a bit stumped on that one
However, i could get AWS to work

I see it listed but have no idea how to use it, and I see no documentation out there (even searched for YouTube videos)
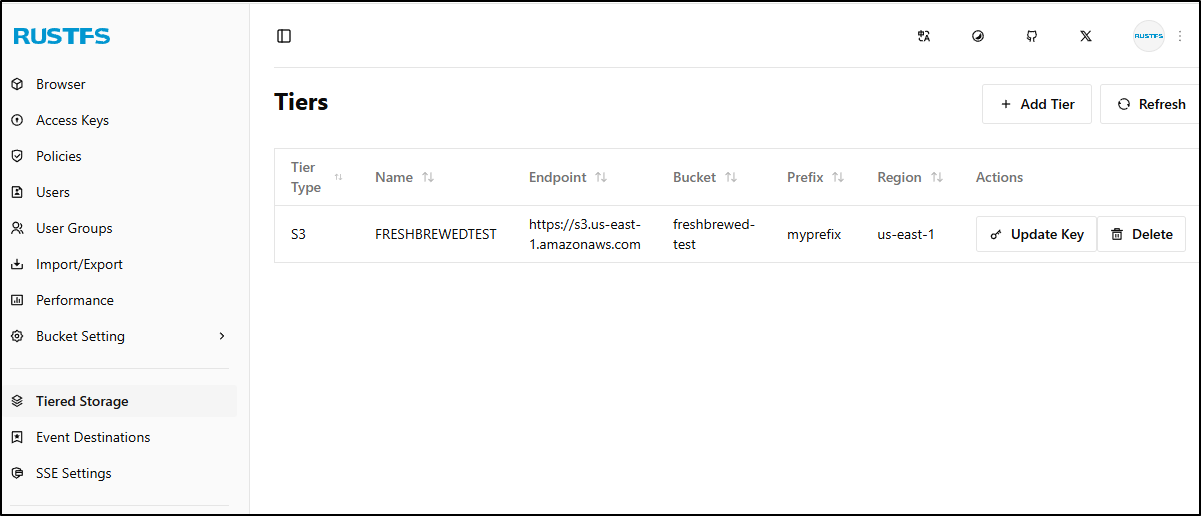
I tried versioned buckets then thought maybe it would key off prefixes but that did nothing
It also doesn’t show up as an S3 endpoint advertised by RustFS
$ aws s3 ls --profile rustfssirnasilot
2025-12-28 08:08:32 bucketwversioning
2025-12-27 09:49:57 mytestbucket
We’ll just have to put a pin in that.
Garage
The other tool I was told might work well is Garage
To start, I’ll pull the latest Docker image on my NAS
ijohnson@sirnasilot:~$ sudo docker pull dxflrs/garage:090dbb412aff0afcbd42183ec12fa62c15bde58b
090dbb412aff0afcbd42183ec12fa62c15bde58b: Pulling from dxflrs/garage
a57ca49060e1: Pull complete
Digest: sha256:3c824d4916bb82d43ef2d447b794e0a62d249cd63eec15899a69032153072022
Status: Downloaded newer image for dxflrs/garage:090dbb412aff0afcbd42183ec12fa62c15bde58b
docker.io/dxflrs/garage:090dbb412aff0afcbd42183ec12fa62c15bde58b
We will now create the basic TOML file. The BASH will add proper tokens inline
cat > garage.toml <<EOF
metadata_dir = "/tmp/meta"
data_dir = "/tmp/data"
db_engine = "sqlite"

replication_factor = 1

rpc_bind_addr = "[::]:3901"
rpc_public_addr = "127.0.0.1:3901"
rpc_secret = "$(openssl rand -hex 32)"

[s3_api]
s3_region = "garage"
api_bind_addr = "[::]:3900"
root_domain = ".s3.garage.localhost"

[s3_web]
bind_addr = "[::]:3902"
root_domain = ".web.garage.localhost"
index = "index.html"

[k2v_api]
api_bind_addr = "[::]:3904"

[admin]
api_bind_addr = "[::]:3903"
admin_token = "$(openssl rand -base64 32)"
metrics_token = "$(openssl rand -base64 32)"
EOF
I’m going to move it to the default dir (though with Docker, it doesnt really matter)
ijohnson@sirnasilot:~$ sudo mv ./garage.toml /etc/garage.toml
Now, let’s fire it up. Luckily it uses different ports than MinIO / RustFS
I want a place for the files so I’ll create the meta and data dirs
ijohnson@sirnasilot:~/garage$ sudo mkdir /volume1/garage
ijohnson@sirnasilot:~/garage$ sudo mkdir /volume1/garage/meta
ijohnson@sirnasilot:~/garage$ sudo mkdir /volume1/garage/data
ijohnson@sirnasilot:~/garage$ sudo chmod 777 /volume1/garage/meta
ijohnson@sirnasilot:~/garage$ sudo chmod 777 /volume1/garage/data
I can now fire it up with
$ sudo docker run \
  -d \
  --name garaged \
  -p 3900:3900 -p 3901:3901 -p 3902:3902 -p 3903:3903 \
  -v /etc/garage.toml:/etc/garage.toml \
  -v /volume1/garage/meta:/var/lib/garage/meta \
  -v /volume1/garage/data:/var/lib/garage/data \
  dxflrs/garage:090dbb412aff0afcbd42183ec12fa62c15bde58b
It launches
$ sudo docker run   -d   --name garaged   -p 3900:3900 -p 3901:3901 -p 3902:3902 -p 3903:3903   -v /etc/garage.toml:/etc/garage.toml   -v /volume1/garage/meta:/var/lib/garage/meta   -v /volume1/garage/data:/var/lib/garage/data   dxflrs/garage:090dbb412aff0afcbd42183ec12fa62c15bde58b
aadc07651440594b11a5d8cf284d07dbc28f66b020e9ee8fc4a138d08f9cdef1
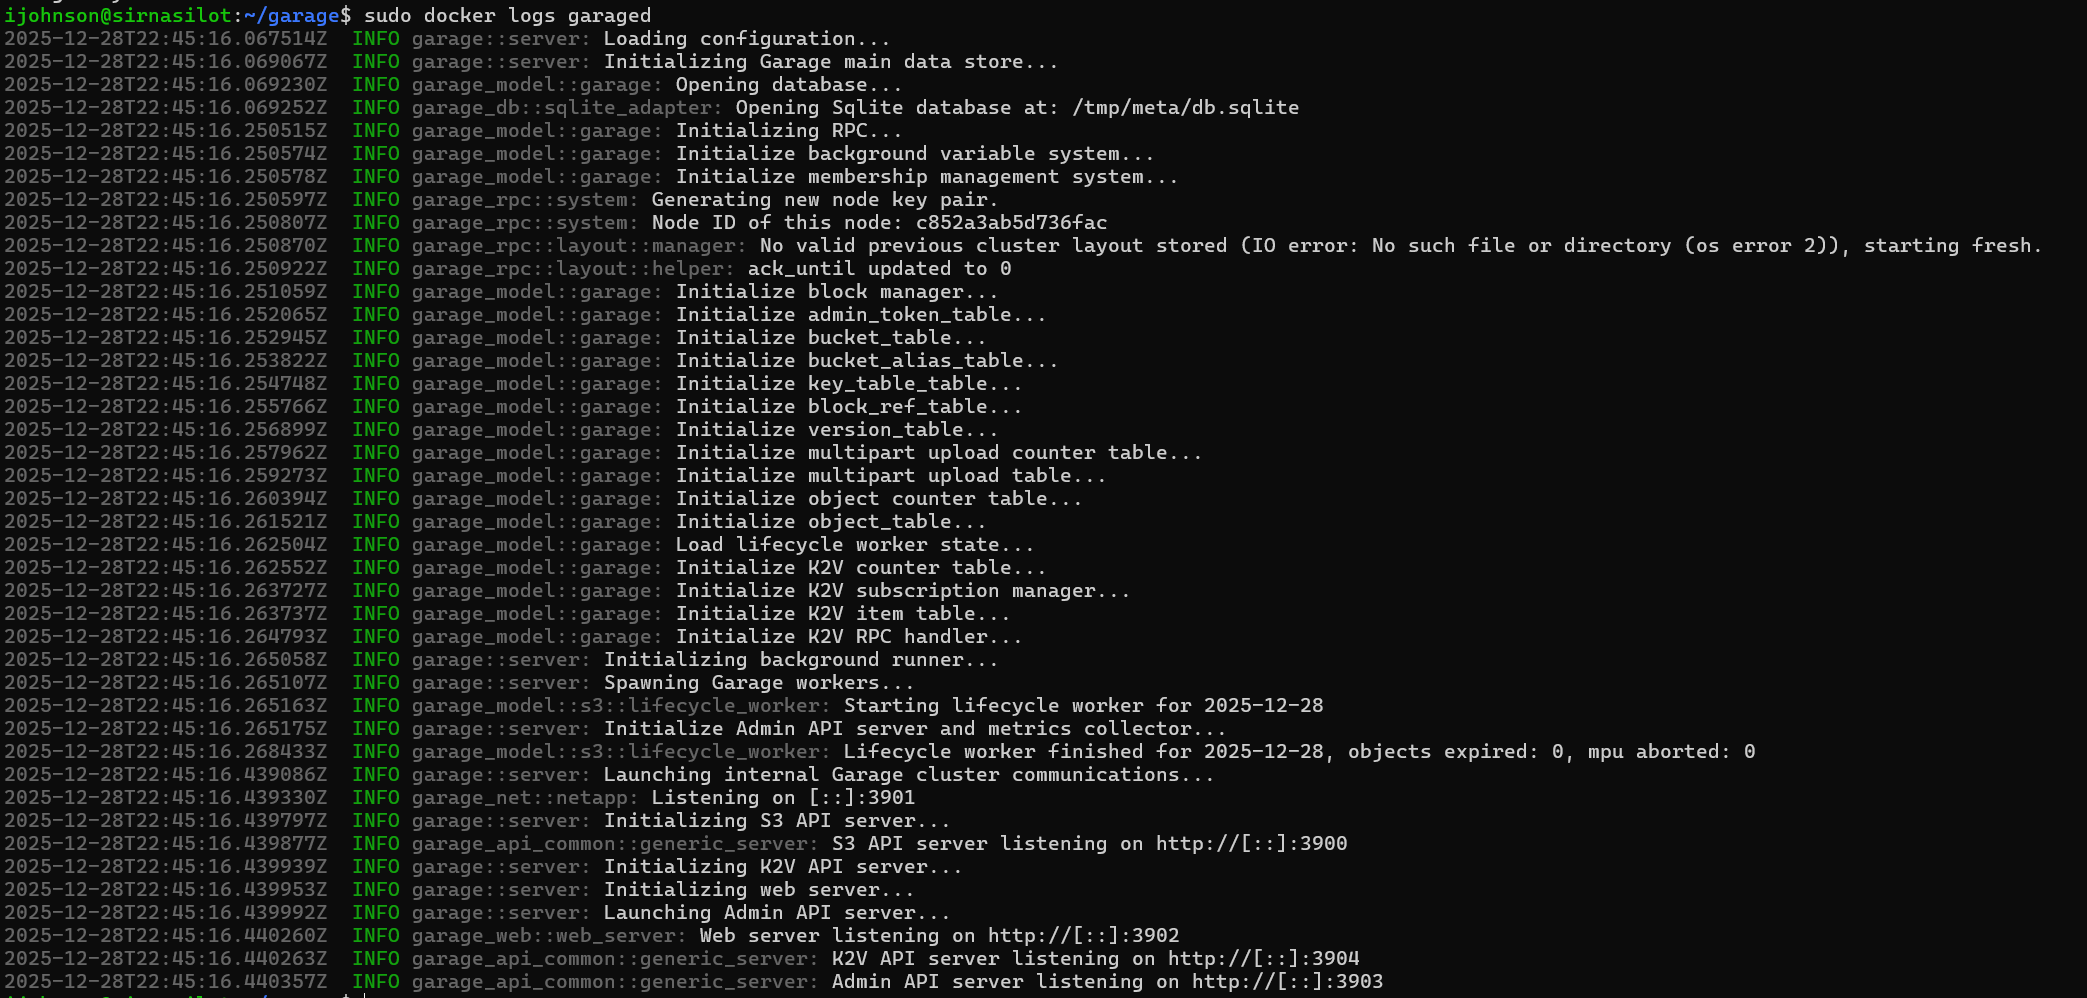
The logs look good
I can also use the garage CLI to check the status
ijohnson@sirnasilot:~/garage$ alias garage="sudo docker exec -ti garaged /garage"
ijohnson@sirnasilot:~/garage$ garage status
2025-12-28T22:47:32.487282Z  INFO garage_net::netapp: Connected to 127.0.0.1:3901, negotiating handshake...
2025-12-28T22:47:32.529291Z  INFO garage_net::netapp: Connection established to c852a3ab5d736fac
==== HEALTHY NODES ====
ID                Hostname      Address         Tags  Zone  Capacity          DataAvail  Version
c852a3ab5d736fac  aadc07651440  127.0.0.1:3901              NO ROLE ASSIGNED             090dbb412aff0afcbd42183ec12fa62c15bde58b
I want to make a new cluster. We use the first 4 characters of the ID from the status above for the Node ID
ijohnson@sirnasilot:~/garage$ garage layout assign -z dc1 -c 1G c852
Password:
2025-12-28T22:52:52.997315Z  INFO garage_net::netapp: Connected to 127.0.0.1:3901, negotiating handshake...
2025-12-28T22:52:53.040028Z  INFO garage_net::netapp: Connection established to c852a3ab5d736fac
Role changes are staged but not yet committed.
Use `garage layout show` to view staged role changes,
and `garage layout apply` to enact staged changes.
That is staged, but not applied. To do that we use layout apply
ijohnson@sirnasilot:~/garage$ garage layout apply --version 1
2025-12-28T22:56:01.688632Z  INFO garage_net::netapp: Connected to 127.0.0.1:3901, negotiating handshake...
2025-12-28T22:56:01.729964Z  INFO garage_net::netapp: Connection established to c852a3ab5d736fac
==== COMPUTATION OF A NEW PARTITION ASSIGNATION ====

Partitions are replicated 1 times on at least 1 distinct zones.

Optimal partition size:                     3.9 MB
Usable capacity / total cluster capacity:   1000.0 MB / 1000.0 MB (100.0 %)
Effective capacity (replication factor 1):  1000.0 MB

dc1                 Tags  Partitions        Capacity   Usable capacity
  c852a3ab5d736fac  []    256 (256 new)     1000.0 MB  1000.0 MB (100.0%)
  TOTAL                   256 (256 unique)  1000.0 MB  1000.0 MB (100.0%)


New cluster layout with updated role assignment has been applied in cluster.
Data will now be moved around between nodes accordingly.
So it is now running, but we have yet to create a bucket.
Bucket creation
Let’s make a “freshbrewed-test” bucket
ijohnson@sirnasilot:~/garage$ garage bucket create freshbucket-test
Password:
2025-12-28T23:04:24.421343Z  INFO garage_net::netapp: Connected to 127.0.0.1:3901, negotiating handshake...
2025-12-28T23:04:24.463241Z  INFO garage_net::netapp: Connection established to c852a3ab5d736fac
==== BUCKET INFORMATION ====
Bucket:          74cf84cbb1476fb2db4e7e5795875966b52cbe40541cbac0183e65e8adf93764
Created:         2025-12-28 23:04:24.464 +00:00

Size:            0 B (0 B)
Objects:         0

Website access:  false

Global alias:    freshbucket-test

==== KEYS FOR THIS BUCKET ====
Permissions  Access key    Local aliases
We now have a bucket but we need an API key to use it
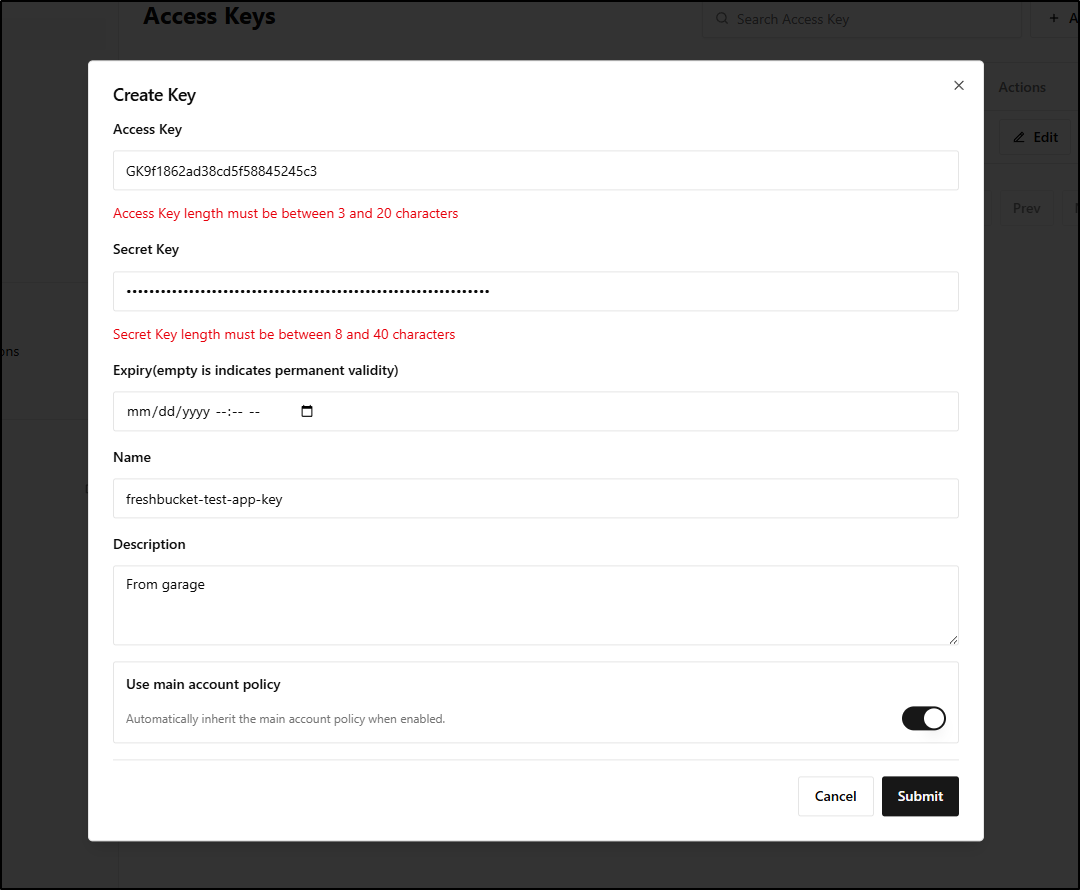
ijohnson@sirnasilot:~/garage$ garage key create freshbucket-test-app-key
2025-12-28T23:07:13.703967Z  INFO garage_net::netapp: Connected to 127.0.0.1:3901, negotiating handshake...
2025-12-28T23:07:13.746375Z  INFO garage_net::netapp: Connection established to c852a3ab5d736fac
==== ACCESS KEY INFORMATION ====
Key ID:              GK9f1862ad38cd5f58845245c3
Key name:            freshbucket-test-app-key
Secret key:          6f7ce12341234123412341234123412341234205
Created:             2025-12-28 23:07:13.747 +00:00
Validity:            valid
Expiration:          never

Can create buckets:  false

==== BUCKETS FOR THIS KEY ====
Permissions  ID  Global aliases  Local aliases
I can now confirm my keys and get info
ijohnson@sirnasilot:~/garage$ garage key list
2025-12-28T23:07:30.932101Z  INFO garage_net::netapp: Connected to 127.0.0.1:3901, negotiating handshake...
2025-12-28T23:07:30.975351Z  INFO garage_net::netapp: Connection established to c852a3ab5d736fac
ID                          Created     Name                      Expiration
GK9f1862ad38cd5f58845245c3  2025-12-28  freshbucket-test-app-key  never
ijohnson@sirnasilot:~/garage$ garage key info freshbucket-test-app-key
2025-12-28T23:08:23.217442Z  INFO garage_net::netapp: Connected to 127.0.0.1:3901, negotiating handshake...
2025-12-28T23:08:23.259246Z  INFO garage_net::netapp: Connection established to c852a3ab5d736fac
==== ACCESS KEY INFORMATION ====
Key ID:              GK9f1862ad38cd5f58845245c3
Key name:            freshbucket-test-app-key
Secret key:          (redacted)
Created:             2025-12-28 23:07:13.747 +00:00
Validity:            valid
Expiration:          never

Can create buckets:  false

==== BUCKETS FOR THIS KEY ====
Permissions  ID  Global aliases  Local aliases
We have a key but by default it has no access to anything. This is in stark contrast to RustFS which has the default behavior of all access.
So let’s give RWO permissions to the test bucket for this key:
ijohnson@sirnasilot:~/garage$ garage bucket allow --read --write --owner freshbucket-test --key freshbucket-test-app-key
2025-12-28T23:10:51.331262Z  INFO garage_net::netapp: Connected to 127.0.0.1:3901, negotiating handshake...
2025-12-28T23:10:51.374229Z  INFO garage_net::netapp: Connection established to c852a3ab5d736fac
==== BUCKET INFORMATION ====
Bucket:          74cf84cbb1476fb2db4e7e5795875966b52cbe40541cbac0183e65e8adf93764
Created:         2025-12-28 23:04:24.464 +00:00

Size:            0 B (0 B)
Objects:         0

Website access:  false

Global alias:    freshbucket-test

==== KEYS FOR THIS BUCKET ====
Permissions  Access key                                            Local aliases
RWO          GK9f1862ad38cd5f58845245c3  freshbucket-test-app-key
Testing
Let’s create an entry in the AWS CLI credentials file
builder@DESKTOP-QADGF36:~/Workspaces/jekyll-blog$ vi ~/.aws/credentials
builder@DESKTOP-QADGF36:~/Workspaces/jekyll-blog$ cat ~/.aws/credentials | tail -n5
[garagesirnasilot]
aws_access_key_id = GK9f1862ad38cd5f58845245c3
aws_secret_access_key = 6f7ce12341234123412341234123412341234205
region = garage
endpoint_url = http://192.168.1.116:3900
I can now list buckets
$ aws s3 ls --profile garagesirnasilot
2025-12-28 17:04:24 freshbucket-test
We can now copy a file out to garage using the AWS CLI
builder@DESKTOP-QADGF36:~/Workspaces/jekyll-blog$ cat mytest.txt
mytest
builder@DESKTOP-QADGF36:~/Workspaces/jekyll-blog$ aws s3 cp ./mytest.txt s3://freshbucket-test/ --profile garagesirnasilot
upload: ./mytest.txt to s3://freshbucket-test/mytest.txt
builder@DESKTOP-QADGF36:~/Workspaces/jekyll-blog$ aws s3 ls s3://freshbucket-test/ --profile garagesirnasilot
2025-12-28 17:17:04          7 mytest.txt
There should be a web interface (we did configure it in the TOML), but I am now seeing a 404 there

Garage WebUI
I wanted to try this other WebUI that might work
ijohnson@sirnasilot:~$ sudo docker run -d -p 3909:3909 -v /etc/garage.toml:/etc/garage.toml:ro --restart unless-stopped --name garage-webui khairul169/garage-webui:latest
Password:
Unable to find image 'khairul169/garage-webui:latest' locally
latest: Pulling from khairul169/garage-webui
a8609d17a802: Pull complete
56c4d2823bde: Pull complete
db7588c41e4a: Pull complete
Digest: sha256:17c793551873155065bf9a022dabcde874de808a1f26e648d4b82e168806439c
Status: Downloaded newer image for khairul169/garage-webui:latest
37ccaf29ea4ee9b38f89b837df1047e7d6c1761e82231e9a9e034273773e69d0
That shows a nice Dashboard
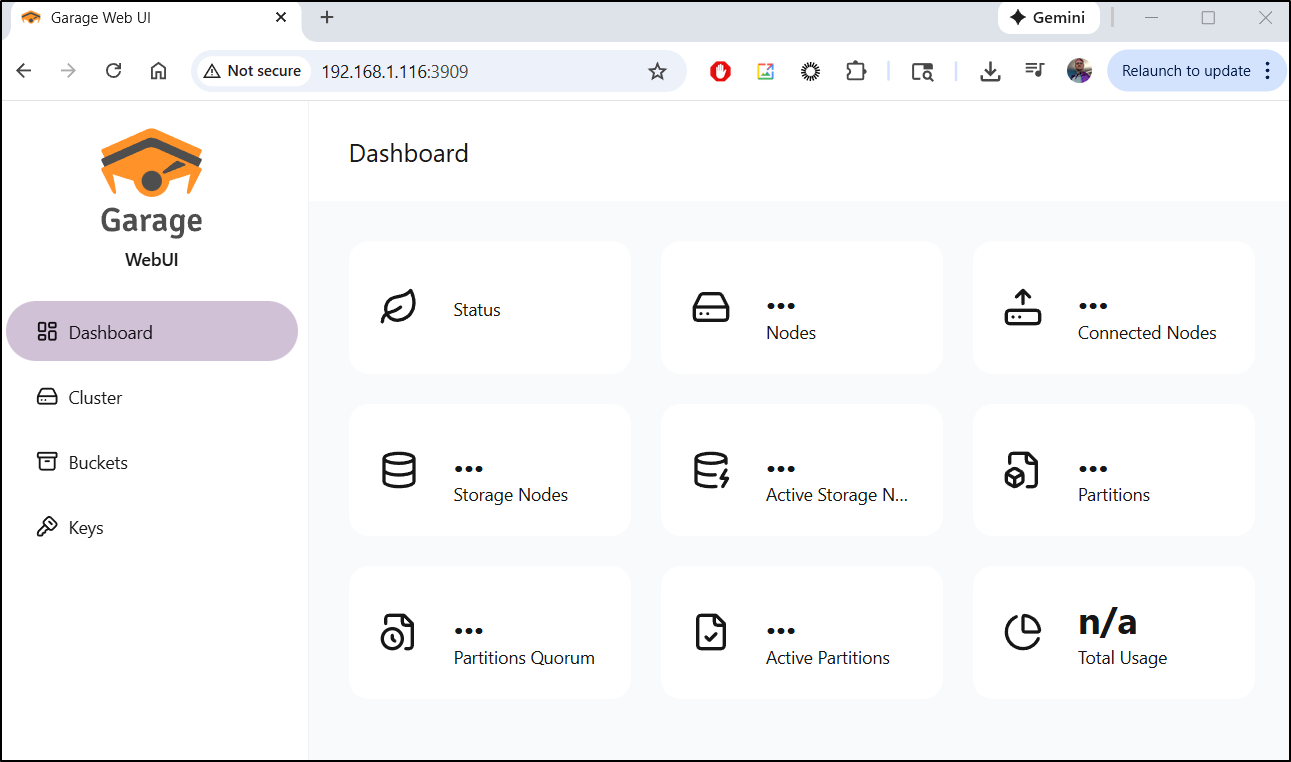
But does not actually work, at least for me.
I just get errors adding the NodeID
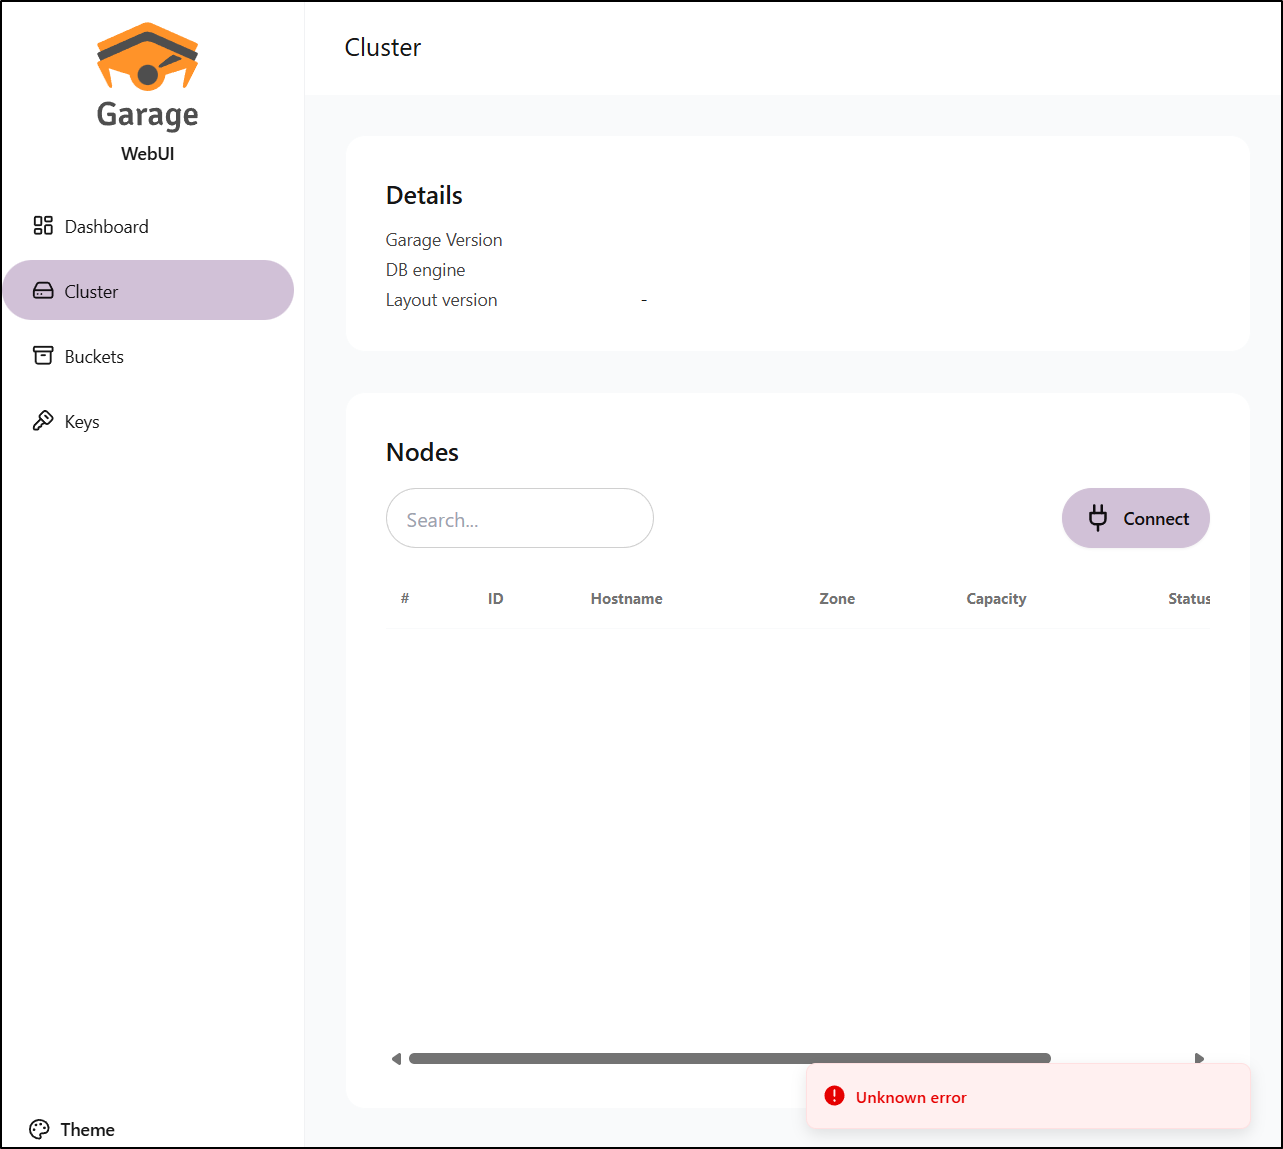
I’ll stop and remove for now
ijohnson@sirnasilot:~$ sudo docker stop garage-webui
garage-webui
ijohnson@sirnasilot:~$ sudo docker rm garage-webui
garage-webui
Usage in Kubernetes
Perhaps the most common way I would think to use these is in Kubernetes as a Storage Class to back new PVCs.
Let’s start by installing the mountpoint s3 csi driver
$ helm repo add aws-mountpoint-s3-csi-driver https://awslabs.github.io/mountpoint-s3-csi-driver
"aws-mountpoint-s3-csi-driver" has been added to your repositories

$ helm repo update
Hang tight while we grab the latest from your chart repositories...
Next, let’s create the secrets used to access either RustFS or Garage.
I’ll start with RustFS.
I tried two suggested ways for creating a key
$ kubectl -n default create secret generic rustfs-credentials \
  --from-literal=accessKeyID='gnORoN381YdZvPETWmua' \
  --from-literal=secretAccessKey='UIP567856785678567856785678567856785678Kws'
secret/rustfs-credentials created

# Try other way
$ kubectl -n default create secret generic rustfs-credentials2 \
  --from-literal=AWS_ACCESS_KEY_ID='gnORoN381YdZvPETWmua' \
  --from-literal=AWS_SECRET_ACCESS_KEY='UIP567856785678567856785678567856785678Kws'
secret/rustfs-credentials2 created
But in the end, the proper way was to use:
apiVersion: v1
kind: Secret
metadata:
  name: rustfs-secret4
  namespace: kube-system
type: Opaque
stringData:
  aws_access_key_id: "gnORoN381YdZvPETWmua"
  aws_secret_access_key: "UIP567856785678567856785678567856785678Kws"
  # Credentials endpoint for non-AWS S3 compatible services
  credentials_file_source: "/mnt/credentials"
Next, I’m just going to check if we have the CSI driver already installed (most likely not)
$ kubectl get csidrivers
No resources found
So I’ll add it with helm
$ helm upgrade --install aws-mountpoint-s3-csi-driver \
   --namespace kube-system \
   aws-mountpoint-s3-csi-driver/aws-mountpoint-s3-csi-driver
Release "aws-mountpoint-s3-csi-driver" does not exist. Installing it now.
NAME: aws-mountpoint-s3-csi-driver
LAST DEPLOYED: Mon Dec 29 08:52:24 2025
NAMESPACE: kube-system
STATUS: deployed
REVISION: 1
TEST SUITE: None
NOTES:
Thank you for using Mountpoint for Amazon S3 CSI Driver v2.2.2.

Learn more about the file system operations Mountpoint supports: https://github.com/awslabs/mountpoint-s3/blob/main/doc/SEMANTICS.md
now I can see a response to kubectl get csidrivers

Update: later, in debugging, I found that I needed to set some S3 Credentials in the kube-system namespace where the mount pods could see them, e.g.
apiVersion: v1
kind: Secret
metadata:
  name: rustfs-secret4
  namespace: kube-system
type: Opaque
stringData:
  aws_access_key_id: "gnORoN381YdZvPETWmua"
  aws_secret_access_key: "UIP567856785678567856785678567856785678Kws"
  # Credentials endpoint for non-AWS S3 compatible services
  credentials_file_source: "/mnt/credentials"
The upgrade Helm to use the local secret:
$ helm upgrade aws-mountpoint-s3-csi-driver \
>   --namespace kube-system \
>   --set awsAccessSecret.name=rustfs-secret4 \
>   --set awsAccessSecret.keyId=aws_access_key_id \
>   --set awsAccessSecret.accessKey=aws_secret_access_key \
>   aws-mountpoint-s3-csi-driver/aws-mountpoint-s3-csi-driver
Release "aws-mountpoint-s3-csi-driver" has been upgraded. Happy Helming!
NAME: aws-mountpoint-s3-csi-driver
LAST DEPLOYED: Tue Dec 30 09:49:56 2025
NAMESPACE: kube-system
STATUS: deployed
REVISION: 2
TEST SUITE: None
NOTES:
Thank you for using Mountpoint for Amazon S3 CSI Driver v2.2.2.

Learn more about the file system operations Mountpoint supports: https://github.com/awslabs/mountpoint-s3/blob/main/doc/SEMANTICS.md

While the CSI driver has been upgraded, existing Mountpoint Pods remain unchanged to avoid disrupting your active workloads. New Mountpoint Pods with the updated version are created only when workload pods are started or restarted. You can view which pods exist created by older V2 versions of the CSI driver using `kubectl get pods -n mount-s3 --label-columns="s3.csi.aws.com/mounted-by-csi-driver-version"`.
So now the values look as such:
$ helm get values aws-mountpoint-s3-csi-driver -n kube-system
USER-SUPPLIED VALUES:
awsAccessSecret:
  accessKey: aws_secret_access_key
  keyId: aws_access_key_id
  name: rustfs-secret4
Next, I create a storageClass that will tie to a bucket
apiVersion: storage.k8s.io/v1
kind: StorageClass
metadata:
  name: s3-rustfs
provisioner: s3.csi.aws.com          # replace with the value from `kubectl get csidrivers` if different
parameters:
  bucketName: "mytestbucket"                    # optional: leave empty to let PVC request create objects; or set a fixed bucket
  region: "us-east-1"               # your region string
  endpoint: "http://192.168.1.116:9000"
  forcePathStyle: "true"            # required for MinIO path-style addressing
  signatureVersion: "v4"
  secretName: "rustfs-credentials"   # must match secret created above
  secretNamespace: "default"
reclaimPolicy: Delete
allowVolumeExpansion: true
mountOptions:
  - allow_other
volumeBindingMode: Immediate
I can now apply that
$ cat ./storageClassRustFS.yaml
apiVersion: storage.k8s.io/v1
kind: StorageClass
metadata:
  name: s3-rustfs
provisioner: s3.csi.aws.com
parameters:
  bucketName: "mytestbucket"
  region: "us-east-1"
  endpoint: "http://192.168.1.116:9000"
  forcePathStyle: "true"
  signatureVersion: "v4"
  secretName: "rustfs-credentials"
  secretNamespace: "default"
reclaimPolicy: Delete
allowVolumeExpansion: true
mountOptions:
  - allow_other
volumeBindingMode: Immediate
$ kubectl apply -f ./storageClassRustFS.yaml
storageclass.storage.k8s.io/s3-rustfs created
It should now show up when we query our storage classes with kubectl get sc

Testing RustFS
In this first pass, we won’t actually use the storageClass, rather use the CSI directly
I’m going to need 4 things: A secret, a Persistent Volume, a Persistent Volume Claim that uses it, and lastly a Pod that then uses the PVC.
$ cat ./rustfs-secret4.yaml
apiVersion: v1
kind: Secret
metadata:
  name: rustfs-secret4
  namespace: default
type: Opaque
stringData:
  aws_access_key_id: "gnORoN381YdZvPETWmua"
  aws_secret_access_key: "UIP567856785678567856785678567856785678Kws"
  # Credentials endpoint for non-AWS S3 compatible services
  credentials_file_source: "/mnt/credentials"


$ cat ./pv-4.yaml
apiVersion: v1
kind: PersistentVolume
metadata:
  name: s3-rustfs-pv4
spec:
  capacity:
    storage: 1Gi
  accessModes:
    - ReadWriteMany
  mountOptions:
    - --allow-other
    - --debug
    - --endpoint-url=http://192.168.1.116:9000
    - --region=us-east-1
    - --force-path-style
  csi:
    driver: s3.csi.aws.com
    volumeHandle: s3-rustfs-pv4
    volumeAttributes:
      bucketName: "mytestbucket"

$ cat ./pvc-4.yaml
apiVersion: v1
kind: PersistentVolumeClaim
metadata:
  name: s3-rustfs-pvc4
spec:
  accessModes:
    - ReadWriteMany
  resources:
    requests:
      storage: 1Gi
  volumeName: s3-rustfs-pv4  # Matches the name of your Available PV
  storageClassName: ""       # This must be empty if the PV has no storageClassName

$ cat ./rustfs1-pod4.yaml
apiVersion: v1
kind: Pod
metadata:
  name: s3-rustfs4-test
spec:
  containers:
  - name: app
    image: busybox
    command: ["/bin/sh","-c","while true; do sleep 3600; done"]
    volumeMounts:
    - name: s3vol
      mountPath: /mnt/s3
  volumes:
  - name: s3vol
    persistentVolumeClaim:
      claimName: s3-rustfs-pvc4
Since this particular part took me a while, I did a lot of “delete it all and recreate” steps, so I ran:
$ kubectl delete -f ./rustfs1-pod4.yaml && kubectl delete -f ./pvc-4.yaml && kubectl delete -f ./pv-4.yaml && kubectl delete -f ./rustfs-secret4.yaml && sleep 5 && kubectl apply -f ./rustfs-secret4.yaml && kubectl apply -f ./pv-4.yaml && kubectl apply -f ./pvc-4.yaml  && kubectl apply -f ./rustfs1-pod4.yaml && echo "done"
pod "s3-rustfs4-test" deleted

persistentvolumeclaim "s3-rustfs-pvc4" deleted
persistentvolume "s3-rustfs-pv4" deleted
secret "rustfs-secret4" deleted
secret/rustfs-secret4 created
persistentvolume/s3-rustfs-pv4 created
persistentvolumeclaim/s3-rustfs-pvc4 created
pod/s3-rustfs4-test created
done
I’ll now check the PV, PVC and Pod:
$ kubectl get pv s3-rustfs-pv4 && echo && kubectl get pvc s3-rustfs-pvc4 && echo && kubectl get po s3-rustfs4-test && echo && kubectl describe po s3-rustfs4-test | tail -n 10
NAME            CAPACITY   ACCESS MODES   RECLAIM POLICY   STATUS   CLAIM                    STORAGECLASS   VOLUMEATTRIBUTESCLASS   REASON   AGE
s3-rustfs-pv4   1Gi        RWX            Retain           Bound    default/s3-rustfs-pvc4                  <unset>                          15s

NAME             STATUS   VOLUME          CAPACITY   ACCESS MODES   STORAGECLASS   VOLUMEATTRIBUTESCLASS   AGE
s3-rustfs-pvc4   Bound    s3-rustfs-pv4   1Gi        RWX                           <unset>                 16s

NAME              READY   STATUS    RESTARTS   AGE
s3-rustfs4-test   1/1     Running   0          16s

                             node.kubernetes.io/unreachable:NoExecute op=Exists for 300s
Events:
  Type     Reason            Age   From               Message
  ----     ------            ----  ----               -------
  Warning  FailedScheduling  15s   default-scheduler  0/3 nodes are available: pod has unbound immediate PersistentVolumeClaims. preemption: 0/3 nodes are available: 3 Preemption is not helpful for scheduling.
  Normal   Scheduled         13s   default-scheduler  Successfully assigned default/s3-rustfs4-test to isaac-macbookpro
  Normal   Pulling           6s    kubelet            Pulling image "busybox"
  Normal   Pulled            4s    kubelet            Successfully pulled image "busybox" in 2.584s (2.584s including waiting). Image size: 2224358 bytes.
  Normal   Created           3s    kubelet            Created container: app
  Normal   Started           3s    kubelet            Started container app
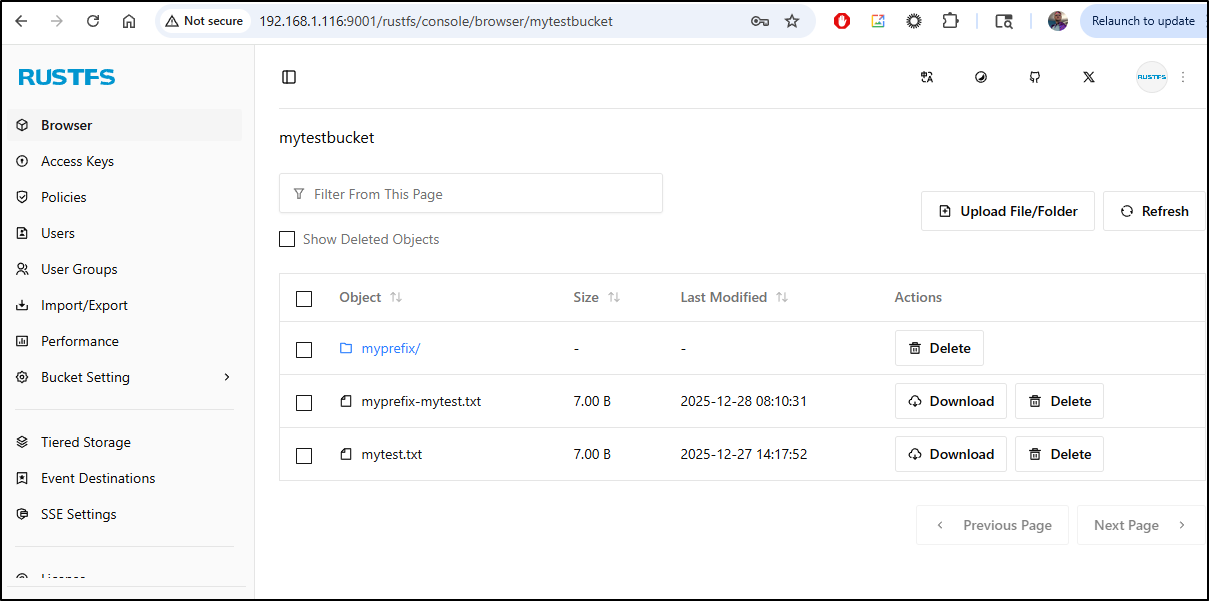
Let’s hop into the pod and check that we can see the S3 files
builder@DESKTOP-QADGF36:~/Workspaces/rustFSGarage$ kubectl exec -it s3-rustfs4-test -- /bin/sh
/ # ls /mnt/s3/
myprefix             myprefix-mytest.txt  mytest.txt
Now lets test adding a file
/ # echo "hello" > /mnt/s3/testing.txt
/ # ls /mnt/s3/
myprefix             myprefix-mytest.txt  mytest.txt           testing.txt
I can now see it in the bucket

Testing garage
Again, I tried using the Storage class
apiVersion: storage.k8s.io/v1
kind: StorageClass
metadata:
  name: s3-garage
provisioner: s3.csi.aws.com          # replace with the value from `kubectl get csidrivers` if different
parameters:
  bucketName: "freshbucket-test"                # optional: leave empty to let PVC request create objects; or set a fixed bucket
  region: "garage"               # your region string
  endpoint: "http://192.168.1.116:3900"
  forcePathStyle: "true"            # required for MinIO path-style addressing
  signatureVersion: "v4"
  secretName: "garage-credentials"   # must match secret created above
  secretNamespace: "kube-system"
reclaimPolicy: Delete
allowVolumeExpansion: true
mountOptions:
  - allow_other
volumeBindingMode: Immediate
But the PVC just stays pending with the note “Waiting for a volume to be created either by the external provisioner ‘s3.csi.aws.com’ or manually by the system administrator. If volume creation is delayed, please verify that the provisioner is running and correctly registered.”
I could, of course, follow the RustFS guide which would work, but then break the CSI mounts to the RustFS instance since we expose our Secret ID to the CSI pods.
I then had an idea - while I cannot set keys in Garage
ijohnson@sirnasilot:~$ garage key create --help
garage-key-create 090dbb412aff0afcbd42183ec12fa62c15bde58b
Create new key

USAGE:
    garage key create [OPTIONS] [name]

FLAGS:
    -h, --help       Prints help information
    -V, --version    Prints version information

OPTIONS:
        --expires-in <expires-in>    Set an expiration time for the access key (see docs.rs/parse_duration for date
                                     format)

ARGS:
    <name>    Name of the key [default: Unnamed key]
Maybe I could use the Garage key in RustFS. Unfortunately, they have different size requirements.
Let’s break RustFS just to see garage work…
I’ll create a new Garage key in Kube-system for the CSI pods:
$ cat ./garage-kubesystem-key.yaml
apiVersion: v1
kind: Secret
metadata:
  name: garage-secret
  namespace: kube-system
type: Opaque
stringData:
  aws_access_key_id: "GK9f1862ad38cd5f58845245c3"
  aws_secret_access_key: "6f7ce12341234123412341234123412341234205"
  # Credentials endpoint for non-AWS S3 compatible services
  credentials_file_source: "/mnt/credentials"

$ kubectl apply -f ./garage-kubesystem-key.yaml
secret/garage-secret created
I’ll now set some Helm value we can use in the CSI pods
$ cat helm-values.yaml
awsAccessSecret:
  accessKey: aws_secret_access_key
  keyId: aws_access_key_id
  name: garage-secret
$ diff helm-values.yaml helm-values.yaml.bak
4c4
<   name: garage-secret
---
>   name: rustfs-secret4
Then upgrade to use it
$ helm upgrade -f ./helm-values.yaml aws-mountpoint-s3-csi-driver -n kube-system aws-mountpoint-s3-csi-driver/aws-mountpoint-s3-csi-driver
Release "aws-mountpoint-s3-csi-driver" has been upgraded. Happy Helming!
NAME: aws-mountpoint-s3-csi-driver
LAST DEPLOYED: Wed Dec 31 09:26:19 2025
NAMESPACE: kube-system
STATUS: deployed
REVISION: 3
TEST SUITE: None
NOTES:
Thank you for using Mountpoint for Amazon S3 CSI Driver v2.2.2.

Learn more about the file system operations Mountpoint supports: https://github.com/awslabs/mountpoint-s3/blob/main/doc/SEMANTICS.md

While the CSI driver has been upgraded, existing Mountpoint Pods remain unchanged to avoid disrupting your active workloads. New Mountpoint Pods with the updated version are created only when workload pods are started or restarted. You can view which pods exist created by older V2 versions of the CSI driver using `kubectl get pods -n mount-s3 --label-columns="s3.csi.aws.com/mounted-by-csi-driver-version"`.
Once I saw the pods rotated, I could move on
$ kubectl get po -n kube-system | grep csi
s3-csi-controller-6df4cfb4f-ht26d           1/1     Running             0              23h
s3-csi-node-225gj                           0/3     ContainerCreating   0              4s
s3-csi-node-c4zps                           3/3     Running             0              22h
s3-csi-node-t9hqc                           3/3     Running             0              13s
$ kubectl get po -n kube-system | grep csi
s3-csi-controller-6df4cfb4f-ht26d           1/1     Running     0              23h
s3-csi-node-225gj                           3/3     Running     0              8s
s3-csi-node-8jv4z                           3/3     Running     0              3s
s3-csi-node-t9hqc                           3/3     Running     0              17s
Now we can create a PV, PVC and Pod as we did before
$ cat ./pv-6.yaml
apiVersion: v1
kind: PersistentVolume
metadata:
  name: s3-garage-pv
spec:
  capacity:
    storage: 1Gi
  accessModes:
    - ReadWriteMany
  mountOptions:
    - --allow-other
    - --debug
    - --endpoint-url=http://192.168.1.116:3900
    - --region=garage
    - --force-path-style
  csi:
    driver: s3.csi.aws.com
    volumeHandle: s3-garage-pv
    volumeAttributes:
      bucketName: "freshbucket-test"
$ cat pvc-6.yaml
apiVersion: v1
kind: PersistentVolumeClaim
metadata:
  name: s3-garage-pvc
spec:
  accessModes:
    - ReadWriteMany
  resources:
    requests:
      storage: 1Gi
  volumeName: s3-garage-pv  # Matches the name of your Available PV
  storageClassName: ""       # This must be empty if the PV has no storageClassName
$ cat garage-pod6.yaml
apiVersion: v1
kind: Pod
metadata:
  name: s3-garage-test
spec:
  containers:
  - name: app
    image: busybox
    command: ["/bin/sh","-c","while true; do sleep 3600; done"]
    volumeMounts:
    - name: s3vol
      mountPath: /mnt/s3
  volumes:
  - name: s3vol
    persistentVolumeClaim:
      claimName: s3-garage-pvc
I’ll now create them:
$ kubectl apply -f ./pv-6.yaml && sleep 2 && kubectl apply -f ./pvc-6.yaml && sleep 2 && kubectl apply -f ./garage-pod6.yaml && echo done
persistentvolume/s3-garage-pv created
persistentvolumeclaim/s3-garage-pvc created
pod/s3-garage-test created
done
This was ready immediately:
$ kubectl get po
NAME                                         READY   STATUS              RESTARTS       AGE
... snip ...
s3-garage-test                               1/1     Running             0              13s
I can test using the pod to create files:
$ kubectl exec -it s3-garage-test -- /bin/sh
/ # ls
bin    dev    etc    home   lib    lib64  mnt    proc   root   sys    tmp    usr    var
/ # cd /mnt/s3
/mnt/s3 # ls
mytest.txt
/mnt/s3 # echo "test" | tee mytest2.txt
test
/mnt/s3 # ls
mytest.txt   mytest2.txt
/mnt/s3 # ls -l
total 1
-rw-r--r--    1 1000     root             7 Dec 28 23:17 mytest.txt
-rw-r--r--    1 1000     root             5 Dec 31 15:34 mytest2.txt
Back on the NAS, while I cannot browse buckets, per se, I can look details on a specific object such as the on we just created:
ijohnson@sirnasilot:~$ garage bucket inspect-object freshbucket-test mytest2.txt
2025-12-31T15:36:56.909671Z  INFO garage_net::netapp: Connected to 127.0.0.1:3901, negotiating handshake...
2025-12-31T15:36:56.952267Z  INFO garage_net::netapp: Connection established to c852a3ab5d736fac
==== OBJECT VERSION ====
Bucket ID:         74cf84cbb1476fb2db4e7e5795875966b52cbe40541cbac0183e65e8adf93764
Key:               mytest2.txt
Version ID:        fef0f82cfcb45090df61aa6e47bb2ef722a87578826236d33223ee813b83fa92
Timestamp:         2025-12-31 15:34:30.185 UTC
Size:              5 B (5 B)
Size (exact):      5
Number of blocks:  1
Etag:              b5ba95b57be9031ff95c8085ddd9147a-1
Encrypted:         false
Uploading:         false
Aborted:           false
Delete marker:     false
Inline data:       false

Part#  Offset     Block hash                                                        Size
   1           0  34073762db7af5008c7213f93390e0e7b73051ecd42d49f3633c82c9af0caff3          5
Summary
Today we looked at RustFS and Garage. We set them up on my primary NAS in Docker and tested them with their own interfaces (CLI and Web UI) as well as the AWS CLI. We then explored how to use the Mountpoint CSI Driver from AWS to access them.
There were some hiccups - I couldn’t get the Tiered Storage in RustFS to do anything, but there is little documentation on it so hopefully it’s just an education issue on my part. I think I know what the WebUI for Garage is about, but I’ll save it for later (you can expose a bucket as a website).
Garage’s performance, at least on my NAS, was superior - it was very fast and I might lean into this one more than RustFS. I’ll have to do a part 3 that includes some of the OpenBao setup as well.