

Published: Jul 25, 2024 by Isaac Johnson
I know I cover a lot of Azure DNS (any post that covers tpk.pw). I also cover Route53 in AWS quite often (freshbrewed.science). However, as I look back, I realize I have yet to cover GCP CloudDNS.
Today we’ll setup a new Domain and add it as a fresh Hosted Zone in CloudDNS. We’ll look at configuring an on-prem cluster using a ClusterIssuer with a new GCP SA. Once we have shown using CloudDNS with the ACME resolver in k3s, we’ll move on to creating certificates. We’ll look at a few ways one can (try) to create in the UI, then look at using certbot for a self-managed LE cert.
Lastly, we’ll touch on using CloudDNS with certificates, both GCP managed and self-managed as we create static websites in GCP Buckets. We’ll setup up Application Load Balancers (ALBs) using Cloud DNS and Certificate Manager with public buckets.
Setup
To use CloudDNS, we need a domain we can host there.
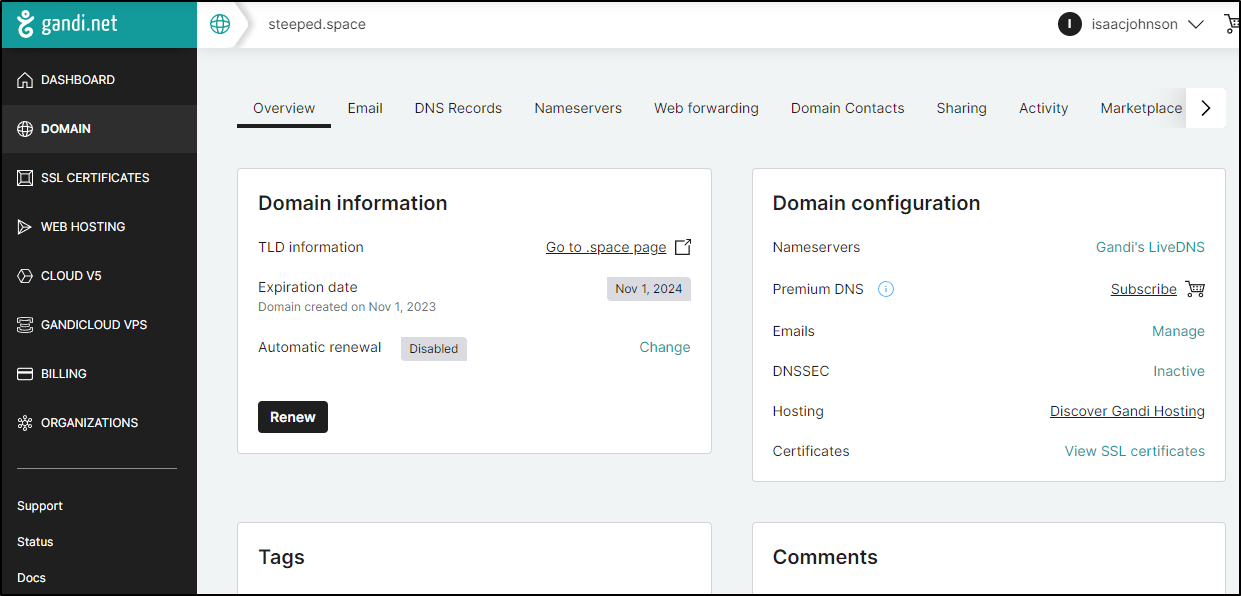
Here I have a steeped.space DNS I registered in Gandi
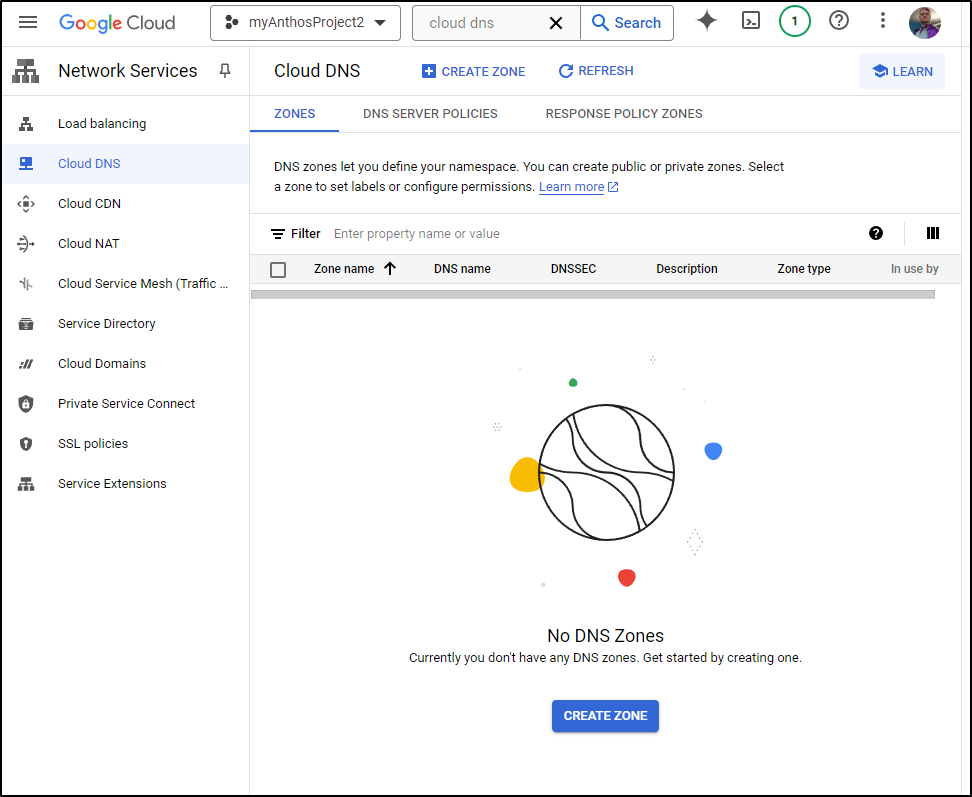
As you can see, I so far have no HZ in Cloud DNS
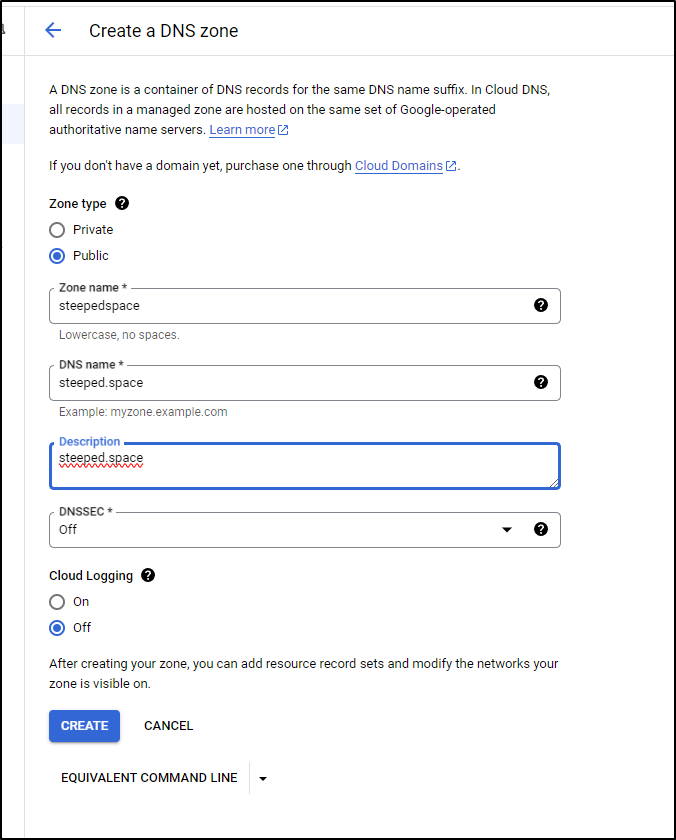
I’ll click “Create Zone” to start and fill out the Hosted Zone entry for our TLD
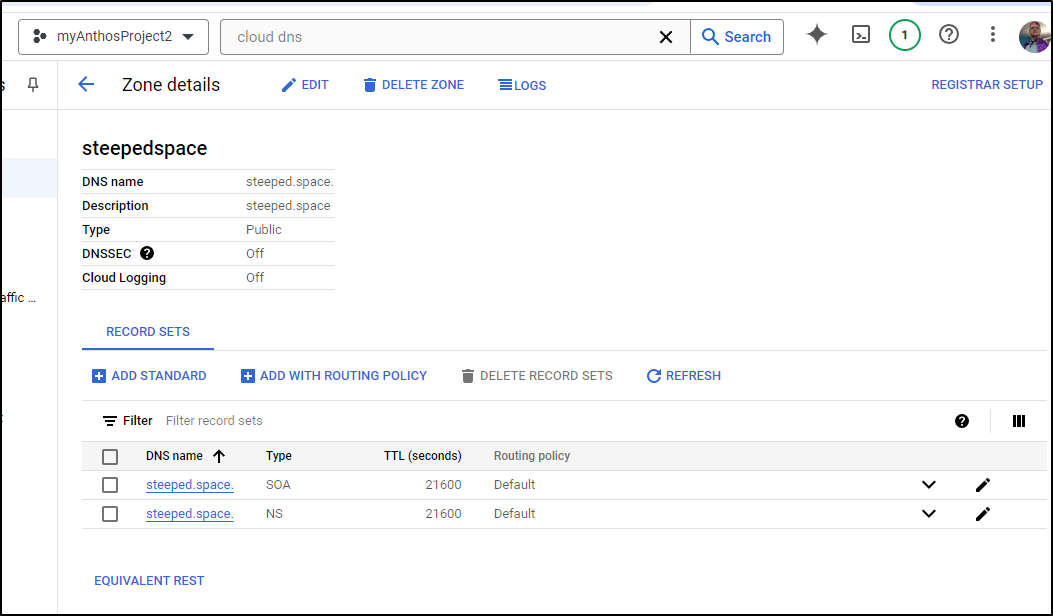
While this has now created a Hosted Zone
We need to update our DNS nameservers to actually make it live
I’ll use gcloud auth login then ask GCP what those should be
$ gcloud dns managed-zones describe steepedspace
cloudLoggingConfig:
  enableLogging: false
  kind: dns#managedZoneCloudLoggingConfig
creationTime: '2024-07-23T11:24:04.427Z'
description: steeped.space
dnsName: steeped.space.
id: '4856857326296579750'
kind: dns#managedZone
name: steepedspace
nameServers:
- ns-cloud-a1.googledomains.com.
- ns-cloud-a2.googledomains.com.
- ns-cloud-a3.googledomains.com.
- ns-cloud-a4.googledomains.com.
visibility: public
In Gandi, right now it’s set as the DNS Registrar and host
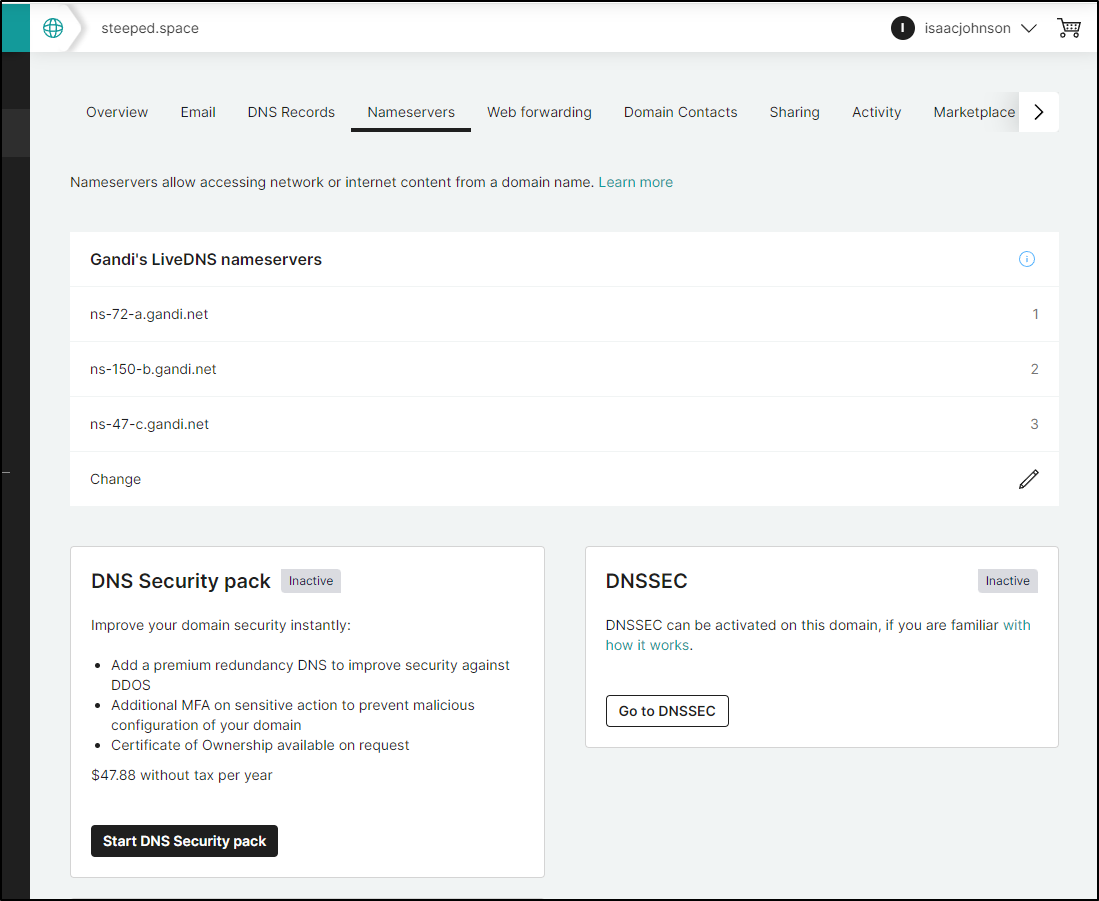
I’ll click the pencil in the “Gandi’s LiveDNS nameservers” table to change them
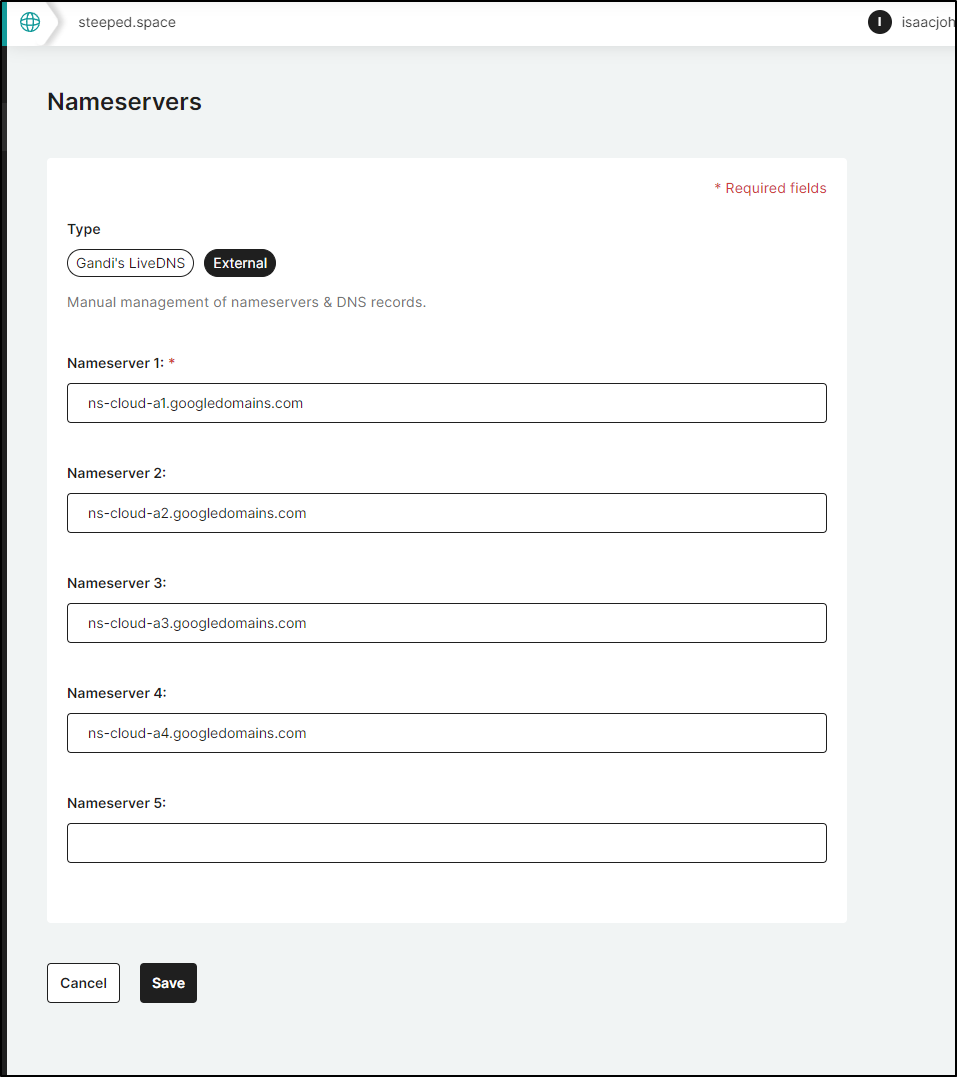
I switch to external and put in the GCP values
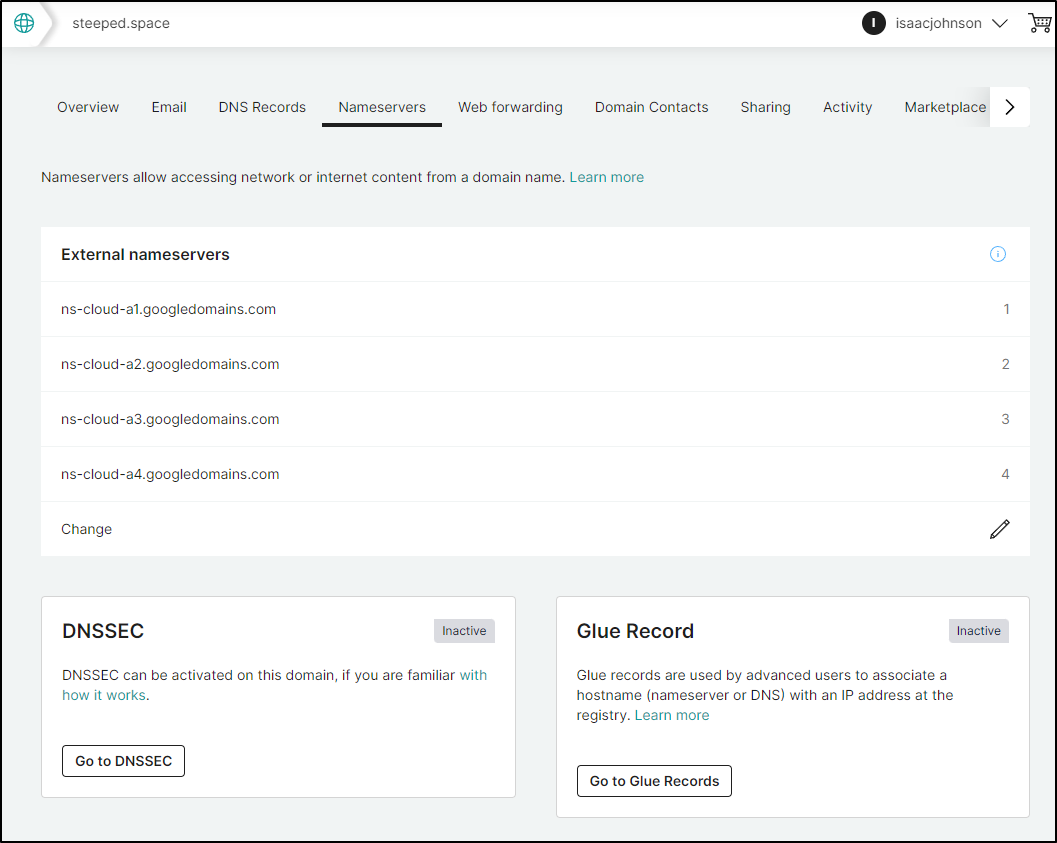
I can now seem them change over
Testing
Let’s add a standard record set in the Hosted Zone
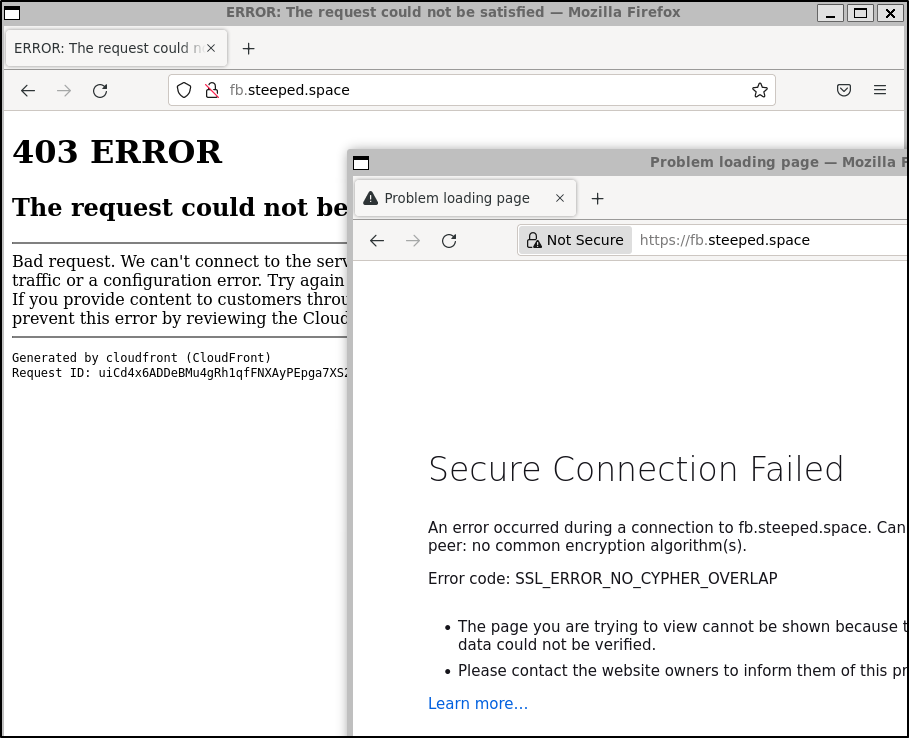
I’ll start with a CName to just repoint fb over to this website

My first error in trying to use it came from cloudfront
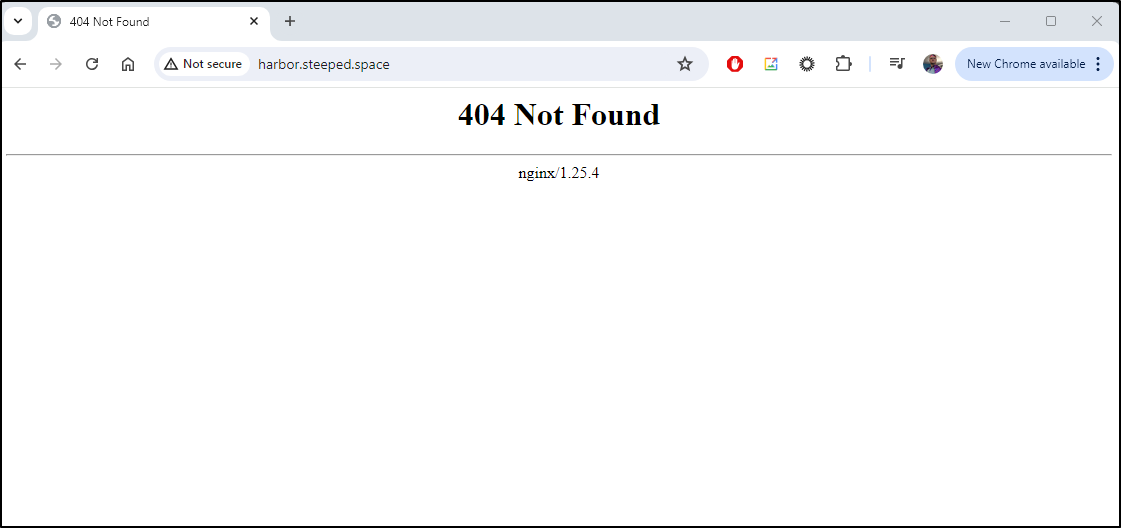
That said, I know it works because I tried redirecting Harbor
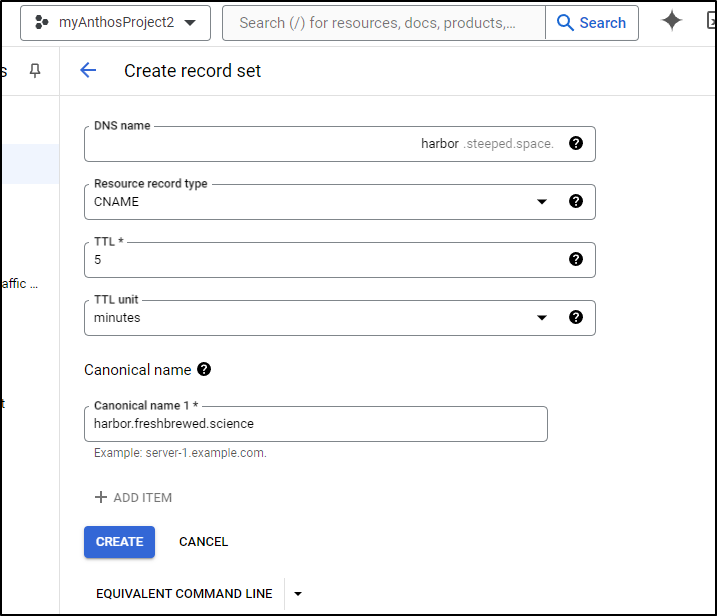
and that gave me a nice 404 from my Nginx host telling me it got to the Prod cluster (my Nginx filters on hostname so this is expected)
Intergaration with Kubernetes
To really use this, we need a CloudDNS cluster issuer
We can follow the docs to get a Service Account setup in GCP
I’ll create a new SA and apply the DNS Admin policy to it
builder@DESKTOP-QADGF36:~$ PROJECT_ID=myanthosproject2

builder@DESKTOP-QADGF36:~$ gcloud iam service-accounts create dns01-solver --display-name "dns01-solver"
Created service account [dns01-solver].

builder@DESKTOP-QADGF36:~$ gcloud projects add-iam-policy-binding $PROJECT_ID --member serviceAccount:dns01-solver@$PROJECT_ID.iam.gserviceaccount.com --role roles/dns.admin
Updated IAM policy for project [myanthosproject2].
bindings:
- members:
  - serviceAccount:service-511842454269@gcp-sa-aiplatform.iam.gserviceaccount.com
  role: roles/aiplatform.serviceAgent
- members:

... snip ...

- members:
  - serviceAccount:configure8-demo@myanthosproject2.iam.gserviceaccount.com
  role: roles/viewer
etag: BwYd6KN5O7Q=
version: 1
We then need an SA Secret for the credentials
$ gcloud iam service-accounts keys create gcpsakey.json --iam-account dns01-solver@$PROJECT_ID.iam.gserviceaccount.com
created key [ddcb59e7cb63a5e6cc9384ae3e1d91305a8173f1] of type [json] as [gcpsakey.json] for [dns01-solver@myanthosproject2.iam.gserviceaccount.com]
That created and saved the local Key JSON. This is a pretty important file as it gives all the details a system would need to be my DNS Admin for my GCP Hosted Zones
builder@DESKTOP-QADGF36:~$ ls -ltra | tail -n1
-rw-------   1 builder builder      2370 Jul 23 06:43 gcpsakey.json
I now need to add as a secret the ClusterIssuer can reference.
I honestly cannot decide if it just needs to be created in the default or cert-manager namespace. I created in both, to be honest. My past examples used both namespaces. Likely something I’ll have to tease out in time.
builder@DESKTOP-QADGF36:~$ kubectl create secret generic clouddns-dns01-solver-svc-acct --from-file=gcpsakey.json
secret/clouddns-dns01-solver-svc-acct created
builder@DESKTOP-QADGF36:~$ kubectl create secret generic clouddns-dns01-solver-svc-acct -n cert-manager --from-file=gcpsakey.json
secret/clouddns-dns01-solver-svc-acct created
The documentation leaves a few details out
apiVersion: cert-manager.io/v1
kind: Issuer
metadata:
  name: example-issuer
spec:
  acme:
    ...
    solvers:
    - dns01:
        cloudDNS:
          # The ID of the GCP project
          project: $PROJECT_ID
          # This is the secret used to access the service account
          serviceAccountSecretRef:
            name: clouddns-dns01-solver-svc-acct
            key: key.json
For example, knowing my project is myAnthosProject2 and the HZ is steepedspace, I will use
apiVersion: cert-manager.io/v1
kind: ClusterIssuer
metadata:
  name: gcp-le-prod
spec:
  acme:
    email: isaac.johnson@gmail.com
    privateKeySecretRef:
      name: gcp-le-prod
    server: https://acme-v02.api.letsencrypt.org/directory
    solvers:
    - dns01:
        cloudDNS:
          project: myanthosproject2
          serviceAccountSecretRef:
            name: clouddns-dns01-solver-svc-acct
            key: gcpsakey.json
      selector:
        dnsZones:
        - steepedspace
I can apply it
builder@DESKTOP-QADGF36:~$ kubectl apply -f ./gcpclusterissuer.yaml
clusterissuer.cert-manager.io/gcp-le-prod created
Because it is a ClusterIssuer, we can see it sans namespace
builder@DESKTOP-QADGF36:~$ kubectl get clusterissuer
NAME               READY   AGE
letsencrypt-prod   True    142d
azuredns-tpkpw     True    141d
gcp-le-prod        True    21s
I know it’s in a good way as the status shows it’s registered
builder@DESKTOP-QADGF36:~$ kubectl get clusterissuer gcp-le-prod -o yaml | tail -n12
status:
  acme:
    lastPrivateKeyHash: EHYYbkOQl0cw1UJ65mEFlaBHwK5HHOAZwETqBQu8rcg=
    lastRegisteredEmail: isaac.johnson@gmail.com
    uri: https://acme-v02.api.letsencrypt.org/acme/acct/1852596517
  conditions:
  - lastTransitionTime: "2024-07-23T11:52:33Z"
    message: The ACME account was registered with the ACME server
    observedGeneration: 1
    reason: ACMEAccountRegistered
    status: "True"
    type: Ready
Testing in Kubernetes
Let’s look at a recent service
builder@DESKTOP-QADGF36:~$ kubectl get ingress | tail -n1
filegatoringress          <none>   filegator.tpk.pw                            80, 443   9d
I’ll dump it local so i can change it
builder@DESKTOP-QADGF36:~$ kubectl get ingress filegatoringress -o yaml > filegatorgcp.yaml
I’ll rework it to use the same backend service, but a new secret, issuer and ingress name
$ cat filegatorgcp.yaml
apiVersion: networking.k8s.io/v1
kind: Ingress
metadata:
  annotations:
    cert-manager.io/cluster-issuer: gcp-le-prod
    kubernetes.io/ingress.class: nginx
    kubernetes.io/tls-acme: "true"
    nginx.ingress.kubernetes.io/proxy-read-timeout: "3600"
    nginx.ingress.kubernetes.io/proxy-send-timeout: "3600"
    nginx.org/websocket-services: filegator-external-ip
  labels:
    app.kubernetes.io/instance: filegatorgcpingress
  name: filegatorgcpingress
spec:
  rules:
  - host: filegator.steeped.space
    http:
      paths:
      - backend:
          service:
            name: filegator-external-ip
            port:
              number: 80
        path: /
        pathType: ImplementationSpecific
  tls:
  - hosts:
    - filegator.steeped.space
    secretName: filegatorgcp-tls
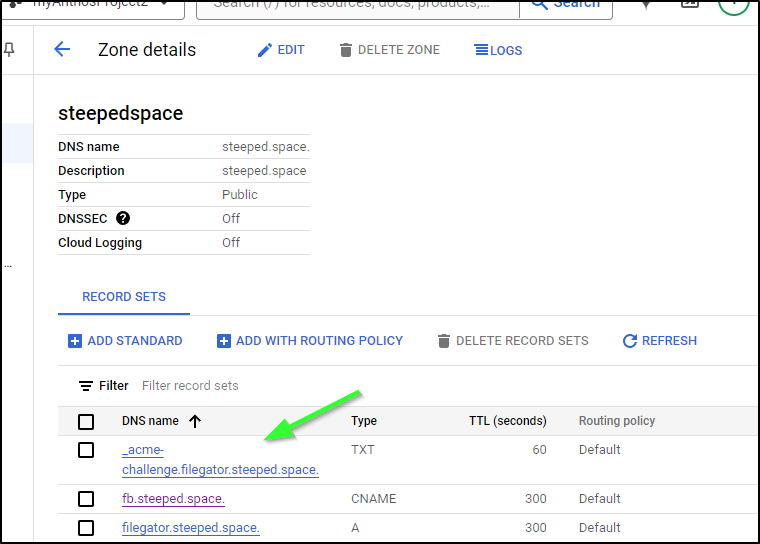
I can now create my A record
$ gcloud dns --project=myanthosproject2 record-sets create filegator.steeped.space --zone="steepedspace" --type="A" --ttl="300" --r
rdatas="75.73.224.240"
NAME                      TYPE  TTL  DATA
filegator.steeped.space.  A     300  75.73.224.240
And apply it
$ cat ./filegatorgcp.yaml
apiVersion: networking.k8s.io/v1
kind: Ingress
metadata:
  annotations:
    ingress.kubernetes.io/proxy-body-size: "0"
    ingress.kubernetes.io/ssl-redirect: "true"
    nginx.ingress.kubernetes.io/proxy-body-size: "0"
    nginx.ingress.kubernetes.io/ssl-redirect: "true"
    nginx.org/client-max-body-size: "0"
    nginx.org/proxy-connect-timeout: "3600"
    nginx.org/proxy-read-timeout: "3600"
    cert-manager.io/cluster-issuer: gcp-le-prod
    kubernetes.io/ingress.class: nginx
    kubernetes.io/tls-acme: "true"
    nginx.ingress.kubernetes.io/proxy-read-timeout: "3600"
    nginx.ingress.kubernetes.io/proxy-send-timeout: "3600"
    nginx.org/websocket-services: filegator-external-ip
  labels:
    app.kubernetes.io/instance: filegatorgcpingress
  name: filegatorgcpingress
spec:
  rules:
  - host: filegator.steeped.space
    http:
      paths:
      - backend:
          service:
            name: filegator-external-ip
            port:
              number: 80
        path: /
        pathType: ImplementationSpecific
  tls:
  - hosts:
    - filegator.steeped.space
    secretName: filegatorgcp-tls

$ kubectl apply -f ./filegatorgcp.yaml
ingress.networking.k8s.io/filegatorgcpingress created
I waited a while, but did not see my cert get created
$ kubectl get cert filegatorgcp-tls
NAME               READY   SECRET             AGE
filegatorgcp-tls   False   filegatorgcp-tls   3m42s
Seems it is hung on the order
$ kubectl get order filegatorgcp-tls-1-3422691204 -o yaml | tail -n19
status:
  authorizations:
  - challenges:
    - token: udByIEDfNBzh4LLFX_eQWIHJfn0CpqgHuDzMm9wXyCk
      type: http-01
      url: https://acme-v02.api.letsencrypt.org/acme/chall-v3/380786063777/b3mOVw
    - token: udByIEDfNBzh4LLFX_eQWIHJfn0CpqgHuDzMm9wXyCk
      type: dns-01
      url: https://acme-v02.api.letsencrypt.org/acme/chall-v3/380786063777/zZu-1w
    - token: udByIEDfNBzh4LLFX_eQWIHJfn0CpqgHuDzMm9wXyCk
      type: tls-alpn-01
      url: https://acme-v02.api.letsencrypt.org/acme/chall-v3/380786063777/bT3Vsg
    identifier: filegator.steeped.space
    initialState: pending
    url: https://acme-v02.api.letsencrypt.org/acme/authz-v3/380786063777
    wildcard: false
  finalizeURL: https://acme-v02.api.letsencrypt.org/acme/finalize/1852596517/289858846917
  state: pending
  url: https://acme-v02.api.letsencrypt.org/acme/order/1852596517/289858846917
Let’s try another way.
I removed the current request by just nixing the ingress
builder@DESKTOP-QADGF36:~$ kubectl delete -f ./filegatorgcp.yaml
ingress.networking.k8s.io "filegatorgcpingress" deleted

# Check it's now gone and not pending
builder@DESKTOP-QADGF36:~$ kubectl get cert | tail -n5
teampass-tls                      True    teampass-tls                      74d
filegator-tls                     True    filegator-tls                     9d
yaade-tls                         True    yaade-tls                         62d
glance-tls                        True    glance-tls                        61d
timetagger-tls                    True    timetagger-tls                    61d
I used Copilot to build out a proper ClusterIssuer
$ cat ./clusterissuer2.yaml
apiVersion: cert-manager.io/v1
kind: ClusterIssuer
metadata:
  name: gcpleprod2
spec:
  acme:
    email: isaac.johnson@gmail.com
    server: https://acme-v02.api.letsencrypt.org/directory
    privateKeySecretRef:
      name: gcpleprod2
    solvers:
    - dns01:
        cloudDNS:
          project: myanthosproject2
          serviceAccountSecretRef:
            name: clouddns-dns01-solver-svc-acct
            key: gcpsakey.json
$ kubectl apply -f ./clusterissuer2.yaml
clusterissuer.cert-manager.io/gcpleprod2 created
I can see that is live
$ kubectl get clusterissuer
NAME               READY   AGE
letsencrypt-prod   True    143d
azuredns-tpkpw     True    141d
gcp-le-prod        True    29m
gcpleprod2         True    117s
let’s try that Filegator again, this time using the simplified GCP ClusterIssuer
builder@DESKTOP-QADGF36:~$ cat filegatorgcp.yaml
apiVersion: networking.k8s.io/v1
kind: Ingress
metadata:
  annotations:
    ingress.kubernetes.io/proxy-body-size: "0"
    ingress.kubernetes.io/ssl-redirect: "true"
    nginx.ingress.kubernetes.io/proxy-body-size: "0"
    nginx.ingress.kubernetes.io/ssl-redirect: "true"
    nginx.org/client-max-body-size: "0"
    nginx.org/proxy-connect-timeout: "3600"
    nginx.org/proxy-read-timeout: "3600"
    cert-manager.io/cluster-issuer: gcpleprod2
    kubernetes.io/ingress.class: nginx
    kubernetes.io/tls-acme: "true"
    nginx.ingress.kubernetes.io/proxy-read-timeout: "3600"
    nginx.ingress.kubernetes.io/proxy-send-timeout: "3600"
    nginx.org/websocket-services: filegator-external-ip
  labels:
    app.kubernetes.io/instance: filegatorgcpingress
  name: filegatorgcpingress
spec:
  rules:
  - host: filegator.steeped.space
    http:
      paths:
      - backend:
          service:
            name: filegator-external-ip
            port:
              number: 80
        path: /
        pathType: ImplementationSpecific
  tls:
  - hosts:
    - filegator.steeped.space
    secretName: filegatorgcp-tls
builder@DESKTOP-QADGF36:~$ kubectl apply -f ./filegatorgcp.yaml
ingress.networking.k8s.io/filegatorgcpingress created
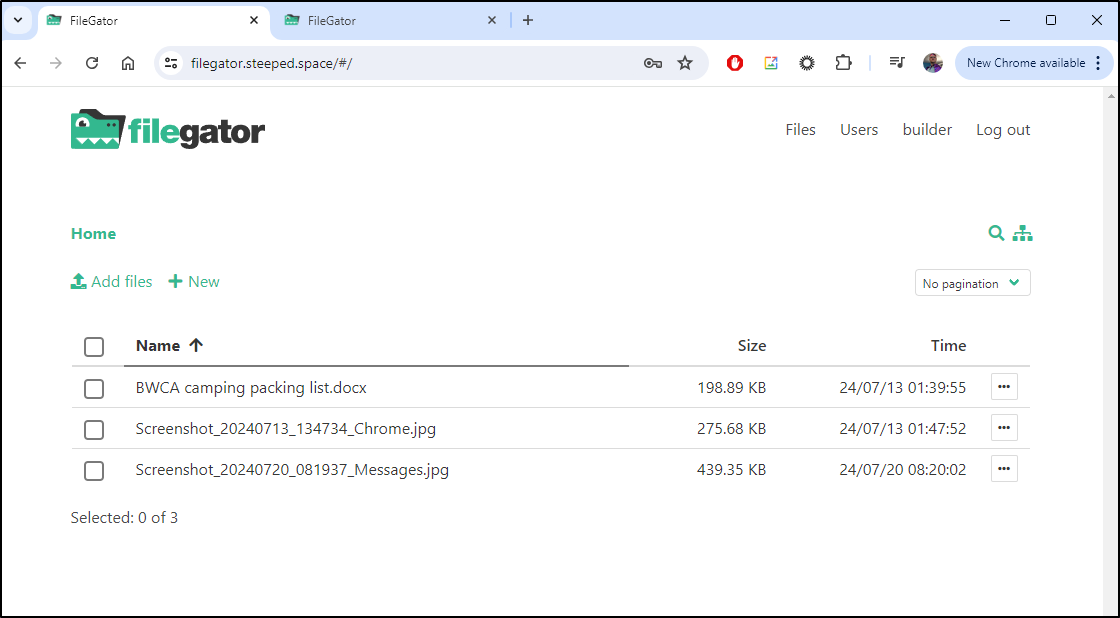
I did a quick refresh on CloudDNS and was pleased to see a resolver record existed now
And in Kubernetes, the cert was satisfied
$ kubectl get cert filegatorgcp-tls
NAME               READY   SECRET             AGE
filegatorgcp-tls   True    filegatorgcp-tls   100s
And that works!
Certs
I want to test creating a Certificate. For instance, perhaps I have a legacy server that doesn’t use a ClusterIssuer and I really would like to get a working cert to use for testing.steeped.space
Since I am not assuming I have a GCP LB I can use for authorization, I’ll do DNS which prompts me to create the missing DNS authorization
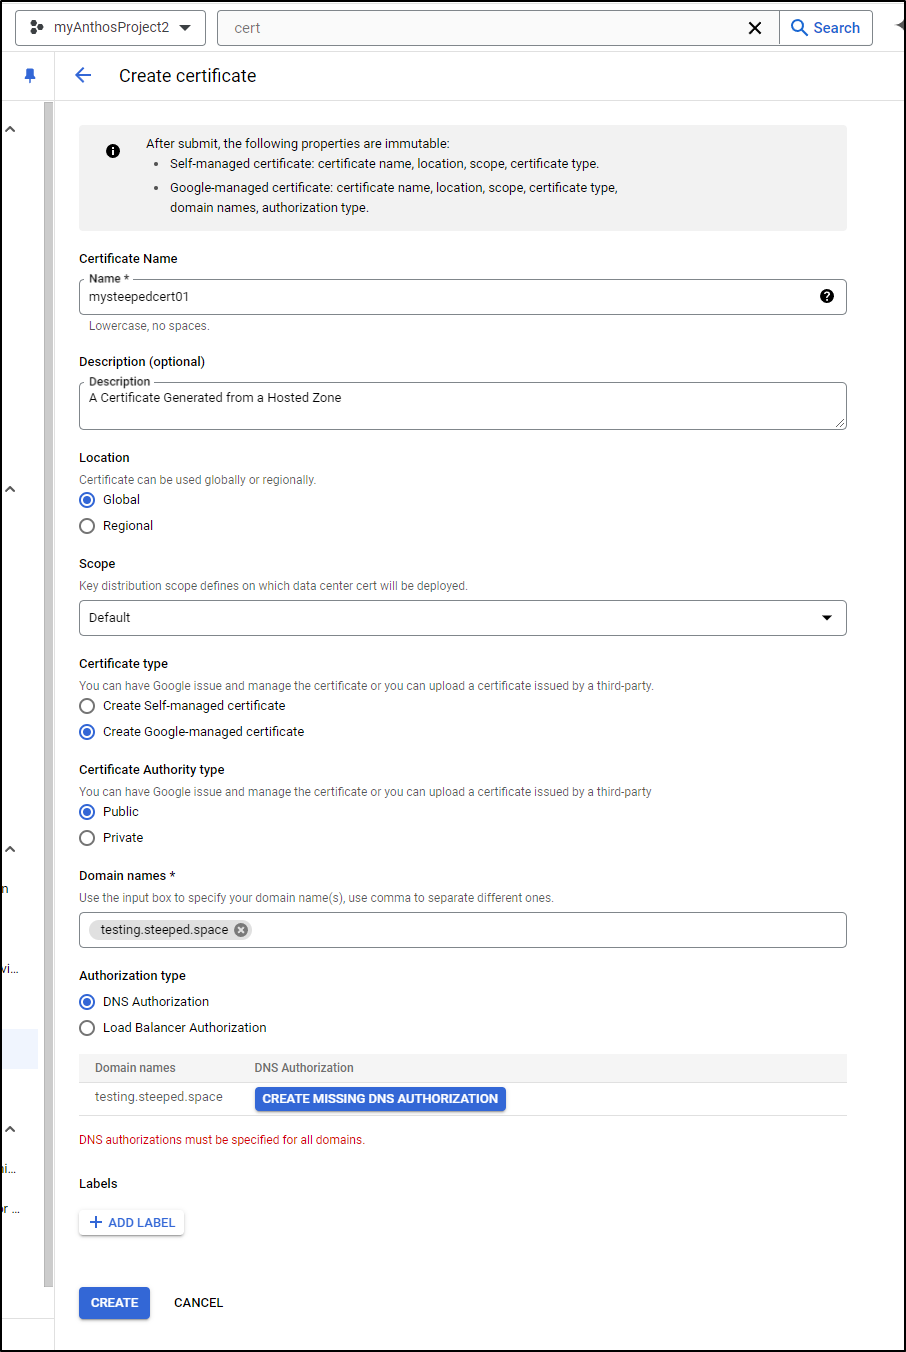
I can click Create to create the DNS Authorization
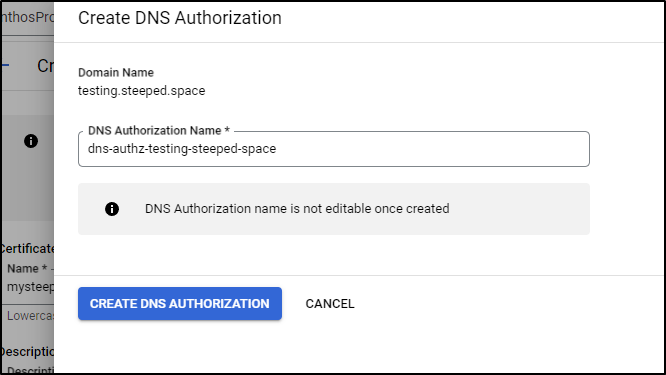
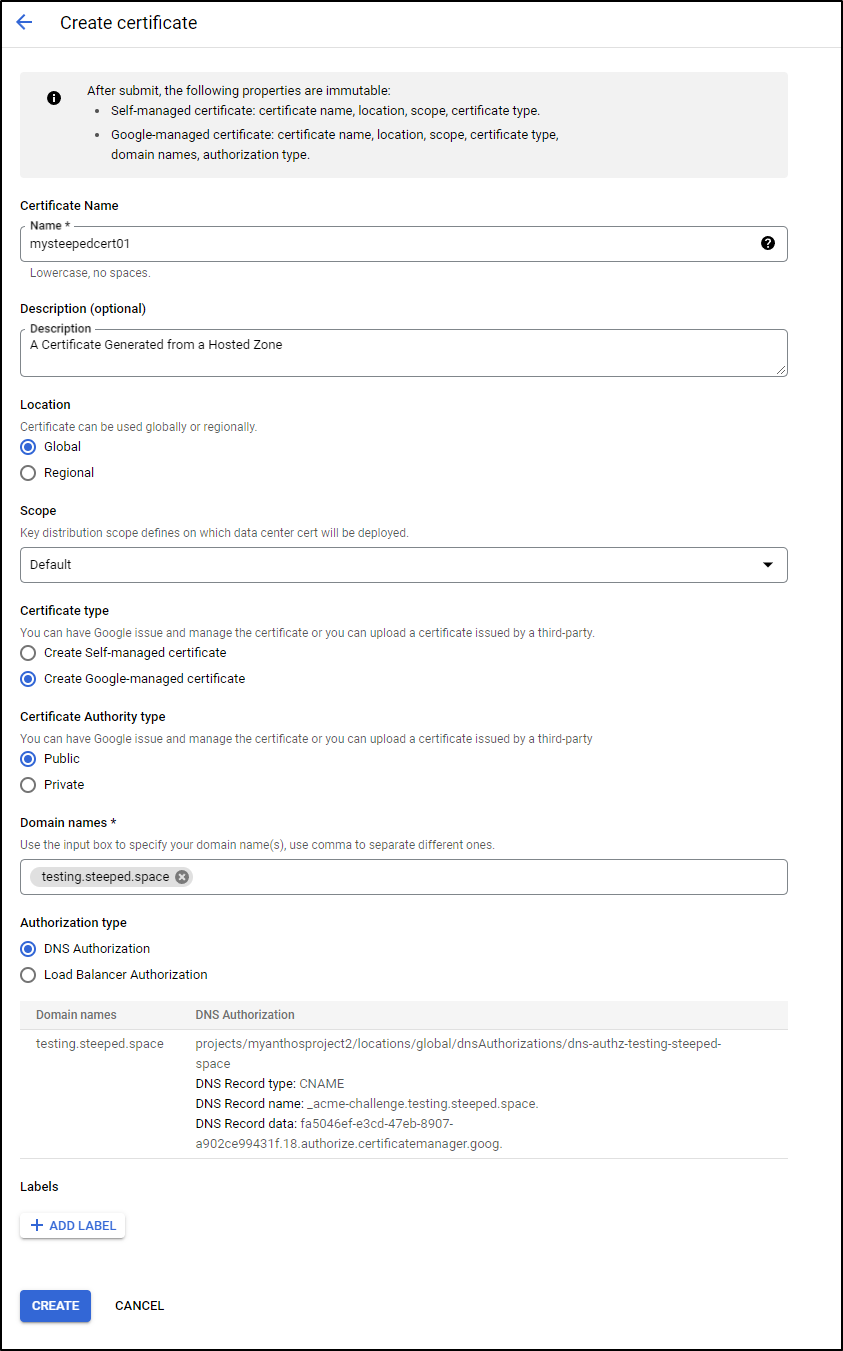
I now see the DNS entry used by the GCP authority
Just to be clear - Google needs some way to ensure you still own that domain if it is handing out a Certificate it signs. This means when it goes to create a new certificate, it has a DNS entry it can check (and/or change) to ensure you still own that DNS name.
I then click Create to start the process

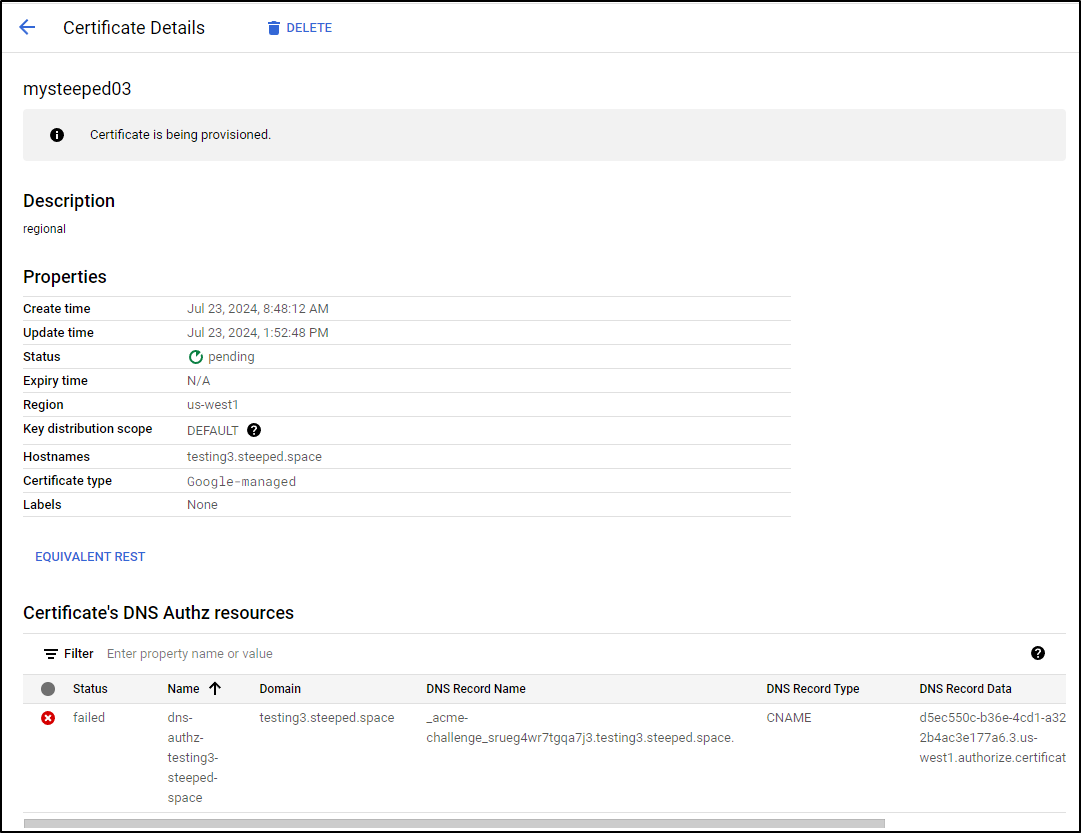
We can check the status and see the certificate is being provisioned
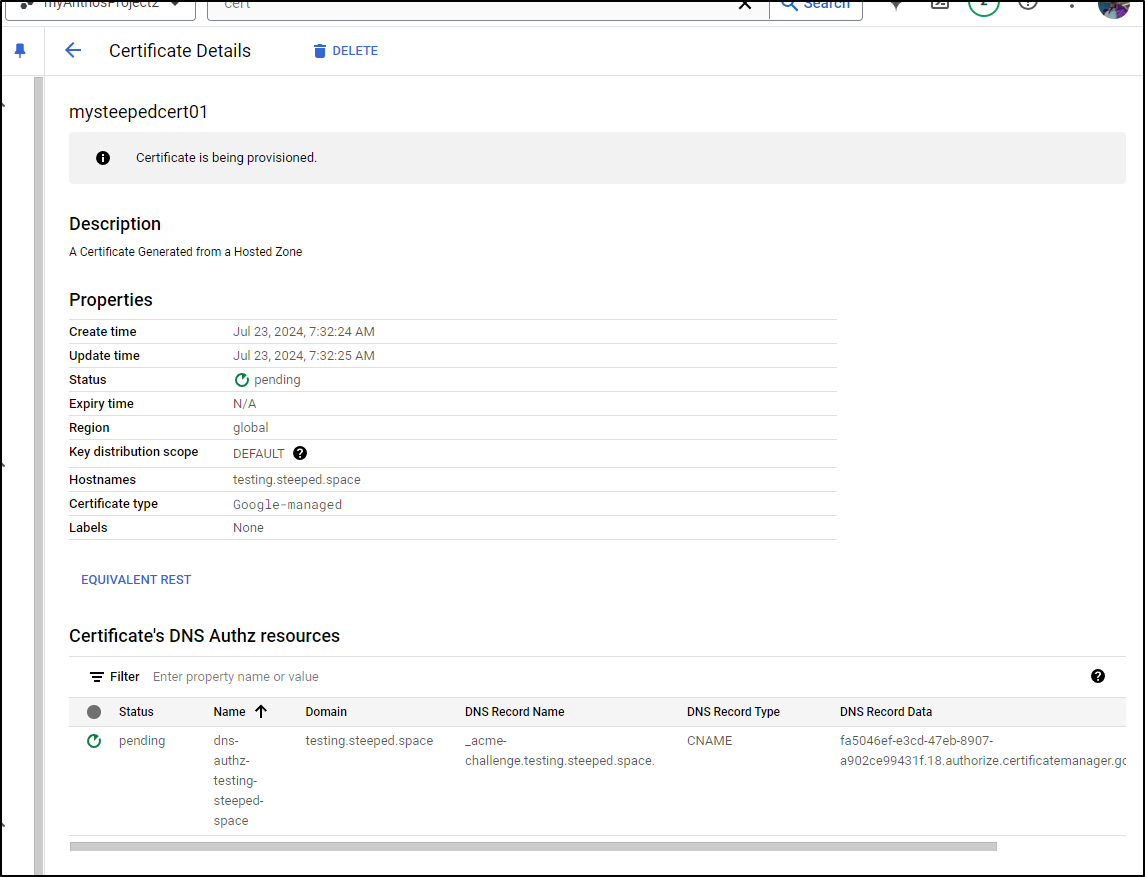
I have no idea why they fail. I tried three times and all three got stuck in pending
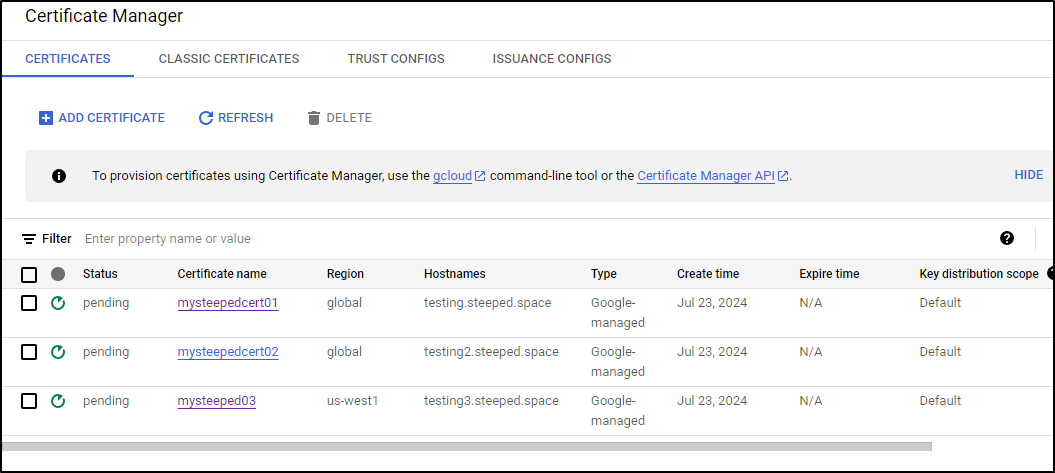
There really isn’t any detail for me to solve - it just sets to failed.
Certbot
I can get certs using certbot on the command-line, provided I can use CloudDNS to set the challenge.
I’ll first add certbot to a linux host
isaac@isaac-MacBookAir:~$ sudo snap install certbot --classic
certbot 2.11.0 from Certbot Project (certbot-eff✓) installed
isaac@isaac-MacBookAir:~$ sudo ln -s /snap/bin/certbot /usr/bin/certbot
Now I can start the process with DNS Challenge
isaac@isaac-MacBookAir:~$ sudo certbot certonly --manual --preferred-challenges dns --debug-challenges -d \*.steeped.space -d steeped.space
Saving debug log to /var/log/letsencrypt/letsencrypt.log
Enter email address (used for urgent renewal and security notices)
 (Enter 'c' to cancel): isaac.johnson@gmail.com

- - - - - - - - - - - - - - - - - - - - - - - - - - - - - - - - - - - - - - - -
Please read the Terms of Service at
https://letsencrypt.org/documents/LE-SA-v1.4-April-3-2024.pdf. You must agree in
order to register with the ACME server. Do you agree?
- - - - - - - - - - - - - - - - - - - - - - - - - - - - - - - - - - - - - - - -
(Y)es/(N)o: Y

- - - - - - - - - - - - - - - - - - - - - - - - - - - - - - - - - - - - - - - -
Would you be willing, once your first certificate is successfully issued, to
share your email address with the Electronic Frontier Foundation, a founding
partner of the Let's Encrypt project and the non-profit organization that
develops Certbot? We'd like to send you email about our work encrypting the web,
EFF news, campaigns, and ways to support digital freedom.
- - - - - - - - - - - - - - - - - - - - - - - - - - - - - - - - - - - - - - - -
(Y)es/(N)o: Y
Account registered.
Requesting a certificate for *.steeped.space and steeped.space

- - - - - - - - - - - - - - - - - - - - - - - - - - - - - - - - - - - - - - - -
Please deploy a DNS TXT record under the name:

_acme-challenge.steeped.space.

with the following value:

RWkylXBrNyn2p0nHtL2n_4zk3uaHqJYvjWD4IktjTcU

- - - - - - - - - - - - - - - - - - - - - - - - - - - - - - - - - - - - - - - -
Press Enter to Continue
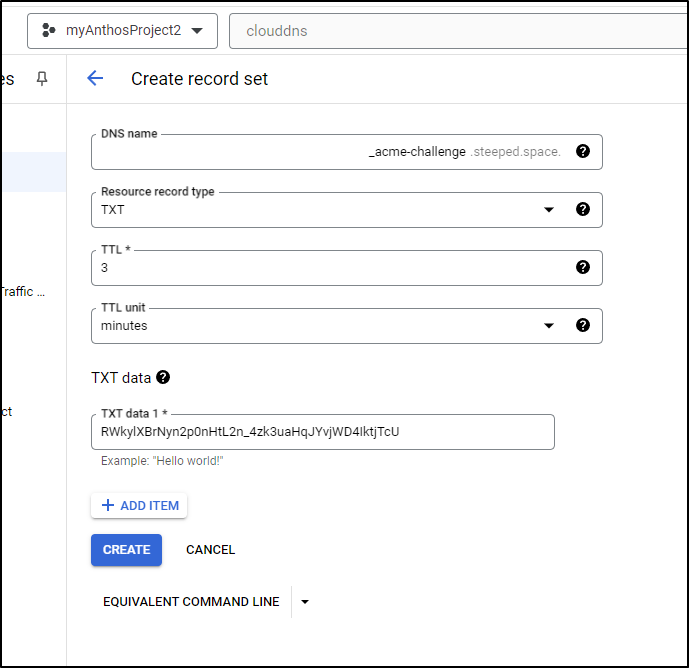
I’ll then create that record in CloudDNS
I found trying to do both a wildcard and root did not work as the challenge record was the same for both and failed
Certbot failed to authenticate some domains (authenticator: manual). The Certificate Authority reported these problems:
  Domain: steeped.space
  Type:   unauthorized
  Detail: Incorrect TXT record "paZrBCD7F24RBWH9Bh3XTppdRyFHeGtjmRLDr4DCcU8" found at _acme-challenge.steeped.space

Hint: The Certificate Authority failed to verify the manually created DNS TXT records. Ensure that you created these in the correct location, or try waiting longer for DNS propagation on the next attempt.
When I kept it simple and just used the wildcard it worked
isaac@isaac-MacBookAir:~$ sudo certbot certonly --manual --preferred-challenges dns --debug-challenges -d \*.steeped.space
Saving debug log to /var/log/letsencrypt/letsencrypt.log
Requesting a certificate for *.steeped.space
- - - - - - - - - - - - - - - - - - - - - - - - - - - - - - - - - - - - - - - -
Please deploy a DNS TXT record under the name:
_acme-challenge.steeped.space.
with the following value:
7j3k8sZLJ0g7HyfdTyNp7jKCKU1bkGnmnJjKnnlIql8
Before continuing, verify the TXT record has been deployed. Depending on the DNS
provider, this may take some time, from a few seconds to multiple minutes. You can
check if it has finished deploying with aid of online tools, such as the Google
Admin Toolbox: https://toolbox.googleapps.com/apps/dig/#TXT/_acme-challenge.steeped.space.
Look for one or more bolded line(s) below the line ';ANSWER'. It should show the
value(s) you've just added.
- - - - - - - - - - - - - - - - - - - - - - - - - - - - - - - - - - - - - - - -
Press Enter to Continue
- - - - - - - - - - - - - - - - - - - - - - - - - - - - - - - - - - - - - - - -
Challenges loaded. Press continue to submit to CA.
Pass "-v" for more info about challenges.
- - - - - - - - - - - - - - - - - - - - - - - - - - - - - - - - - - - - - - - -
Press Enter to Continue
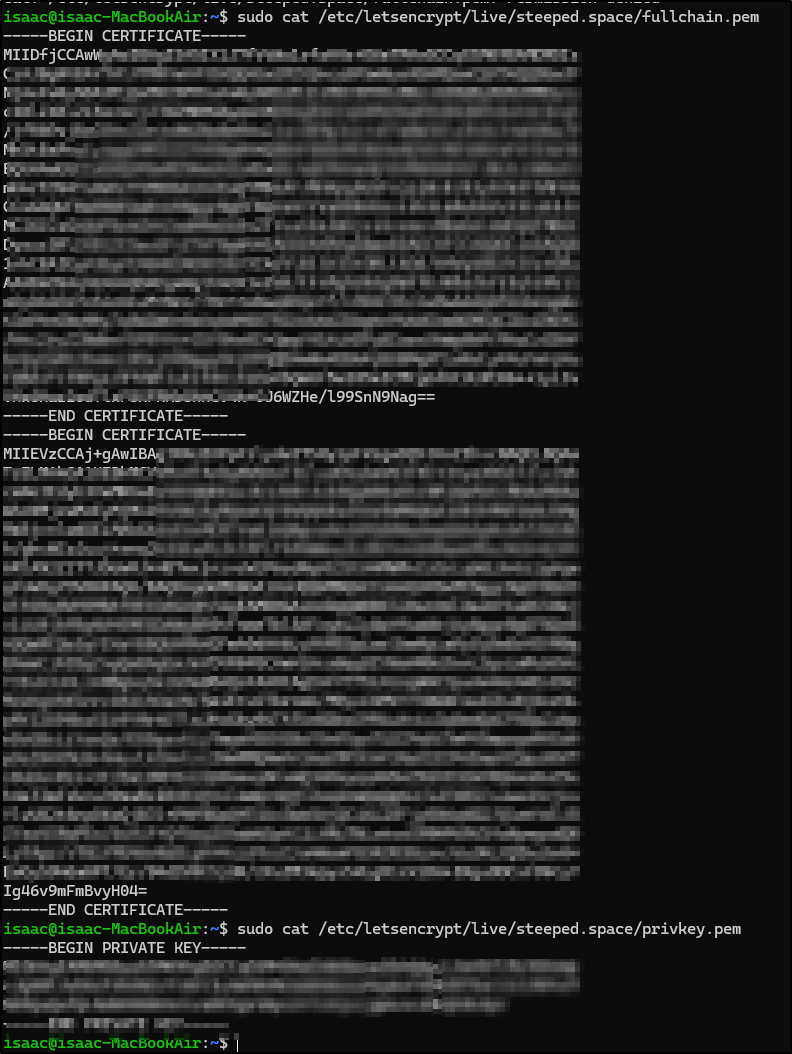
Successfully received certificate.
Certificate is saved at: /etc/letsencrypt/live/steeped.space/fullchain.pem
Key is saved at: /etc/letsencrypt/live/steeped.space/privkey.pem
This certificate expires on 2024-10-22.
These files will be updated when the certificate renews.
NEXT STEPS:
- This certificate will not be renewed automatically. Autorenewal of --manual certificates requires the use of an authentication hook script (--manual-auth-hook) but one was not provided. To renew this certificate, repeat this same certbot command before the certificate's expiry date.
- - - - - - - - - - - - - - - - - - - - - - - - - - - - - - - - - - - - - - - -
If you like Certbot, please consider supporting our work by:
* Donating to ISRG / Let's Encrypt: https://letsencrypt.org/donate
* Donating to EFF: https://eff.org/donate-le
- - - - - - - - - - - - - - - - - - - - - - - - - - - - - - - - - - - - - - - -
We can now see the keys were created
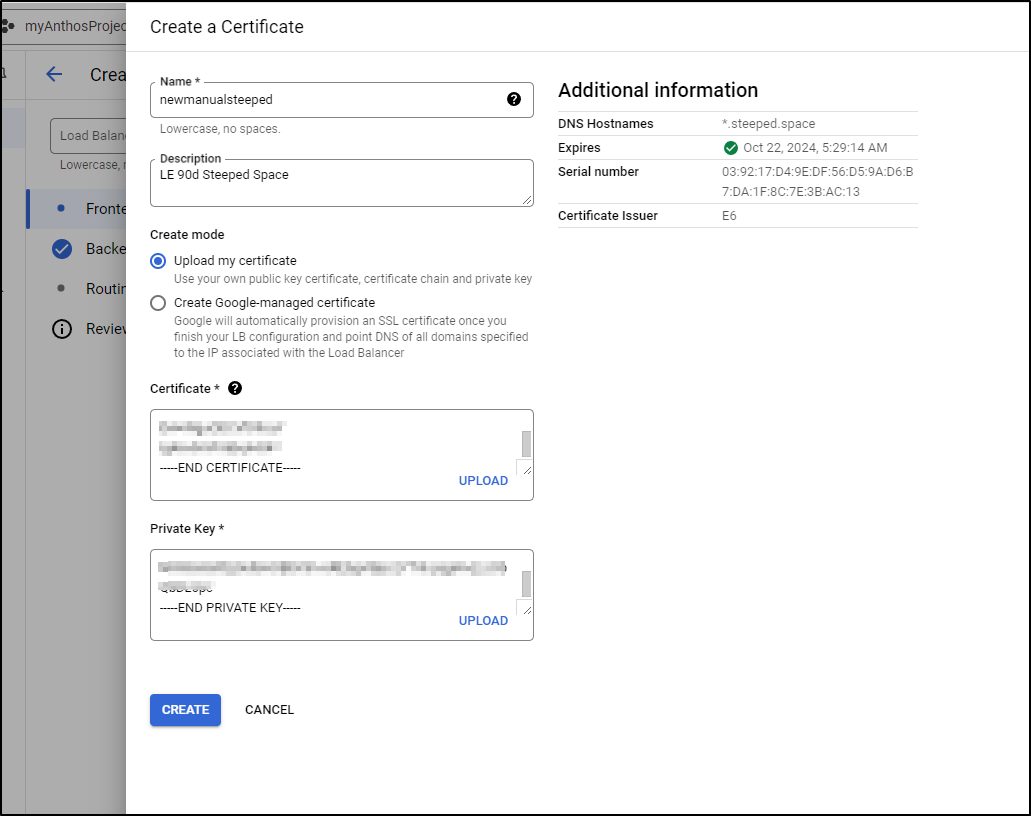
Since I would rather not leave this sitting on a utility host, I’ll now add to Classic Certificates
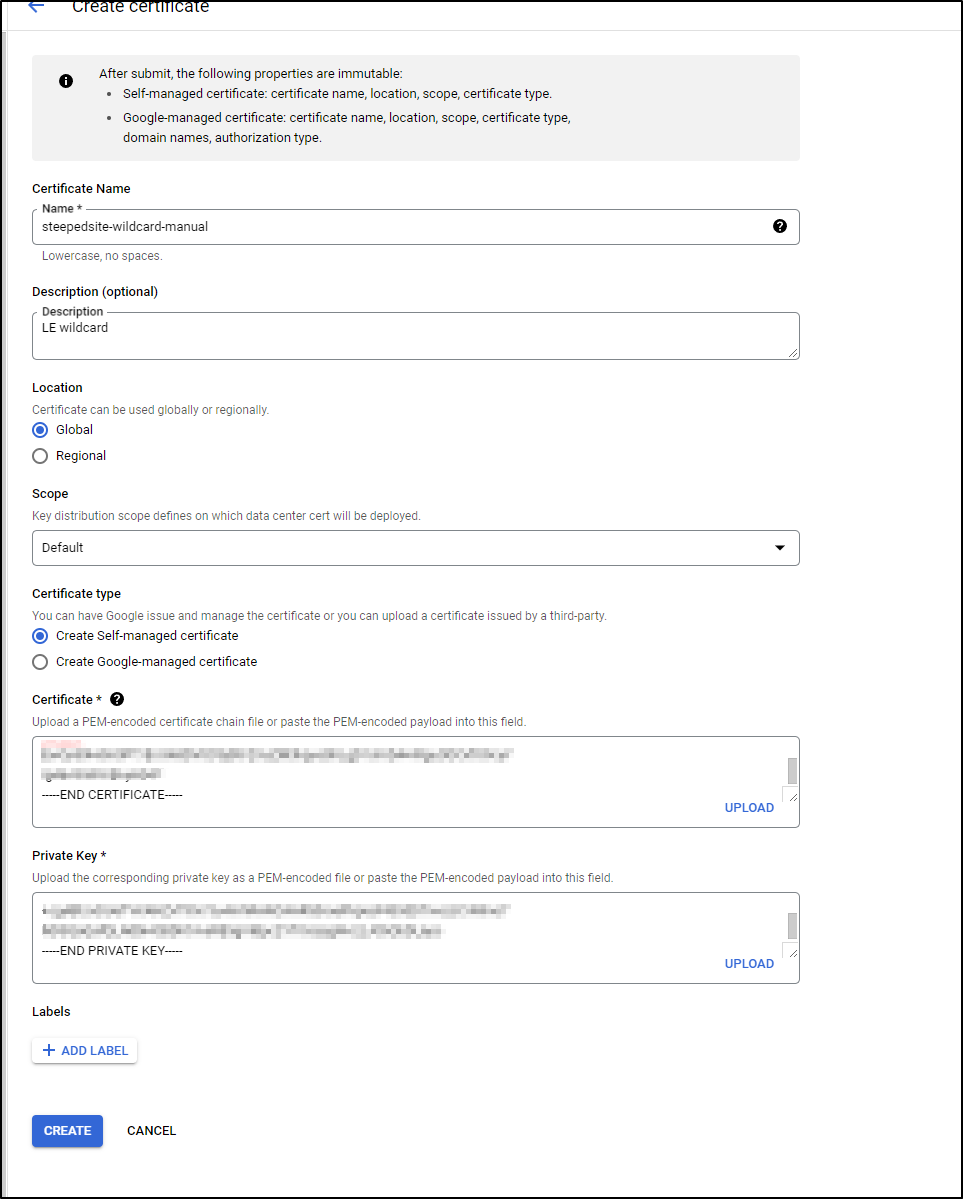
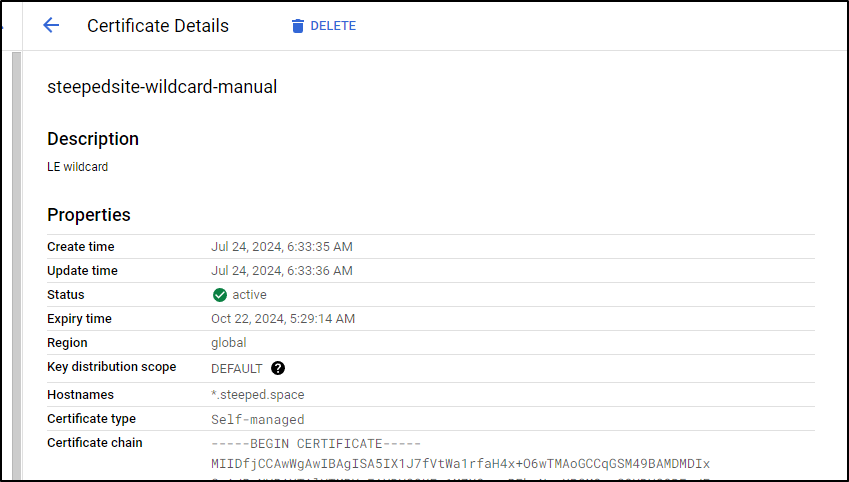
I can now see the cert and as expected, it’s valid for 90 days
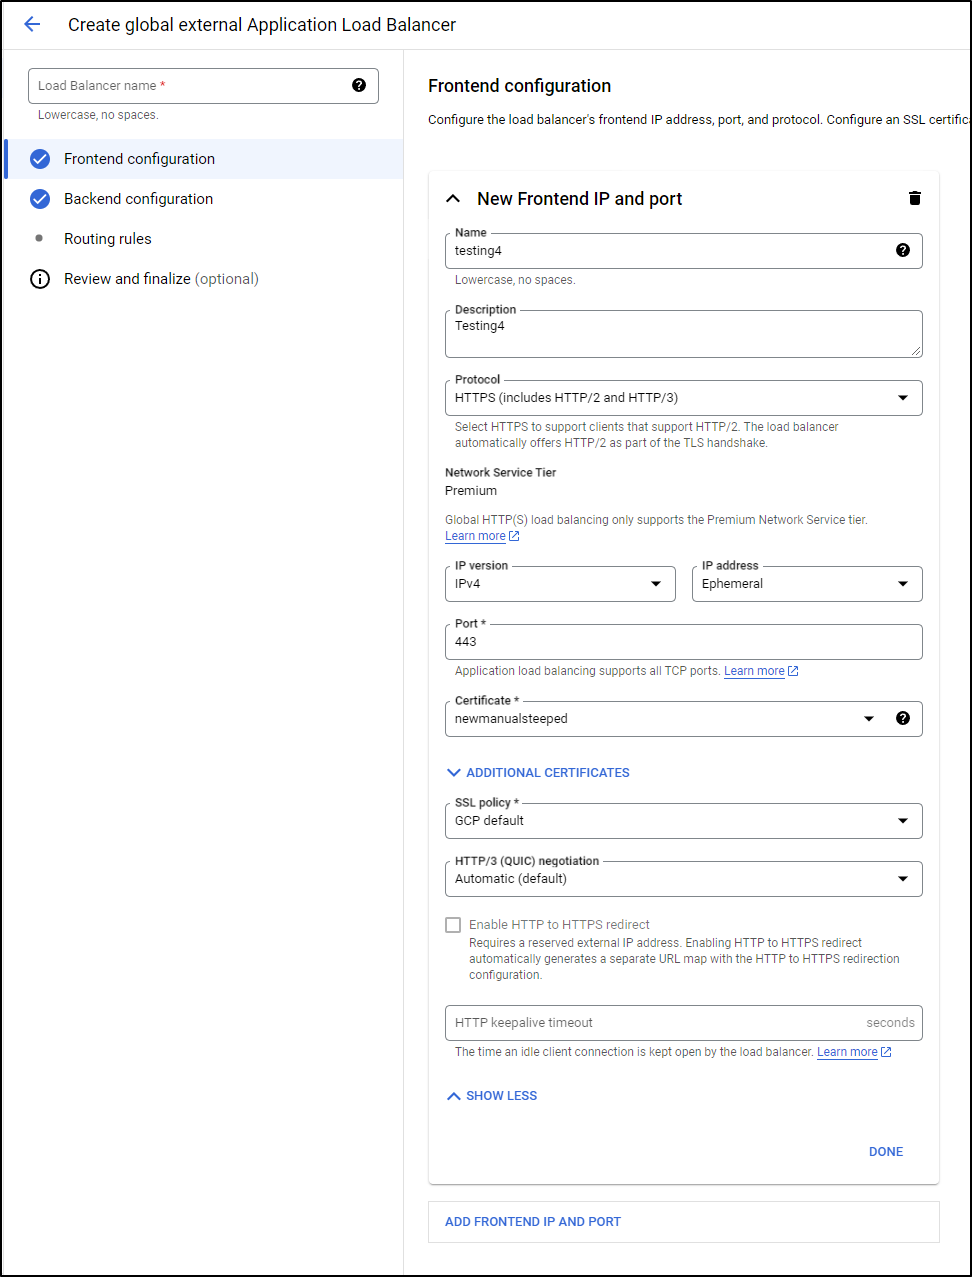
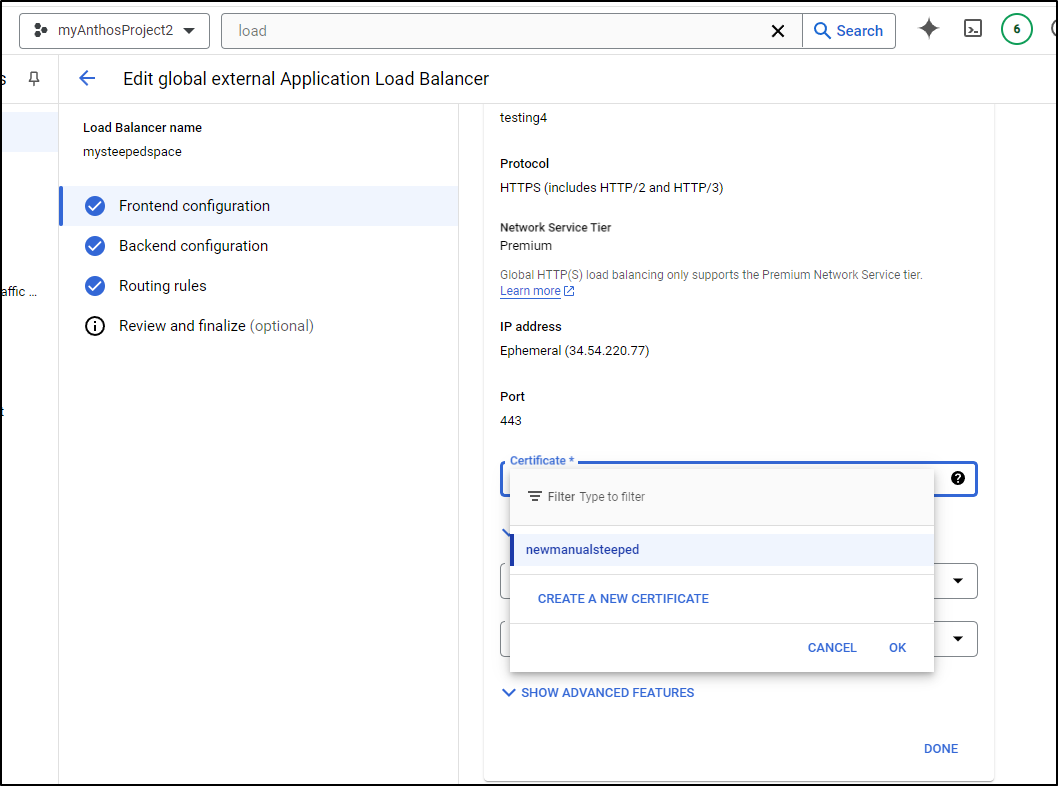
I can also use this in creating an external Application Load Balancer
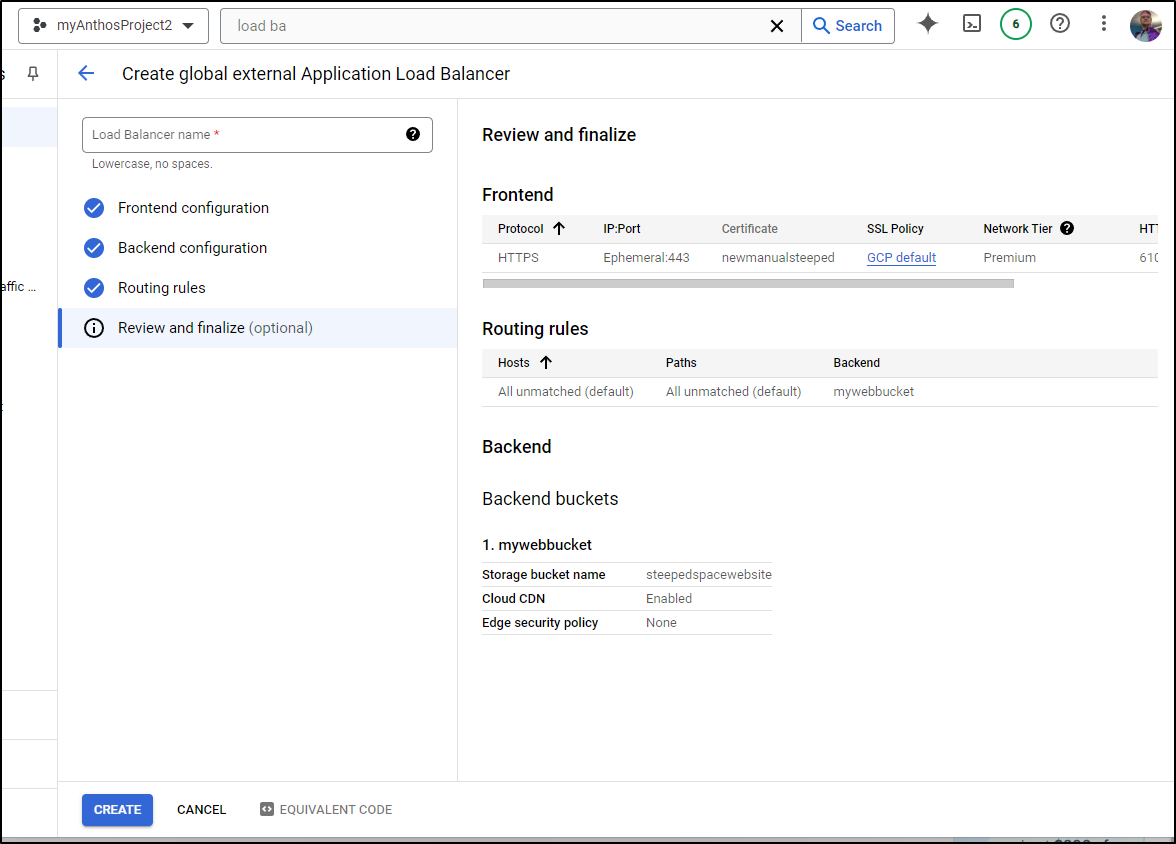
In the configuration section we see highlighted in red “Certificate”
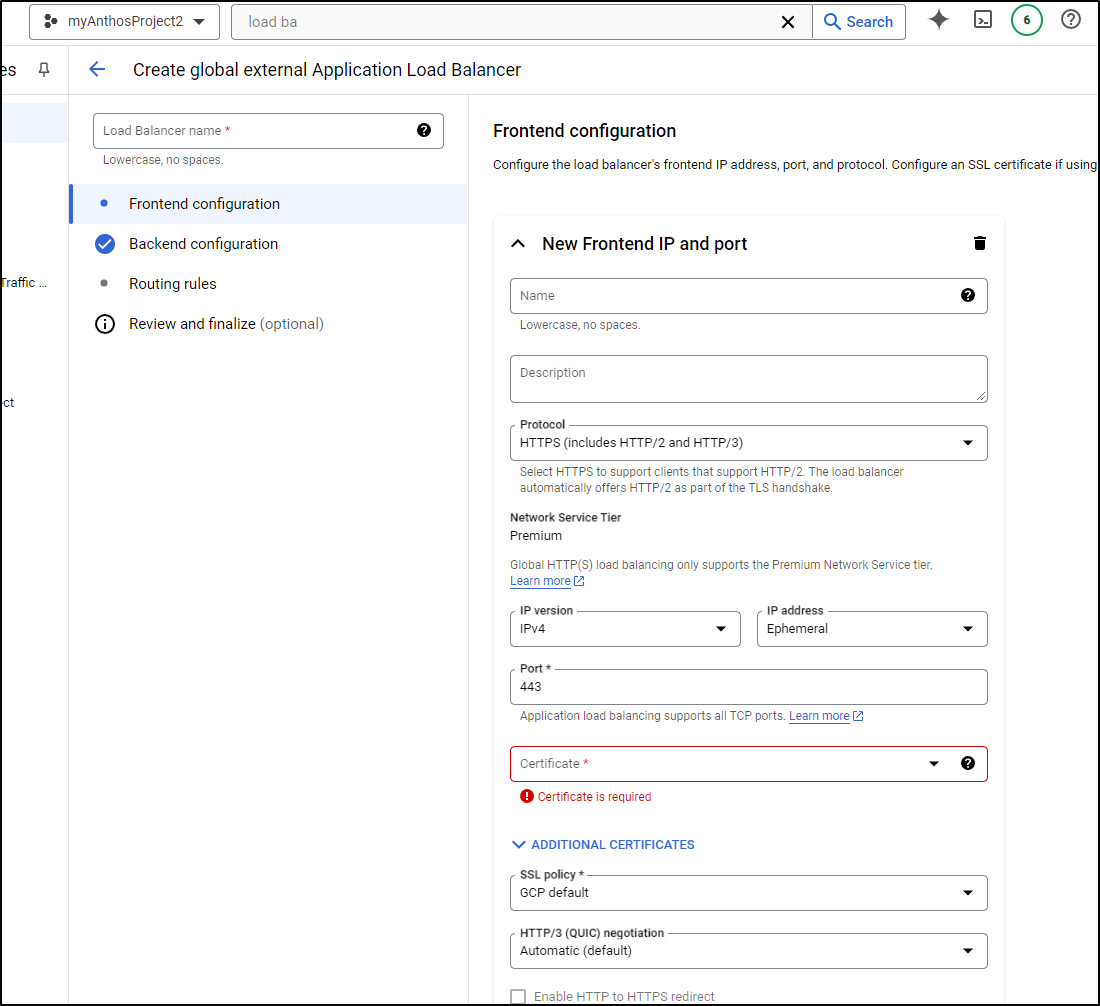
While it won’t let me pick my self-created, i can create a new certificate
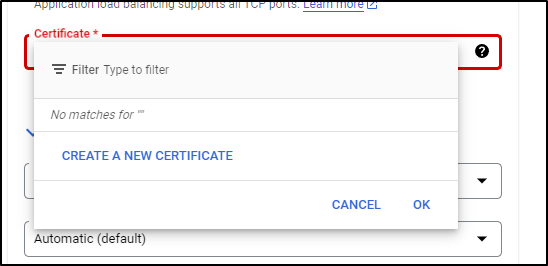
Then I’ll just use the details I have from my utility box here
That now shows up as the certificate in the Frontend IP Setup pane
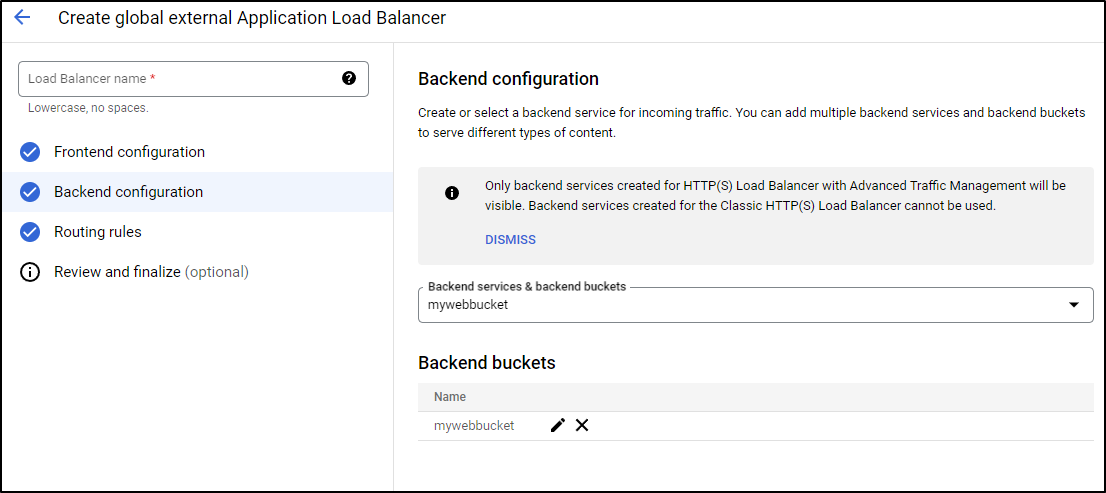
In the wizard for backend, I created a bucket (and allowed public access).
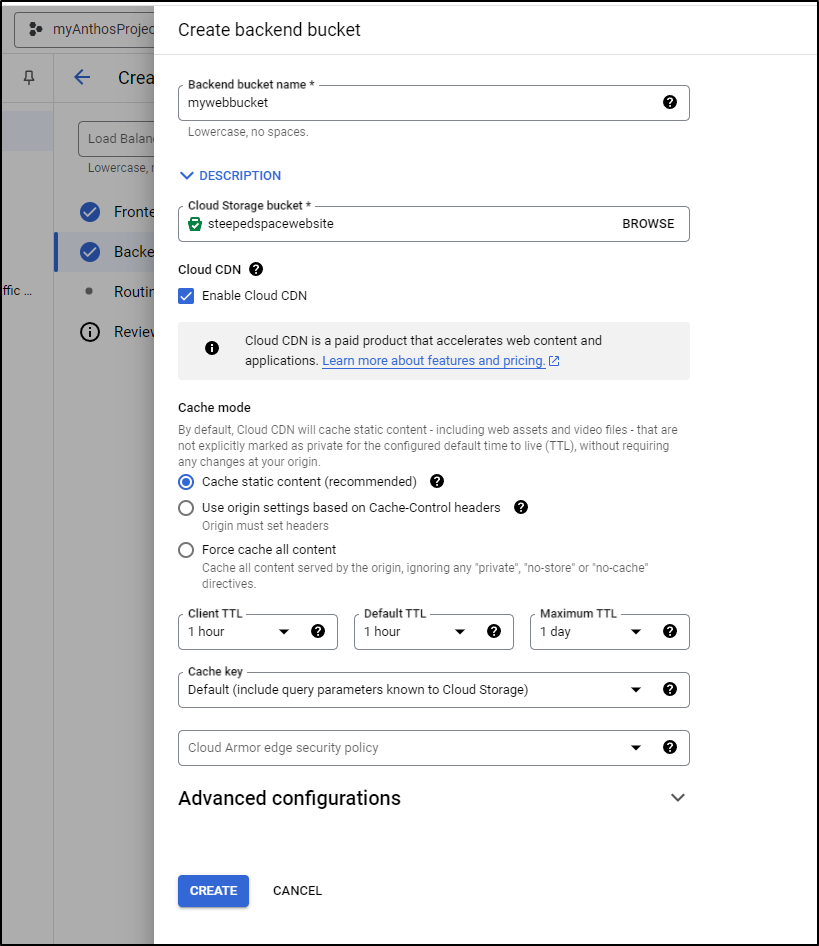
Because I’m using simple routing, all DNS names I end up mapping to the external IP will route to the bucket
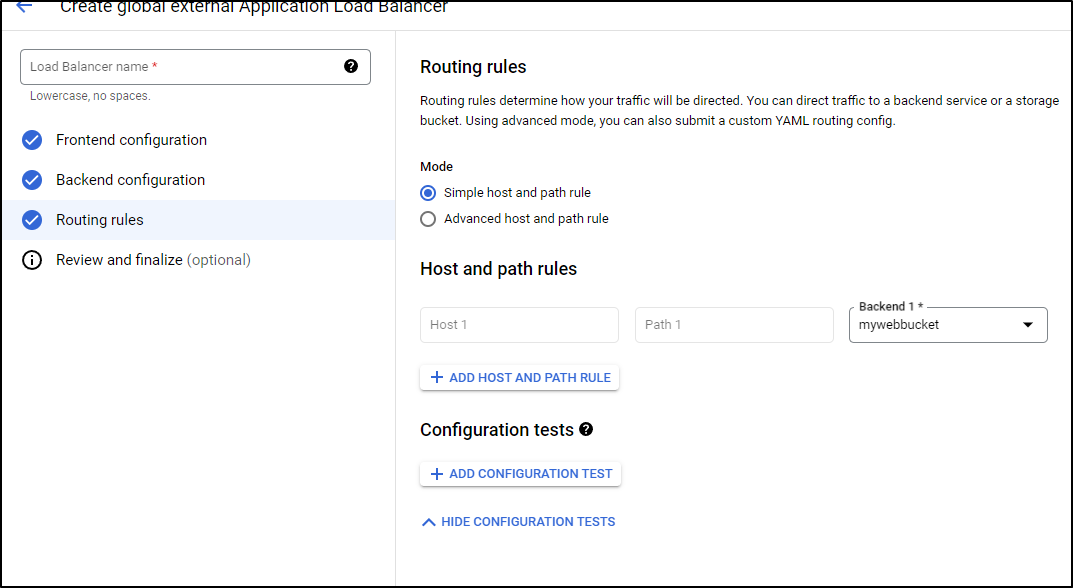
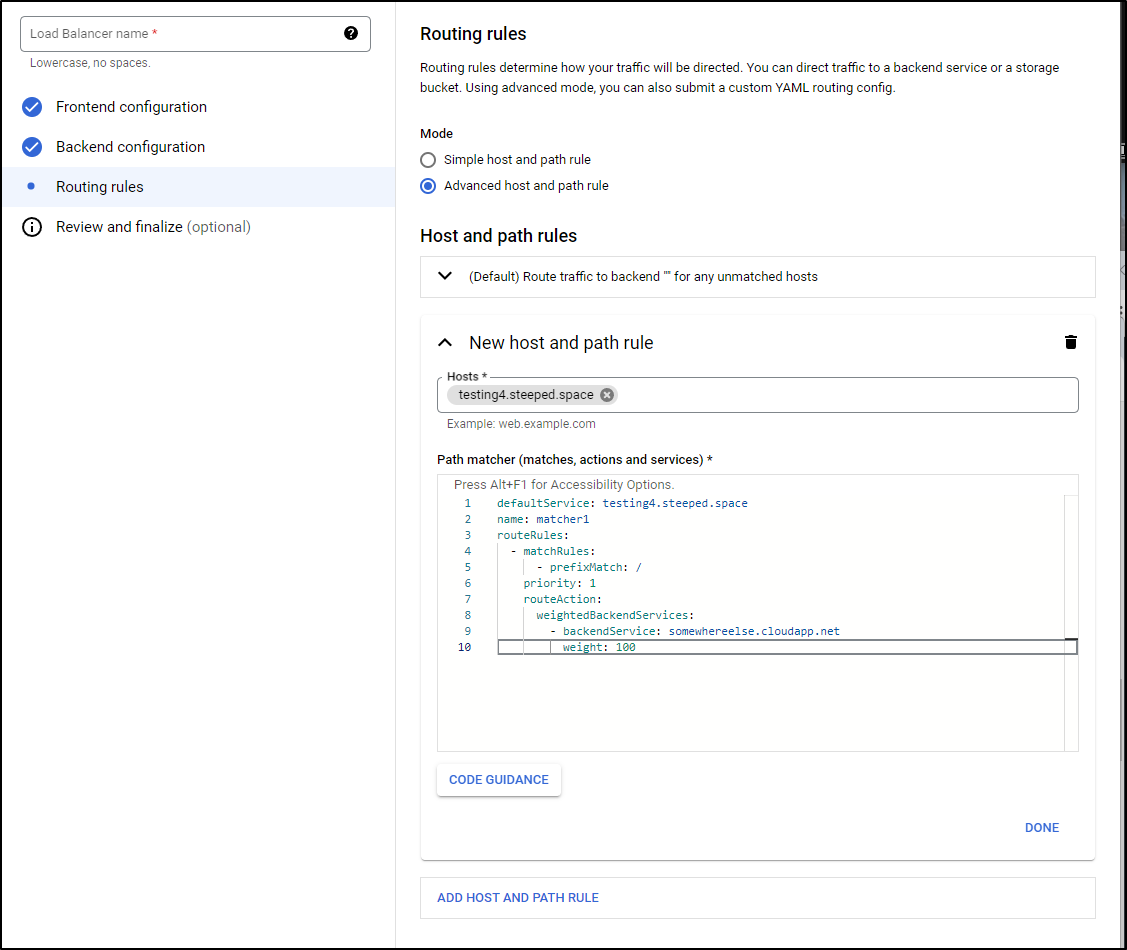
We could get more fancy with the Advanced host and path
But we’ll stick with simple.
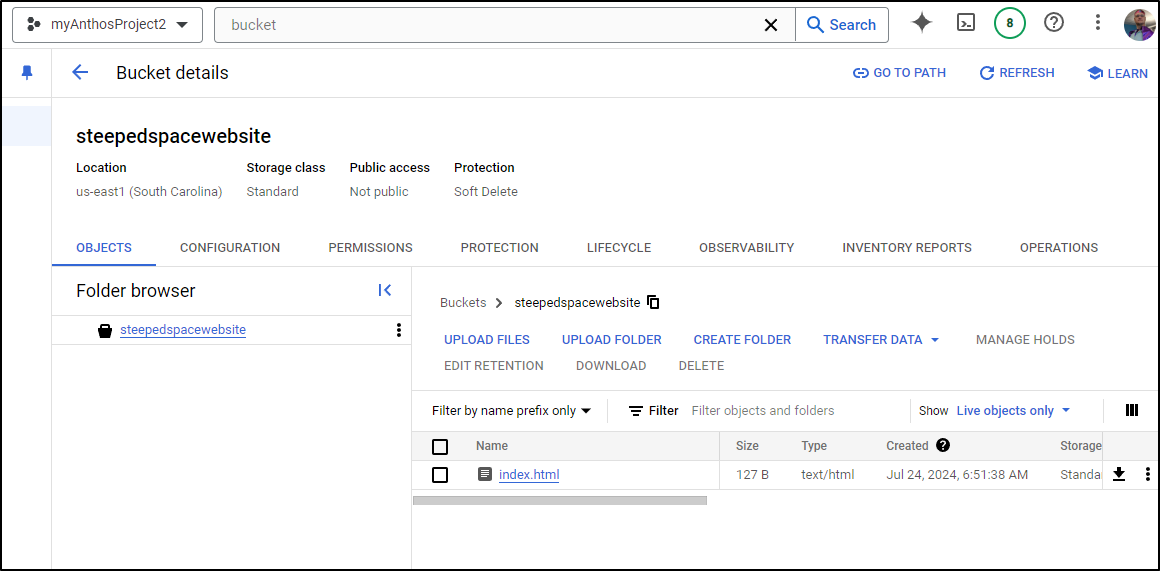
Before I review and finalize, let’s add a basic index.html to the bucket so we have something to see
I’ll make a quick index.html we can use
builder@DESKTOP-QADGF36:~$ vi /mnt/c/Users/isaac/Documents/index.html
builder@DESKTOP-QADGF36:~$ cat /mnt/c/Users/isaac/Documents/index.html
<HTML>
        <HEAD>
                <TITLE>Hello Steeped</TITLE>
        </HEAD>
        <BODY>
                <h1>Hello there, Steeped.space</h1>
        </BODY>
</HTML>
In the bucket, I’ll click upload files
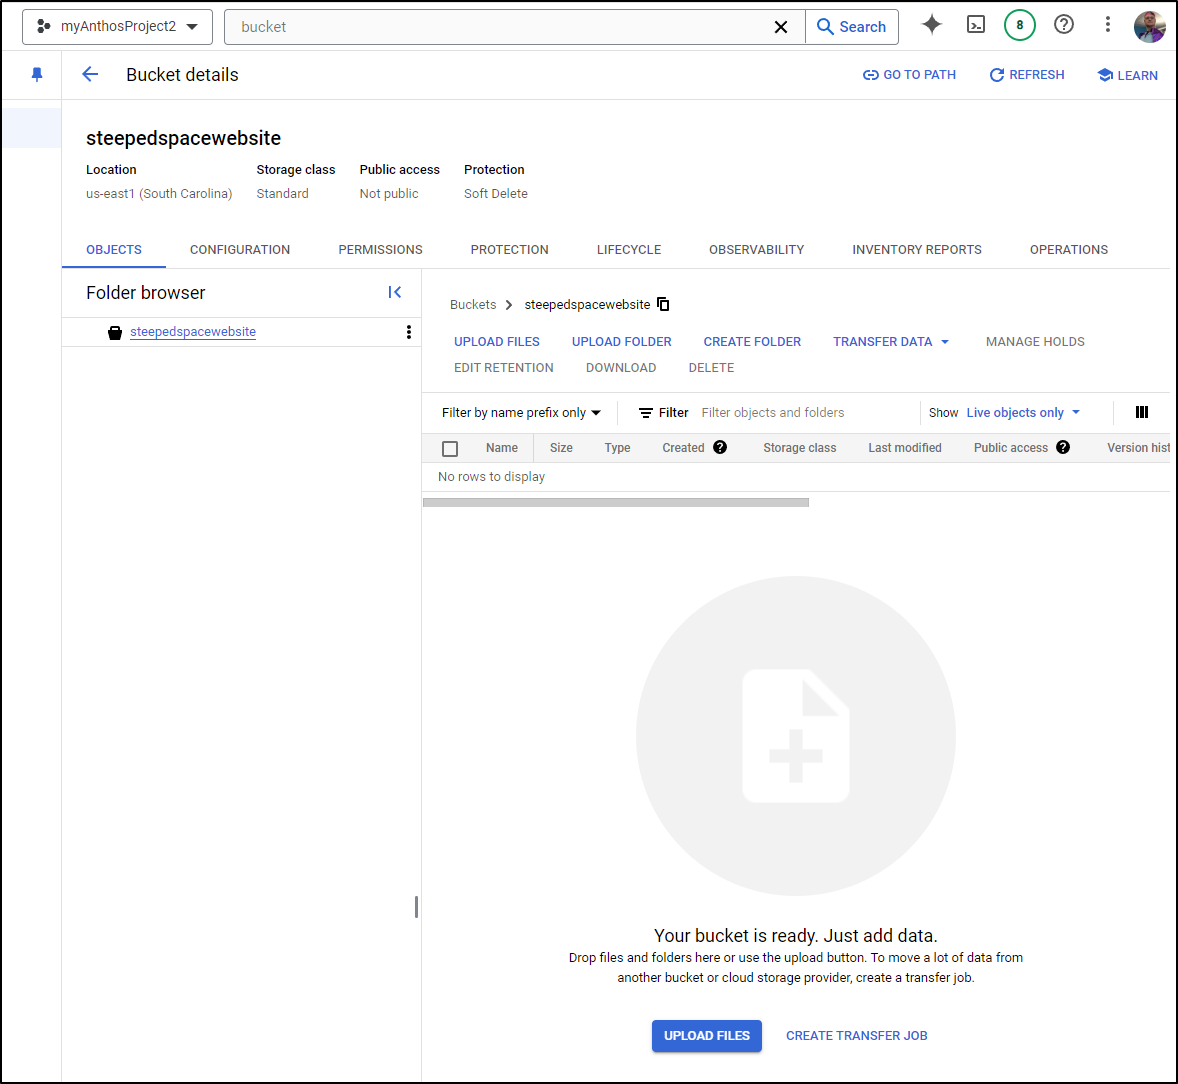
It’s now uploaded to the bucket
I can now finish the ALB create wizard
I gave it a name and clicked create
In the resulting details page, I can see my Public IP is 34.54.220.77
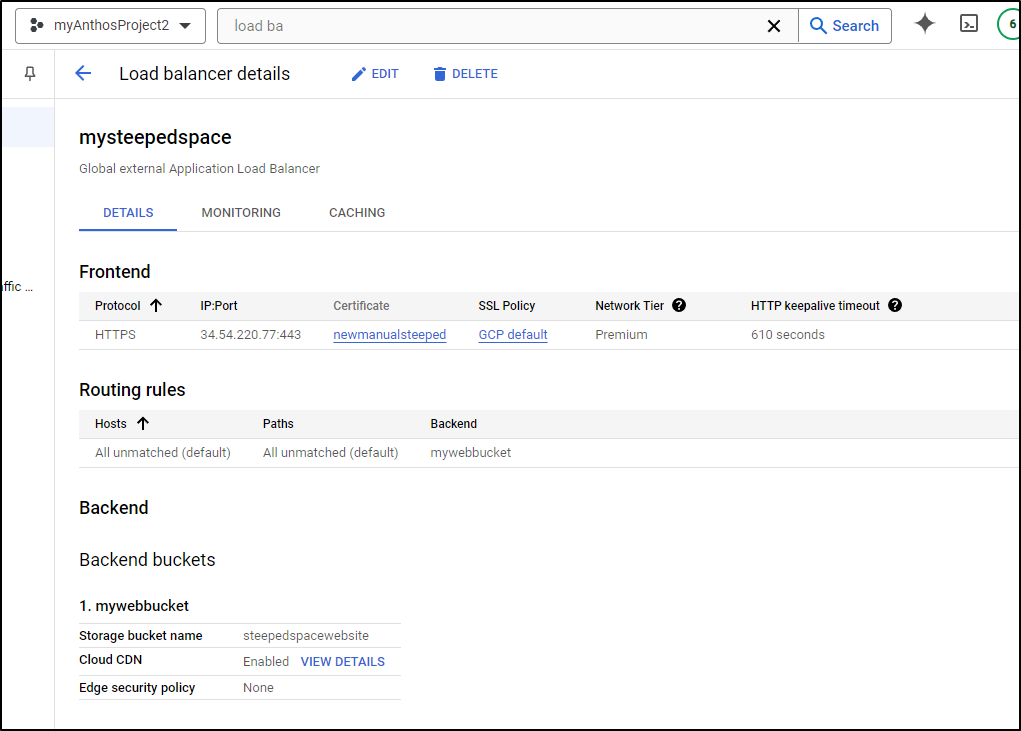
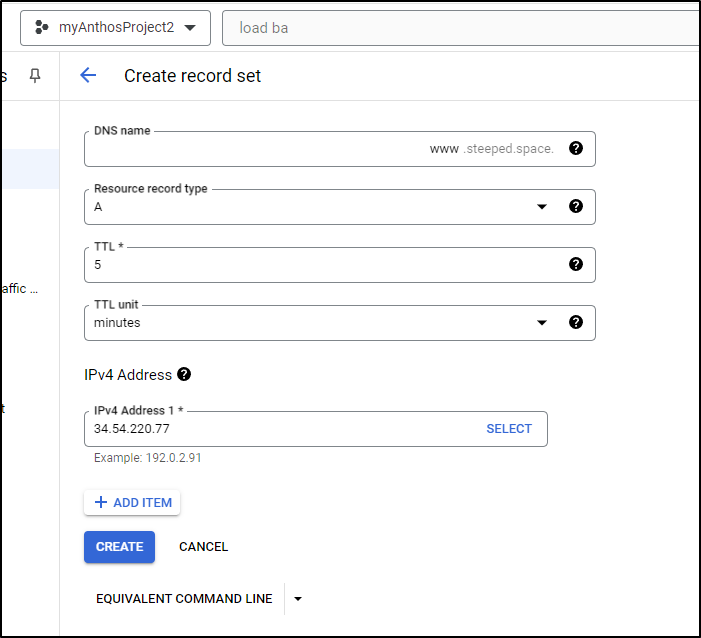
I can now make a www A Record to serve that up
This is also a good time to cleanup our acme challenges as it’s just kind of derpy to leave them sitting around
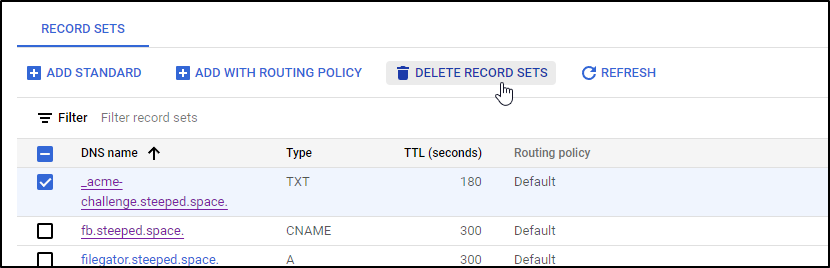
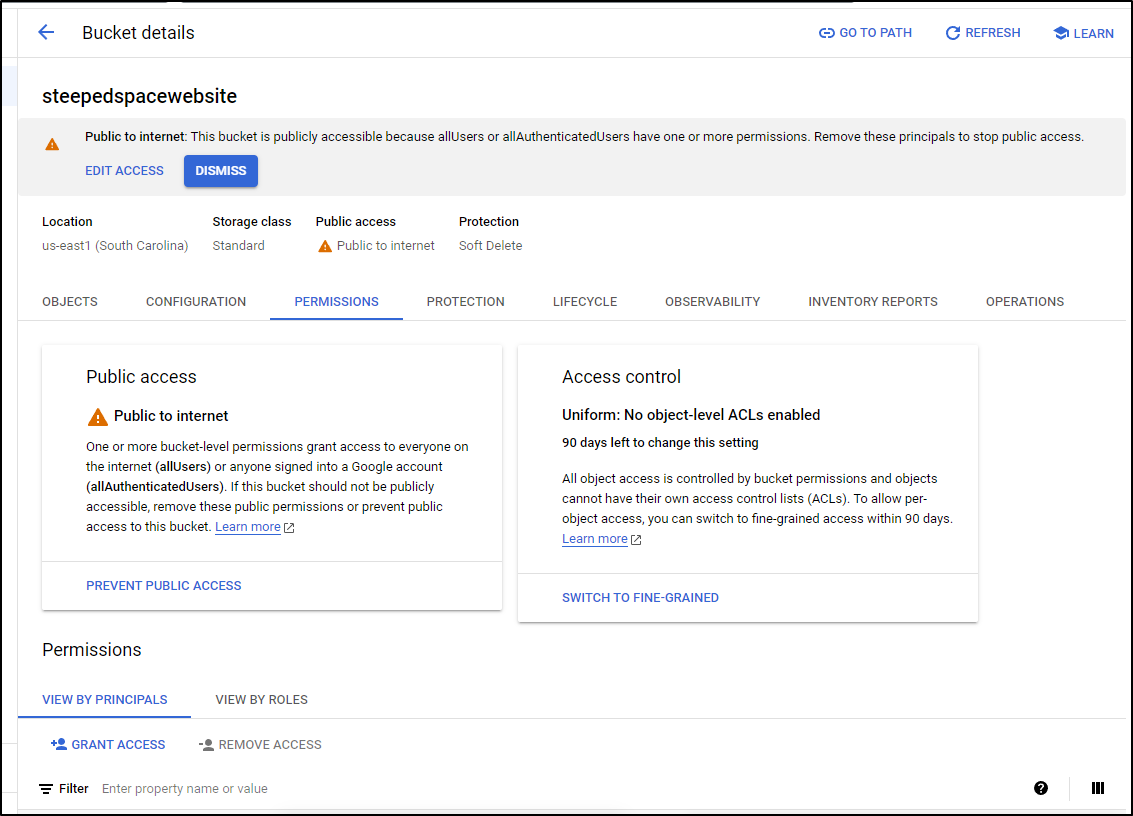
The first issue I see is an access denied
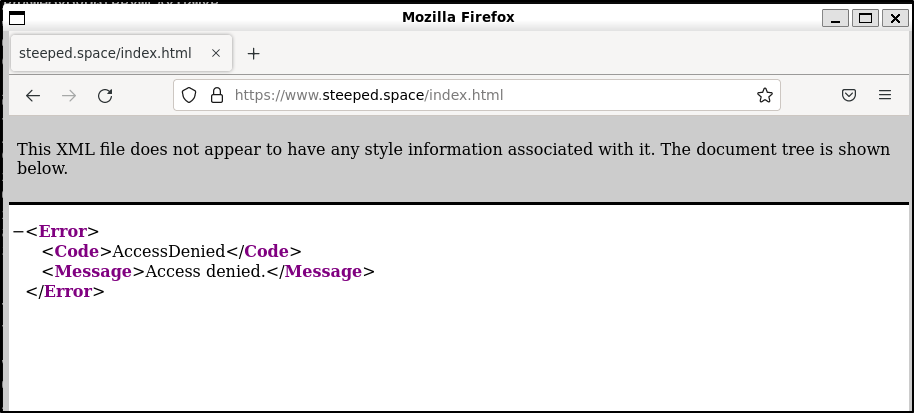
Reviewing the upload, I realized I neglected to set it to public
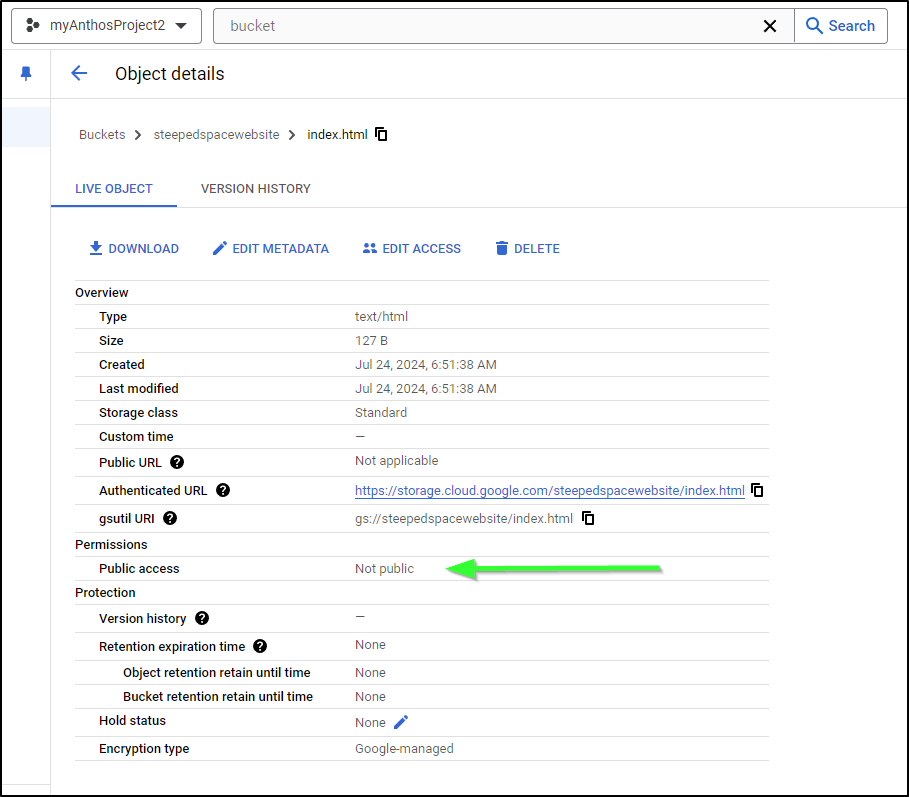
We can follow the steps here to enable all users to access our bucket contents. Note: I would only do this for static websites.
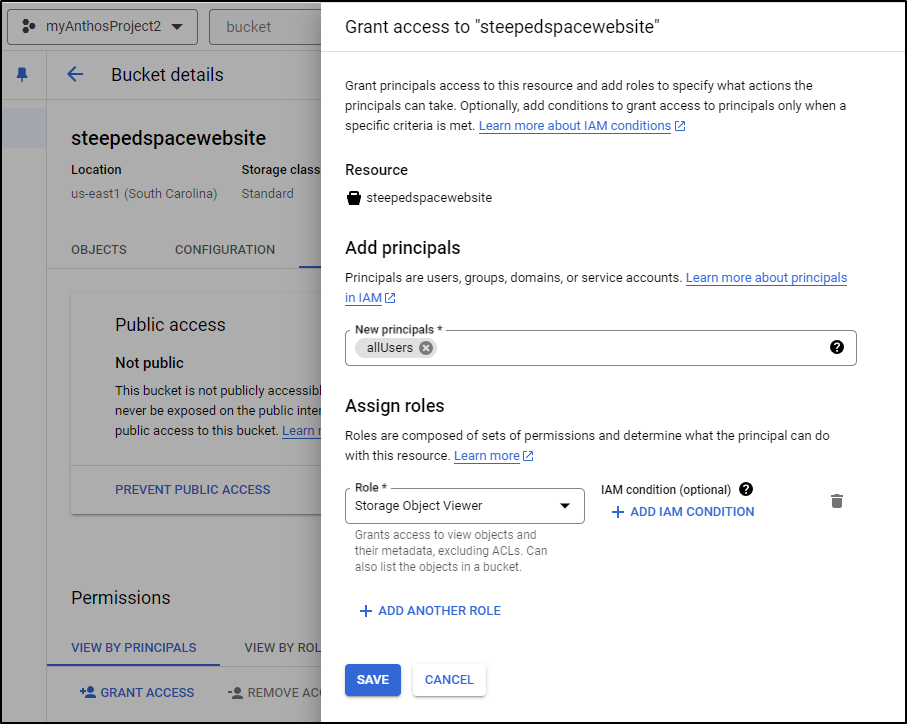
I can now see a warning it is “Public to internet” now on the bucket
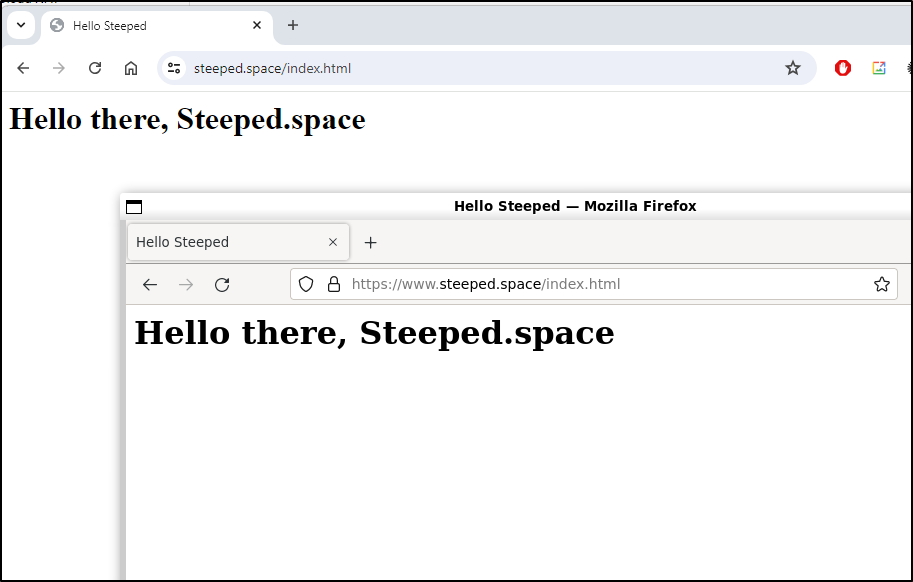
But now we can see our little HTTPS backed website
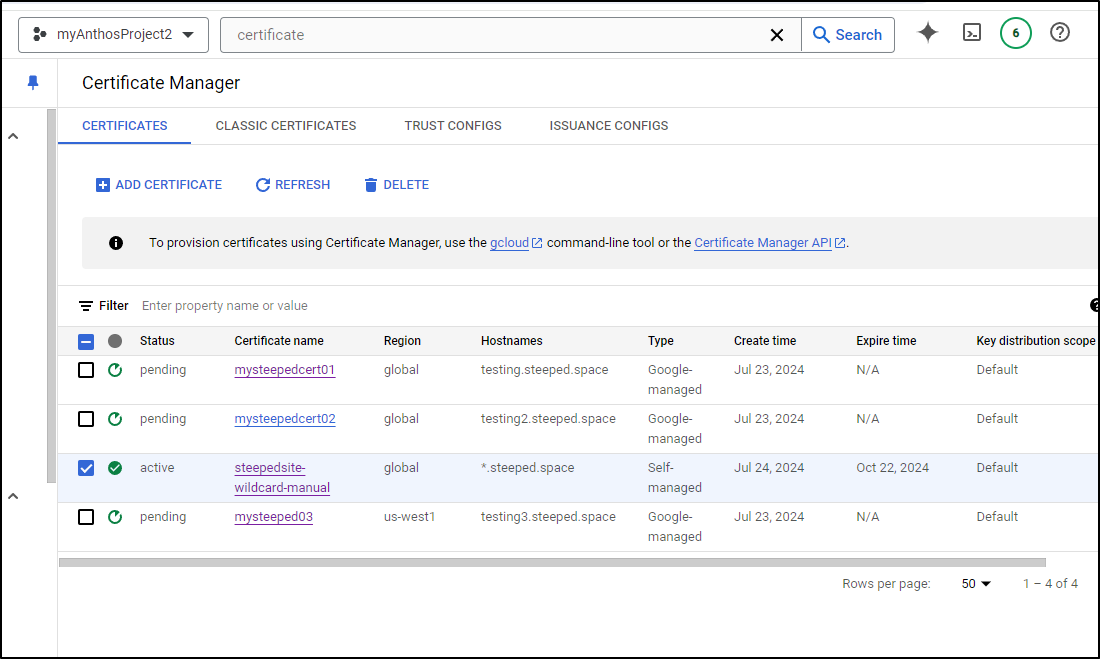
I can also view the certificate to see the Validity matches our manual
We can also see the Wildcard that was created in our Certificates section of Certificate Manager
Before we expire in October, I would need to come back to the frontend configuration and create a replacement certificate
GCP Managed in ALB
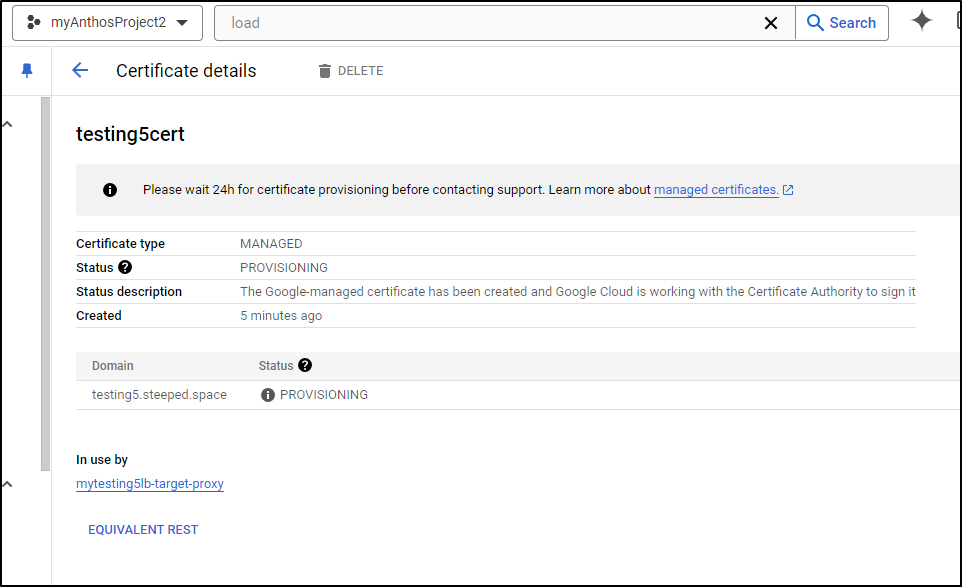
Let’s do a similar activity but let GCP manage the cert. At the cert page, I’ll switch to Google-managed and use the domain “testing5.steeped.space”
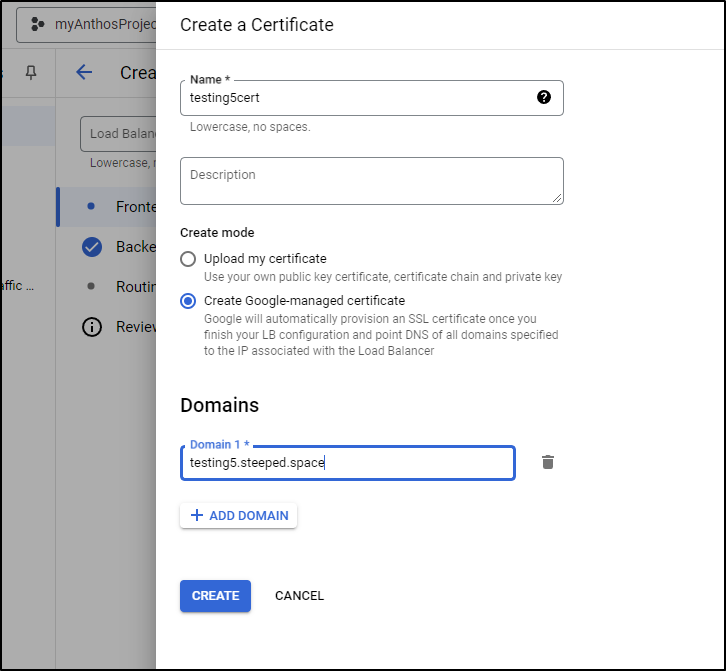
I can see it applied

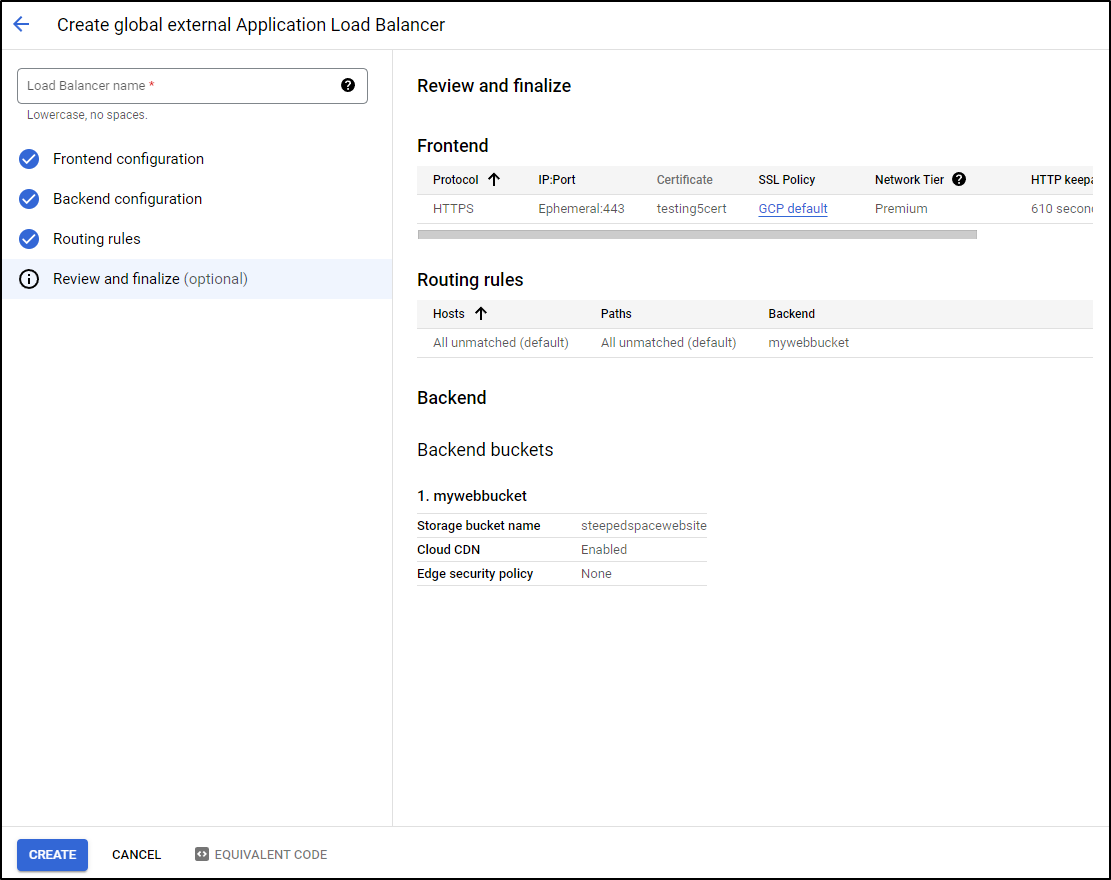
I used the same bucket then clicked Create at the finalize screen
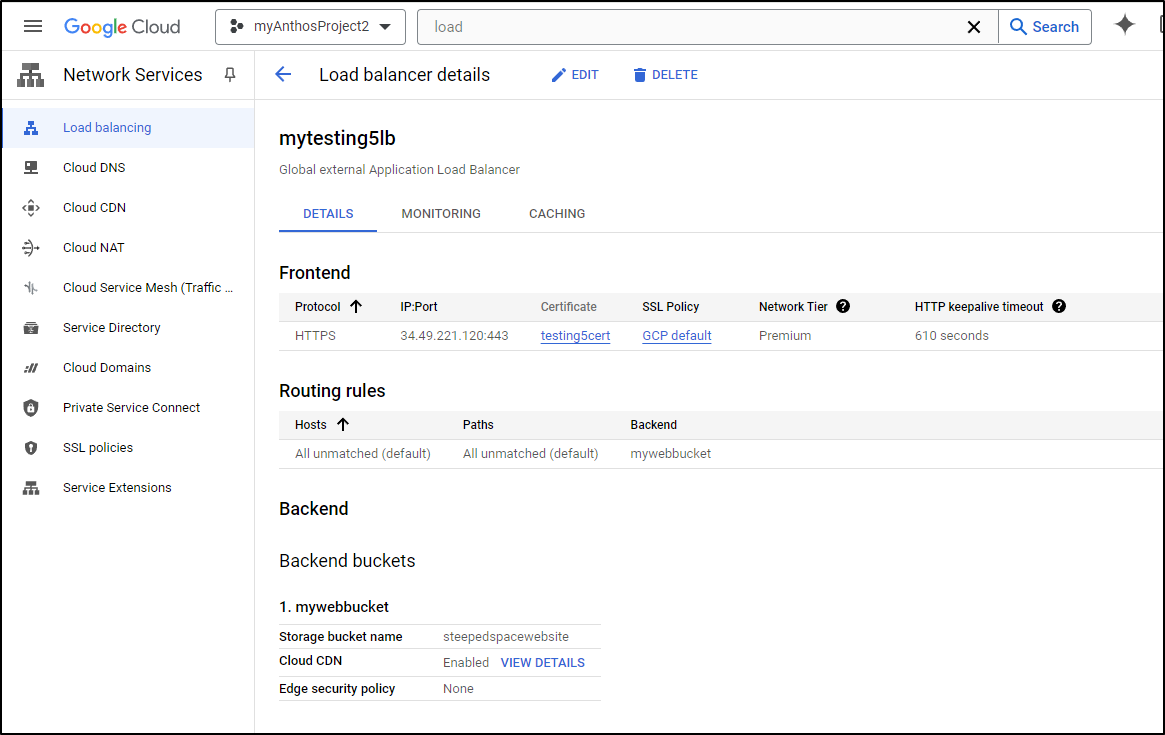
I can see the new IP is 34.49.221.120 in the details page
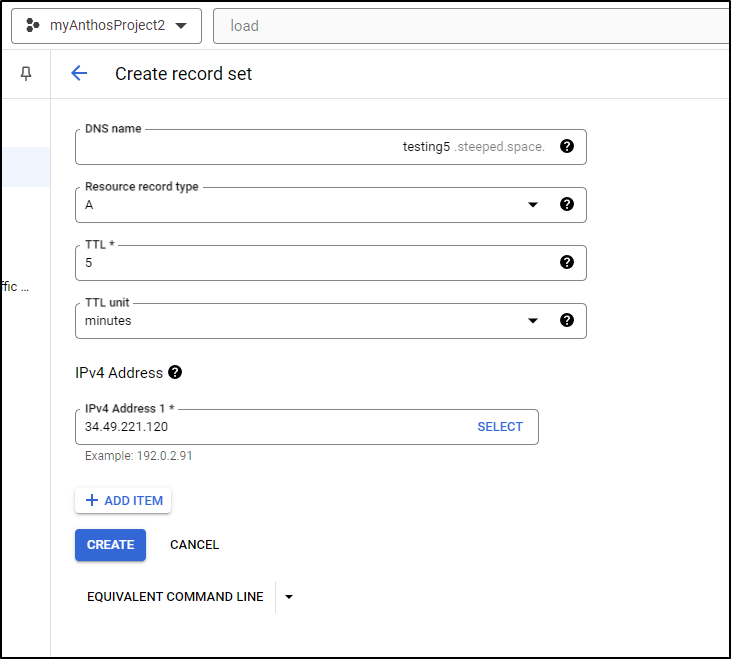
For which I’ll create an A record
This is a bit slower and I can see the site is not up
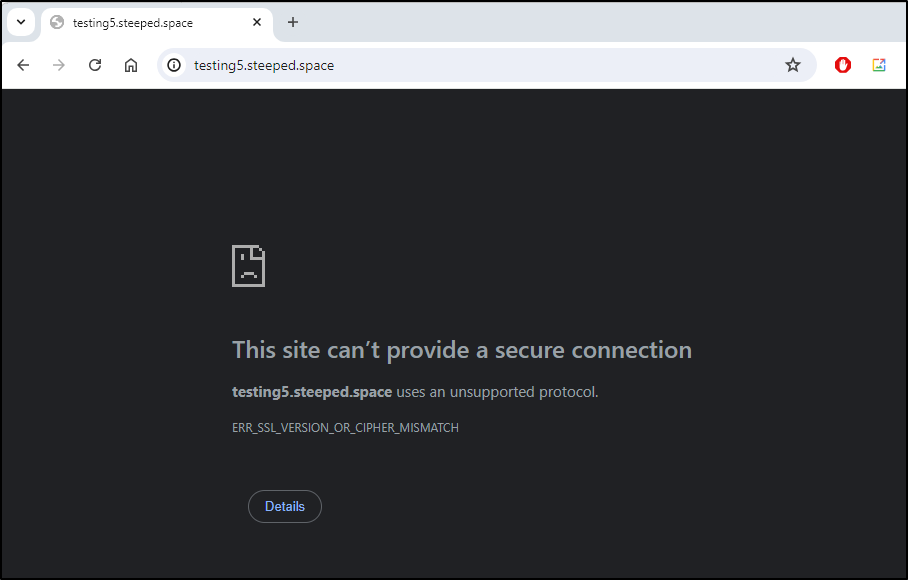
Checking in to the details, I can see it’s still in the provisioning state
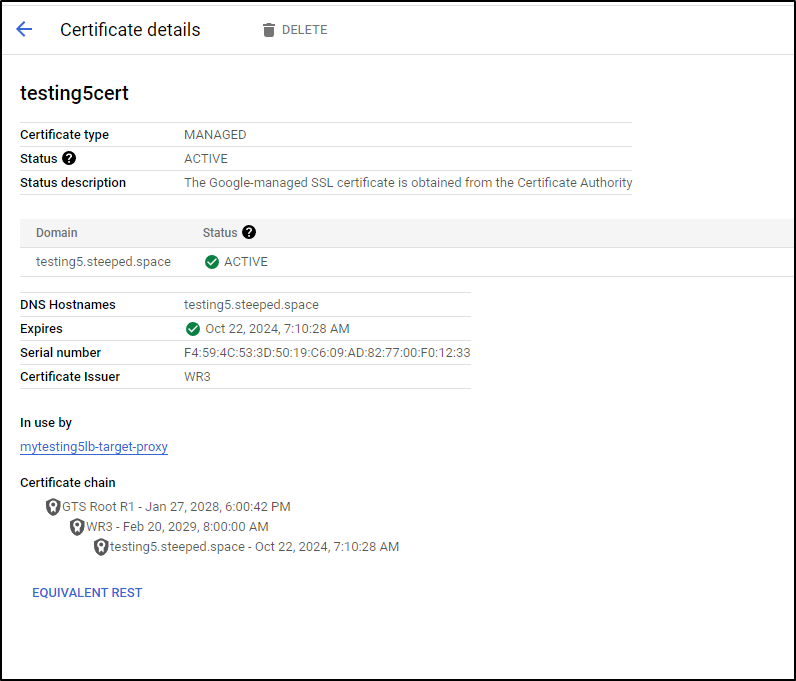
However, within 10 minutes I saw a satisfied certificate
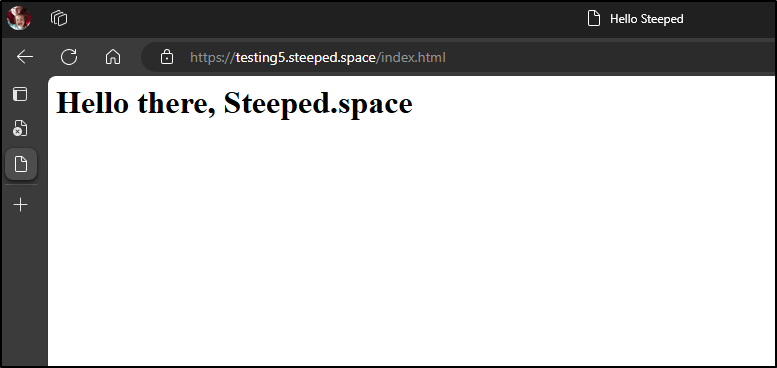
And the website comes up
Note: If you are testing in a browser window, it sometimes caches the cert and you need to try Incognito or Private windows.
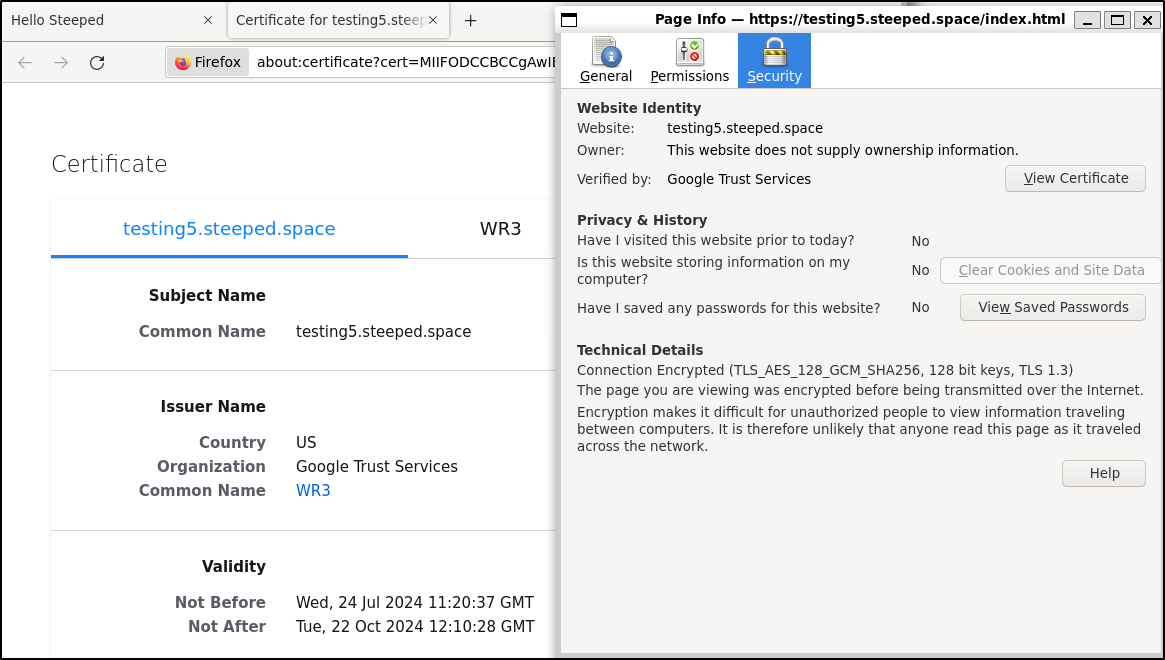
Just as before, we can view the cert details and see its just as long as the free LE, but the signing authority is “Google Trust Services” now
Summary
I think this is a pretty good start. We covered creating our first Hosted Zone in CloudDNS and using it. We started with CNames then moved on to A Records. We showed how we might use it to serve up an Open-Source app like FileGator in an on-prem cluster using a GCP-enabled ACME (LE) ClusterIssuer.
We tried to create some GCP managed certificates but were not successful doing that directly. However, using certbot on a utility Linux VM worked and we showed how to create a Classic Cert as well as use it in the creation of a new static website fronted by GCP CDN and a newer ALB. We also were successful in creating a GCP managed Cert using the ALB approach. The end result was to have two tiny websites hosted with certs tied to our new DNS, testing5 with GCP certs and www with LE certs.
I had planned to show some OpenToFu usage and CICD Automation, but we’ll save that for another day. Hopefully you got a good tour of how to use it.
Though, there is a part of me that thinks no one will read this directly and it just feeds the AI’s out there coming back as knowledge in Copilot or Gemini. Frankly I’m fine with that too - it’s digital cosmic karma I suppose.