

Published: May 5, 2023 by Isaac Johnson
I had grand plans for a telemetry deep dive today. But things just kept not sorting out for me. But sometimes, it’s in the problems we can find something worthwhile to share.
In this post I’ll document the findings and fixes, and then the manual steps to check that Dapr was fine.
The problem
The first issue I encountered was that my playbook to reset the cluster seemed to not be uploading.
Often that can come from expired az tokens, but the first issue was a failure on some list variable
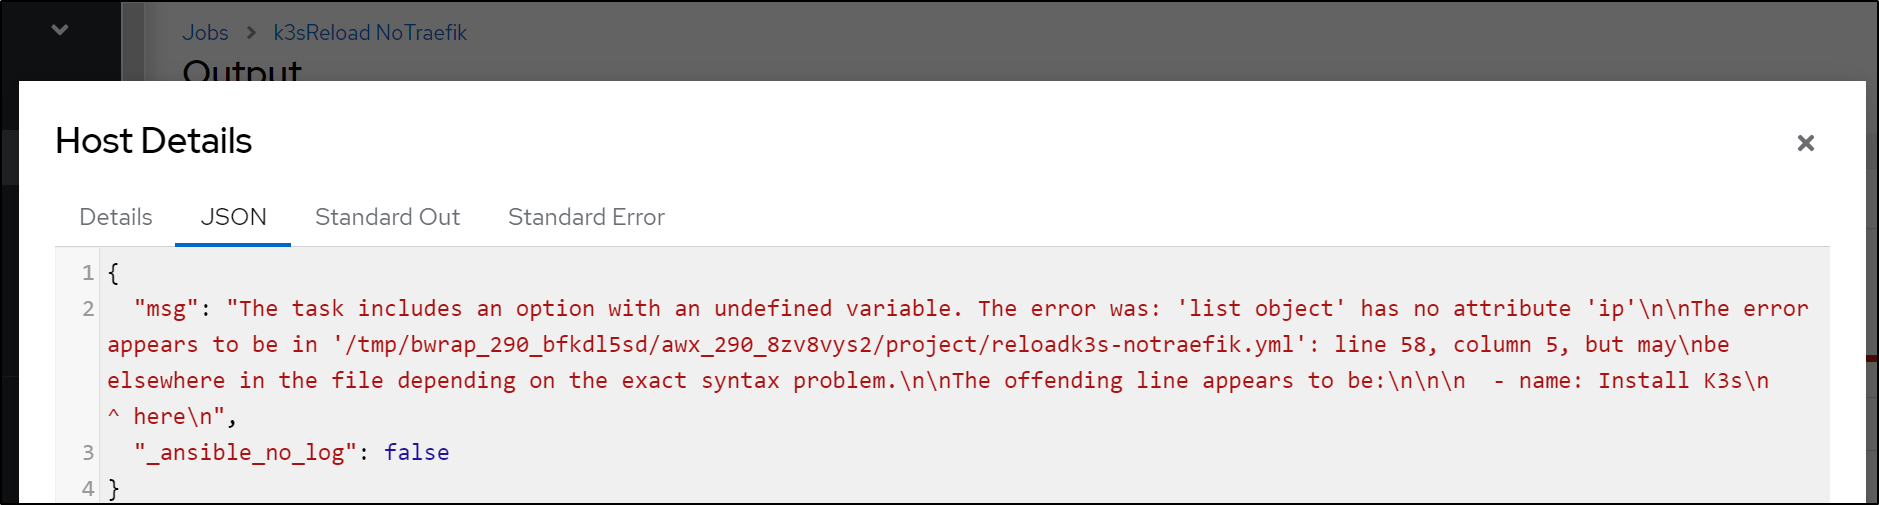
What did that mean?
The task includes an option with an undefined variable. The error was: 'list object' has no attribute 'ip'\n\nThe error appears to be in '/tmp/bwrap_290_bfkdl5sd/awx_290_8zv8vys2/project/reloadk3s-notraefik.yml': line 58, column 5, but may\nbe elsewhere in the file depending on the exact syntax problem.\n\nThe offending line appears to be:\n\n\n - name: Install K3s\n ^ here
I’ll save the drawn out details. Quite simply, in one Template I had properly set the vars
---
k3sversion: v1.23.10%2Bk3s1
hosts:
  - name: 192.168.1.13
  - name: 192.168.1.206
  - name: 192.168.1.162
extingress:
  ip: 73.242.50.46
  port: 12345
But in the Template that failed I had used
---
k3sversion: v1.23.10%2Bk3s1
hosts:
  - name: 192.168.1.13
  - name: 192.168.1.206
  - name: 192.168.1.162
extingress:
  - ip: 73.242.50.46
  - port: 12345
Hopefully that shows up well, but “- ip” made it a false list and it should have just been “ip”.
Next, I thought, “hey, let’s use a newer K3s version on the cluster”. Since the variable downloads it on the fly to the main and workers, it seemed it should just be as easy as upping the k3sversion
---
k3sversion: v1.26.4%2Bk3s1
hosts:
  - name: 192.168.1.13
  - name: 192.168.1.206
  - name: 192.168.1.162
extingress:
  - ip: 73.242.50.46
  - port: 12345
But then that failed
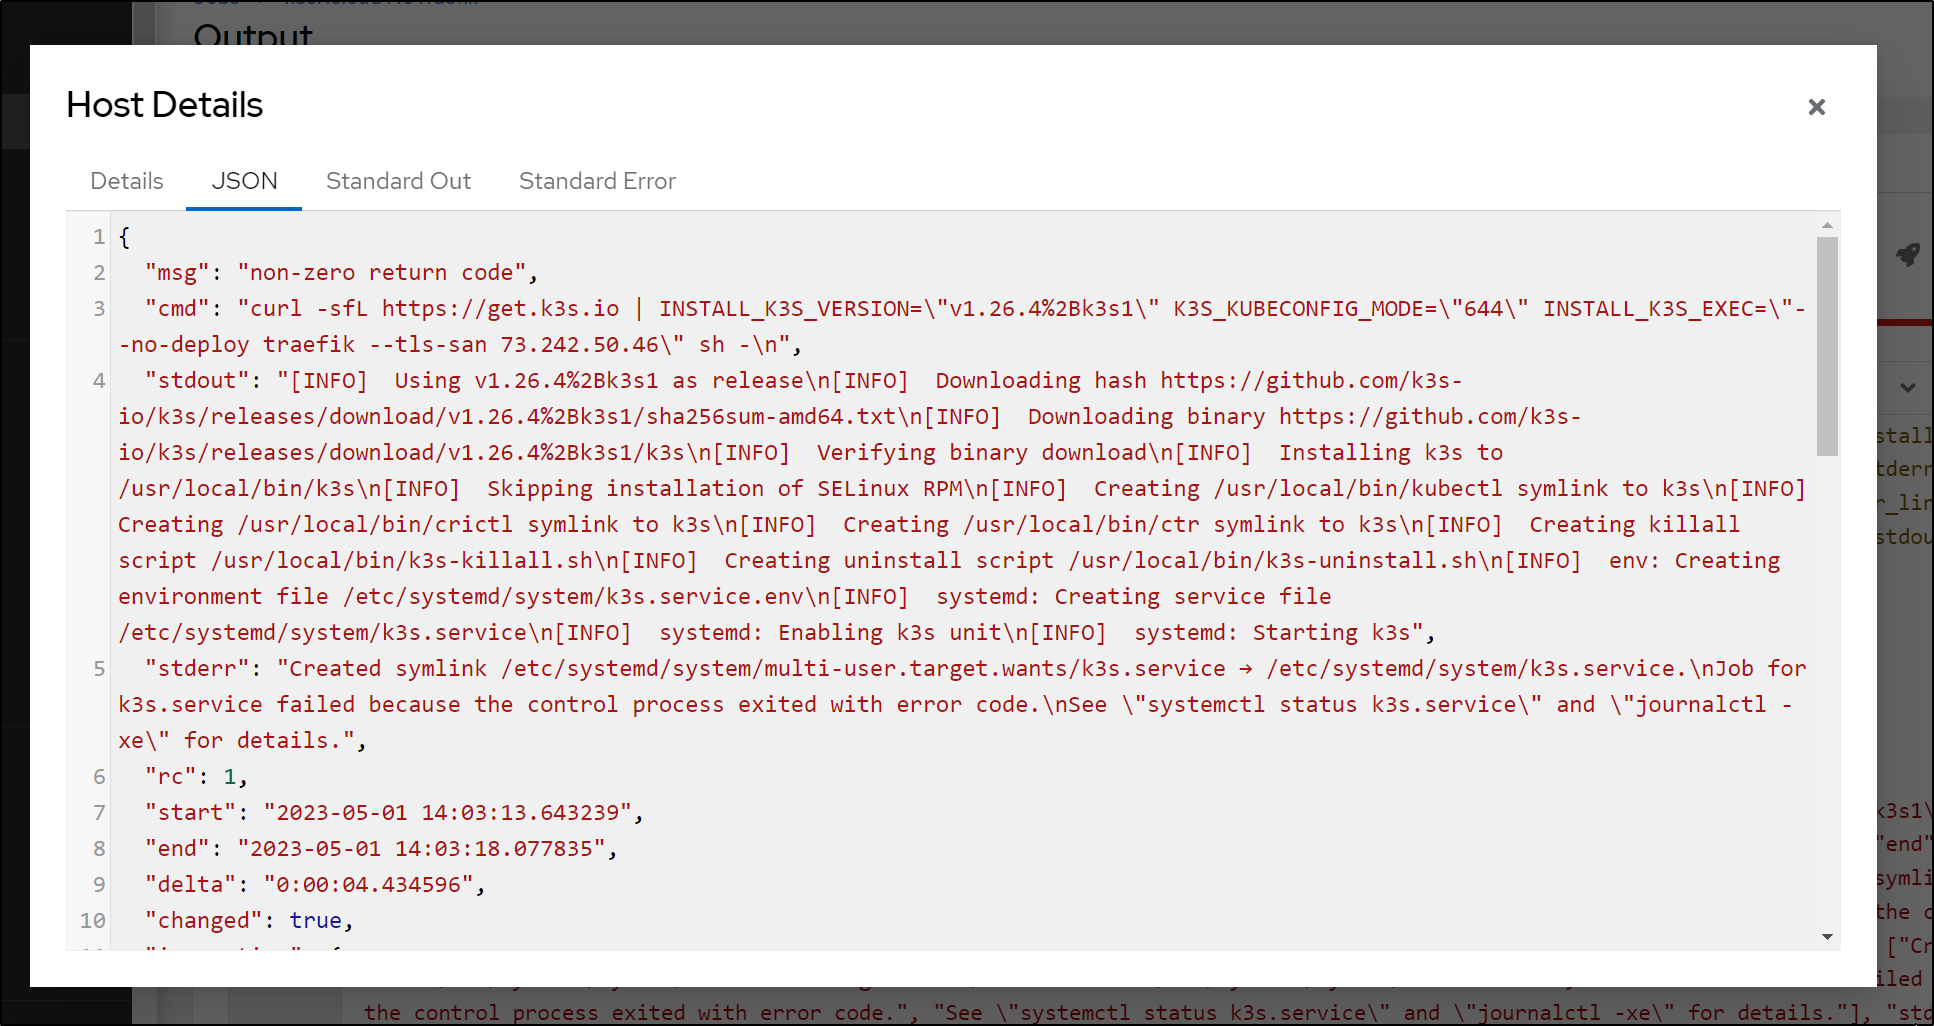
This took even longer to sort out. I ended up shelling into the host and trying to launch k3s manually
The offending line
 - name: Install K3s
    ansible.builtin.shell: |
      curl -sfL https://get.k3s.io | INSTALL_K3S_VERSION="" K3S_KUBECONFIG_MODE="644" INSTALL_K3S_EXEC="--no-deploy traefik --tls-san " sh -
    become: true
    args:
      chdir: /tmp
It was as if “–no-deploy” was gone. I couldn’t find it anywhere in the usage or docs. A bit of searching found that some time back the deprecated “–no-deploy”, but had not really removed it - so I never took notice.
Instead of “–no-deploy traefik” (which we want to use when adding Istio), the new k3s parameter would be “–disable traefik”.
This presented a nice opportunity to add an ansible variable default so I would have backwards compatibility.
I changed the playbook to take an optional “disableword” that would fall back to “no-deploy” if unset
  - name: Install K3s
    ansible.builtin.shell: |
      curl -sfL https://get.k3s.io | INSTALL_K3S_VERSION="{{ k3sversion }}" K3S_KUBECONFIG_MODE="644" INSTALL_K3S_EXEC="--{{ disableword | default('no-deploy') }} traefik --tls-san {{ extingress.ip }}" sh -
    become: true
    args:
      chdir: /tmp
Then the Variables block of my template changed to:
---
disableword: disable
k3sversion: v1.26.4%2Bk3s1
hosts:
  - name: 192.168.1.13
  - name: 192.168.1.206
  - name: 192.168.1.162
extingress:
  ip: 73.242.50.46
  port: 12345
At this point, I thought “super! it works”, after all the playbook run completed successfully.
But every attempt to connect failed. I would check the downloaded k3s file and it would have the old IP. If I changed from 192.168.1.12 to 192.168.1.13, it would fail on certs - telling me the whole block was not updating in the shared kubeconfig file.
If we look at the old version of the perl script you’ll see i try and find different matching IP blocks to replace.
	#  certificate-authority-data
	if (($filec[$i] =~ /server: https:\/\/73.242.50.46:25460/)||($filec[$i] =~ /server: https:\/\/192.168.1.81:6443/)||($filec[$i] =~ /server: https:\/\/$newRemote:$newPort/)||($filec[$i] =~ /server: https:\/\/$newLocal:6443/))
	{
The old file had generally been in the external IP or the 1.81 block (the slower NIC on the host). Now it was 1.12.. and the new IP would be 1.13. This endless list was going to be a pain to manage.
What I needed was to find the mac81 kubecontext and then note the IP last used which would be the “server: https://x.x.x.x:6443” line above it. now the “-name: mac81” would appear a few times in the file, so only the one that had the preceding line of “server” mattered.
Perl is like an old worn well loved blanked. I love perl. I started in perl and fortran, then perl and c, then perl and java.. perl is .. well, i love perl, we’ll leave it as that.
So I basically added a blank variable then searched for the mac81 block and set the ‘oldIp’ from what i found in the last known combined kubeconfig
my $oldIp="";

#....

for (my $i = 0; $i < scalar(@filec); $i += 1)
{
        if ($filec[$i] =~ /name: mac81/) {
           if ($filec[($i - 1)] =~ /server: https:\/\/(.*):6443/)
           {
                $oldIp = $1;
           }
         }
}
Not all that complicated.. then i added that “OldIp” in my pattern check
if (($filec[$i] =~ /server: https:\/\/73.242.50.46:25460/)||($filec[$i] =~ /server: https:\/\/$oldIp:6443/)||($filec[$i] =~ /server: https:\/\/192.168.1.81:6443/)||($filec[$i] =~ /server: https:\/\/$newRemote:$newPort/)||($filec[$i] =~ /server: https:\/\/$newLocal:6443/))
Which rendered a final file as such
#!/bin/perl
#

my ($combined,$newint,$output,$newLocal,$newRemote,$newPort) = @ARGV;

open(FILEH,"$combined");
@filec = <FILEH>;
close(FILEH);

my $oldIp="";
my $newcad=`cat $newint | grep 'certificate-authority-data' | sed 's/^.*: //'`;
my $clientcertdata=`cat $newint | grep 'client-certificate-data' | sed 's/^.*: //'`;
my $clientkeydata=`cat $newint | grep 'client-key-data' | sed 's/^.*: //'`;

for (my $i = 0; $i < scalar(@filec); $i += 1)
{
        if ($filec[$i] =~ /name: mac81/) {
           if ($filec[($i - 1)] =~ /server: https:\/\/(.*):6443/)
           {
                $oldIp = $1;
           }
         }
}

for (my $i = 0; $i < scalar(@filec); $i += 1)
{
        #       print "$i\n";

        #  certificate-authority-data
        if (($filec[$i] =~ /server: https:\/\/73.242.50.46:25460/)||($filec[$i] =~ /server: https:\/\/$oldIp:6443/)||($filec[$i] =~ /server: https:\/\/192.168.1.81:6443/)||($filec[$i] =~ /server: https:\/\/$newRemote:$newPort/)||($filec[$i] =~ /server: https:\/\/$newLocal:6443/))
        {
                #print $filec[($i - 1)];
                $filec[($i - 1)] =~ s/^(.*)data: .*/\1data: /;
                chomp($filec[($i - 1)]);
                #       print $filec[($i - 1)] . $newcad;
                $filec[($i - 1)] .= $newcad;
                # Now fix the Server IP and Ports if we changed
                if ($filec[$i] =~ /server: https:\/\/192/) {
                        $filec[$i] =~ s/https:\/\/.*/https:\/\/$newLocal:6443/;
                } else {
                        $filec[$i] =~ s/https:\/\/.*/https:\/\/$newRemote:$newPort/;
                }
        }
        # client cert and key data
        if ($filec[$i] =~ /^- name: mac81/) {
            $filec[$i+2] =~ s/^(.*)data: .*/\1data: /;
            chomp($filec[$i+2]);
            $filec[$i+2] .= $clientcertdata;
            $filec[$i+3] =~ s/^(.*)data: .*/\1data: /;
            chomp($filec[$i+3]);
            $filec[$i+3] .= $clientkeydata;
        }
}

# print updated file
open(FILEO,">$output");
foreach my $line (@filec)
{
   print FILEO $line;
}
close(FILEO);

exit 0;
Now AKV was updated properly and I could reach the cluster.
Dapr
Hey, I love me a bit of Dapr.io. I typically hand add Dapr each time.
But could I not just automated with Ansible?
The Dapr playbook actually came together pretty well
---
- name: Dapr and Sample
  hosts: AnnaMacbook

  tasks:
  - name: Install dapr cli
    ansible.builtin.shell: |
      wget -q https://raw.githubusercontent.com/dapr/cli/master/install/install.sh
      chmod 755 ./install.sh
      sudo ./install.sh
    become: true
    args:
      chdir: /tmp

  - name: Dapr Init
    ansible.builtin.shell: |
      export KUBECONFIG=/etc/rancher/k3s/k3s.yaml
      dapr init -k
    become: true
    args:
      chdir: /tmp

  - name: Install Helm and git
    ansible.builtin.shell: |
      curl https://baltocdn.com/helm/signing.asc | gpg --dearmor | tee /usr/share/keyrings/helm.gpg > /dev/null
      apt-get install apt-transport-https --yes
      echo "deb [arch=$(dpkg --print-architecture) signed-by=/usr/share/keyrings/helm.gpg] https://baltocdn.com/helm/stable/debian/ all main" | tee /etc/apt/sources.list.d/helm-stable-debian.list
      apt-get update
      apt-get install -y helm git
    become: true
    args:
      chdir: /

  - name: Add Bitnami Chart
    ansible.builtin.shell: |
      export KUBECONFIG=/etc/rancher/k3s/k3s.yaml
      helm repo add bitnami https://charts.bitnami.com/bitnami
      helm repo update
    become: true
    args:
      chdir: /tmp

  - name: Install Redis
    ansible.builtin.shell: |
      export KUBECONFIG=/etc/rancher/k3s/k3s.yaml
      helm install redis bitnami/redis
    become: true
    args:
      chdir: /tmp

  - name: Add Calculator with Appconfig
    ansible.builtin.shell: |
      git clone https://github.com/dapr/quickstarts.git
      kubectl apply -f quickstarts/tutorials/distributed-calculator/deploy/
    become: true
    args:
      chdir: /tmp

  - name: Add OTel Chart
    ansible.builtin.shell: |
      export KUBECONFIG=/etc/rancher/k3s/k3s.yaml
      helm repo add open-telemetry https://open-telemetry.github.io/opentelemetry-helm-charts
      helm repo updae
    become: true
    args:
      chdir: /tmp

  - name: Install OTel
    ansible.builtin.shell: |
      export KUBECONFIG=/etc/rancher/k3s/k3s.yaml
      helm install opentelemetry-collector open-telemetry/opentelemetry-collector --set mode=deployment
    become: true
    args:
      chdir: /tmp
But here is where I get stuck. Even rolling back to the last release and traefik. I cannot get Dapr to kick in
$ kubectl get nodes
NAME                  STATUS   ROLES                  AGE   VERSION
anna-macbookair       Ready    control-plane,master   21h   v1.23.10+k3s1
builder-macbookpro2   Ready    <none>                 21h   v1.23.10+k3s1
isaac-macbookpro      Ready    <none>                 21h   v1.23.10+k3s1

$ kubectl get pods
NAME                                       READY   STATUS    RESTARTS   AGE
divideapp-585848cf4d-blgmp                 1/1     Running   0          21h
opentelemetry-collector-5bc64d97cc-dnv2n   1/1     Running   0          21h
multiplyapp-bdbdf4b5-lpsqc                 1/1     Running   0          21h
addapp-76dbf95c88-ltr6z                    1/1     Running   0          21h
subtractapp-6c449d8cb9-fpsdj               1/1     Running   0          21h
calculator-front-end-6694bbfdf-ffpnn       1/1     Running   0          21h
redis-master-0                             1/1     Running   0          21h
redis-replicas-0                           1/1     Running   0          21h
redis-replicas-1                           1/1     Running   0          21h
redis-replicas-2                           1/1     Running   0          21h
I see Dapr running and the annotations are there
$ kubectl get pods -n dapr-system
NAME                                    READY   STATUS    RESTARTS   AGE
dapr-dashboard-75468cfc9c-vfg25         1/1     Running   0          21h
dapr-sidecar-injector-c78cdc54c-jzgns   1/1     Running   0          21h
dapr-placement-server-0                 1/1     Running   0          21h
dapr-sentry-7bfbdc74bc-bjwfh            1/1     Running   0          21h
dapr-operator-794b5985c7-vl8kh          1/1     Running   0          21h


$ kubectl describe pod subtractapp-6c449d8cb9-fpsdj | head -n13 | tail -n 5
Annotations:      dapr.io/app-id: subtractapp
                  dapr.io/app-port: 80
                  dapr.io/config: appconfig
                  dapr.io/enabled: true
Status:           Running
By Hand
I’ll reset then see that the cluster is fresh with traefik
$ kubectl get nodes
NAME                  STATUS   ROLES                  AGE    VERSION
anna-macbookair       Ready    control-plane,master   2m5s   v1.23.10+k3s1
isaac-macbookpro      Ready    <none>                 84s    v1.23.10+k3s1
builder-macbookpro2   Ready    <none>                 76s    v1.23.10+k3s1

$ kubectl get svc --all-namespaces
NAMESPACE     NAME             TYPE           CLUSTER-IP      EXTERNAL-IP                                PORT(S)                      AGE
default       kubernetes       ClusterIP      10.43.0.1       <none>                                     443/TCP                      2m19s
kube-system   kube-dns         ClusterIP      10.43.0.10      <none>                                     53/UDP,53/TCP,9153/TCP       2m16s
kube-system   metrics-server   ClusterIP      10.43.242.241   <none>                                     443/TCP                      2m15s
kube-system   traefik          LoadBalancer   10.43.33.126    192.168.1.13,192.168.1.162,192.168.1.206   80:32168/TCP,443:30139/TCP   97s
Next, I’ll add Dapr via CLI
$ dapr init -k
⌛  Making the jump to hyperspace...
ℹ️  Note: To install Dapr using Helm, see here: https://docs.dapr.io/getting-started/install-dapr-kubernetes/#install-with-helm-advanced

ℹ️  Container images will be pulled from Docker Hub
✅  Deploying the Dapr control plane to your cluster...
✅  Success! Dapr has been installed to namespace dapr-system. To verify, run `dapr status -k' in your terminal. To get started, go here: https://aka.ms/dapr-getting-started

$ kubectl get pods -n dapr-system
NAME                                    READY   STATUS    RESTARTS      AGE
dapr-dashboard-75468cfc9c-h6btn         1/1     Running   0             89s
dapr-sidecar-injector-c78cdc54c-ckfbd   1/1     Running   0             89s
dapr-sentry-7bfbdc74bc-7bv6w            1/1     Running   0             89s
dapr-placement-server-0                 1/1     Running   0             89s
dapr-operator-794b5985c7-rdpxx          1/1     Running   1 (53s ago)   89s
Even though I don’t have zipkin yet, Let’s at least create the configuration “appconfig” so it exists
$ cat appconfig.yaml
apiVersion: dapr.io/v1alpha1
kind: Configuration
metadata:
  name: appconfig
  namespace: default
spec:
  metric:
    enabled: true
  tracing:
    samplingRate: "1"
    zipkin:
      endpointAddress: "http://zipkin.default.svc.cluster.local:9411/api/v2/spans"
$ kubectl apply -f appconfig.yaml
configuration.dapr.io/appconfig created
Since I know we’ll need the statestore based on redis
builder@DESKTOP-72D2D9T:~/Workspaces/quickstarts/tutorials/distributed-calculator/deploy$ cat redis.yaml
apiVersion: dapr.io/v1alpha1
kind: Component
metadata:
  name: statestore
spec:
  type: state.redis
  version: v1
  metadata:
  # These settings will work out of the box if you use `helm install
  # bitnami/redis`.  If you have your own setup, replace
  # `redis-master:6379` with your own Redis master address, and the
  # Redis password with your own Secret's name. For more information,
  # see https://docs.dapr.io/operations/components/component-secrets .
  - name: redisHost
    value: redis-master:6379
  - name: redisPassword
    secretKeyRef:
      name: redis
      key: redis-password
auth:
  secretStore: kubernetes
I best add redis.
$ helm install redis bitnami/redis
NAME: redis
LAST DEPLOYED: Thu May  4 19:19:49 2023
NAMESPACE: default
STATUS: deployed
REVISION: 1
TEST SUITE: None
NOTES:
CHART NAME: redis
CHART VERSION: 17.10.1
APP VERSION: 7.0.11

** Please be patient while the chart is being deployed **

Redis® can be accessed on the following DNS names from within your cluster:

    redis-master.default.svc.cluster.local for read/write operations (port 6379)
    redis-replicas.default.svc.cluster.local for read-only operations (port 6379)


To get your password run:

    export REDIS_PASSWORD=$(kubectl get secret --namespace default redis -o jsonpath="{.data.redis-password}" | base64 -d)

To connect to your Redis® server:

1. Run a Redis® pod that you can use as a client:

   kubectl run --namespace default redis-client --restart='Never'  --env REDIS_PASSWORD=$REDIS_PASSWORD  --image docker.io/bitnami/redis:7.0.11-debian-11-r0 --command -- sleep infinity

   Use the following command to attach to the pod:

   kubectl exec --tty -i redis-client \
   --namespace default -- bash

2. Connect using the Redis® CLI:
   REDISCLI_AUTH="$REDIS_PASSWORD" redis-cli -h redis-master
   REDISCLI_AUTH="$REDIS_PASSWORD" redis-cli -h redis-replicas

To connect to your database from outside the cluster execute the following commands:

    kubectl port-forward --namespace default svc/redis-master 6379:6379 &
    REDISCLI_AUTH="$REDIS_PASSWORD" redis-cli -h 127.0.0.1 -p 6379
I can see the password
$ kubectl get secret redis -o json | jq -r '.data."redis-password"' | base64
--decode && echo
ToopVd0Uud
I can now apply
$ kubectl apply -f redis.yaml
component.dapr.io/statestore created

$ kubectl get component
NAME         AGE
statestore   25s
Which seems fine
$ kubectl describe component statestore
Name:         statestore
Namespace:    default
Labels:       <none>
Annotations:  <none>
API Version:  dapr.io/v1alpha1
Auth:
  Secret Store:  kubernetes
Kind:            Component
Metadata:
  Creation Timestamp:  2023-05-05T00:50:51Z
  Generation:          1
  Resource Version:    4314
  UID:                 b2e8162a-585d-4dc3-be60-89518e9f97b4
Spec:
  Metadata:
    Name:   redisHost
    Value:  redis-master:6379
    Name:   redisPassword
    Secret Key Ref:
      Key:   redis-password
      Name:  redis
  Type:      state.redis
  Version:   v1
Events:      <none>
So I can see the pods… will it work this time?
$ kubectl get pods --all-namespaces
NAMESPACE     NAME                                      READY   STATUS      RESTARTS      AGE
kube-system   local-path-provisioner-6c79684f77-hrr84   1/1     Running     0             40m
kube-system   coredns-d76bd69b-5l6nl                    1/1     Running     0             40m
kube-system   helm-install-traefik-crd-22hh7            0/1     Completed   0             40m
kube-system   helm-install-traefik-kxjv6                0/1     Completed   1             40m
kube-system   svclb-traefik-3966837f-s4vrt              2/2     Running     0             40m
kube-system   metrics-server-7cd5fcb6b7-4x4tj           1/1     Running     0             40m
kube-system   traefik-df4ff85d6-wf4t4                   1/1     Running     0             40m
kube-system   svclb-traefik-3966837f-86bg5              2/2     Running     0             40m
kube-system   svclb-traefik-3966837f-7rm54              2/2     Running     0             40m
dapr-system   dapr-dashboard-75468cfc9c-h6btn           1/1     Running     0             37m
dapr-system   dapr-sidecar-injector-c78cdc54c-ckfbd     1/1     Running     0             37m
dapr-system   dapr-sentry-7bfbdc74bc-7bv6w              1/1     Running     0             37m
dapr-system   dapr-placement-server-0                   1/1     Running     0             37m
dapr-system   dapr-operator-794b5985c7-rdpxx            1/1     Running     1 (37m ago)   37m
default       redis-master-0                            1/1     Running     0             32m
default       redis-replicas-0                          1/1     Running     0             32m
default       redis-replicas-1                          1/1     Running     0             31m
default       redis-replicas-2                          1/1     Running     0             30m
I’ll install the apps
builder@DESKTOP-72D2D9T:~/Workspaces/quickstarts/tutorials/distributed-calculator/deploy$ kubectl apply -f dotnet-subtractor.yaml
deployment.apps/subtractapp created
builder@DESKTOP-72D2D9T:~/Workspaces/quickstarts/tutorials/distributed-calculator/deploy$ kubectl apply -f go-adder.yaml
deployment.apps/addapp created
builder@DESKTOP-72D2D9T:~/Workspaces/quickstarts/tutorials/distributed-calculator/deploy$ kubectl apply -f node-divider.yaml
deployment.apps/divideapp created
builder@DESKTOP-72D2D9T:~/Workspaces/quickstarts/tutorials/distributed-calculator/deploy$ kubectl apply -f python-multiplier.yaml
deployment.apps/multiplyapp created
builder@DESKTOP-72D2D9T:~/Workspaces/quickstarts/tutorials/distributed-calculator/deploy$ kubectl apply -f react-calculator.yaml
service/calculator-front-end created
deployment.apps/calculator-front-end created
This worked
$ kubectl get pods
NAME                                   READY   STATUS    RESTARTS   AGE
redis-master-0                         1/1     Running   0          34m
redis-replicas-0                       1/1     Running   0          34m
redis-replicas-1                       1/1     Running   0          33m
redis-replicas-2                       1/1     Running   0          33m
divideapp-585848cf4d-9v9v2             2/2     Running   0          105s
addapp-76dbf95c88-hfwbf                2/2     Running   0          112s
subtractapp-6c449d8cb9-cbsjz           2/2     Running   0          118s
multiplyapp-bdbdf4b5-js9pm             2/2     Running   0          101s
calculator-front-end-6694bbfdf-58svk   2/2     Running   0          96s
Maybe it’s the speed Ansible does everything?
Zipkin
I can add a repo that will provide the OS app
$ helm repo add carlosjgp https://carlosjgp.github.io/open-charts/
"carlosjgp" has been added to your repositories
$ helm repo update
Hang tight while we grab the latest from your chart repositories...
...Successfully got an update from the "carlosjgp" chart repository
...Successfully got an update from the "c7n" chart repository
...Successfully got an update from the "metallb" chart repository
...Successfully got an update from the "longhorn" chart repository
...Successfully got an update from the "cribl" chart repository
...Successfully got an update from the "lifen-charts" chart repository
...Successfully got an update from the "adwerx" chart repository
...Successfully got an update from the "novum-rgi-helm" chart repository
...Successfully got an update from the "actions-runner-controller" chart repository
...Successfully got an update from the "hashicorp" chart repository
...Successfully got an update from the "ingress-nginx" chart repository
...Successfully got an update from the "kubecost" chart repository
...Successfully got an update from the "rancher-stable" chart repository
...Successfully got an update from the "signoz" chart repository
...Successfully got an update from the "harbor" chart repository
...Successfully got an update from the "istio" chart repository
...Successfully got an update from the "rook-release" chart repository
...Successfully got an update from the "datadog" chart repository
...Successfully got an update from the "jenkins" chart repository
...Successfully got an update from the "argo-cd" chart repository
...Successfully got an update from the "grafana" chart repository
...Successfully got an update from the "gitlab" chart repository
...Successfully got an update from the "bitnami" chart repository
...Successfully got an update from the "stable" chart repository
Update Complete. ⎈Happy Helming!⎈
Then I’ll install
$ helm install my-zipkin carlosjgp/zipkin
NAME: my-zipkin
LAST DEPLOYED: Thu May  4 20:01:08 2023
NAMESPACE: default
STATUS: deployed
REVISION: 1
TEST SUITE: None
NOTES:
1. Get the application URL by running these commands:
  export POD_NAME=$(kubectl get pods --namespace default -l "app.kubernetes.io/name=zipkin,app.kubernetes.io/instance=my-zipkin,app.kubernetes.io/component=ui" -o jsonpath="{.items[0].metadata.name}")
  echo "Visit http://127.0.0.1:8080 to use your application"
  kubectl --namespace default port-forward $POD_NAME 8080:8080
  export POD_NAME=$(kubectl get pods --namespace default -l "app.kubernetes.io/name=zipkin,app.kubernetes.io/instance=my-zipkin,app.kubernetes.io/component=collector" -o jsonpath="{.items[0].metadata.name}")
  echo "Visit http://127.0.0.1:8080 to use your application"
  kubectl --namespace default port-forward $POD_NAME 8080:9411
I can see the service:
$ kubectl get svc | grep zip
my-zipkin-collector         ClusterIP      10.43.217.82   <none>        9411/TCP                              2m9s
my-zipkin-ui                ClusterIP      10.43.168.7    <none>        8080/TCP                              2m9s
I’ll now change the file
$ kubectl get configuration appconfig -o yaml > appconfig.yaml.old
$ kubectl get configuration appconfig -o yaml > appconfig.yaml.new
$ vi appconfig.yaml.new
$ diff appconfig.yaml.old appconfig.yaml.new
21c21
<       endpointAddress: http://zipkin.default.svc.cluster.local:9411/api/v2/spans
---
>       endpointAddress: http://my-zipkin-collector.default.svc.cluster.local:9411/api/v2/spans
I’ll then rotate the pods
$ kubectl get pod -o=jsonpath='{.items[?(@.metadata.annotations.dapr\.io/enabled=="true")].metadata.name}' | xargs kubectl delete pod
pod "divideapp-585848cf4d-9v9v2" deleted
pod "addapp-76dbf95c88-hfwbf" deleted
pod "subtractapp-6c449d8cb9-cbsjz" deleted
pod "multiplyapp-bdbdf4b5-js9pm" deleted
pod "calculator-front-end-6694bbfdf-58svk" deleted
Now I’ll try the zipkin service
$ kubectl --namespace default port-forward `kubectl get pods --namespace defa
ult -l "app.kubernetes.io/name=zipkin,app.kubernetes.io/instance=my-zipkin,app.kubernetes.io/component=ui" -o jsonpath="{.items[0].metadata.name}"` 8080:8080
Forwarding from 127.0.0.1:8080 -> 8080
Forwarding from [::1]:8080 -> 8080
I can see the Dashboard, but not yet traces

Then I’ll forward to the calculator
$ kubectl port-forward svc/calculator-front-end 8888:80
Forwarding from 127.0.0.1:8888 -> 8080
Forwarding from [::1]:8888 -> 8080
And now I can see it
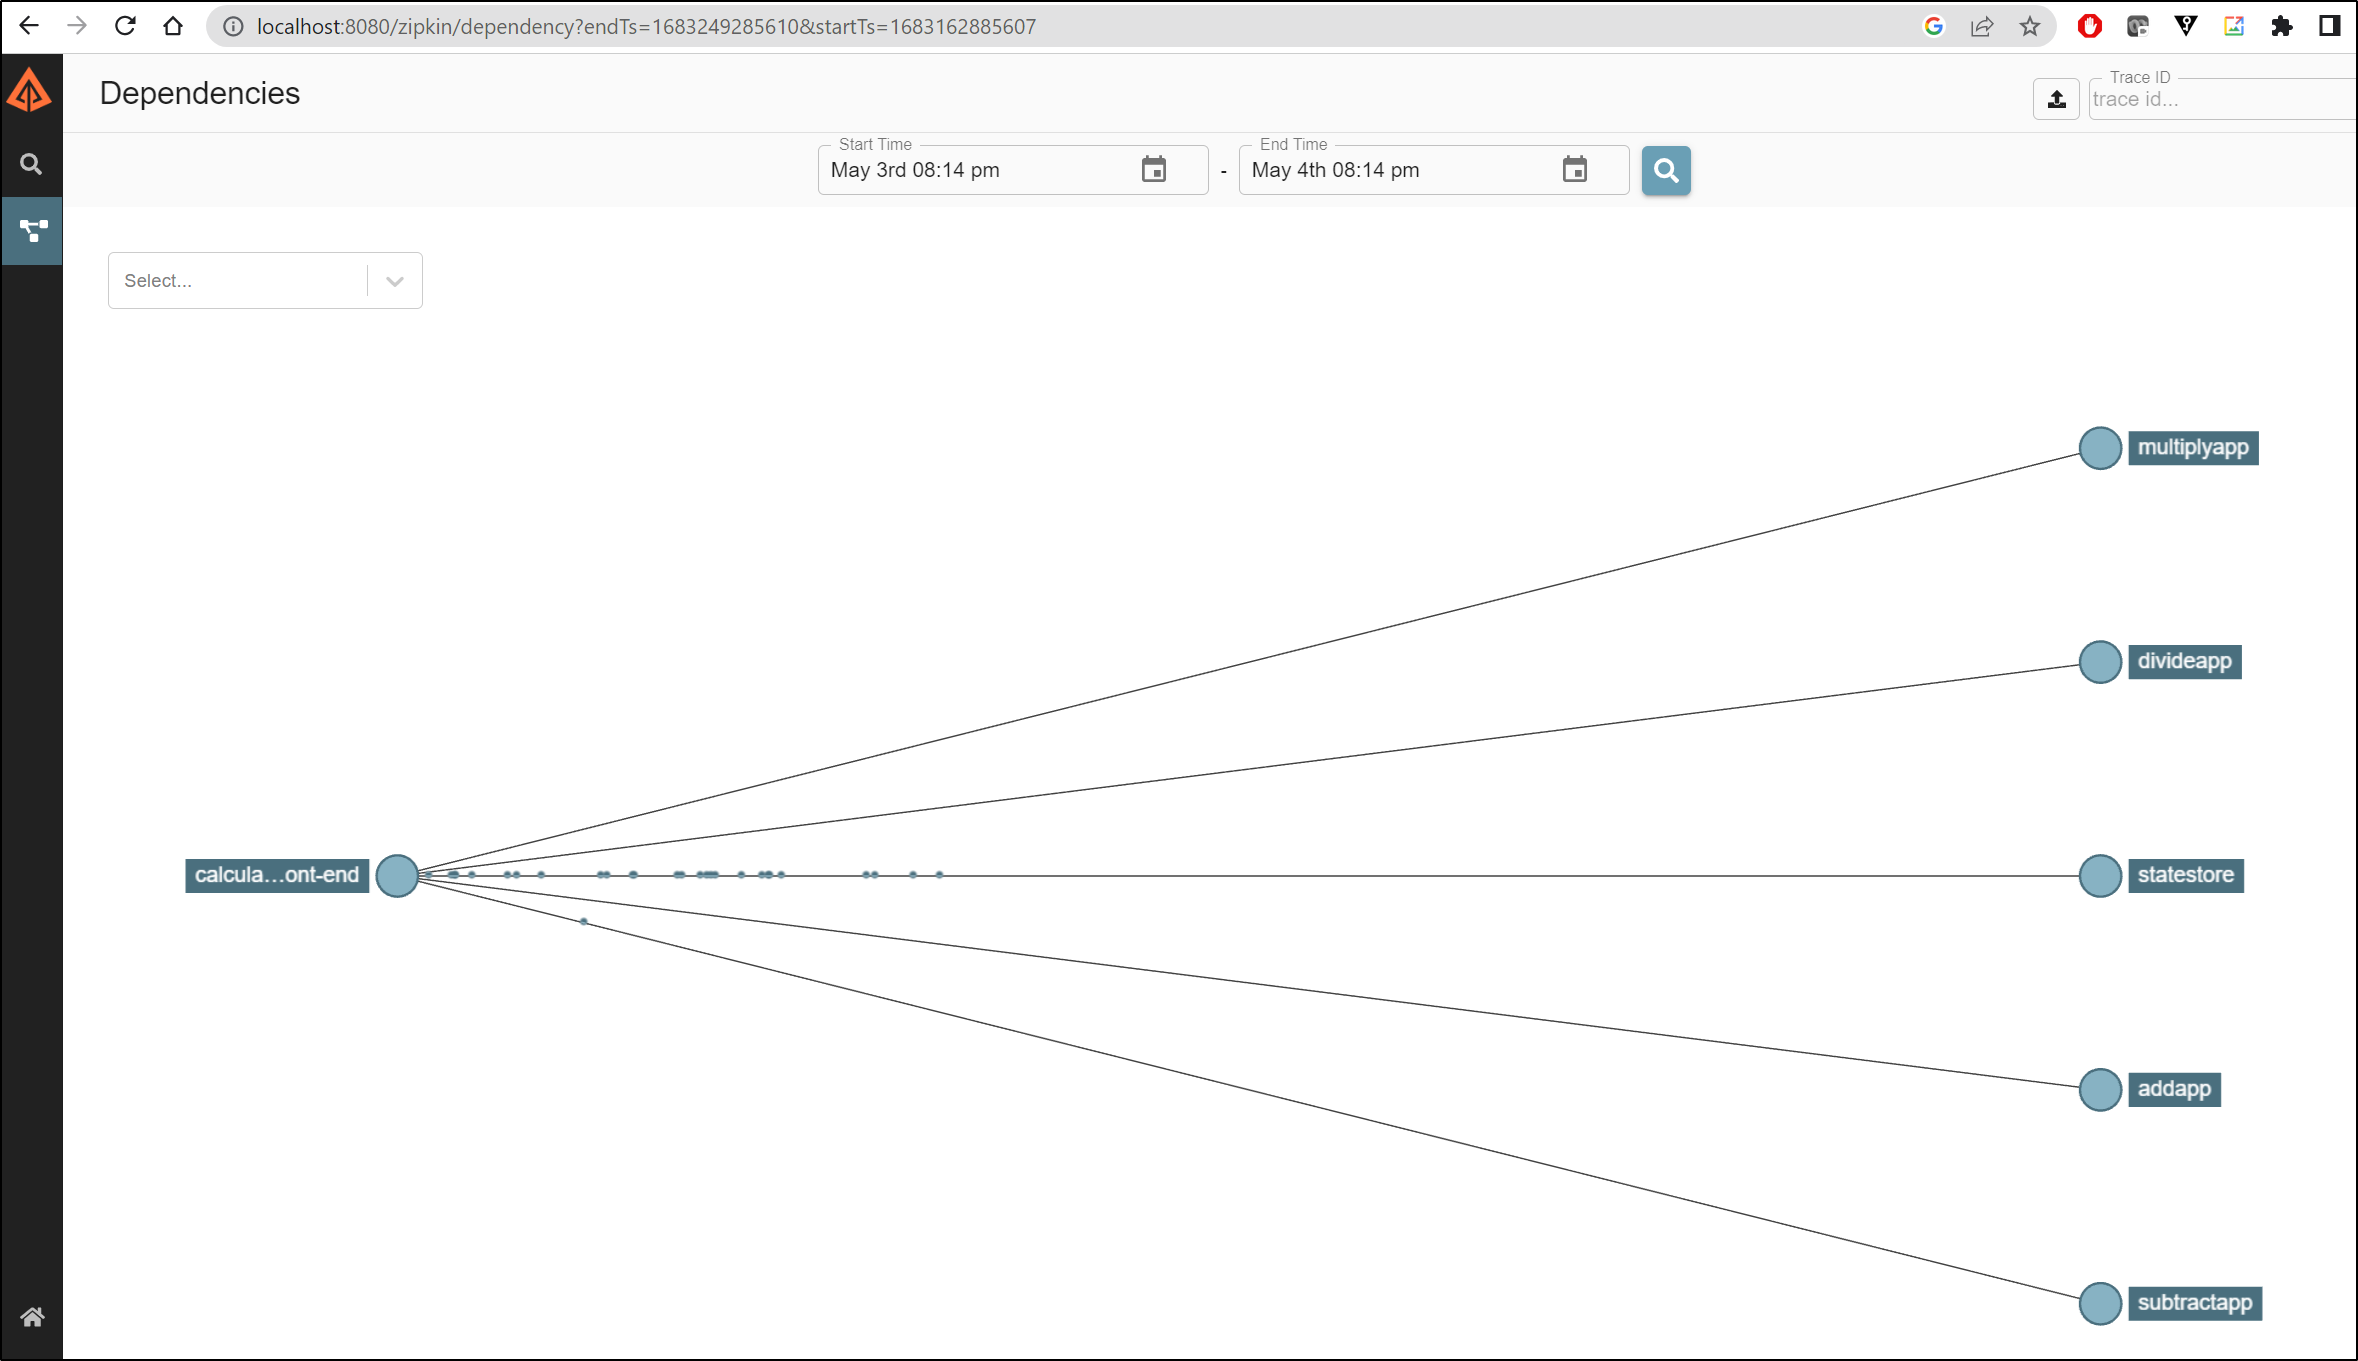
Summary
So I haven’t fully solved the playbook, but I plan to work on it more.