

Published: Oct 1, 2022 by Isaac Johnson
Now that we have a simple cloud run function deployed that sends notifications, we should improve things by adding some semblance of test coverage.
And as long as we intend to capture test coverage, we might as well capture other metrics using Sonarqube.
Today we’ll start by setting up Sonarqube in our cluster then do the steps necessary to add it as an “App” in our user account.
We’ll then add Python tests with pytests and lastly integration with test coverage results sent to Sonarqube.
Installing with Helm
The easiest way to setup Sonarqube is to use Helm
$ helm repo add sonarqube https://SonarSource.github.io/helm-chart-sonarqube
"sonarqube" has been added to your repositories

$ helm repo update
Hang tight while we grab the latest from your chart repositories...
...Successfully got an update from the "longhorn" chart repository
...Successfully got an update from the "confluentinc" chart repository
...Successfully got an update from the "dapr" chart repository
...Successfully got an update from the "adwerx" chart repository
...Successfully got an update from the "novum-rgi-helm" chart repository
...Successfully got an update from the "uptime-kuma" chart repository
...Successfully got an update from the "hashicorp" chart repository
...Successfully got an update from the "rhcharts" chart repository
...Successfully got an update from the "kuma" chart repository
...Successfully got an update from the "actions-runner-controller" chart repository
...Successfully got an update from the "sonarqube" chart repository
...Successfully got an update from the "kubecost" chart repository
...Successfully got an update from the "sumologic" chart repository
...Successfully got an update from the "epsagon" chart repository
...Successfully got an update from the "azure-samples" chart repository
...Successfully got an update from the "nginx-stable" chart repository
...Successfully got an update from the "crossplane-stable" chart repository
...Successfully got an update from the "datadog" chart repository
...Successfully got an update from the "argo-cd" chart repository
...Successfully got an update from the "lifen-charts" chart repository
...Successfully got an update from the "harbor" chart repository
...Successfully got an update from the "rook-release" chart repository
...Successfully got an update from the "rancher-latest" chart repository
...Successfully got an update from the "incubator" chart repository
...Successfully got an update from the "myharbor" chart repository
...Successfully got an update from the "newrelic" chart repository
...Successfully got an update from the "gitlab" chart repository
...Successfully got an update from the "bitnami" chart repository
Update Complete. ⎈Happy Helming!⎈

$ helm upgrade --install sonarqube sonarqube/sonarqube
Release "sonarqube" does not exist. Installing it now.
NAME: sonarqube
LAST DEPLOYED: Fri Sep 23 06:18:03 2022
NAMESPACE: default
STATUS: deployed
REVISION: 1
NOTES:
1. Get the application URL by running these commands:
  export POD_NAME=$(kubectl get pods --namespace default -l "app=sonarqube,release=sonarqube" -o jsonpath="{.items[0].metadata.name}")
  echo "Visit http://127.0.0.1:8080 to use your application"
  kubectl port-forward $POD_NAME 8080:9000 -n default
However, this did not install the PostgreSQL database (as it should).
try again
$ helm uninstall sonarqube
WARNING: Kubernetes configuration file is group-readable. This is insecure. Location: /home/builder/.kube/config
WARNING: Kubernetes configuration file is world-readable. This is insecure. Location: /home/builder/.kube/config
release "sonarqube" uninstalled

builder@DESKTOP-QADGF36:~$ helm install sonarqube-ce bitnami/sonarqube
WARNING: Kubernetes configuration file is group-readable. This is insecure. Location: /home/builder/.kube/config
WARNING: Kubernetes configuration file is world-readable. This is insecure. Location: /home/builder/.kube/config
NAME: sonarqube-ce
LAST DEPLOYED: Fri Sep 23 06:26:43 2022
NAMESPACE: default
STATUS: deployed
REVISION: 1
TEST SUITE: None
NOTES:
** Please be patient while the chart is being deployed **

Your SonarQube site can be accessed through the following DNS name from within your cluster:

    sonarqube-ce.default.svc.cluster.local (port 80)

To access your SonarQube site from outside the cluster follow the steps below:

1. Get the SonarQube URL by running these commands:

  NOTE: It may take a few minutes for the LoadBalancer IP to be available.
        Watch the status with: 'kubectl get svc --namespace default -w sonarqube-ce'

   export SERVICE_IP=$(kubectl get svc --namespace default sonarqube-ce --template "{{ range (index .status.loadBalancer.ingress 0) }}{{ . }}{{ end }}")
   echo "SonarQube URL: http://$SERVICE_IP/"

2. Open a browser and access SonarQube using the obtained URL.

3. Login with the following credentials below:

  echo Username: user
  echo Password: $(kubectl get secret --namespace default sonarqube-ce -o jsonpath="{.data.sonarqube-password}" | base64 -d)
In a little bit we see the postgresql pods come up
$ kubectl get pods
NAME                            READY   STATUS            RESTARTS   AGE
hello-openshift-pod             1/1     Running           0          4d
www                             1/1     Running           0          3d23h
www2                            1/1     Running           0          3d23h
sonarqube-ce-74d48f97b8-sj65z   0/1     PodInitializing   0          86s
sonarqube-ce-postgresql-0       1/1     Running           0          86s
To login we need our user (user) and first time password:
$ kubectl get secret --namespace default sonarqube-ce -o jsonpath="{.data.sonarqube-password}" | base64 -d && echo
1ewjA0Mnwl
In a normal cluster, we would get an external-ip immediately satisfied
$ kubectl get svc --namespace default sonarqube-ce
NAME           TYPE           CLUSTER-IP    EXTERNAL-IP   PORT(S)                       AGE
sonarqube-ce   LoadBalancer   10.43.2.101   <pending>     80:32259/TCP,9001:30534/TCP   4m38s
However, for testing, I’ll just port-forward to the service
$ kubectl port-forward svc/sonarqube-ce 8080:80
trying adding a mmapfs statement
builder@DESKTOP-QADGF36:~$ diff t.yaml t.yaml.bak
100,101d99
<         - name: SONARQUBE_ELASTICSEARCH_JAVA_ADD_OPTS
<           value: "-Dnode.store.allow_mmapfs=false"
builder@DESKTOP-QADGF36:~$ kubectl apply -f t.yaml
Warning: resource deployments/sonarqube-ce2 is missing the kubectl.kubernetes.io/last-applied-configuration annotation which is required by kubectl apply. kubectl apply should only be used on resources created declaratively by either kubectl create --save-config or kubectl apply. The missing annotation will be patched automatically.
deployment.apps/sonarqube-ce2 configured
That failed then i tried
diff t.yaml t.yaml.bak
103c103
<           value: -Dnode.store.allow_mmap=false
---
>           value: -Dnode.store.allow_mmapfs=false
It was at this time I realized it eventually did come up the first time
builder@DESKTOP-QADGF36:~$ kubectl get pods
NAME                             READY   STATUS    RESTARTS        AGE
hello-openshift-pod              1/1     Running   0               4d
www                              1/1     Running   0               4d
www2                             1/1     Running   0               3d23h
sonarqube-ce2-postgresql-0       1/1     Running   0               7m40s
sonarqube-ce2-79b45589b7-wtj6d   1/1     Running   1 (3m47s ago)   7m40s
sonarqube-ce2-5fd7889df9-wck9k   0/1     Running   0               16s
We can now port-forward to configure the service
$ kubectl port-forward svc/sonarqube-ce 8080:80
Forwarding from 127.0.0.1:8080 -> 9000
Forwarding from [::1]:8080 -> 9000
Handling connection for 8080
Handling connection for 8080
At this point, I’ll pause to switch to my primary cluster. I would rather install Sonarqube as an externally accessible system.
This means after I run the helm install there
$ helm install sonarqube-ce --set service.type=ClusterIP bitnami/sonarqube
NAME: sonarqube-ce
LAST DEPLOYED: Fri Sep 23 07:05:14 2022
NAMESPACE: default
STATUS: deployed
REVISION: 1
TEST SUITE: None
NOTES:
** Please be patient while the chart is being deployed **

Your SonarQube site can be accessed through the following DNS name from within your cluster:

    sonarqube-ce.default.svc.cluster.local (port 80)

To access your SonarQube site from outside the cluster follow the steps below:

1. Get the SonarQube URL by running these commands:

   kubectl port-forward --namespace default svc/sonarqube-ce 80:80 &
   echo "SonarQube URL: http://127.0.0.1/"

2. Open a browser and access SonarQube using the obtained URL.

3. Login with the following credentials below:

  echo Username: user
  echo Password: $(kubectl get secret --namespace default sonarqube-ce -o jsonpath="{.data.sonarqube-password}" | base64 -d)
I’ll wait to see them startup
$ kubectl get pods -l app.kubernetes.io/instance=sonarqube-ce
NAME                           READY   STATUS    RESTARTS   AGE
sonarqube-ce-postgresql-0      1/1     Running   0          106s
sonarqube-ce-c9c856d9c-cxvzf   0/1     Running   0          106s

$ kubectl get svc -l app.kubernetes.io/instance=sonarqube-ce
NAME                         TYPE           CLUSTER-IP      EXTERNAL-IP   PORT(S)                       AGE
sonarqube-ce-postgresql-hl   ClusterIP      None            <none>        5432/TCP                      2m16s
sonarqube-ce-postgresql      ClusterIP      10.43.131.54    <none>        5432/TCP                      2m16s
sonarqube-ce                 LoadBalancer   10.43.235.116   <pending>     80:31220/TCP,9001:30671/TCP   2m16s
I’ll add an Ingress
$ cat sonarqubeIngress.yml
apiVersion: networking.k8s.io/v1
kind: Ingress
metadata:
  annotations:
    kubernetes.io/tls-acme: "true"
    cert-manager.io/cluster-issuer: "letsencrypt-prod"
    nginx.ingress.kubernetes.io/proxy-body-size: "0"
    nginx.ingress.kubernetes.io/proxy-read-timeout: "600"
    nginx.ingress.kubernetes.io/proxy-send-timeout: "600"
    nginx.ingress.kubernetes.io/ssl-redirect: "true"
    nginx.org/client-max-body-size: "0"
    nginx.org/proxy-connect-timeout: "600"
    nginx.org/proxy-read-timeout: "600"
  name: sonarqube
  namespace: default
spec:
  ingressClassName: nginx
  tls:
  - hosts:
    - sonarqube.freshbrewed.science
    secretName: sonarqube-tls
  rules:
  - host: sonarqube.freshbrewed.science
    http:
      paths:
      - backend:
          service:
            name: sonarqube-sonarqube
            port:
              number: 9000
        path: /
        pathType: ImplementationSpecific
$ kubectl apply -f sonarqubeIngress.yml
ingress.networking.k8s.io/sonarqube created
The database pod came up but the Sonarqube application pod continued to crash
sonarqube-ce-postgresql-0                              1/1     Running            0                131m
sonarqube-ce-6c79fc565b-rb9c4                          0/1     CrashLoopBackOff   24 (13s ago)     123m
builder@DESKTOP-QADGF36:~$ kubectl exec -it sonarqube-ce-6c79fc565b-rb9c4 -- /bin/bash
Defaulted container "sonarqube" out of: sonarqube, sysctl (init)
error: unable to upgrade connection: container not found ("sonarqube")
builder@DESKTOP-QADGF36:~$ kubectl exec -it sonarqube-ce-6c79fc565b-rb9c4 -- /bin/bash
Defaulted container "sonarqube" out of: sonarqube, sysctl (init)
error: unable to upgrade connection: container not found ("sonarqube")
builder@DESKTOP-QADGF36:~$ kubectl exec -it sonarqube-ce-6c79fc565b-rb9c4 -- /bin/bash
Defaulted container "sonarqube" out of: sonarqube, sysctl (init)
error: unable to upgrade connection: container not found ("sonarqube")
I used an interactive shell to test, but again, none of the passwords worked. Clearly the step to configure PostgreSQL was not occurring
$ kubectl run my-shell --rm -i --tty --image ubuntu -- bash
If you don't see a command prompt, try pressing enter.
root@my-shell:/# apt update && apt install -y postgresdb-client

Root@my-shell:/# psql -h sonarqube-ce-postgresql.svc.default.cluster.local -d postgres -U bn_sonarqube
psql: error: could not translate host name "sonarqube-ce-postgresql.svc.default.cluster.local" to address: Name or service not known
root@my-shell:/# psql -h 10.43.18.19 -d postgres -U bn_sonarqube
Password for user bn_sonarqube:
psql: error: connection to server at "10.43.18.19", port 5432 failed: FATAL:  password authentication failed for user "bn_sonarqube"
root@my-shell:/# psql -h 10.43.18.19 -d postgres -U bn_sonarqube
Password for user bn_sonarqube:
psql: error: connection to server at "10.43.18.19", port 5432 failed: fe_sendauth: no password supplied
root@my-shell:/# psql -h 10.43.18.19 -d postgres -U bn_sonarqube
Password for user bn_sonarqube:
psql: error: connection to server at "10.43.18.19", port 5432 failed: FATAL:  password authentication failed for user "bn_sonarqube"
A little later….
A little later, to try and capture logs, I tried again these same commands on a freshly spun v1.23.10 cluster and it worked smooth. Perhaps a former PVC / Longhorn demo had affected things the first time
builder@DESKTOP-QADGF36:~$ helm install sonarqube-ce --set service.type=ClusterIP bitnami/sonarqube
NAME: sonarqube-ce
LAST DEPLOYED: Sat Sep 24 08:54:29 2022
NAMESPACE: default
STATUS: deployed
REVISION: 1
TEST SUITE: None
NOTES:
** Please be patient while the chart is being deployed **

Your SonarQube site can be accessed through the following DNS name from within your cluster:

    sonarqube-ce.default.svc.cluster.local (port 80)

To access your SonarQube site from outside the cluster follow the steps below:

1. Get the SonarQube URL by running these commands:

   kubectl port-forward --namespace default svc/sonarqube-ce 80:80 &
   echo "SonarQube URL: http://127.0.0.1/"

2. Open a browser and access SonarQube using the obtained URL.

3. Login with the following credentials below:

  echo Username: user
  echo Password: $(kubectl get secret --namespace default sonarqube-ce -o jsonpath="{.data.sonarqube-password}" | base64 -d)
builder@DESKTOP-QADGF36:~$ kubectl get pods
NAME                            READY   STATUS    RESTARTS   AGE
sonarqube-ce-postgresql-0       1/1     Running   0          5m32s
sonarqube-ce-54d68ddcff-r2txr   1/1     Running   0          5m32s
That said, let’s show how you do this in two steps; first the database then the application
Install postgres
builder@DESKTOP-QADGF36:~$ helm repo add bitnami https://charts.bitnami.com/bitnami
"bitnami" already exists with the same configuration, skipping
builder@DESKTOP-QADGF36:~$ helm install mypostgres bitnami/postgresql
NAME: mypostgres
LAST DEPLOYED: Fri Sep 23 09:53:47 2022
NAMESPACE: default
STATUS: deployed
REVISION: 1
TEST SUITE: None
NOTES:
CHART NAME: postgresql
CHART VERSION: 11.9.1
APP VERSION: 14.5.0

** Please be patient while the chart is being deployed **

PostgreSQL can be accessed via port 5432 on the following DNS names from within your cluster:

    mypostgres-postgresql.default.svc.cluster.local - Read/Write connection

To get the password for "postgres" run:

    export POSTGRES_PASSWORD=$(kubectl get secret --namespace default mypostgres-postgresql -o jsonpath="{.data.postgres-password}" | base64 -d)

To connect to your database run the following command:

    kubectl run mypostgres-postgresql-client --rm --tty -i --restart='Never' --namespace default --image docker.io/bitnami/postgresql:14.5.0-debian-11-r14 --env="PGPASSWORD=$POSTGRES_PASSWORD" \
      --command -- psql --host mypostgres-postgresql -U postgres -d postgres -p 5432

    > NOTE: If you access the container using bash, make sure that you execute "/opt/bitnami/scripts/postgresql/entrypoint.sh /bin/bash" in order to avoid the error "psql: local user with ID 1001} does not exist"

To connect to your database from outside the cluster execute the following commands:

    kubectl port-forward --namespace default svc/mypostgres-postgresql 5432:5432 &
    PGPASSWORD="$POSTGRES_PASSWORD" psql --host 127.0.0.1 -U postgres -d postgres -p 5432
Once PostgreSQL is installed, we need to create a database and user, and give the user privileges on that database
builder@DESKTOP-QADGF36:~$ kubectl run mypostgres-postgresql-client --rm --tty -i --restart='Never' --namespace default --image docker.io/bitnami/postgresql:14.5.0-debian-11-r14 --env="PGPASSWORD=XUq7rTf5cL" --command -- psql --host mypostgres-postgresql -U postgres -d postgres -p 5432
If you don't see a command prompt, try pressing enter.

postgres=# CREATE USER bn_sonarqube WITH PASSWORD 'mySonarPassword';
CREATE ROLE
postgres=# CREATE database sonarqube;
CREATE DATABASE
postgres=# grant all privileges on database sonarqube to bn_sonarqube;
GRANT
postgres=# exit
pod "mypostgres-postgresql-client" deleted
With our database requirement now sorted out, I’ll reinstall Sonarqube with helm, this time passing the settings
builder@DESKTOP-QADGF36:~$ helm install sonarqube-ce --set service.type=ClusterIP --set externalDatabase.host=mypostgres-postgresql.default.svc.cluster.local --set externalDatabase.user=bn_sonarqube --set externalDatabase.password=mySonarPassword --set postgresql.enabled=false bitnami/sonarqube
NAME: sonarqube-ce
LAST DEPLOYED: Fri Sep 23 10:04:42 2022
NAMESPACE: default
STATUS: deployed
REVISION: 1
TEST SUITE: None
NOTES:
** Please be patient while the chart is being deployed **

Your SonarQube site can be accessed through the following DNS name from within your cluster:

    sonarqube-ce.default.svc.cluster.local (port 80)

To access your SonarQube site from outside the cluster follow the steps below:

1. Get the SonarQube URL by running these commands:

   kubectl port-forward --namespace default svc/sonarqube-ce 80:80 &
   echo "SonarQube URL: http://127.0.0.1/"

2. Open a browser and access SonarQube using the obtained URL.

3. Login with the following credentials below:

  echo Username: user
  echo Password: $(kubectl get secret --namespace default sonarqube-ce -o jsonpath="{.data.sonarqube-password}" | base64 -d)
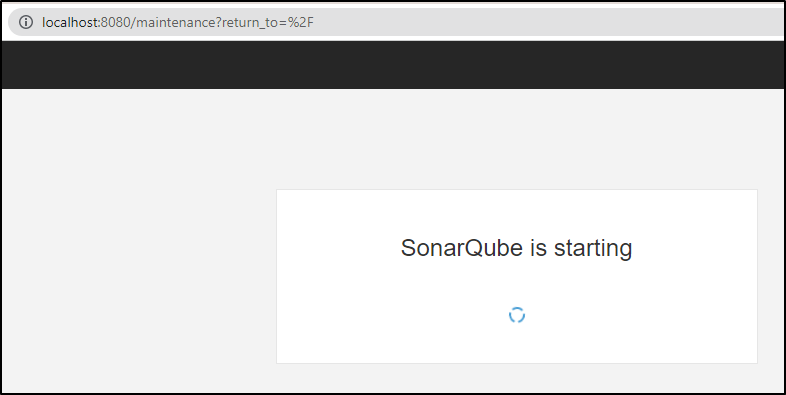
Testing, I could now access it with the Ingress
Configuring Sonarqube
One of my first activities is to create a user outside the default
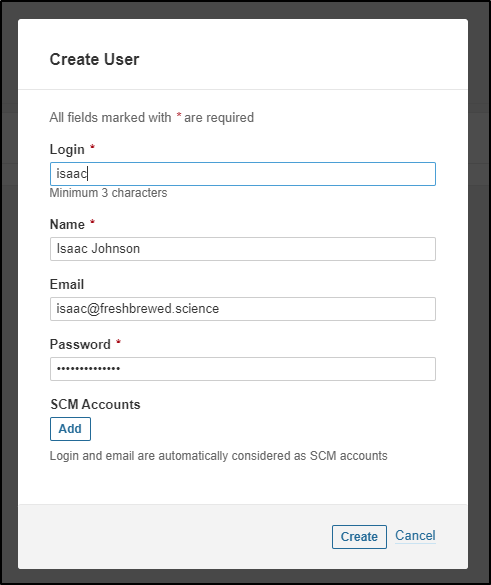
Then add that user to administrators
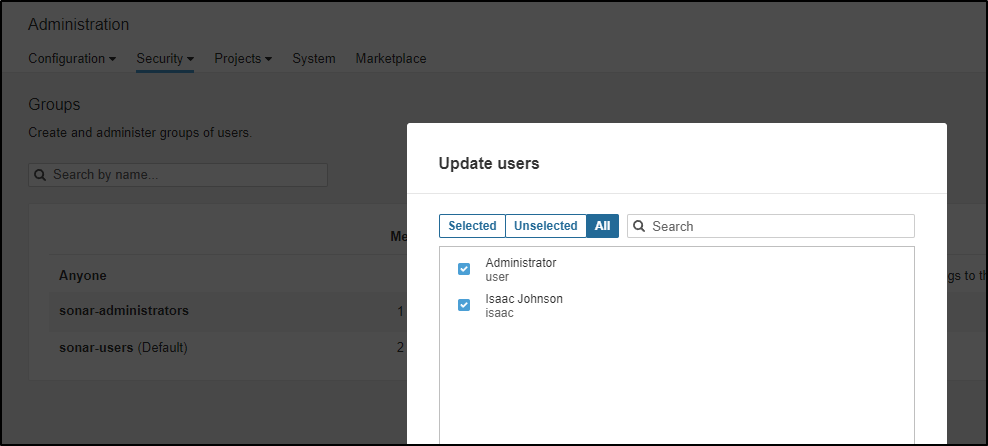
I can now log out and log back in
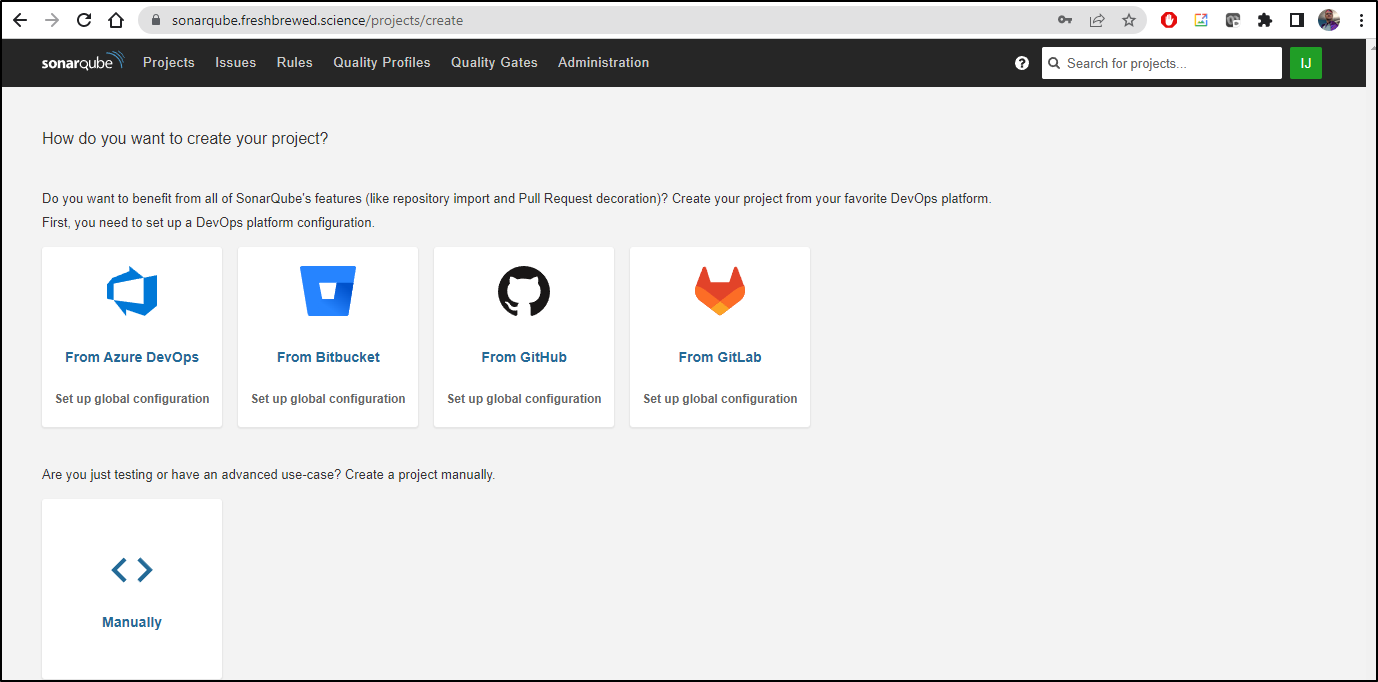
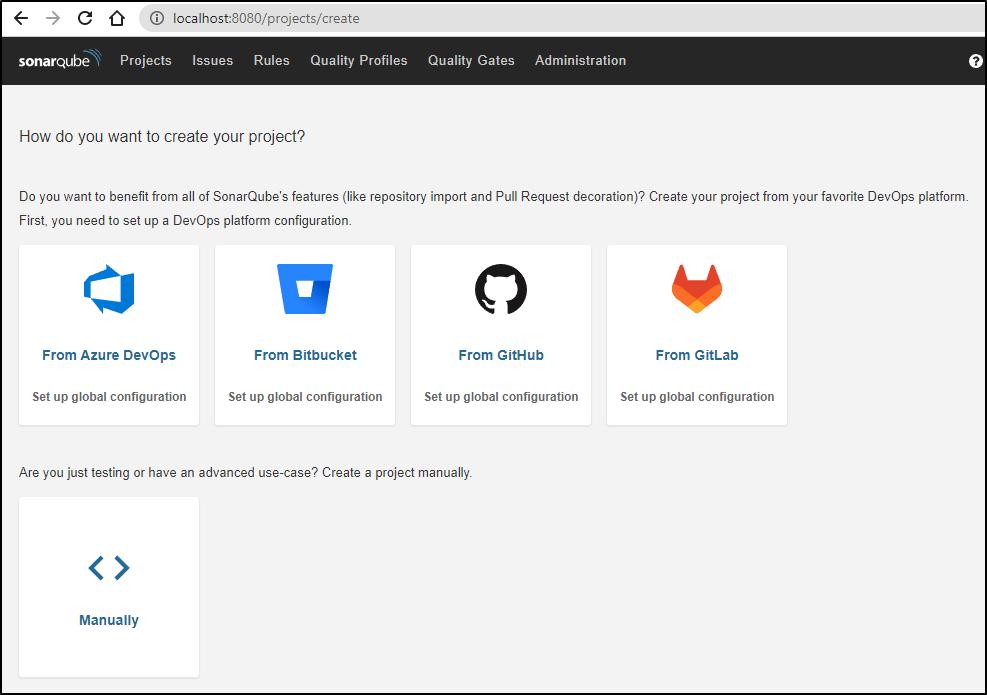
Setup with Github from Sonarqube
We can back in a scan with our container image, but we can also connect it directly to Github.
To do that, we chose Github from the “create your project” page

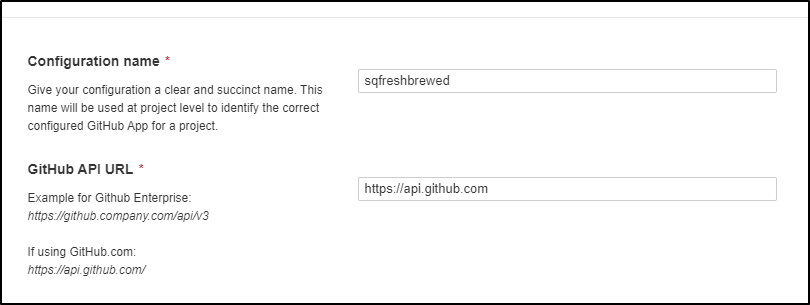
The first two fields are just a name and API URL
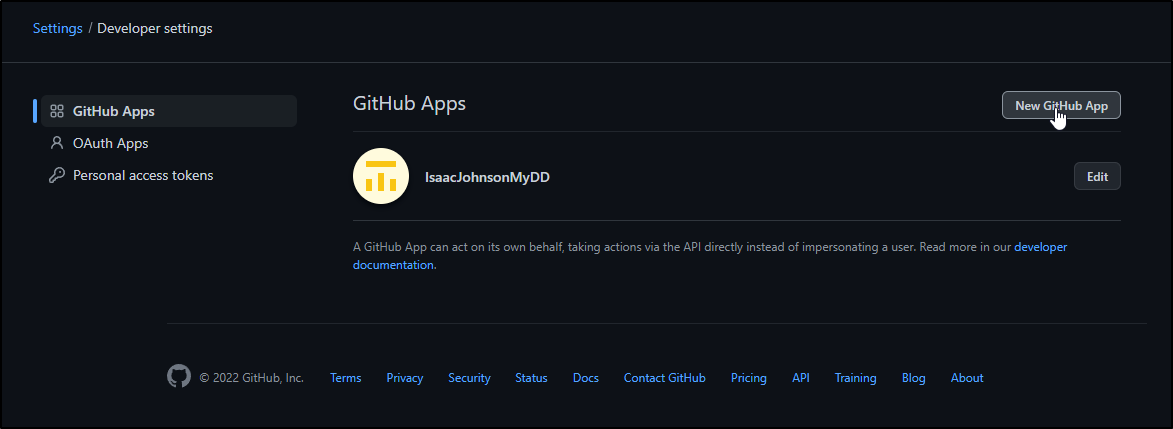
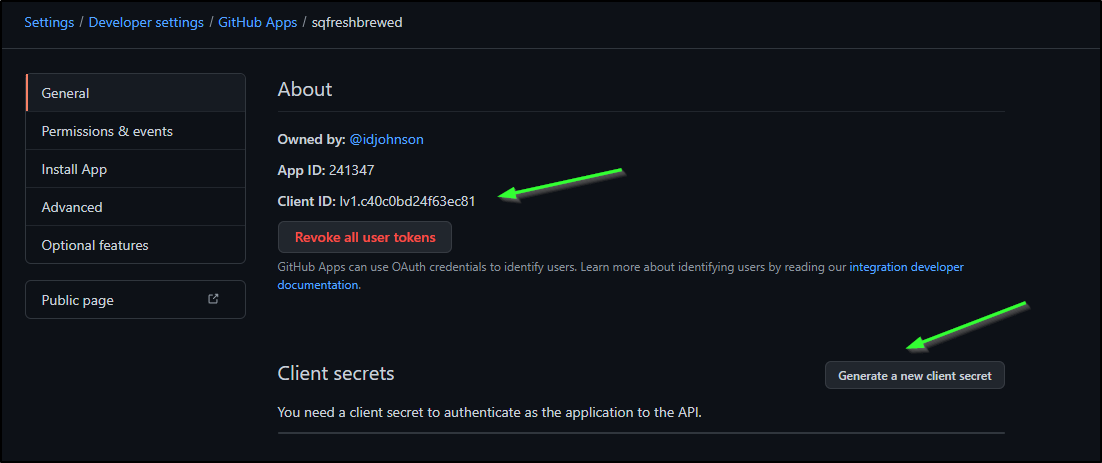
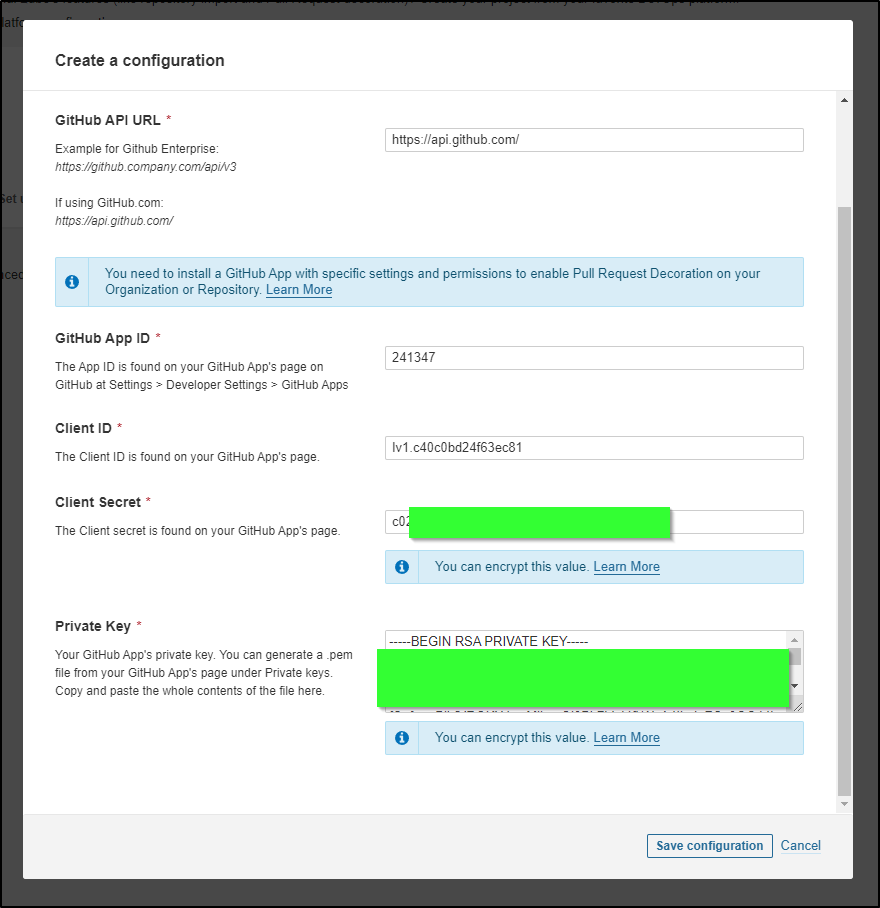
Create a Github App
The next fields we need in Sonar come from Github.
To get those, we create an “app” in our account.
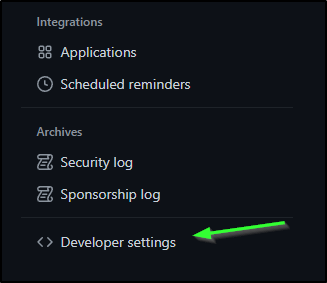
The first step is to go to your settings
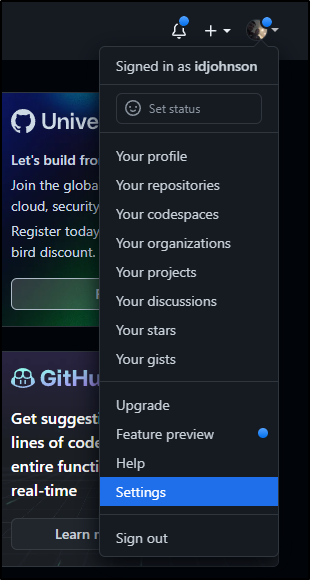
then developer settings
We’ll then choose to create a new GH App
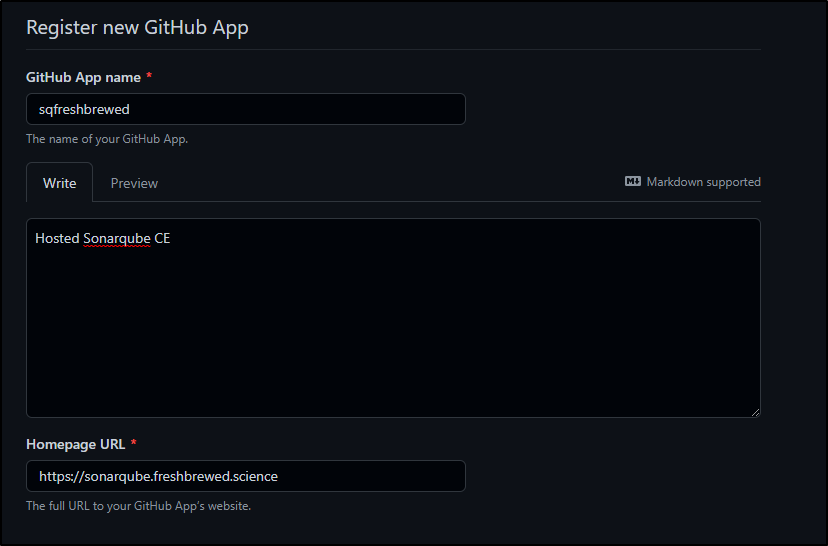
We will give it a name (e.g. sqfreshbrewed) and description as well as URL
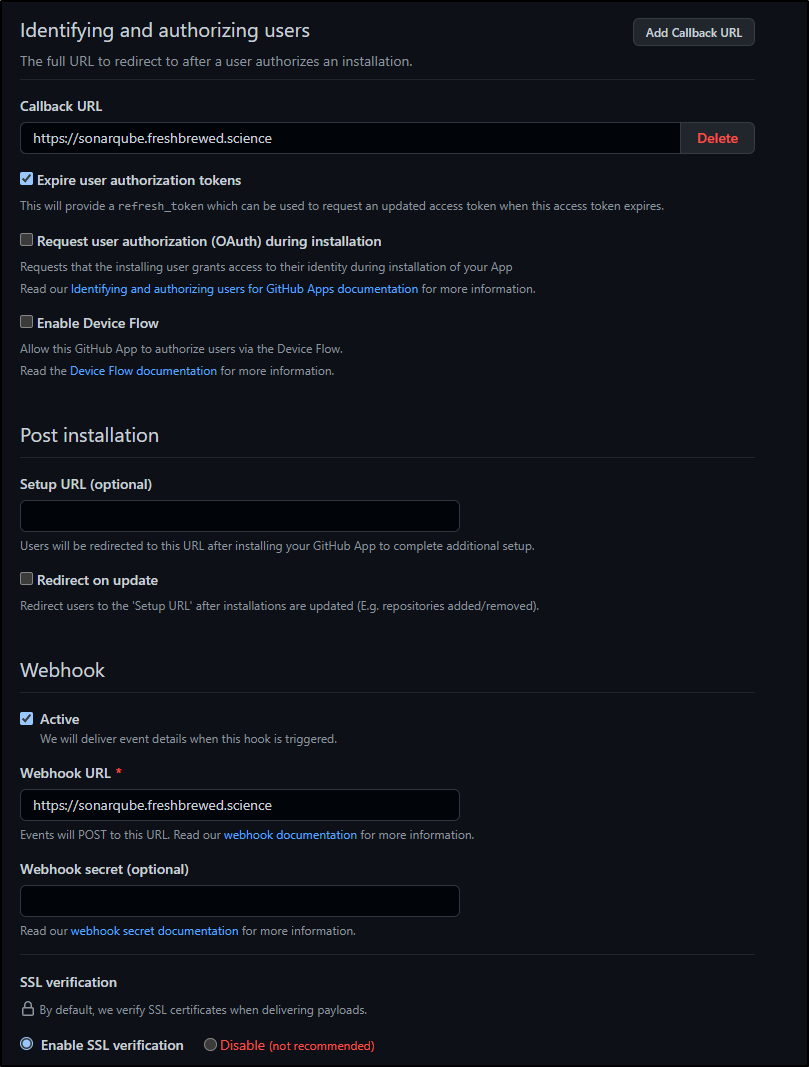
We will use our Base URL for both the callback and webhook
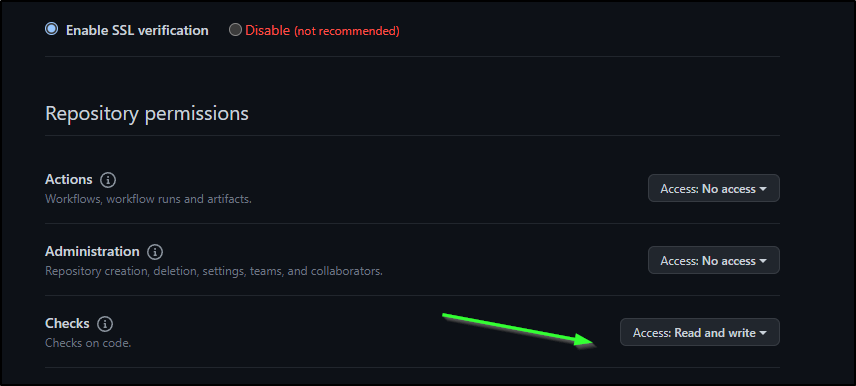
The key permissions we need to set
| Permission | Access |
|---|---|
| Checks | Read & write |
| Metadata | (this setting is automatically set by GitHub) Read-only |
| Pull Requests | Read & write |
| Commit statuses | Read-only |
| Contents | Read-only |
e.g.
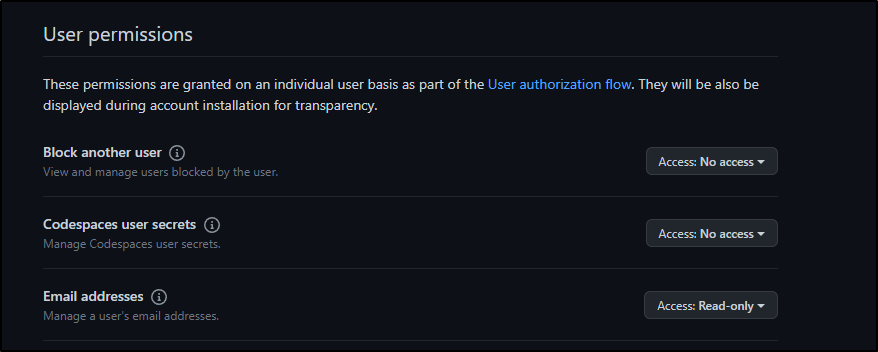
We can also add (if setting up Github Auth)
| Permission Category | Permission | Access |
|---|---|---|
| User | Email Addresses | Read-only |
| Organization | Members | Read-only |
| Organization | Projects | Read-only |
e.g.
Once we create, we need to generate a Click secret
And create a private key:
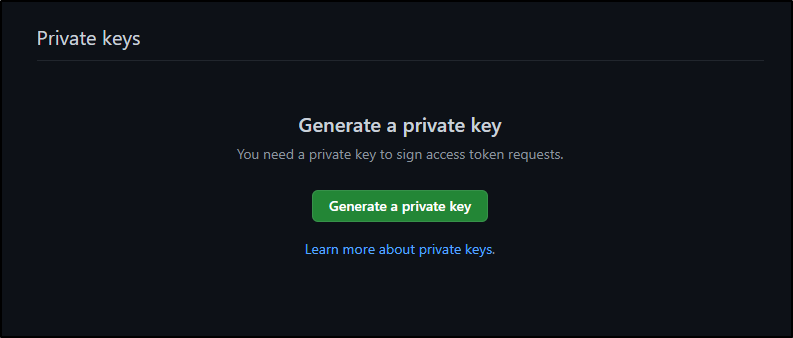
(when clicked, downloads a .pem file)
back to Sonarqube
We can paste in those details, including the contents of the PEM file
This prompts an authorization flow
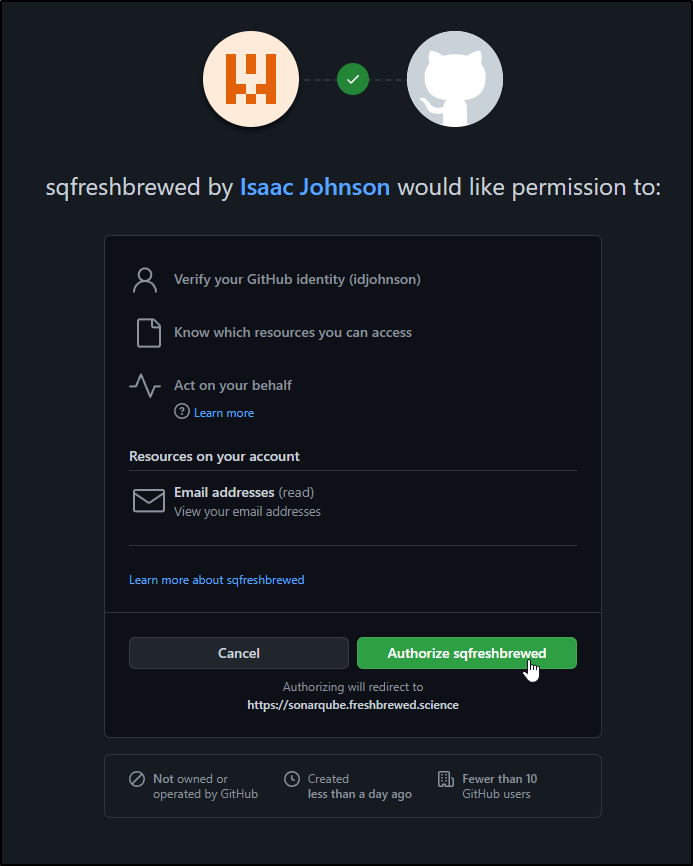
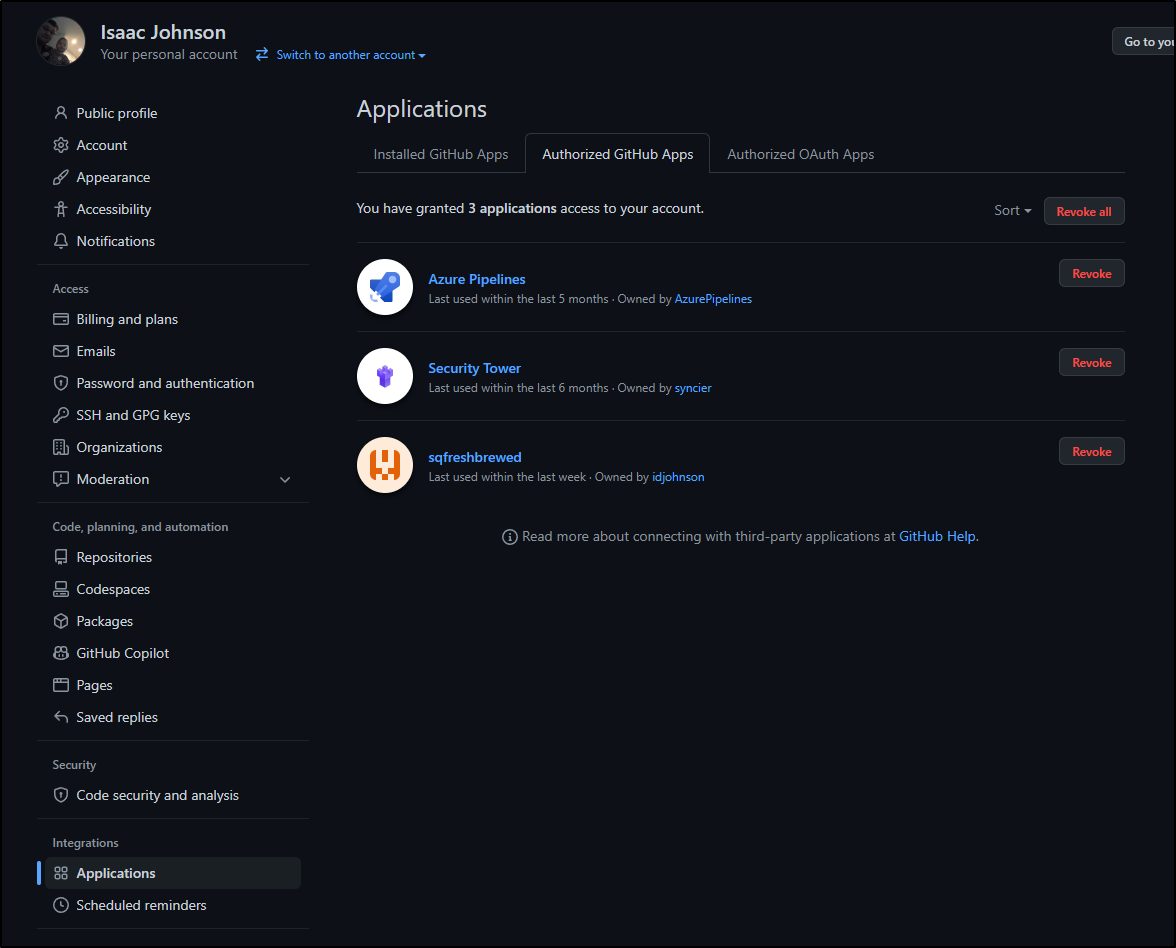
Ensure the App is installed into Integrations/Applications
Using
We can now go to Sonarqube, Pick Github and select our User ID from the organization to present a list of repos, both public and private
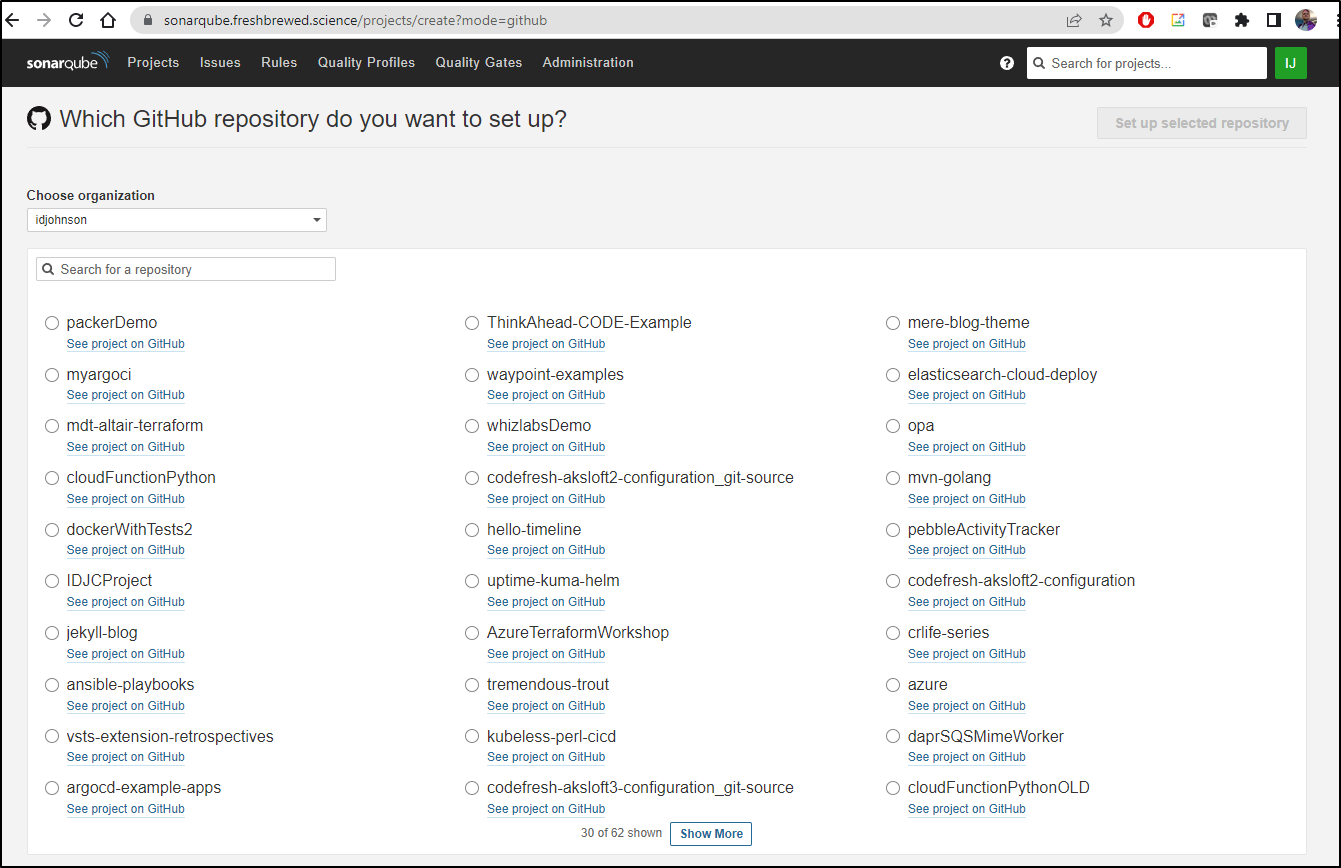
In this case, I’ll select the Cloud Function repo and choose “Set up selected repository”
In the next window
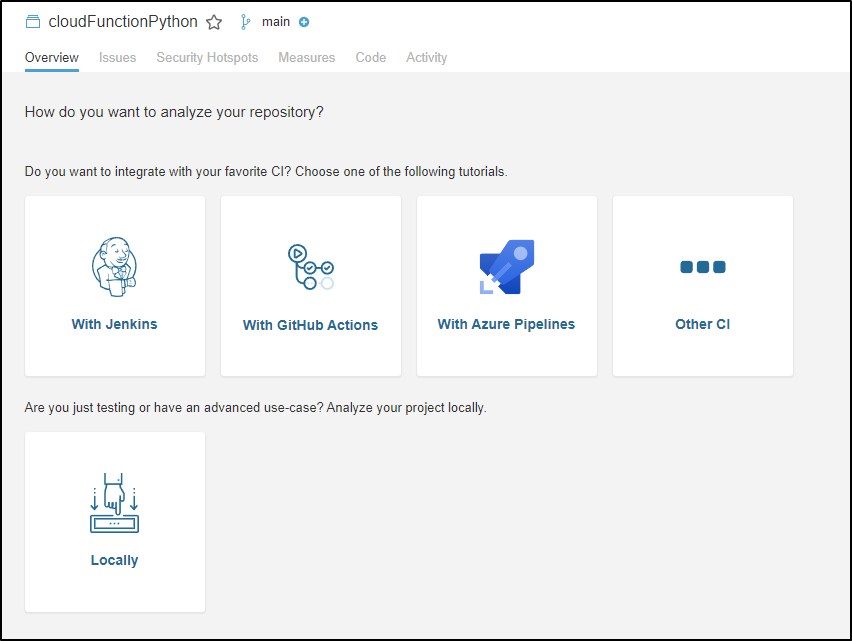
I’ll choose Github Actions which will walk us through the steps
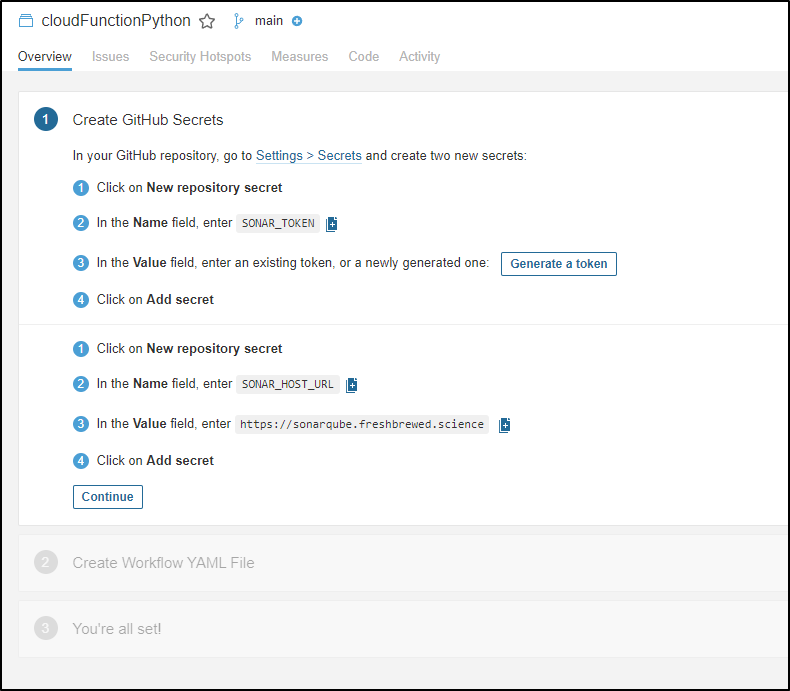
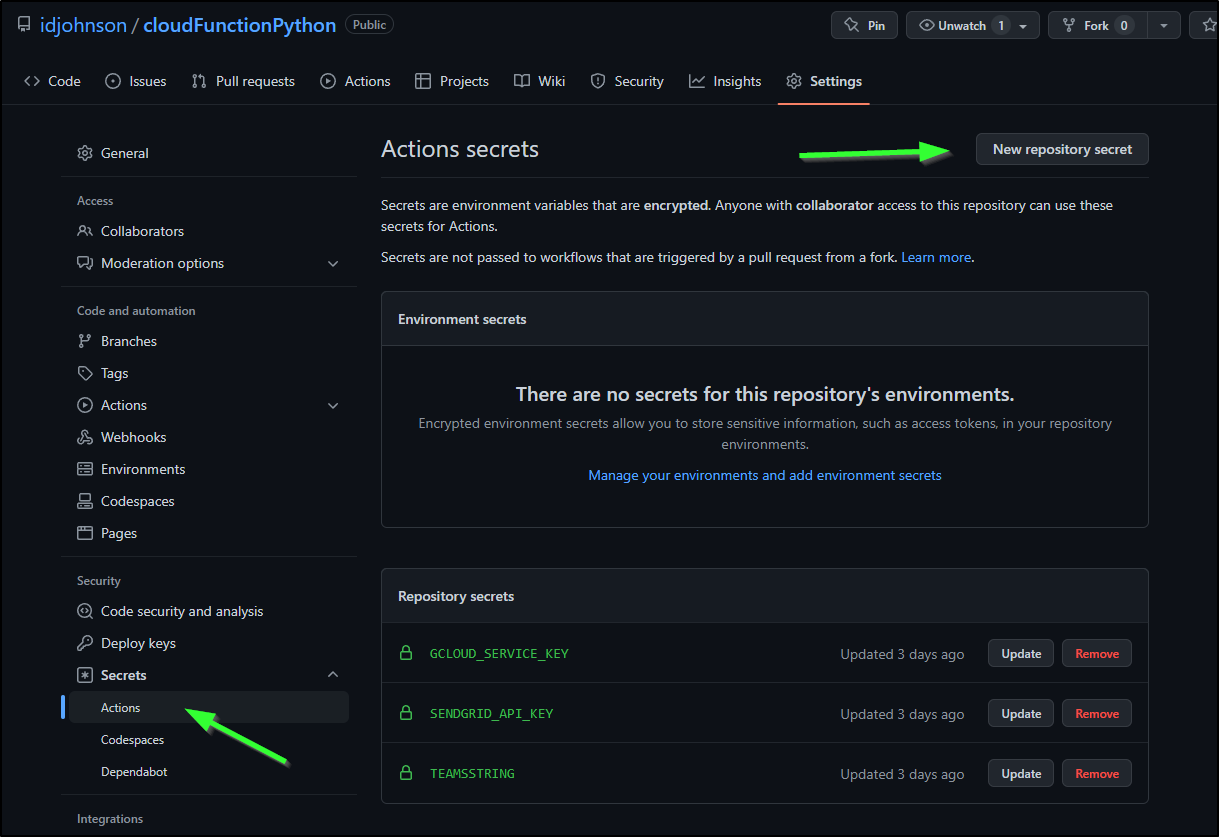
We’ll create Repository secrets from Secrets/Actions
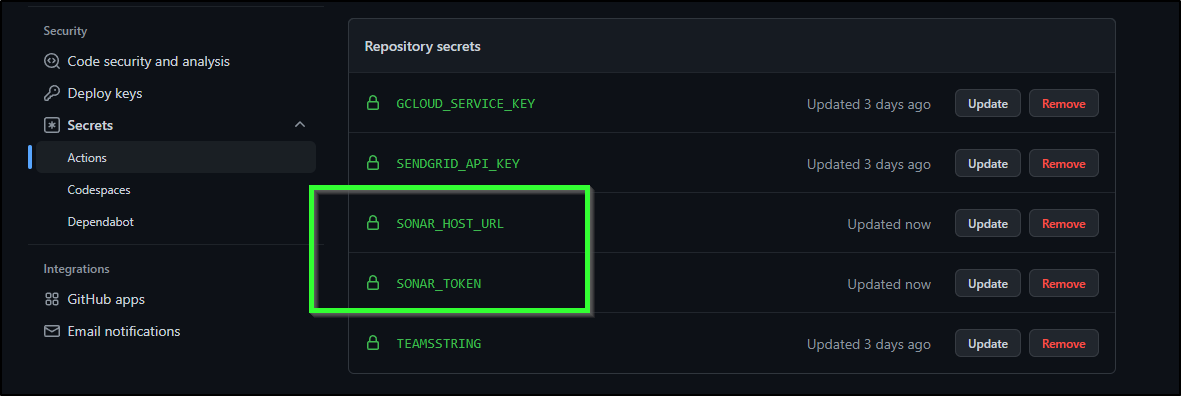
When set, we can see them listed
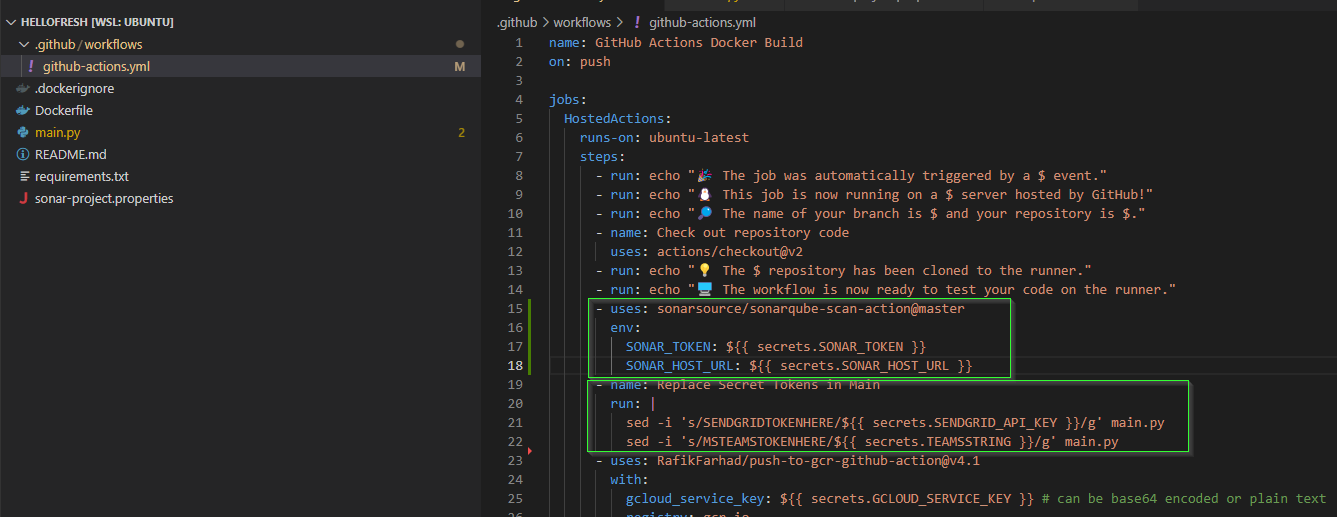
I added the properties file then added a step in my workflow
builder@DESKTOP-QADGF36:~/Workspaces/hellofresh$ git diff
diff --git a/.github/workflows/github-actions.yml b/.github/workflows/github-actions.yml
index 2fd5928..ff56e23 100644
--- a/.github/workflows/github-actions.yml
+++ b/.github/workflows/github-actions.yml
@@ -16,6 +16,10 @@ jobs:
         run: |
           sed -i 's/SENDGRIDTOKENHERE/$/g' main.py
           sed -i 's/MSTEAMSTOKENHERE/$/g' main.py
+      - uses: sonarsource/sonarqube-scan-action@master
+        env:
+          SONAR_TOKEN: $
+          SONAR_HOST_URL: $
       - uses: RafikFarhad/push-to-gcr-github-action@v4.1
         with:
           gcloud_service_key: $ # can be base64 encoded or plain text
builder@DESKTOP-QADGF36:~/Workspaces/hellofresh$ cat sonar-project.properties
sonar.projectKey=idjohnson_cloudFunctionPython_AYNxjV-p3oTU84gY6sze
This triggered a scan
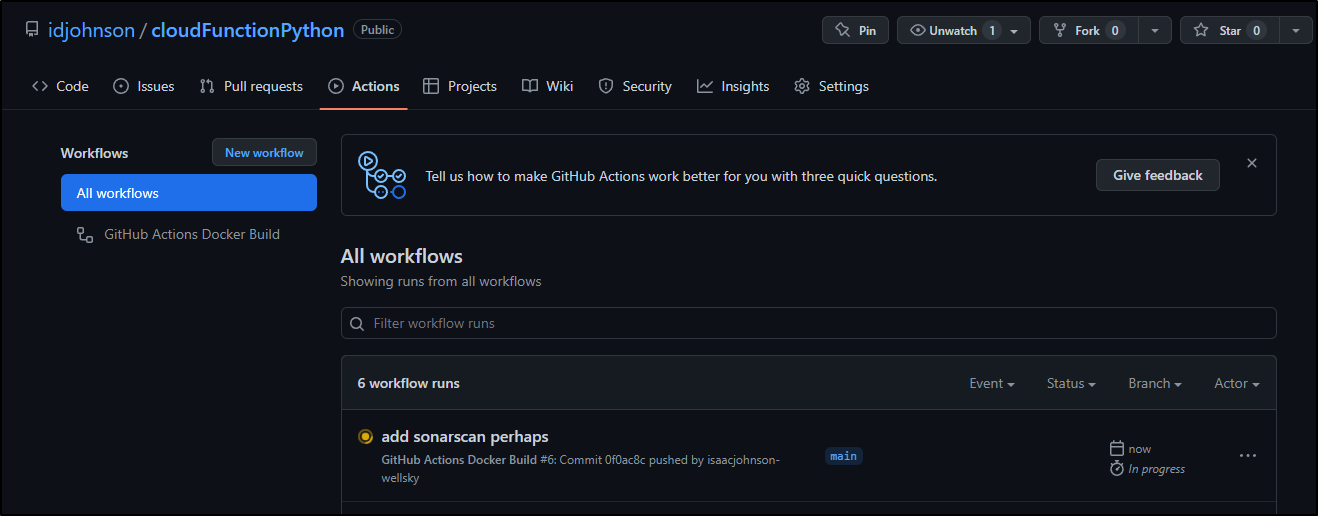
Which I could see running
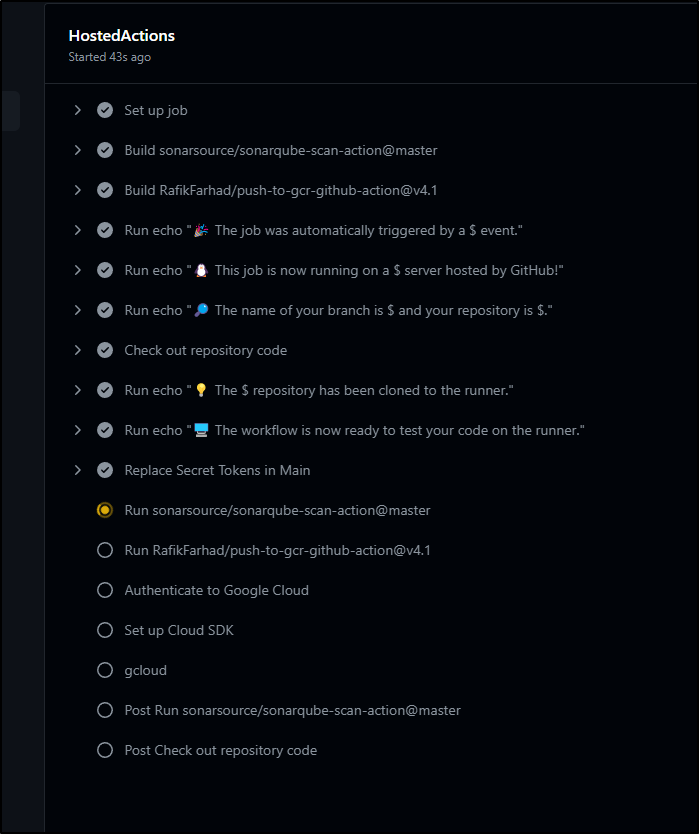
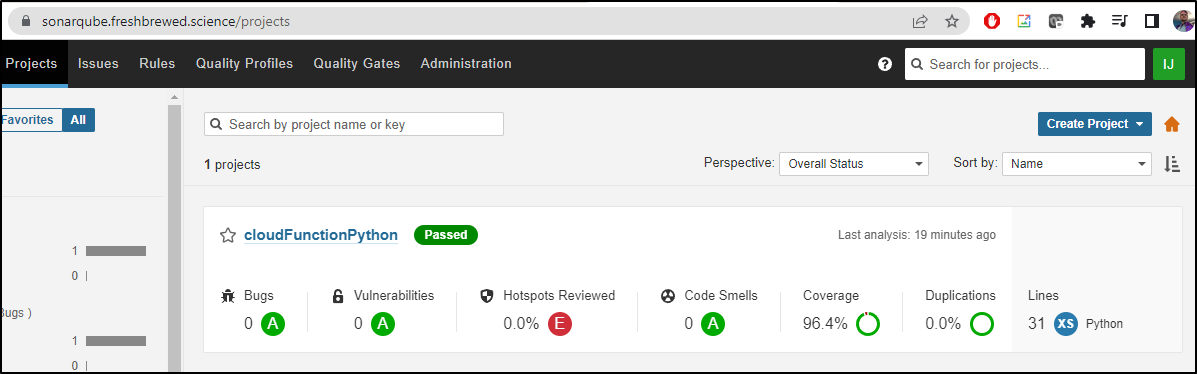
The moment that step completed, I could see some results in Sonarqube
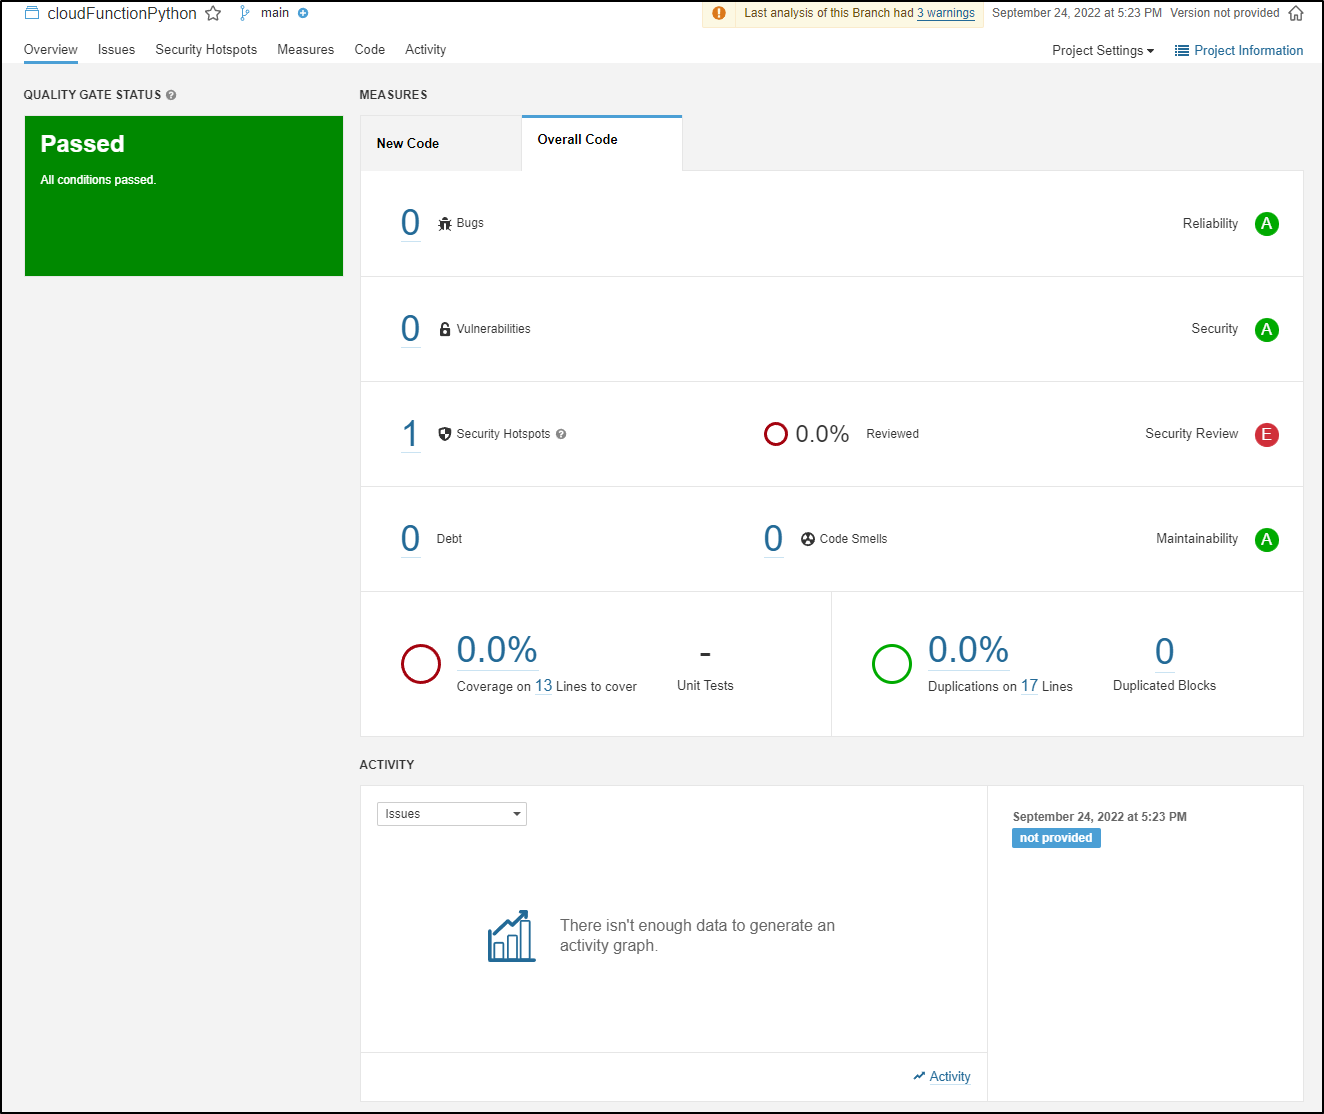
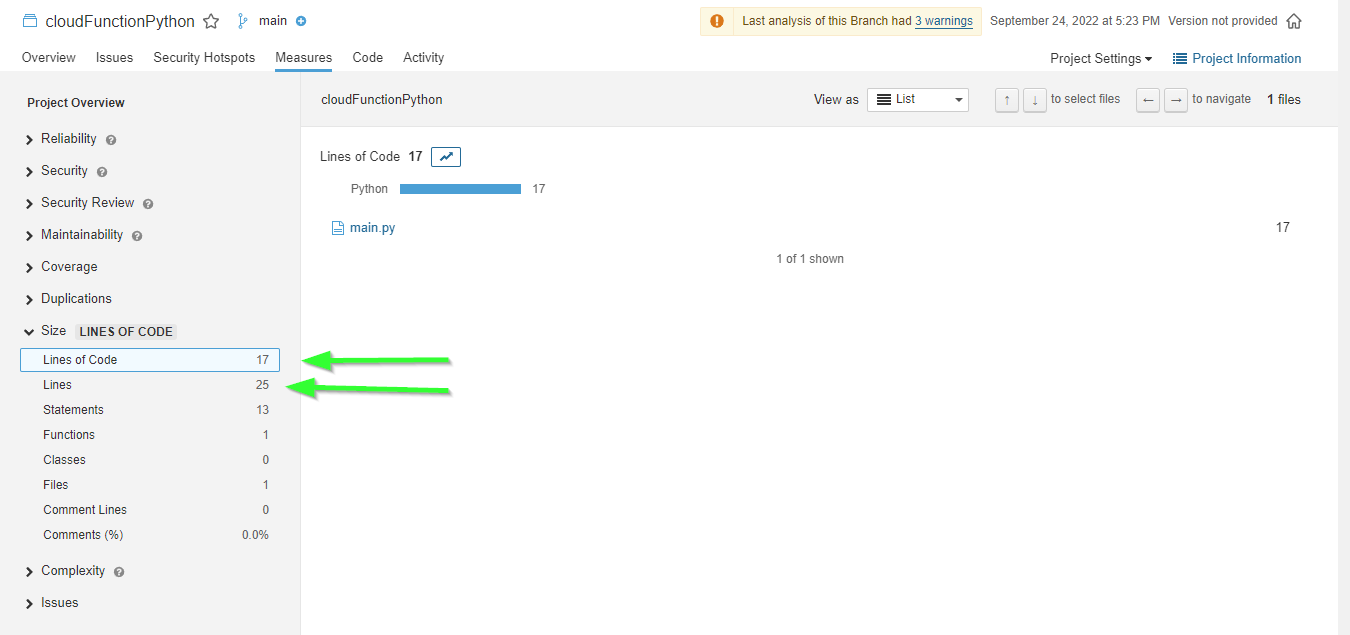
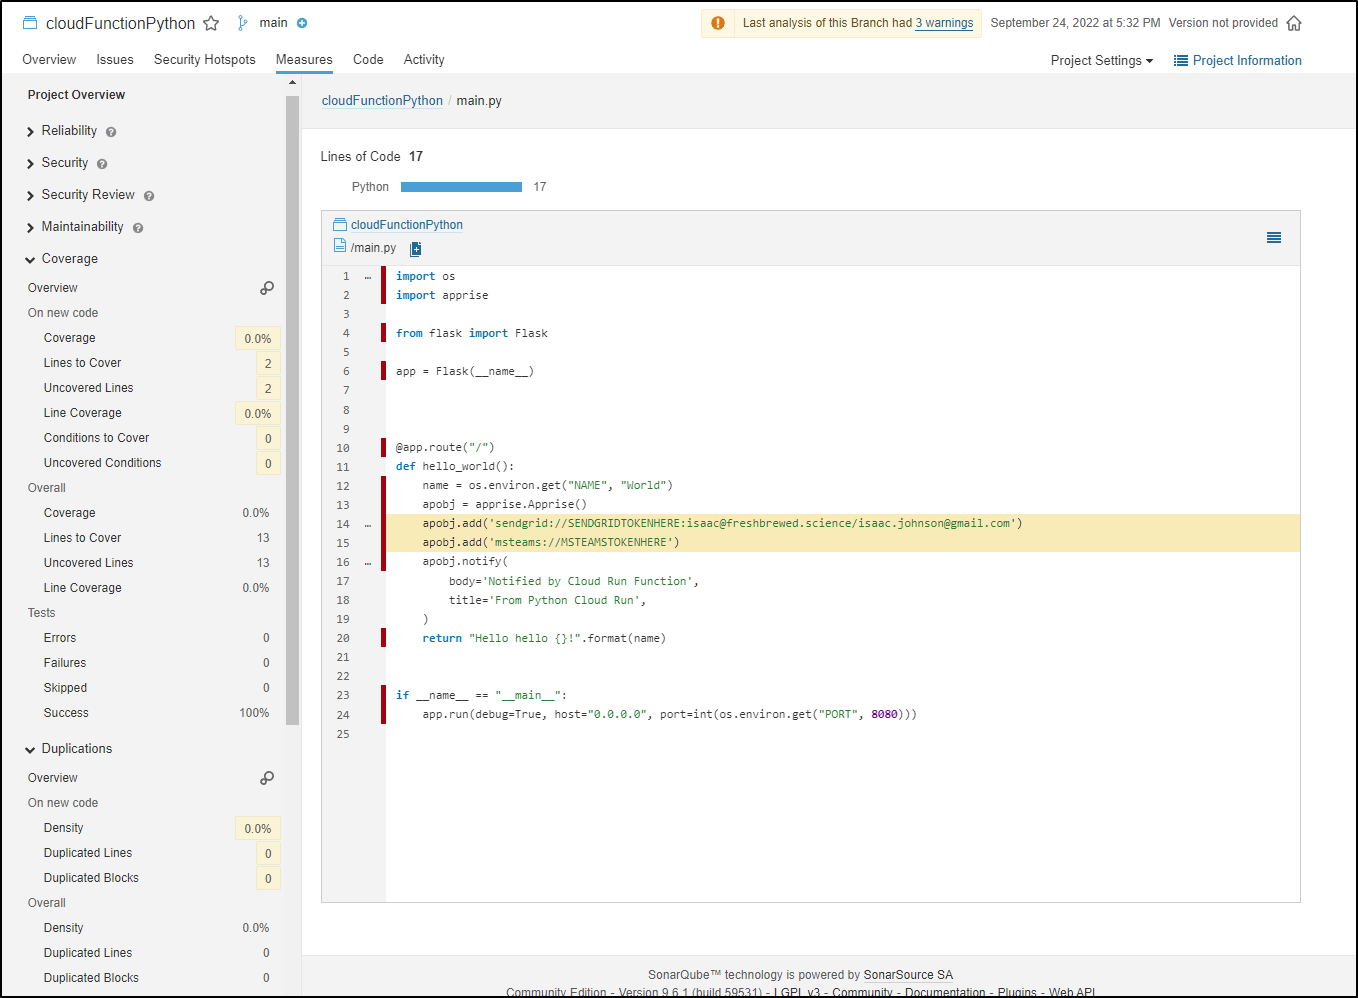
This is not a large project, the bulk is in the main.py
while my code editor will show 25, sonar lets me know that yes, there are 25 lines but only 17 Lines of actual Code
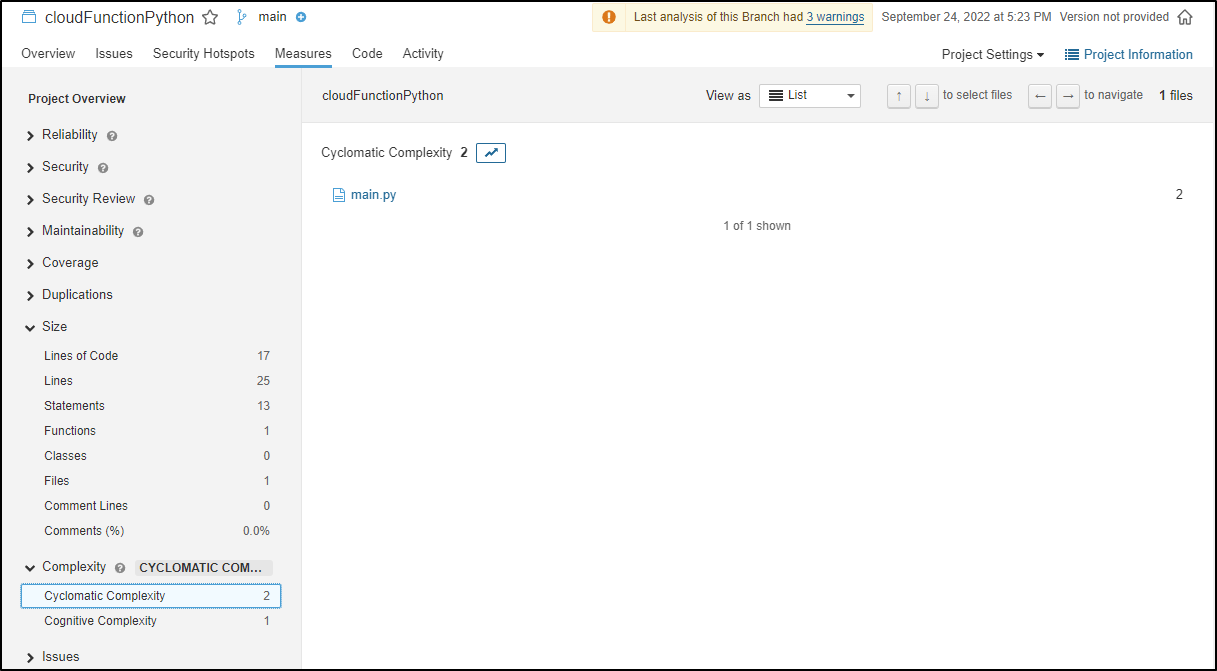
Furthermore, I can get the Cyclomatic and Cognative complexity of the repo
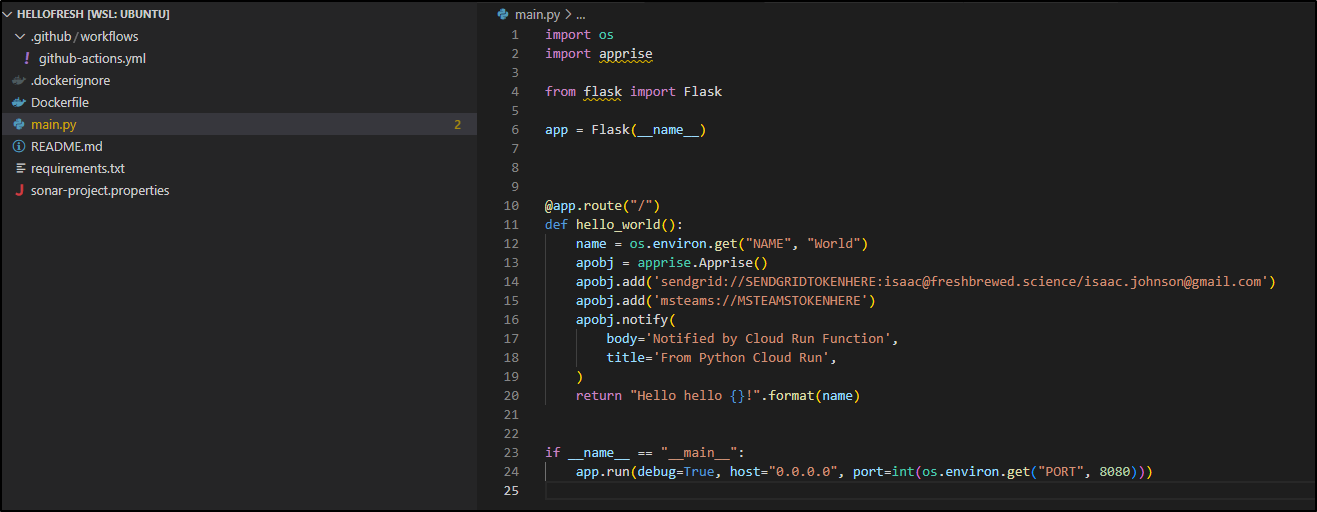
One Problem I see right away is that I ran the scan AFTER I had substituted the secret variables. This now means anyone who could view sonar can see my tokens
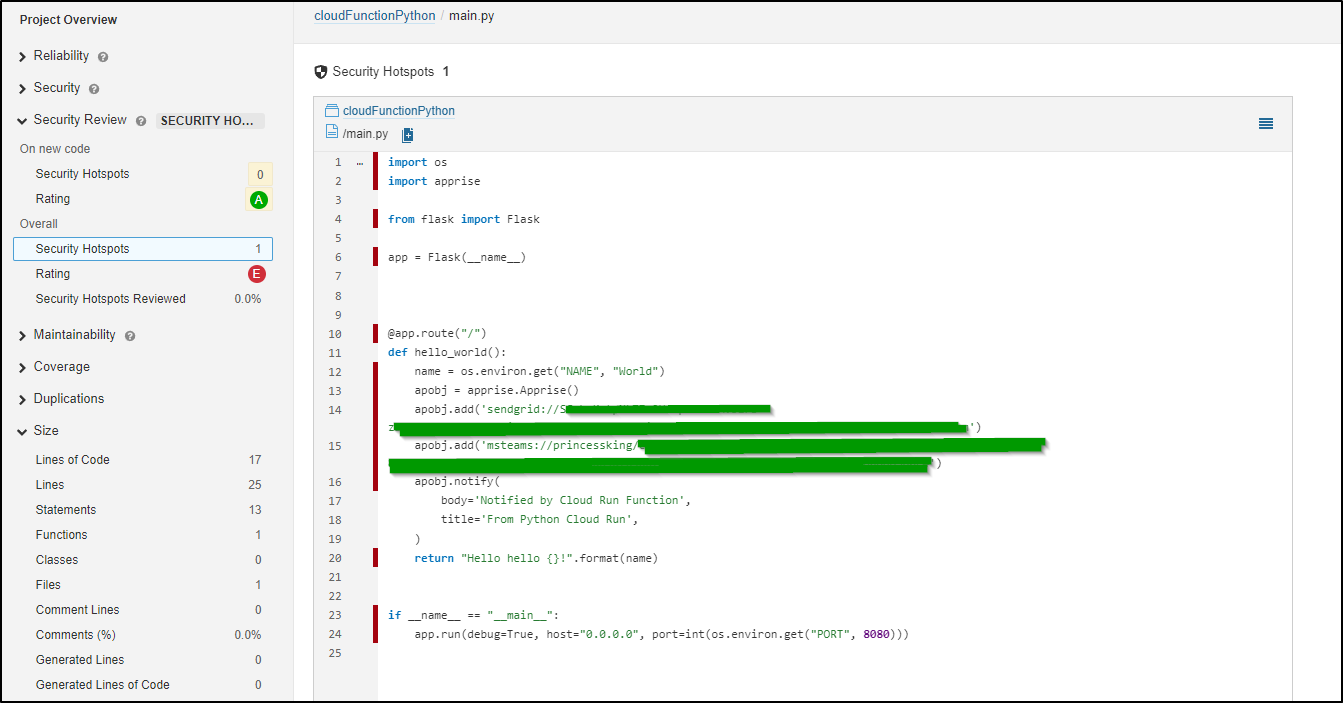
If I swap the sed and the scan
That should remedy the issue
Adding coverage
Getting test coverage took a few steps
Fast-forward
 .github/workflows/github-actions.yml | 51 ++++++++++++++++++++-------------------------------
 .gitignore                           |  2 ++
 conftest.py                          | 13 +++++++++++++
 main.py                              |  2 --
 requirements.txt                     |  5 ++++-
 sonar-project.properties             |  8 +++++++-
 test_main.py                         |  8 ++++++++
The github actions was updated:
name: GitHub Actions Docker Build
on: push

jobs:
  HostedActions:
    runs-on: ubuntu-latest
    steps:
      - run: echo "🎉 The job was automatically triggered by a $ event."
      - run: echo "🐧 This job is now running on a $ server hosted by GitHub!"
      - run: echo "🔎 The name of your branch is $ and your repository is $."
      - name: Check out repository code
        uses: actions/checkout@v2
      - run: echo "💡 The $ repository has been cloned to the runner."
      - run: echo "🖥️ The workflow is now ready to test your code on the runner."
      - name: Run Tests
        run: |
          set -x
          pip3 install -r requirements.txt
          python3 -m pytest

          python3 -m pytest -v --cov --cov-report xml:test-results/coverage.xml --junitxml=test-results/results.xml

      - uses: sonarsource/sonarqube-scan-action@master
        env:
          SONAR_TOKEN: $
          SONAR_HOST_URL: $
file: test_main.py
import json


def test_main(app, client):
    res = client.get('/')
    assert res.status_code == 200
    expected = "Hello hello World!"
    assert expected == res.get_data(as_text=True)
and it’s conftest.py
import pytest

from main import app as flask_app


@pytest.fixture
def app():
    yield flask_app


@pytest.fixture
def client(app):
    return app.test_client()
file: sonar-project.properties
sonar.projectKey=idjohnson_cloudFunctionPython_AYNxjV-p3oTU84gY6sze
sonar.language=py
sonar.core.codeCoveragePlugin=cobertura
sonar.python.coverage.reportPaths=test-results/coverage.xml
sonar.python.xunit.reportPaths=test-results/results.xml
sonar.exclusions=**/*.xml,*.xml
#/home/runner/work/cloudFunctionPython/cloudFunctionPython/test-results
The updated requirements
Flask==2.1.0
gunicorn==20.1.0
apprise==1.0.0
pytest==7.1.3
coverage==6.4.4
pytest-cov==3.0.0
then I added a .gitignore
test-results/
__pycache__/
And the details show in the graph
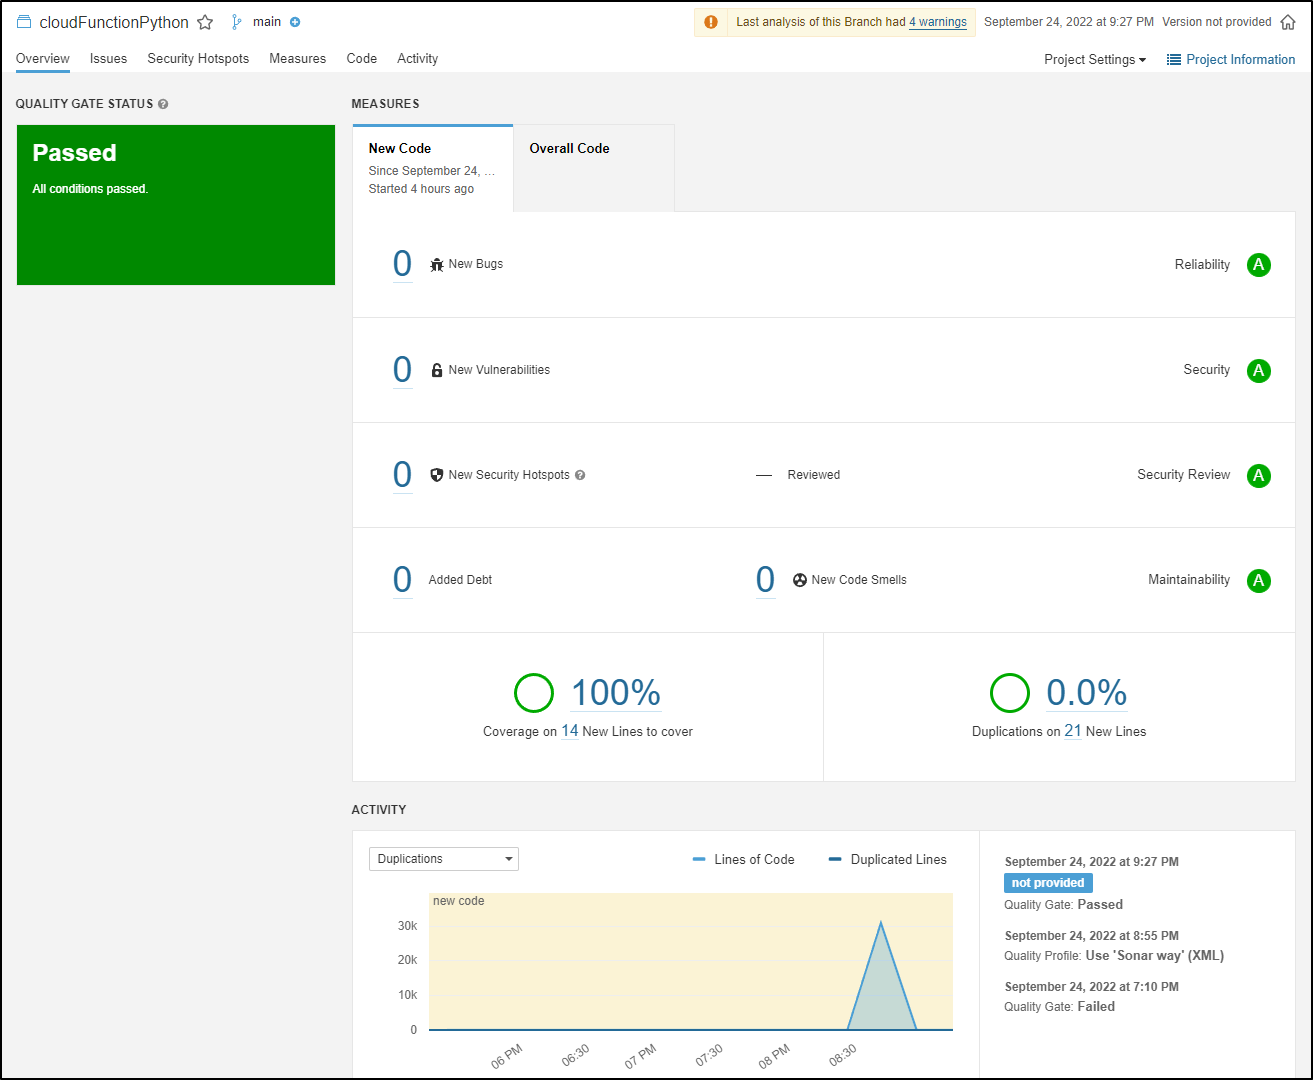
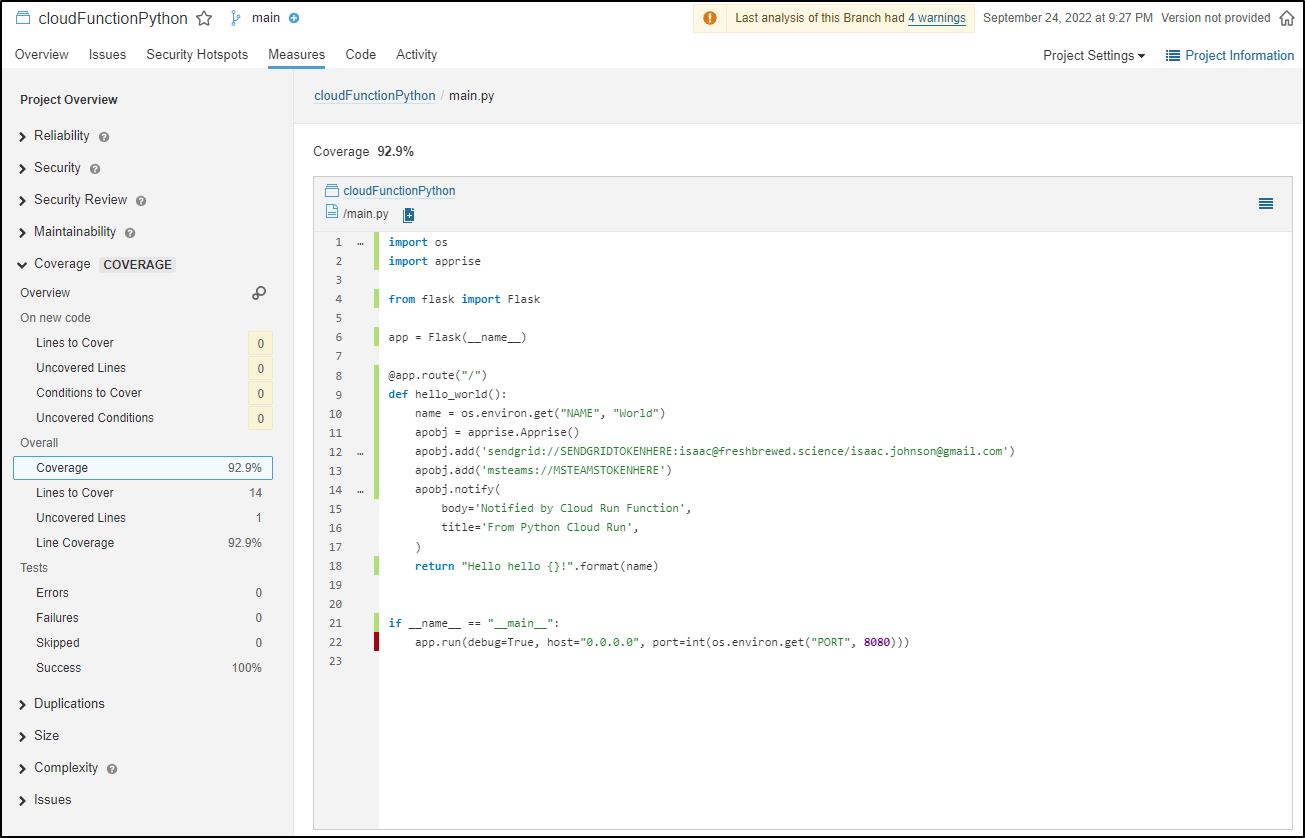
we can see the coverage on the specific file
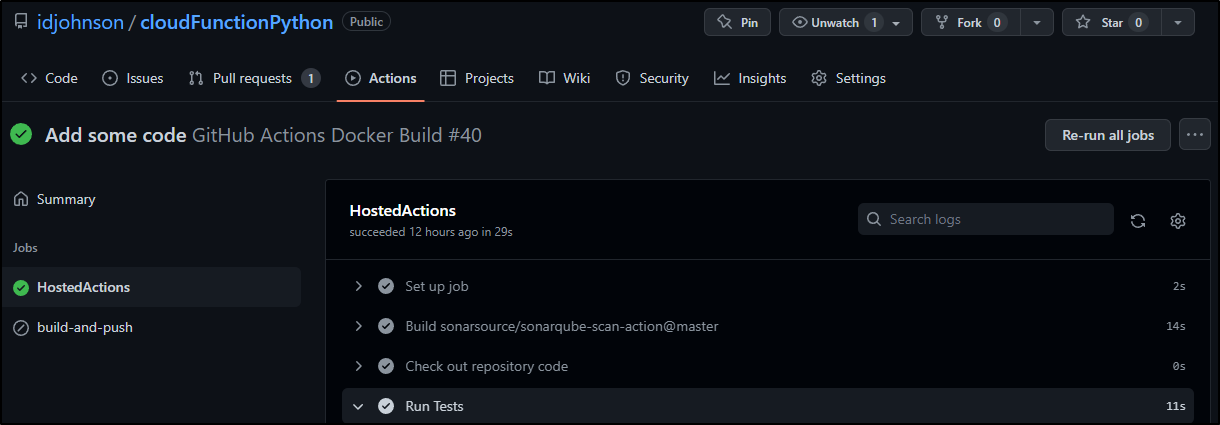
One last optimization I’ll make is to limit my Sonarscans to just the main branch. As we are using the Community Edition (CE), scans of non-main branches will fail.
name: GitHub Actions Docker Build
on: push

jobs:
  HostedActions:
    runs-on: ubuntu-latest
    steps:
      - name: Check out repository code
        uses: actions/checkout@v2
      - name: Run Tests
        run: |
          set -x
          pip3 install -r requirements.txt
          python3 -m pytest

          # pytest --junitxml=test-results/coverage.xml
          # python3 -m pytest --cov-report xml:test-results/results.xml
          # python3 -m pytest -v -o junit_family=xunit1 --cov-report xml:test-results/coverage.xml --junitxml=test-results/results.xml
          python3 -m pytest -v --cov --cov-report xml:test-results/coverage.xml --junitxml=test-results/results.xml

          pwd
          ls -ltra
          ls -ltra ./test-results || true
          cat ./test-results/results.xml

          ls -ltra /home/runner/work/cloudFunctionPython/cloudFunctionPython/test-results

          echo $
          #pytest -v  --cov --cov-report=xml --cov-report=html
        if: contains('
            refs/heads/main
           ', github.ref)
      - uses: sonarsource/sonarqube-scan-action@master
        env:
          SONAR_TOKEN: $
          SONAR_HOST_URL: $
        if: contains('
            refs/heads/main
           ', github.ref)

  build-and-push:
    runs-on: ubuntu-latest
    needs: HostedActions
    if: github.ref == 'refs/heads/main'
    steps:
      - name: Check out repository code
        uses: actions/checkout@v2
      - name: Replace Secret Tokens in Main
        run: |
          sed -i 's/SENDGRIDTOKENHERE/$/g' main.py
          sed -i 's/MSTEAMSTOKENHERE/$/g' main.py

      - uses: RafikFarhad/push-to-gcr-github-action@v4.1
        with:
          gcloud_service_key: $ # can be base64 encoded or plain text
          registry: gcr.io
          project_id: myanthosproject2
          image_name: pythonfunction
          image_tag: latest,$
          dockerfile: ./Dockerfile
          context: .
      - id: 'auth'
        name: 'Authenticate to Google Cloud'
        uses: 'google-github-actions/auth@v0'
        with:
          credentials_json: '$'
      #- id: 'deploy'
      #  uses: 'google-github-actions/deploy-cloudrun@v0'
      #  with:
      #    service: 'namespaces/511842454269/services/hellofresh'
      #    image: 'gcr.io/myanthosproject2/pythonfunction:$'
      - name: 'Set up Cloud SDK'
        uses: 'google-github-actions/setup-gcloud@v0'

      # Run Gcloud Run Deploy as GCP gcloud command instead
      - id: 'gcloud'
        name: 'gcloud'
        run: |-
          gcloud run deploy namespaces/511842454269/services/hellofresh --image gcr.io/myanthosproject2/pythonfunction:$ --quiet --platform managed --region us-central1 --project myanthosproject2 --format json
Coverage Thresholds
We could pay for Sonarqube to apply a coverage threshold. This would be the easiest.
However, what if we just want some basic threshold test?
We could code that into a bash check
jobs:
  HostedActions:
    runs-on: ubuntu-latest
    steps:
      - name: Check out repository code
        uses: actions/checkout@v2
      - name: Run Tests
        run: |
          set -x
          pip3 install -r requirements.txt
          python3 -m pytest

          python3 -m pytest -v --cov --cov-report xml:test-results/coverage.xml --junitxml=test-results/results.xml

          a=`cat ./test-results/coverage.xml | grep line-rate | grep 'name="."' | sed 's/^.*line-rate="\([^"]*\)".*/\1/' | tr -d '\n'`
          b=0.98

          if (( $(bc <<<"$a > $b") )); then
              echo "The Coverage has met the threshold of $b"
          else
              echo "The Coverage has not met the minimum threshold. This build will terminate.  Please increase your coverage to build and deploy."
              exit 1
          fi
      - uses: sonarsource/sonarqube-scan-action@master
        env:
          SONAR_TOKEN: $
          SONAR_HOST_URL: $
        if: contains('
            refs/heads/main
           ', github.ref)
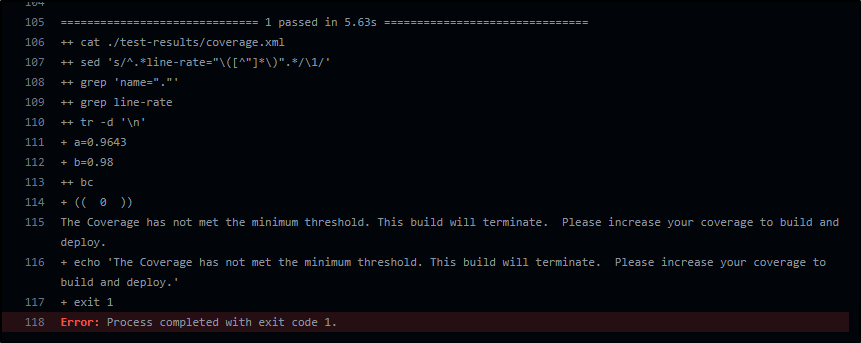
Essentially the above would require 98% coverage from pytest.
Which we can see failed:
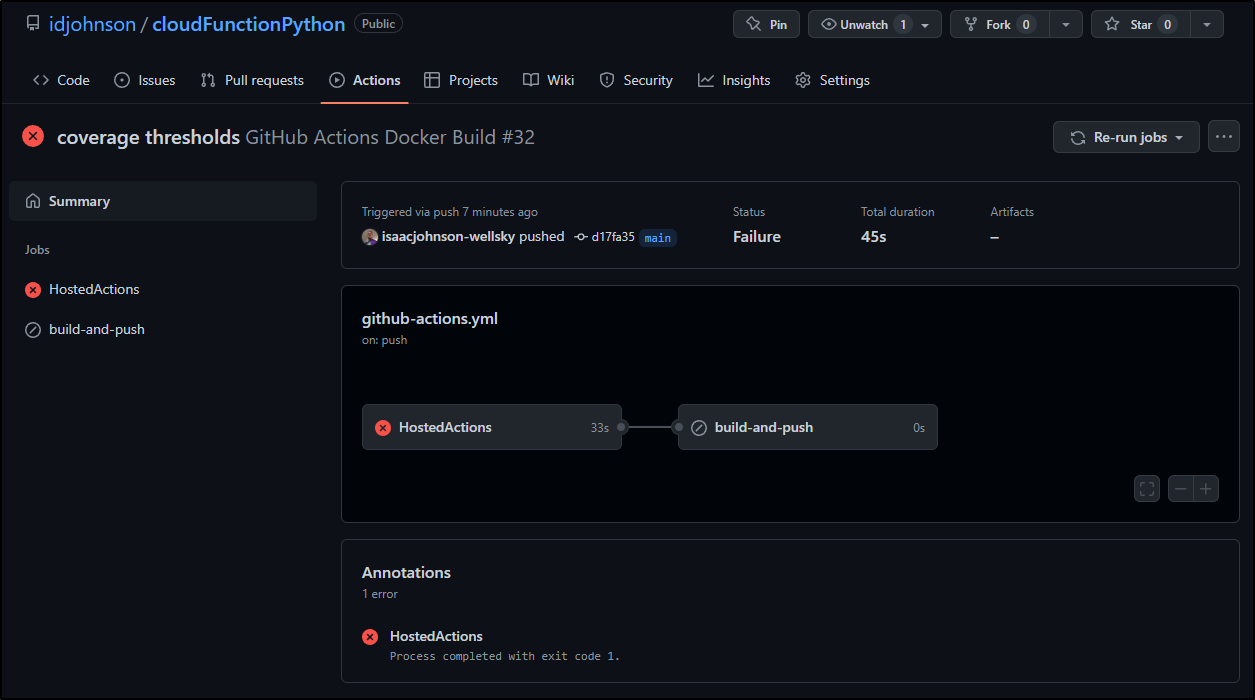
As it is a 96.43%
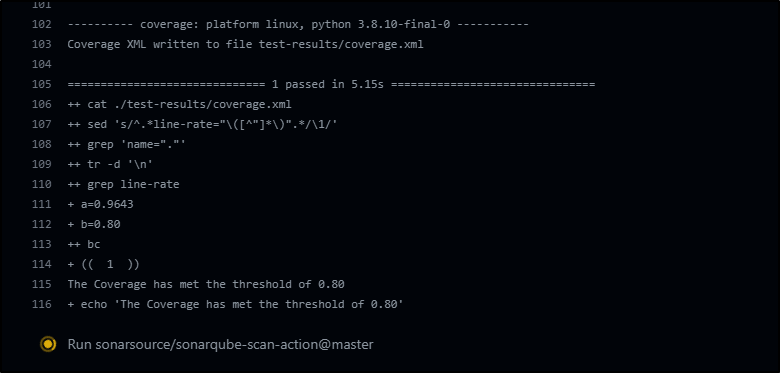
A more reasonable check (80%)
  a=`cat ./test-results/coverage.xml | grep line-rate | grep 'name="."' | sed 's/^.*line-rate="\([^"]*\)".*/\1/' | tr -d '\n'`
  b=0.80

  if (( $(bc <<<"$a > $b") )); then
      echo "The Coverage has met the threshold of $b"
  else
      echo "The Coverage has not met the minimum threshold. This build will terminate.  Please increase your coverage to build and deploy."
      exit 1
  fi
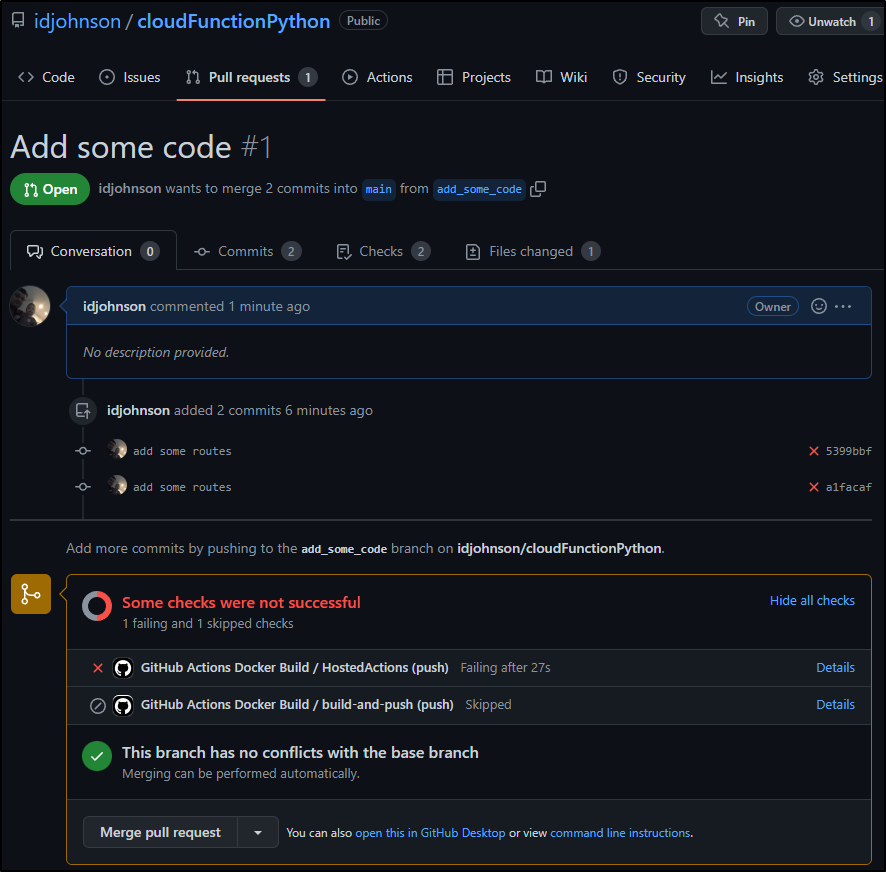
Adding code
To see these changes in effect, let’s add some code
builder@DESKTOP-QADGF36:~/Workspaces/hellofresh$ git checkout -b add_some_code
Switched to a new branch 'add_some_code'
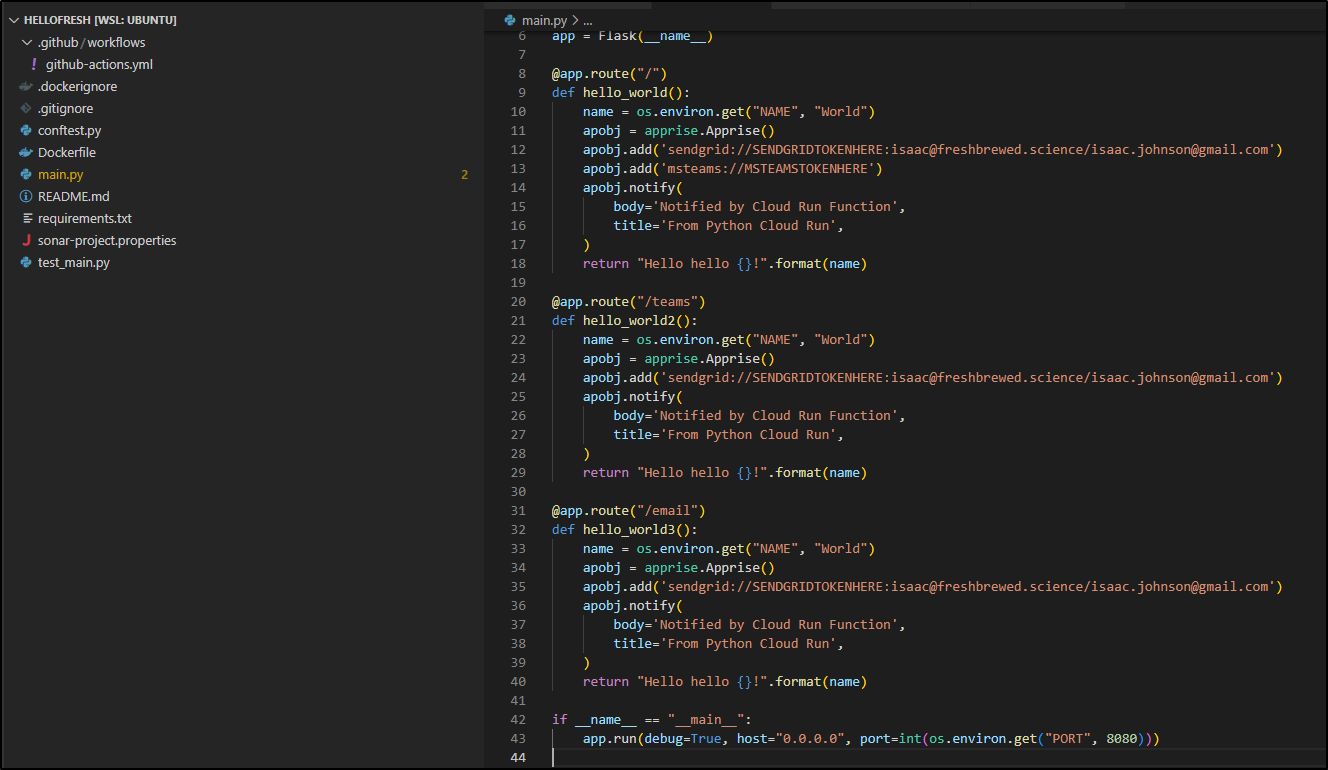
Then I’ll add some new endpoints
Then push it
builder@DESKTOP-QADGF36:~/Workspaces/hellofresh$ git add main.py
builder@DESKTOP-QADGF36:~/Workspaces/hellofresh$ git commit -m "add some routes"
[add_some_code 5399bbf] add some routes
 1 file changed, 21 insertions(+)
builder@DESKTOP-QADGF36:~/Workspaces/hellofresh$ git push
fatal: The current branch add_some_code has no upstream branch.
To push the current branch and set the remote as upstream, use

    git push --set-upstream origin add_some_code

builder@DESKTOP-QADGF36:~/Workspaces/hellofresh$ git push --set-upstream origin add_some_code
Enumerating objects: 5, done.
Counting objects: 100% (5/5), done.
Delta compression using up to 16 threads
Compressing objects: 100% (3/3), done.
Writing objects: 100% (3/3), 652 bytes | 652.00 KiB/s, done.
Total 3 (delta 1), reused 0 (delta 0)
remote: Resolving deltas: 100% (1/1), completed with 1 local object.
remote:
remote: Create a pull request for 'add_some_code' on GitHub by visiting:
remote:      https://github.com/idjohnson/cloudFunctionPython/pull/new/add_some_code
remote:
To https://github.com/idjohnson/cloudFunctionPython.git
 * [new branch]      add_some_code -> add_some_code
Branch 'add_some_code' set up to track remote branch 'add_some_code' from 'origin'.
As I haven’t added any tests yet, this fails the coverage
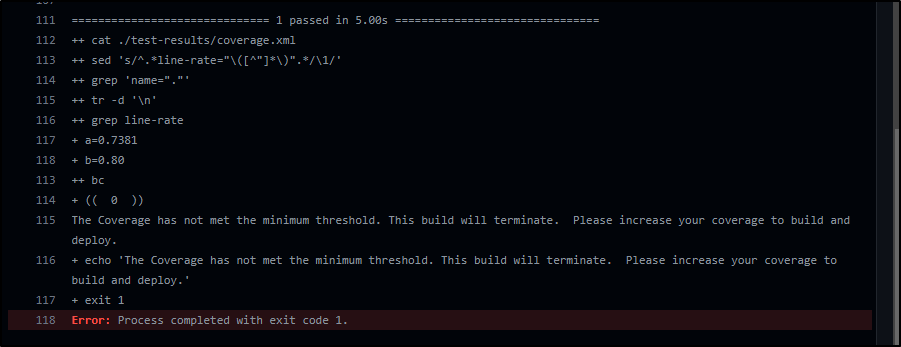
And we can see how it fails in a PR
Limitations
Because the PR build uses its own branch, trying to cheat the threshold would work
  a=`cat ./test-results/coverage.xml | grep line-rate | grep 'name="."' | sed 's/^.*line-rate="\([^"]*\)".*/\1/' | tr -d '\n'`
  b=0.50

  if (( $(bc <<<"$a > $b") )); then
      echo "The Coverage has met the threshold of $b"
  else
      echo "The Coverage has not met the minimum threshold. This build will terminate.  Please increase your coverage to build and deploy."
      exit 1
  fi
then we push
builder@DESKTOP-QADGF36:~/Workspaces/hellofresh$ git commit -m "try cheating the coverage threshold"
[add_some_code 78fdc1b] try cheating the coverage threshold
 1 file changed, 1 insertion(+), 1 deletion(-)
builder@DESKTOP-QADGF36:~/Workspaces/hellofresh$ git push
Enumerating objects: 9, done.
Counting objects: 100% (9/9), done.
Delta compression using up to 16 threads
Compressing objects: 100% (3/3), done.
Writing objects: 100% (5/5), 414 bytes | 414.00 KiB/s, done.
Total 5 (delta 2), reused 0 (delta 0)
remote: Resolving deltas: 100% (2/2), completed with 2 local objects.
To https://github.com/idjohnson/cloudFunctionPython.git
   780a22f..78fdc1b  add_some_code -> add_some_code
And we can see we only succeeded because the threshold was dropped to 50%.

This just means we have to watch for modifications to the threshold. I would argue tight controls is one thing you pay for with the Developer and higher licenses (and the Developer is just US$150/year presently)
Summary
We setup Sonarqube locally with proper Ingress. We then tied it to our Github as a proper App. Lastly, we set configured python tests. Finally we showed a basic way to add threshold checks.
Next time we’ll focus on other ways to run this containerized function.