Published: Aug 23, 2022 by Isaac Johnson
Several times recently I have looked to automate the configuration of AWX, the OSS version of Ansible Tower. As a followup to my last post on AWX in Kubernetes, we will now configure the AWX setup in Kubernetes using curl and Kubernetes Jobs.
Everything I show could be done within the context of a Job, however, I’ll demonstrate with a mix of Kubernetes Jobs and directly commandline with curl.
Creating Organizations, SCM Credentials and Projects
First, let us show any organizations we have already created. We can do this with the REST API of AWX.
Since the ADWerx helm chart created secrets with our login, password and host we can use them in a Job.
$ cat awx_job.yaml
apiVersion: batch/v1
kind: Job
metadata:
  name: awxtest
  namespace: adwerx
spec:
  backoffLimit: 4
  template:
    spec:
      containers:
      - name: test
        image: alpine
        envFrom:
        - secretRef:
            name: adwerxawx
        command:
        - bin/sh
        - -c
        - |
          apk --no-cache add curl
          apk --no-cache add jq
          curl --user $AWX_ADMIN_USER:$AWX_ADMIN_PASSWORD -X GET -H "Content-Type: application/json" http://$ADWERXAWX_SERVICE_HOST:$ADWERXAWX_SERVICE_PORT_HTTP/api/v2/organizations/ | jq
      restartPolicy: Never

$ kubectl apply -f awx_job.yaml
job.batch/awxtest created
We can then get the pod name from the event log and then use that to get logs
$ kubectl logs `kubectl describe job awxtest -n adwerx | grep "Created pod" | sed 's/^.*: //' | tr -d '\n
'` -n adwerx | grep url
(4/5) Installing libcurl (7.83.1-r2)
(5/5) Installing curl (7.83.1-r2)
      "url": "/api/v2/organizations/1/",
I can also do these steps on the command line to see details, like the Organization name
$ curl --silent --user $AWX_ADMIN_USER:$AWX_ADMIN_PASSWORD -X GET -H "Content-Type: application/json" htt
ps://awx.freshbrewed.science/api/v2/organizations/ | jq '.results[] | .name'
"onprem"
And I can see a project created already
$ curl --silent --user $AWX_ADMIN_USER:$AWX_ADMIN_PASSWORD -X GET -H "Content-Type: application/json" https://awx.freshbrewed.science/api/v2/projects/ | jq '.results[] | .name'
"My New Proejct"
Adding a Project
To add a project, we first need to create a credential. I’ll get the OrgID then use to create a GH PAT SCM Token.
$ export ORGID=`curl --silent --user $AWX_ADMIN_USER:$AWX_ADMIN_PASSWORD -X GET -H "Content-Type: application/json" https://awx.freshbrewed.science/api/v2/organizations/ | jq '.results[] | .id' | tr -d '\n'`

$ curl --silent --user $AWX_ADMIN_USER:$AWX_ADMIN_PASSWORD -X POST -H "Content-Type: application/json" https://awx.freshbrewed.science/api/v2/credentials/ --data "{\"credential_type\": 2, \"inputs\": { \"username\": \"idjohnson\", \"password\": \"ghp_************************************\" }, \"name\": \"ij_gh_pat\", \"organization\": $ORGID}"{"id":4,"type":"credential","url":"/api/v2/credentials/4/","related":{"named_url":"/api/v2/credentials/ij_gh_pat++Source Control+scm++onprem/","created_by":"/api/v2/users/1/","modified_by":"/api/v2/users/1/","organization":"/api/v2/organizations/1/","activity_stream":"/api/v2/credentials/4/activity_stream/","access_list":"/api/v2/credentials/4/access_list/","object_roles":"/api/v2/credentials/4/object_roles/","owner_users":"/api/v2/credentials/4/owner_users/","owner_teams":"/api/v2/credentials/4/owner_teams/","copy":"/api/v2/credentials/4/copy/","input_sources":"/api/v2/credentials/4/input_sources/","credential_type":"/api/v2/credential_types/2/"},"summary_fields":{"organization":{"id":1,"name":"onprem","description":"onprem datacenter"},"credential_type":{"id":2,"name":"Source Control","description":""},"created_by":{"id":1,"username":"admin","first_name":"","last_name":""},"modified_by":{"id":1,"username":"admin","first_name":"","last_name":""},"object_roles":{"admin_role":{"description":"Can manage all aspects of the credential","name":"Admin","id":60},"use_role":{"description":"Can use the credential in a job template","name":"Use","id":61},"read_role":{"description":"May view settings for the credential","name":"Read","id":62}},"user_capabilities":{"edit":true,"delete":true,"copy":true,"use":true},"owners":[{"id":1,"type":"organization","name":"onprem","description":"onprem datacenter","url":"/api/v2/organizations/1/"}]},"created":"2022-08-18T00:29:22.429042Z","modified":"2022-08-18T00:29:22.429088Z","name":"ij_gh_pat","description":"","organization":1,"credential_type":2,"managed_by_tower":false,"inputs":{"password":"$encrypted$","username":"idjohnson"},"kind":"scm","cloud":false,"kubernetes":false}
Now to use to create a project, I’ll update the Job and relaunch it
$ cat awx_job.yaml
apiVersion: batch/v1
kind: Job
metadata:
  name: awxtest
  namespace: adwerx
spec:
  backoffLimit: 4
  template:
    spec:
      containers:
      - name: test
        image: alpine
        envFrom:
        - secretRef:
            name: adwerxawx
        command:
        - bin/sh
        - -c
        - |
          apk --no-cache add curl
          apk --no-cache add jq

          # Org ID for final curl
          curl --silent --user $AWX_ADMIN_USER:$AWX_ADMIN_PASSWORD -X GET -H "Content-Type: application/json" https://awx.freshbrewed.science/api/v2/organizations/ | jq '.results[] | select(.name=="onprem") | .id' > ./ORGID
          export ORGID=`cat ./ORGID | tr -d '\n'`

          # Easier to use org name in JQ. Tail in case we have multiple vars
          curl --silent --user $AWX_ADMIN_USER:$AWX_ADMIN_PASSWORD -X GET -H "Content-Type: application/json" http://$ADWERXAWX_SERVICE_HOST:$ADWERXAWX_SERVICE_PORT_HTTP/api/v2/credentials/ |  jq '.results[] | select((.kind == "scm") and (.summary_fields.organization.name == "onprem")) | .id' | tail -n1 > GHTOKENID
          export GHID=`cat ./GHTOKENID | tr -d '\n'`

          curl --user $AWX_ADMIN_USER:$AWX_ADMIN_PASSWORD -X POST -H "Content-Type: application/json" http://$ADWERXAWX_SERVICE_HOST:$ADWERXAWX_SERVICE_PORT_HTTP/api/v2/projects/ --data "{ \"name\": \"FBDevOps\", \"description\": \"FB SRE Project\", \"scm_type\": \"git\", \"scm_url\": \"https://github.com/idjohnson/ansible-playbooks.git\", \"scm_branch\": \"main\", \"scm_clean\": false, \"credential\": $GHID, \"timeout\": 0, \"organization\": $ORGID, \"scm_update_on_launch\": true, \"scm_update_cache_timeout\": 0, \"allow_override\": false }"
      restartPolicy: Never
Now delete and relaunch
$ kubectl delete -f awx_job.yaml
job.batch "awxtest" deleted

$ kubectl apply -f awx_job.yaml
job.batch/awxtest created
We can see it completed:
$ kubectl get job -n adwerx
NAME       COMPLETIONS   DURATION   AGE
awxtest    1/1           6s         8s
We can see the new project and verify it synced content
At this point we have an Organization, a proper GH Credential, and a Project that uses it.
I should note we can create a “Github PAT”, but best I can tell, it isn’t usable with projects.
curl --user admin:********-X POST -H "Content-Type: application/json" "https://awx.freshbrewed.science/api/v2/credentials/" --data '{"credential_type": 11, "inputs": { "token": "myOtherToken" }, "name": "anotherTestToken", "organization": 1}'
Adding a user
Perhaps we do not wish to do everything as the built in Admin user.
We can create a new user with admin rights using the REST API:
curl --user $AWX_ADMIN_USER:$AWX_ADMIN_PASSWORD -X POST -H "Content-Type: application/json" "https://awx.freshbrewed.science/api/v2/users/" --data '{"email":"isaac@freshbrewed.science","first_name": "Isaac","is_superuser": true, "last_name": "Johnson", "password": "MyUsersPassword", "username":"isaac"}'
Now to test it, we could use the new user to fetch our existing tokens:
$ curl --silent --user isaac:MyUsersPassword -X GET -H "Content-Type: application/json" "https://awx.freshbrewed.science/api/v2/credentials/" | jq '.results[] | .name'
"anotherTestToken"
"ansibleuser"
"builder"
"builderByKey"
"builderNetwork"
"hpTest"
"idj_gh_token"
"ij_gh_pat"
"myFakeGithub"
Adding a host
We first need an inventory to contain the host.
We’ll create it in our first organization (1):
$ curl --user $AWX_ADMIN_USER:$AWX_ADMIN_PASSWORD -X POST -H "Content-Type: application/json" "https://awx.freshbrewed.science/api/v2/inventories/" --data '{"name": "MyFirstInventory","description": "My First Inventory", "organization": 1, "variables": "---" }'
{"id":2,"type":"inventory","url":"/api/v2/inventories/2/","related":{"named_url":"/api/v2/inventories/MyFirstInventory++onprem/","created_by":"/api/v2/users/35/","modified_by":"/api/v2/users/35/","hosts":"/api/v2/inventories/2/hosts/","groups":"/api/v2/inventories/2/groups/","root_groups":"/api/v2/inventories/2/root_groups/","variable_data":"/api/v2/inventories/2/variable_data/","script":"/api/v2/inventories/2/script/","tree":"/api/v2/inventories/2/tree/","inventory_sources":"/api/v2/inventories/2/inventory_sources/","update_inventory_sources":"/api/v2/inventories/2/update_inventory_sources/","activity_stream":"/api/v2/inventories/2/activity_stream/","job_templates":"/api/v2/inventories/2/job_templates/","ad_hoc_commands":"/api/v2/inventories/2/ad_hoc_commands/","access_list":"/api/v2/inventories/2/access_list/","object_roles":"/api/v2/inventories/2/object_roles/","instance_groups":"/api/v2/inventories/2/instance_groups/","copy":"/api/v2/inventories/2/copy/","organization":"/api/v2/organizations/1/"},"summary_fields":{"organization":{"id":1,"name":"onprem","description":"onprem datacenter"},"created_by":{"id":35,"username":"isaac","first_name":"Isaac","last_name":"Johnson"},"modified_by":{"id":35,"username":"isaac","first_name":"Isaac","last_name":"Johnson"},"object_roles":{"admin_role":{"description":"Can manage all aspects of the inventory","name":"Admin","id":83},"update_role":{"description":"May update the inventory","name":"Update","id":84},"adhoc_role":{"description":"May run ad hoc commands on the inventory","name":"Ad Hoc","id":85},"use_role":{"description":"Can use the inventory in a job template","name":"Use","id":86},"read_role":{"description":"May view settings for the inventory","name":"Read","id":87}},"user_capabilities":{"edit":true,"delete":true,"copy":true,"adhoc":true}},"created":"2022-08-23T11:14:19.740912Z","modified":"2022-08-23T11:14:19.740974Z","name":"MyFirstInventory","description":"My First Inventory","organization":1,"kind":"","host_filter":null,"variables":"---","has_active_failures":false,"total_hosts":0,"hosts_with_active_failures":0,"total_groups":0,"has_inventory_sources":false,"total_inventory_sources":0,"inventory_sources_with_failures":0,"insights_credential":null,"pending_deletion":false}
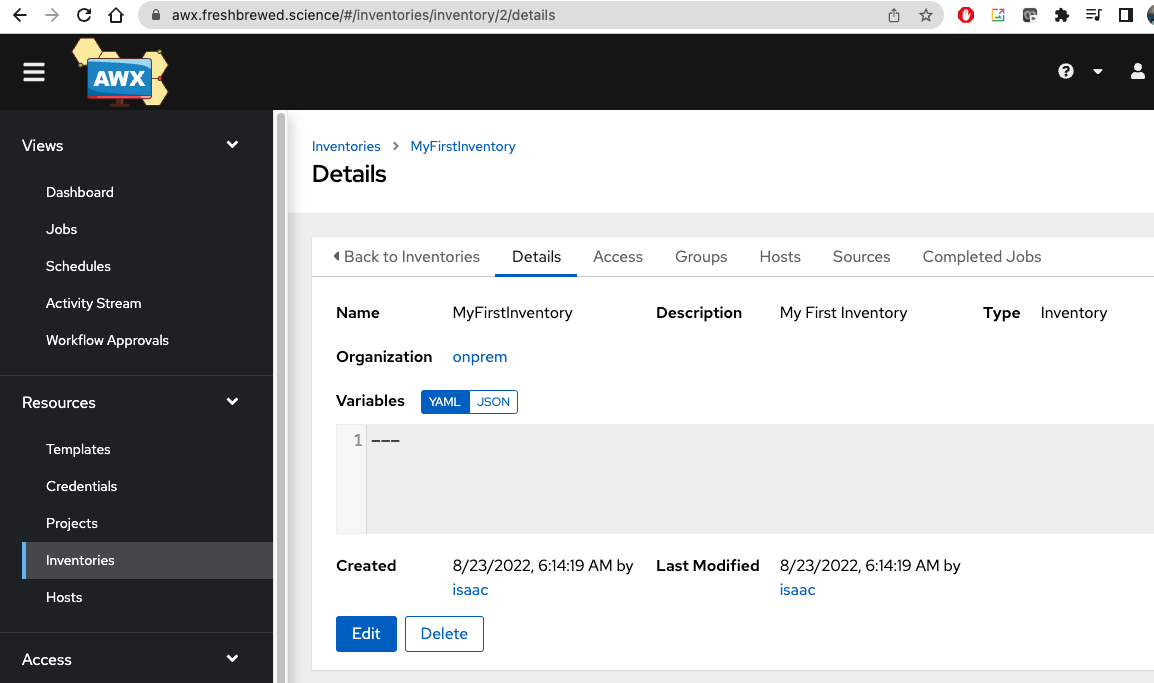
And we can see it reflected
Next, we can add a host to it.
Note: we will circle back on the credentials for the host, but at this moment, we just need to add the host into the Inventory.
I’ll want to use a human readable name, but be specific on the local IP. If your network has proper name resolution, the IP variable is not required.
We can also pipe the output to jq to see a much easier to read output.
$ curl --user $AWX_ADMIN_USER:$AWX_ADMIN_PASSWORD -X POST -H "Content-Type: application/json" "https://awx.freshbrewed.science/api/v2/hosts/" --data '{ "name": "AnnaMacbook", "description": "Annas Macbook Air", "inventory": 2, "enabled": true, "variables": "---\nansible_host: 192.168.1.81\nansible_connection: ssh"}' | jq
  % Total    % Received % Xferd  Average Speed   Time    Time     Time  Current
                                 Dload  Upload   Total   Spent    Left  Speed
100  1997  100  1831  100   166   2495    226 --:--:-- --:--:-- --:--:--  2743
{
  "id": 3,
  "type": "host",
  "url": "/api/v2/hosts/3/",
  "related": {
    "named_url": "/api/v2/hosts/AnnaMacbook++MyFirstInventory++onprem/",
    "created_by": "/api/v2/users/35/",
    "modified_by": "/api/v2/users/35/",
    "variable_data": "/api/v2/hosts/3/variable_data/",
    "groups": "/api/v2/hosts/3/groups/",
    "all_groups": "/api/v2/hosts/3/all_groups/",
    "job_events": "/api/v2/hosts/3/job_events/",
    "job_host_summaries": "/api/v2/hosts/3/job_host_summaries/",
    "activity_stream": "/api/v2/hosts/3/activity_stream/",
    "inventory_sources": "/api/v2/hosts/3/inventory_sources/",
    "smart_inventories": "/api/v2/hosts/3/smart_inventories/",
    "ad_hoc_commands": "/api/v2/hosts/3/ad_hoc_commands/",
    "ad_hoc_command_events": "/api/v2/hosts/3/ad_hoc_command_events/",
    "insights": "/api/v2/hosts/3/insights/",
    "ansible_facts": "/api/v2/hosts/3/ansible_facts/",
    "inventory": "/api/v2/inventories/2/"
  },
  "summary_fields": {
    "inventory": {
      "id": 2,
      "name": "MyFirstInventory",
      "description": "My First Inventory",
      "has_active_failures": false,
      "total_hosts": 0,
      "hosts_with_active_failures": 0,
      "total_groups": 0,
      "has_inventory_sources": false,
      "total_inventory_sources": 0,
      "inventory_sources_with_failures": 0,
      "organization_id": 1,
      "kind": ""
    },
    "created_by": {
      "id": 35,
      "username": "isaac",
      "first_name": "Isaac",
      "last_name": "Johnson"
    },
    "modified_by": {
      "id": 35,
      "username": "isaac",
      "first_name": "Isaac",
      "last_name": "Johnson"
    },
    "user_capabilities": {
      "edit": true,
      "delete": true
    },
    "groups": {
      "count": 0,
      "results": []
    },
    "recent_jobs": []
  },
  "created": "2022-08-23T11:25:07.500148Z",
  "modified": "2022-08-23T11:25:07.500191Z",
  "name": "AnnaMacbook",
  "description": "Annas Macbook Air",
  "inventory": 2,
  "enabled": true,
  "instance_id": "",
  "variables": "---\nansible_host: 192.168.1.81\nansible_connection: ssh",
  "has_active_failures": false,
  "has_inventory_sources": false,
  "last_job": null,
  "last_job_host_summary": null,
  "insights_system_id": null,
  "ansible_facts_modified": null
}
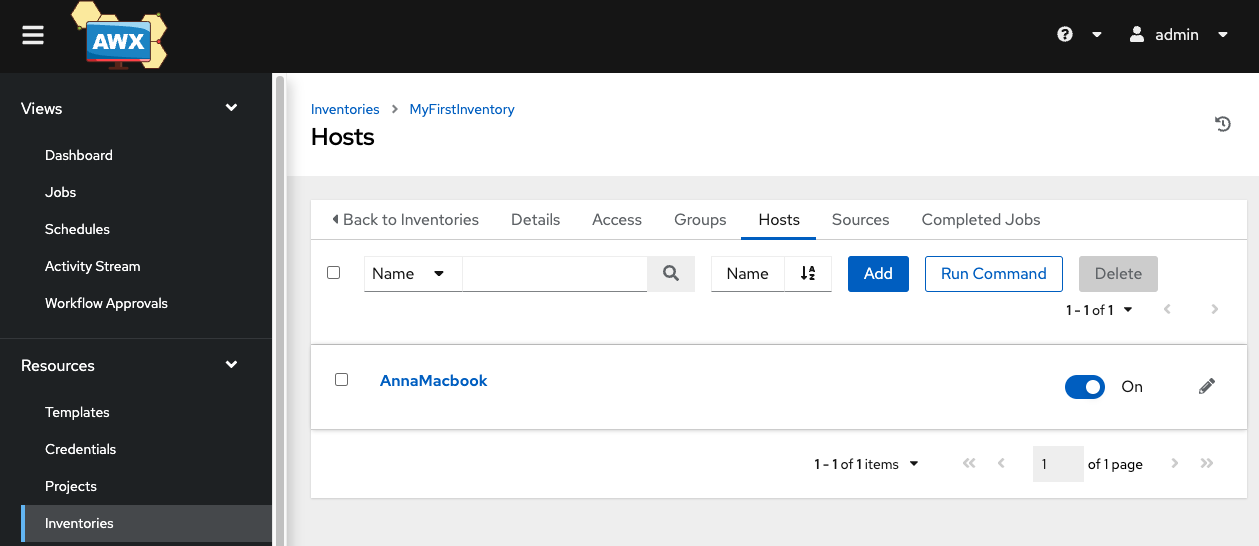
We can see this new host now listed in the Inventory
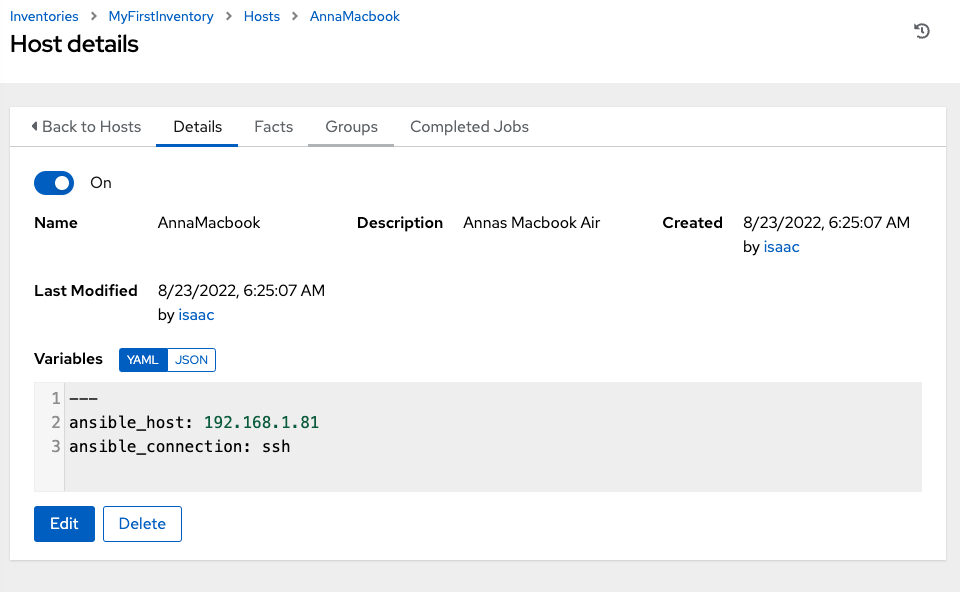
And if we check the YAML in the Variables for the host, it confirms what IP ansible will use
Machine Credentials: What should work
We should be able to create a credential with a valid user and password for this host:
$ curl --silent --user $AWX_ADMIN_USER:$AWX_ADMIN_PASSWORD -X POST -H "Content-Type: application/json" https://awx.freshbrewed.science/api/v2/credentials/ --data "{\"credential_type\": 1, \"inputs\": { \"username\": \"builder\", \"password\": \"RTheUsersPassword\" }, \"name\": \"AnnaMachineCredential\", \"organization\": 1}" | jq
{
  "id": 10,
  "type": "credential",
  "url": "/api/v2/credentials/10/",
  "related": {
    "named_url": "/api/v2/credentials/AnnaMachineCredential++Machine+ssh++onprem/",
    "created_by": "/api/v2/users/35/",
    "modified_by": "/api/v2/users/35/",
    "organization": "/api/v2/organizations/1/",
    "activity_stream": "/api/v2/credentials/10/activity_stream/",
    "access_list": "/api/v2/credentials/10/access_list/",
    "object_roles": "/api/v2/credentials/10/object_roles/",
    "owner_users": "/api/v2/credentials/10/owner_users/",
    "owner_teams": "/api/v2/credentials/10/owner_teams/",
    "copy": "/api/v2/credentials/10/copy/",
    "input_sources": "/api/v2/credentials/10/input_sources/",
    "credential_type": "/api/v2/credential_types/1/"
  },
  "summary_fields": {
    "organization": {
      "id": 1,
      "name": "onprem",
      "description": "onprem datacenter"
    },
    "credential_type": {
      "id": 1,
      "name": "Machine",
      "description": ""
    },
    "created_by": {
      "id": 35,
      "username": "isaac",
      "first_name": "Isaac",
      "last_name": "Johnson"
    },
    "modified_by": {
      "id": 35,
      "username": "isaac",
      "first_name": "Isaac",
      "last_name": "Johnson"
    },
    "object_roles": {
      "admin_role": {
        "description": "Can manage all aspects of the credential",
        "name": "Admin",
        "id": 88
      },
      "use_role": {
        "description": "Can use the credential in a job template",
        "name": "Use",
        "id": 89
      },
      "read_role": {
        "description": "May view settings for the credential",
        "name": "Read",
        "id": 90
      }
    },
    "user_capabilities": {
      "edit": true,
      "delete": true,
      "copy": true,
      "use": true
    },
    "owners": [
      {
        "id": 1,
        "type": "organization",
        "name": "onprem",
        "description": "onprem datacenter",
        "url": "/api/v2/organizations/1/"
      }
    ]
  },
  "created": "2022-08-23T11:33:44.926758Z",
  "modified": "2022-08-23T11:33:44.926802Z",
  "name": "AnnaMachineCredential",
  "description": "",
  "organization": 1,
  "credential_type": 1,
  "managed_by_tower": false,
  "inputs": {
    "password": "$encrypted$",
    "username": "builder"
  },
  "kind": "ssh",
  "cloud": false,
  "kubernetes": false
}
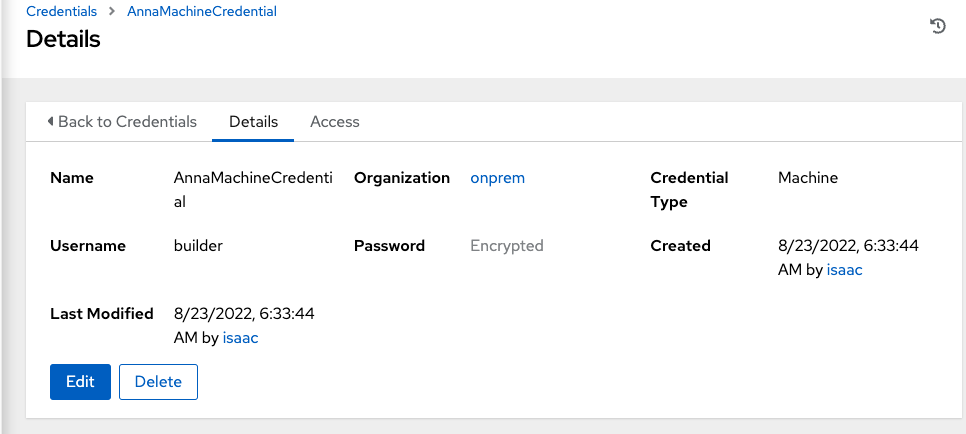
And we can see it created
However, if we test with a Job (as we see below) we will see an error (and perhaps this is just a “my environment” issue)
Testing
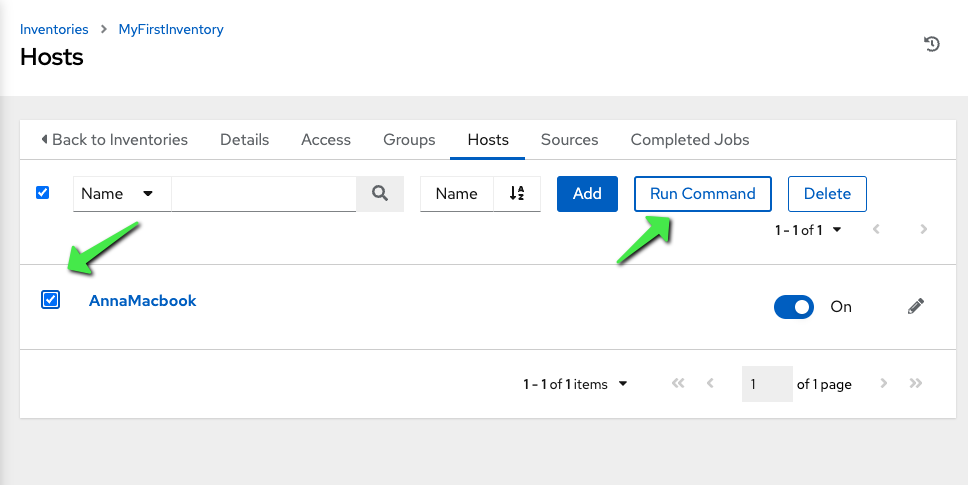
Go to the inventories where you can see hosts, and click the host and choose “Run Command”
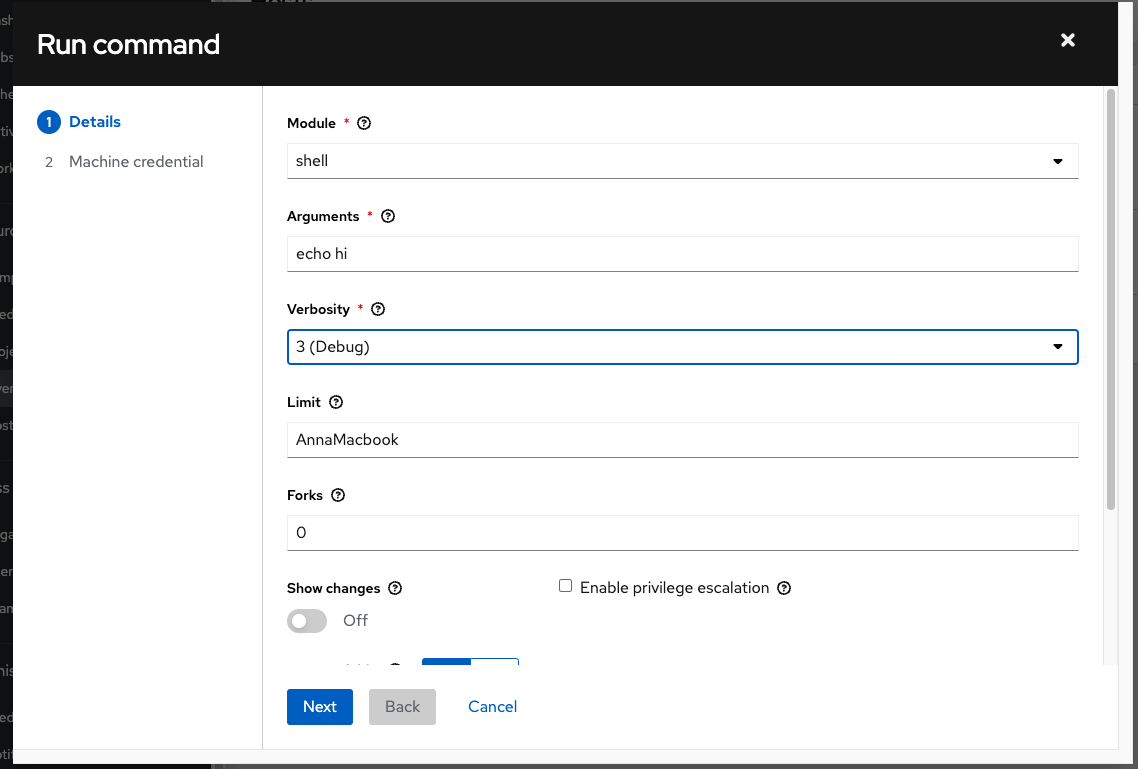
Choose the command to run (Shell) and a Debug verbosity
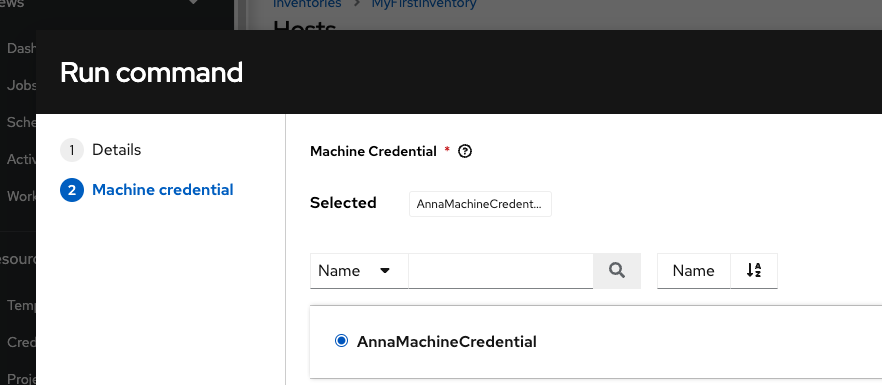
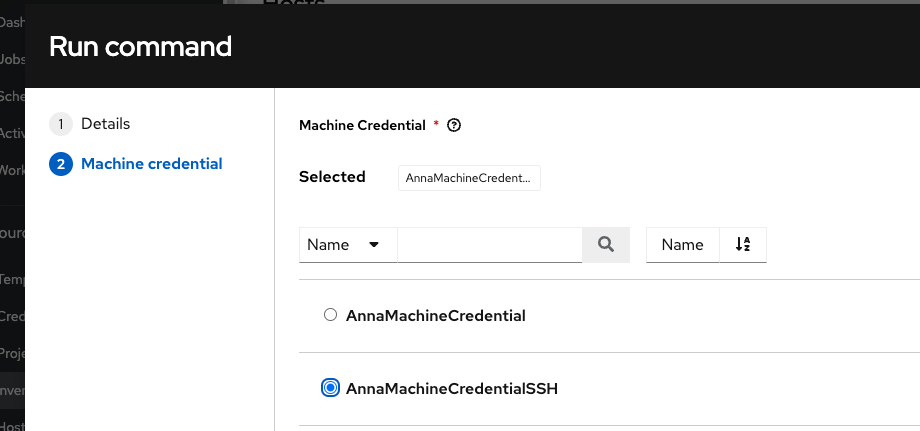
Then check our machine credential
and click the “Launch” button at the bottom.
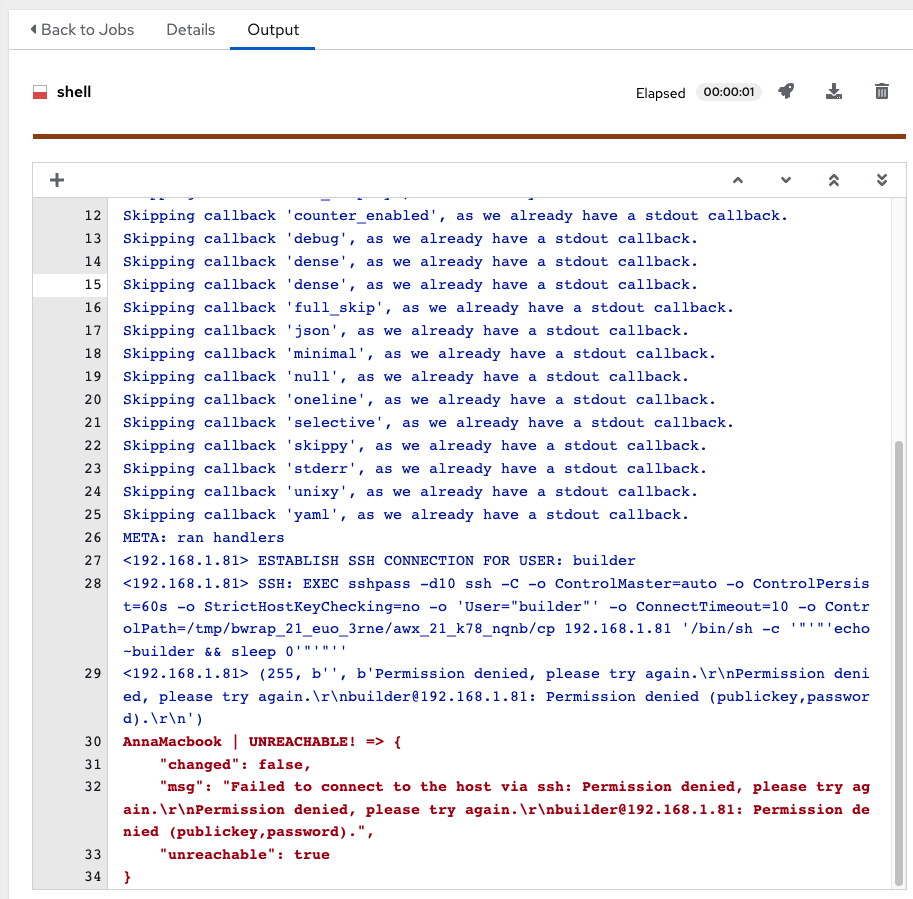
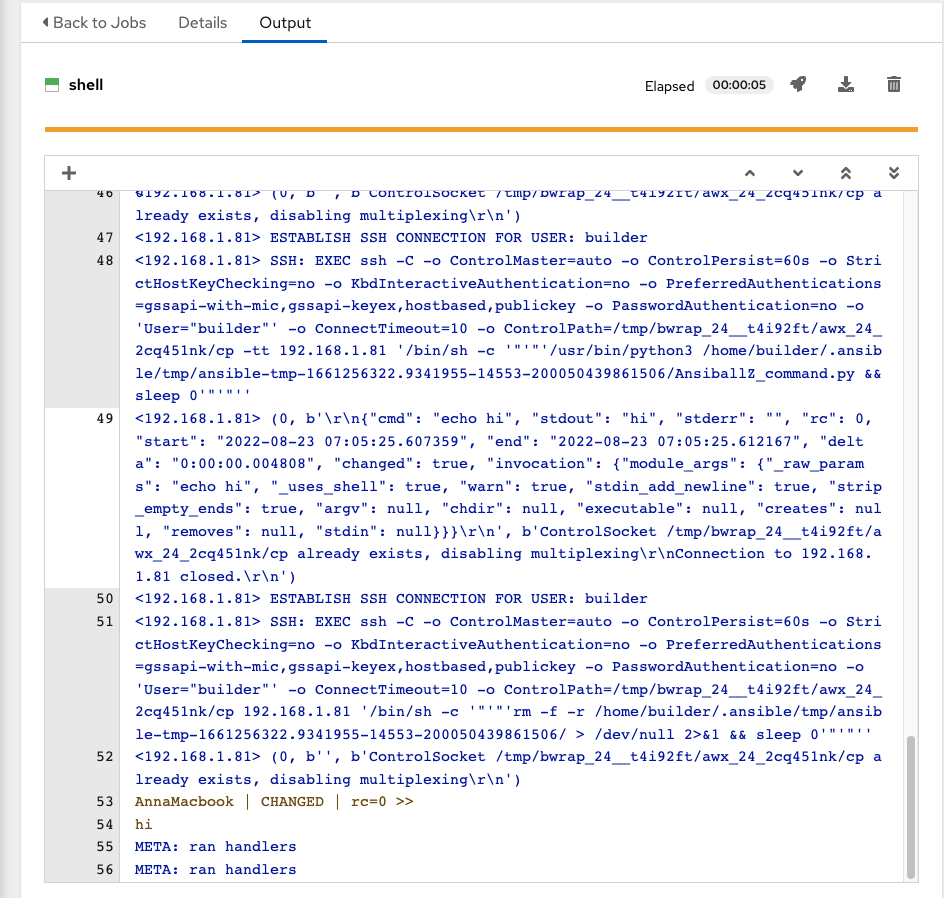
For me, I needed to refresh the page for the output
I can test this user manually and it works fine. Why I get the UNREACHABLE error still puzzles me
AnnaMacbook | UNREACHABLE! => {
    "changed": false,
    "msg": "Failed to connect to the host via ssh: Permission denied, please try again.\r\nPermission denied, please try again.\r\nbuilder@192.168.1.81: Permission denied (publickey,password).",
    "unreachable": true
}
Using SSH Credential
However, it is possible for us to use a passwordless SSH credential instead which is a more common approach to using Ansible.
I’ll assume you know how to copy ~/.ssh/id_rsa.pub to the target host (e.g. builder@anna-MacBookAir:~$ vi ~/.ssh/authorized_keys).
We can how use that private key in an SSH credential
$ SSHKEY=$(cat ~/.ssh/id_rsa) && echo ${SSHKEY2//$'\n'/\\n} > /tmp/key_escaped
$ curl --silent --user $AWX_ADMIN_USER:$AWX_ADMIN_PASSWORD -X POST -H "Content-Type: application/json" https://awx.freshbrewed.science/api/v2/credentials/ --data "{\"credential_type\": 1, \"inputs\": { \"username\": \"builder\", \"ssh_key_data\": \"`cat /tmp/key_escaped`\" }, \"name\": \"AnnaMachineCredentialSSH\", \"organization\": 1}" | jq
{
  "id": 11,
  "type": "credential",
  "url": "/api/v2/credentials/11/",
  "related": {
    "named_url": "/api/v2/credentials/AnnaMachineCredentialSSH++Machine+ssh++onprem/",
    "created_by": "/api/v2/users/35/",
    "modified_by": "/api/v2/users/35/",
    "organization": "/api/v2/organizations/1/",
    "activity_stream": "/api/v2/credentials/11/activity_stream/",
    "access_list": "/api/v2/credentials/11/access_list/",
    "object_roles": "/api/v2/credentials/11/object_roles/",
    "owner_users": "/api/v2/credentials/11/owner_users/",
    "owner_teams": "/api/v2/credentials/11/owner_teams/",
    "copy": "/api/v2/credentials/11/copy/",
    "input_sources": "/api/v2/credentials/11/input_sources/",
    "credential_type": "/api/v2/credential_types/1/"
  },
  "summary_fields": {
    "organization": {
      "id": 1,
      "name": "onprem",
      "description": "onprem datacenter"
    },
    "credential_type": {
      "id": 1,
      "name": "Machine",
      "description": ""
    },
    "created_by": {
      "id": 35,
      "username": "isaac",
      "first_name": "Isaac",
      "last_name": "Johnson"
    },
    "modified_by": {
      "id": 35,
      "username": "isaac",
      "first_name": "Isaac",
      "last_name": "Johnson"
    },
    "object_roles": {
      "admin_role": {
        "description": "Can manage all aspects of the credential",
        "name": "Admin",
        "id": 91
      },
      "use_role": {
        "description": "Can use the credential in a job template",
        "name": "Use",
        "id": 92
      },
      "read_role": {
        "description": "May view settings for the credential",
        "name": "Read",
        "id": 93
      }
    },
    "user_capabilities": {
      "edit": true,
      "delete": true,
      "copy": true,
      "use": true
    },
    "owners": [
      {
        "id": 1,
        "type": "organization",
        "name": "onprem",
        "description": "onprem datacenter",
        "url": "/api/v2/organizations/1/"
      }
    ]
  },
  "created": "2022-08-23T11:46:36.475303Z",
  "modified": "2022-08-23T11:46:36.475340Z",
  "name": "AnnaMachineCredentialSSH",
  "description": "",
  "organization": 1,
  "credential_type": 1,
  "managed_by_tower": false,
  "inputs": {
    "username": "builder",
    "ssh_key_data": "$encrypted$"
  },
  "kind": "ssh",
  "cloud": false,
  "kubernetes": false
}
$ rm /tmp/key_escaped
We will run the same Job, but this time pick our new SSH credential
And we can see it ran
As an aside, I had to do that funny business with a temp file because the BASH interpreter on the Mac is a bit different than what you would get on other distros. Had we been on WSL or another Ubuntu host we could have used
... \"ssh_key_data\": \"`$( sed -z 's/\n/\\n/g' ~/.ssh/id_rsa )`\" }, ...
Adding a Job Template
The last step is to create a template to run
Here, we can use the cloudcustodian template we created a few weeks ago
$ curl --silent --user $AWX_ADMIN_USER:$AWX_ADMIN_PASSWORD -X POST -H "Content-Type: application/json" https://awx.freshbrewed.science/api/v2/job_templates/ --data '{"name": "Run Azure CloudCustodian", "description": "Run the Azure Cloud Custodian Playbook", "job_type": "run", "inventory": 2, "project": 35, "playbook": "cloudcustodian.yaml", "extra_vars": "---", "timeout": 0, "ask_credential_on_launch": true, "become_enabled": false, "allow_simultaneous": false }'
{"id":37,"type":"job_template","url":"/api/v2/job_templates/37/","related":{"named_url":"/api/v2/job_templates/Run Azure CloudCustodian++onprem/","created_by":"/api/v2/users/35/","modified_by":"/api/v2/users/35/","labels":"/api/v2/job_templates/37/labels/","inventory":"/api/v2/inventories/2/","project":"/api/v2/projects/35/","organization":"/api/v2/organizations/1/","credentials":"/api/v2/job_templates/37/credentials/","jobs":"/api/v2/job_templates/37/jobs/","schedules":"/api/v2/job_templates/37/schedules/","activity_stream":"/api/v2/job_templates/37/activity_stream/","launch":"/api/v2/job_templates/37/launch/","webhook_key":"/api/v2/job_templates/37/webhook_key/","webhook_receiver":"","notification_templates_started":"/api/v2/job_templates/37/notification_templates_started/","notification_templates_success":"/api/v2/job_templates/37/notification_templates_success/","notification_templates_error":"/api/v2/job_templates/37/notification_templates_error/","access_list":"/api/v2/job_templates/37/access_list/","survey_spec":"/api/v2/job_templates/37/survey_spec/","object_roles":"/api/v2/job_templates/37/object_roles/","instance_groups":"/api/v2/job_templates/37/instance_groups/","slice_workflow_jobs":"/api/v2/job_templates/37/slice_workflow_jobs/","copy":"/api/v2/job_templates/37/copy/"},"summary_fields":{"organization":{"id":1,"name":"onprem","description":"onprem datacenter"},"inventory":{"id":2,"name":"MyFirstInventory","description":"My First Inventory","has_active_failures":false,"total_hosts":1,"hosts_with_active_failures":0,"total_groups":0,"has_inventory_sources":false,"total_inventory_sources":0,"inventory_sources_with_failures":0,"organization_id":1,"kind":""},"project":{"id":35,"name":"FBDevOps","description":"FB SRE Project","status":"successful","scm_type":"git"},"created_by":{"id":35,"username":"isaac","first_name":"Isaac","last_name":"Johnson"},"modified_by":{"id":35,"username":"isaac","first_name":"Isaac","last_name":"Johnson"},"object_roles":{"admin_role":{"description":"Can manage all aspects of the job template","name":"Admin","id":113},"execute_role":{"description":"May run the job template","name":"Execute","id":114},"read_role":{"description":"May view settings for the job template","name":"Read","id":115}},"user_capabilities":{"edit":true,"delete":true,"start":true,"schedule":true,"copy":true},"labels":{"count":0,"results":[]},"recent_jobs":[],"credentials":[]},"created":"2022-08-23T12:52:47.385947Z","modified":"2022-08-23T12:52:47.385978Z","name":"Run Azure CloudCustodian","description":"Run the Azure Cloud Custodian Playbook","job_type":"run","inventory":2,"project":35,"playbook":"cloudcustodian.yaml","scm_branch":"","forks":0,"limit":"","verbosity":0,"extra_vars":"---","job_tags":"","force_handlers":false,"skip_tags":"","start_at_task":"","timeout":0,"use_fact_cache":false,"organization":1,"last_job_run":null,"last_job_failed":false,"next_job_run":null,"status":"never updated","host_config_key":"","ask_scm_branch_on_launch":false,"ask_diff_mode_on_launch":false,"ask_variables_on_launch":false,"ask_limit_on_launch":false,"ask_tags_on_launch":false,"ask_skip_tags_on_launch":false,"ask_job_type_on_launch":false,"ask_verbosity_on_launch":false,"ask_inventory_on_launch":false,"ask_credential_on_launch":true,"survey_enabled":false,"become_enabled":false,"diff_mode":false,"allow_simultaneous":false,"custom_virtualenv":null,"job_slice_count":1,"webhook_service":"","webhook_credential":null}
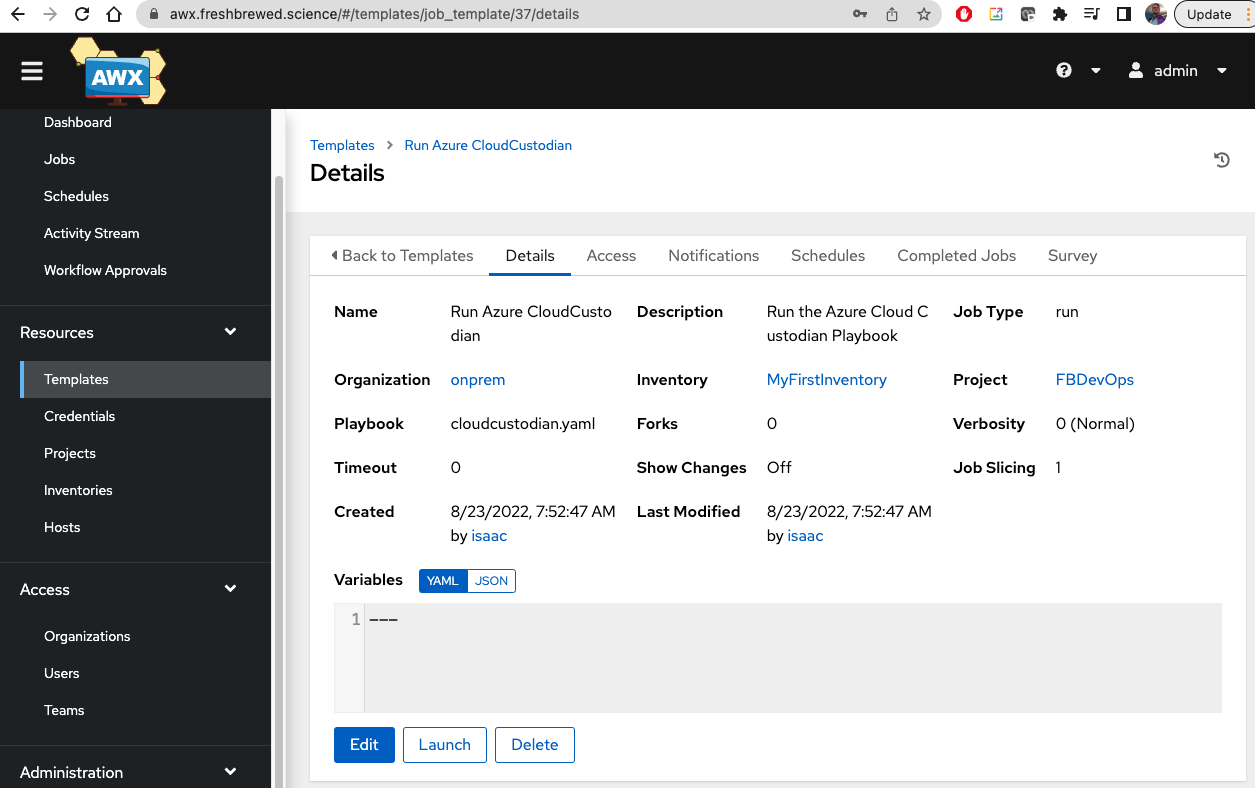
We now see that Job Template listed and ready to use
Summary
Today we setup our Organization, credentials and projects in AWX. We setup an inventory, added a host, the SSH credential and lastly tested interactively with a bespoke “hello work” test job.
Using this pattern we could easily tie to a local-exec TF provisioner or wrap the configuration into a Helm chart using Kubernetes jobs or even use the Terraform batch/v1 provider


