Published: Oct 6, 2021 by Isaac Johnson
The Docker SA has been updated recently to require businesses to pay for Docker Desktop if they have more than 250 developers which at the cheapest (Pro) is US$5/user/month (if paid annual, $7 otherwise). If you are an large company with, say, 5000 developers, suddenly being required to pay US$25,000 a month for something that was effectively free till now is a tough pill to swallow.
We can get into why they did this, or where it might head at the end (see my “old man rant” at the bottom), but the first question always asked when something like this happens (e.g. Sun Java, Hudson, etc), is “what is the alternative?”
Today we will explore moving from Docker Desktop to Minikube with Hyper-V (and notes on Hyperkit): How to set it up and what can we do it with it. We’ll attempt to answer the questions: Does it scale? Does it perform? and lastly Should I move to it?
Uninstalling Docker Desktop
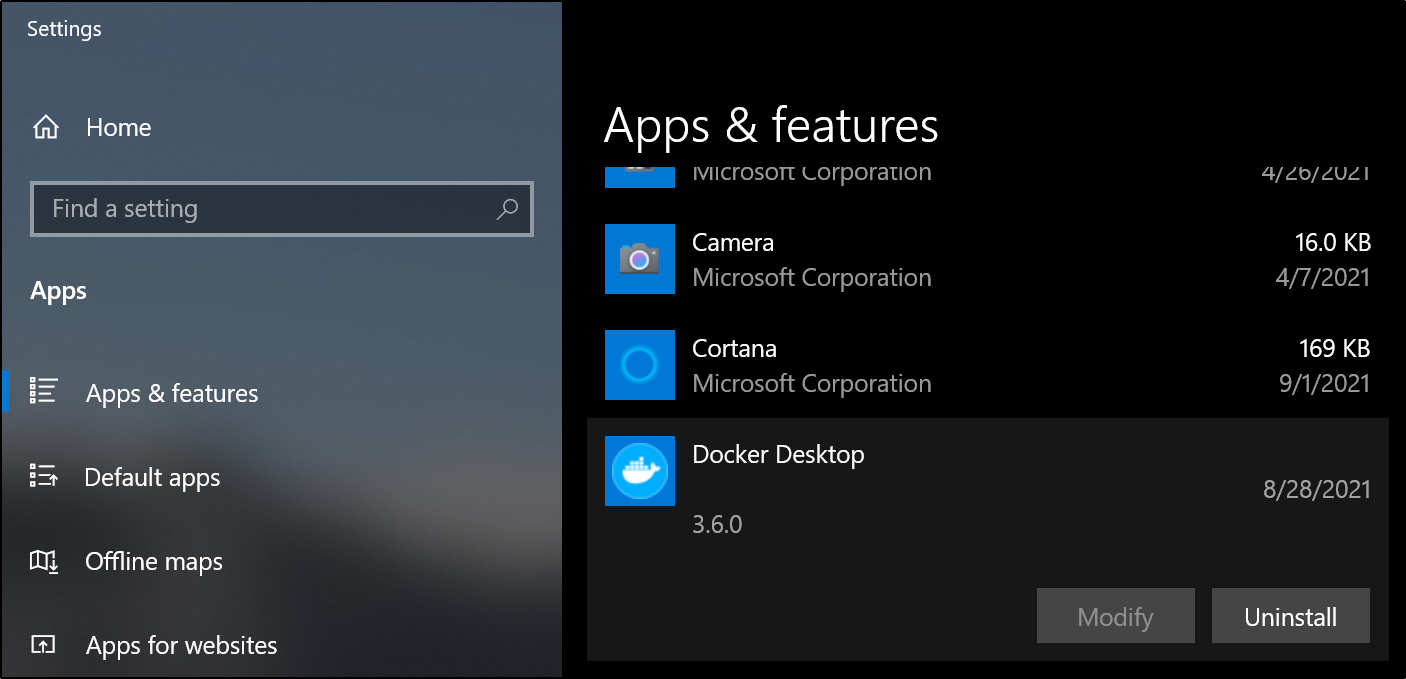
First, we need to uninstall Docker Desktop. We can do that from Apps & features:
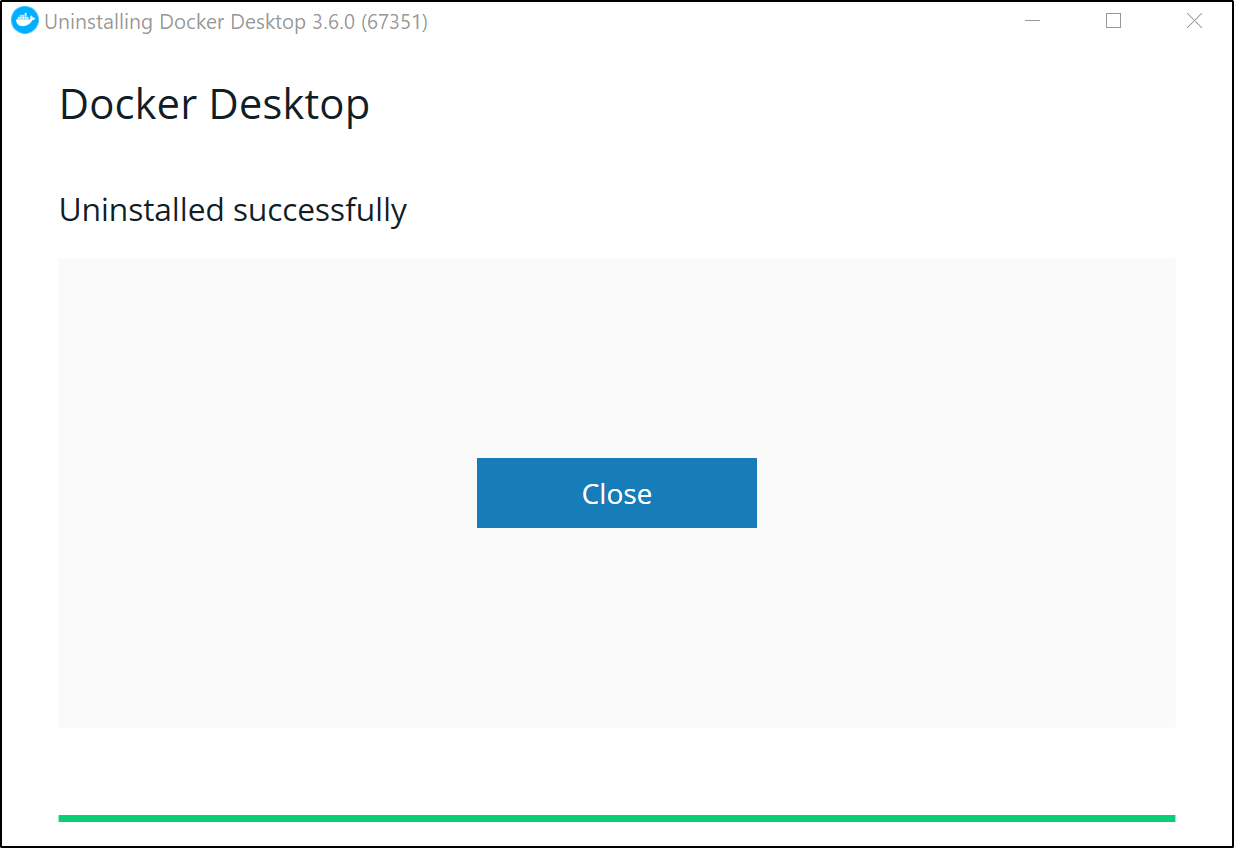
and when done:
Installing Minikube
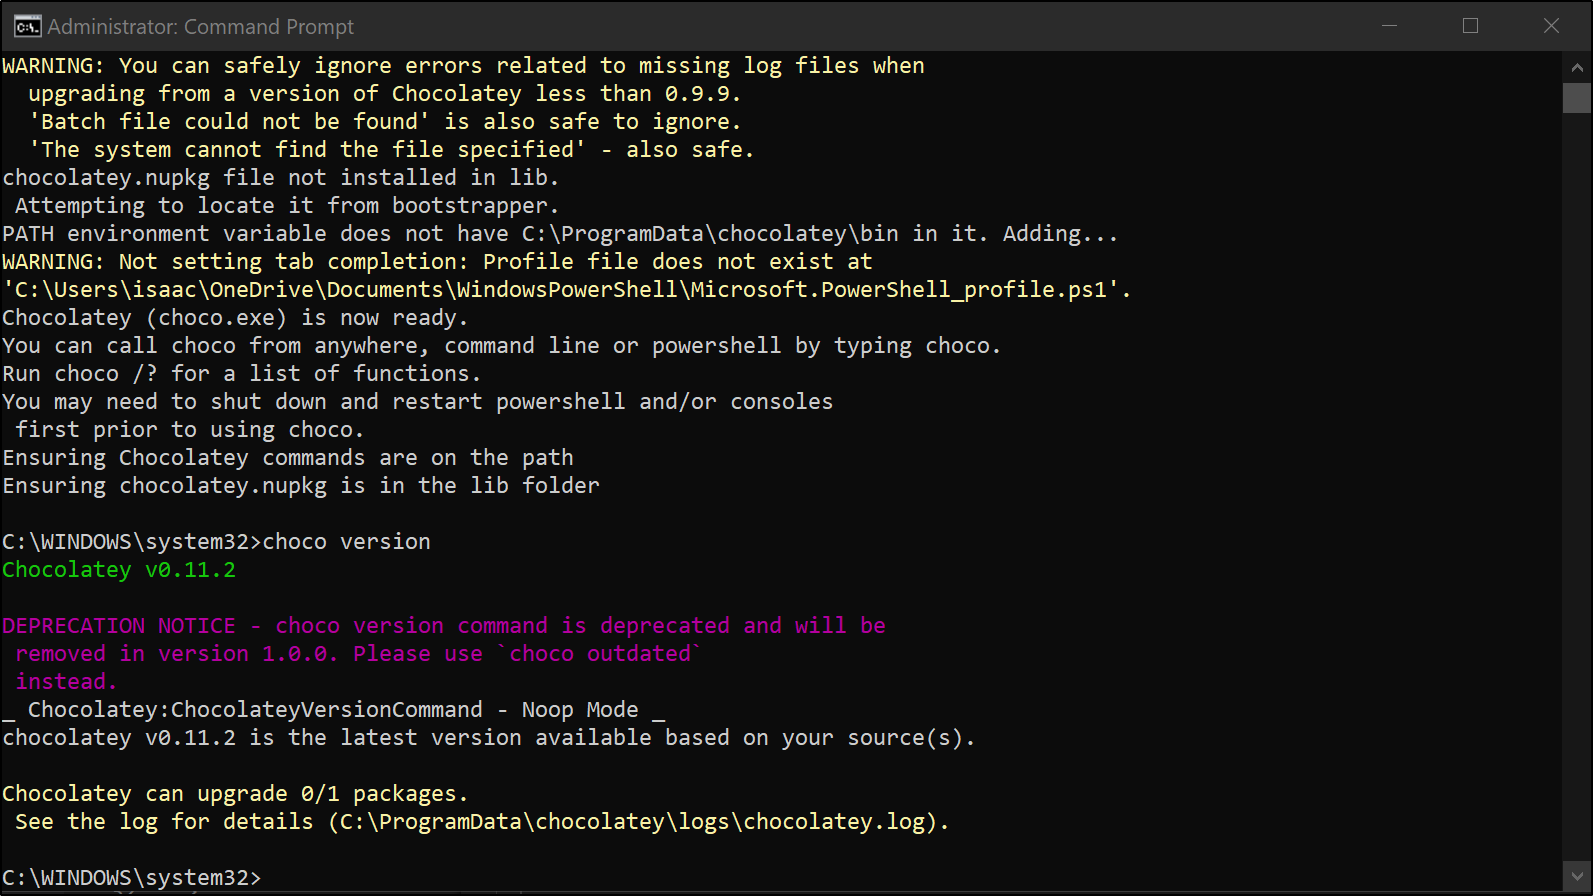
First, we need chocolatey if we don’t already have it.
You can install on the command line (see this) which was from here
@"%SystemRoot%\System32\WindowsPowerShell\v1.0\powershell.exe" -NoProfile -InputFormat None -ExecutionPolicy Bypass -Command "iex ((New-Object System.Net.WebClient).DownloadString('https://chocolatey.org/install.ps1'))" && SET "PATH=%PATH%;%ALLUSERSPROFILE%\chocolatey\bin"
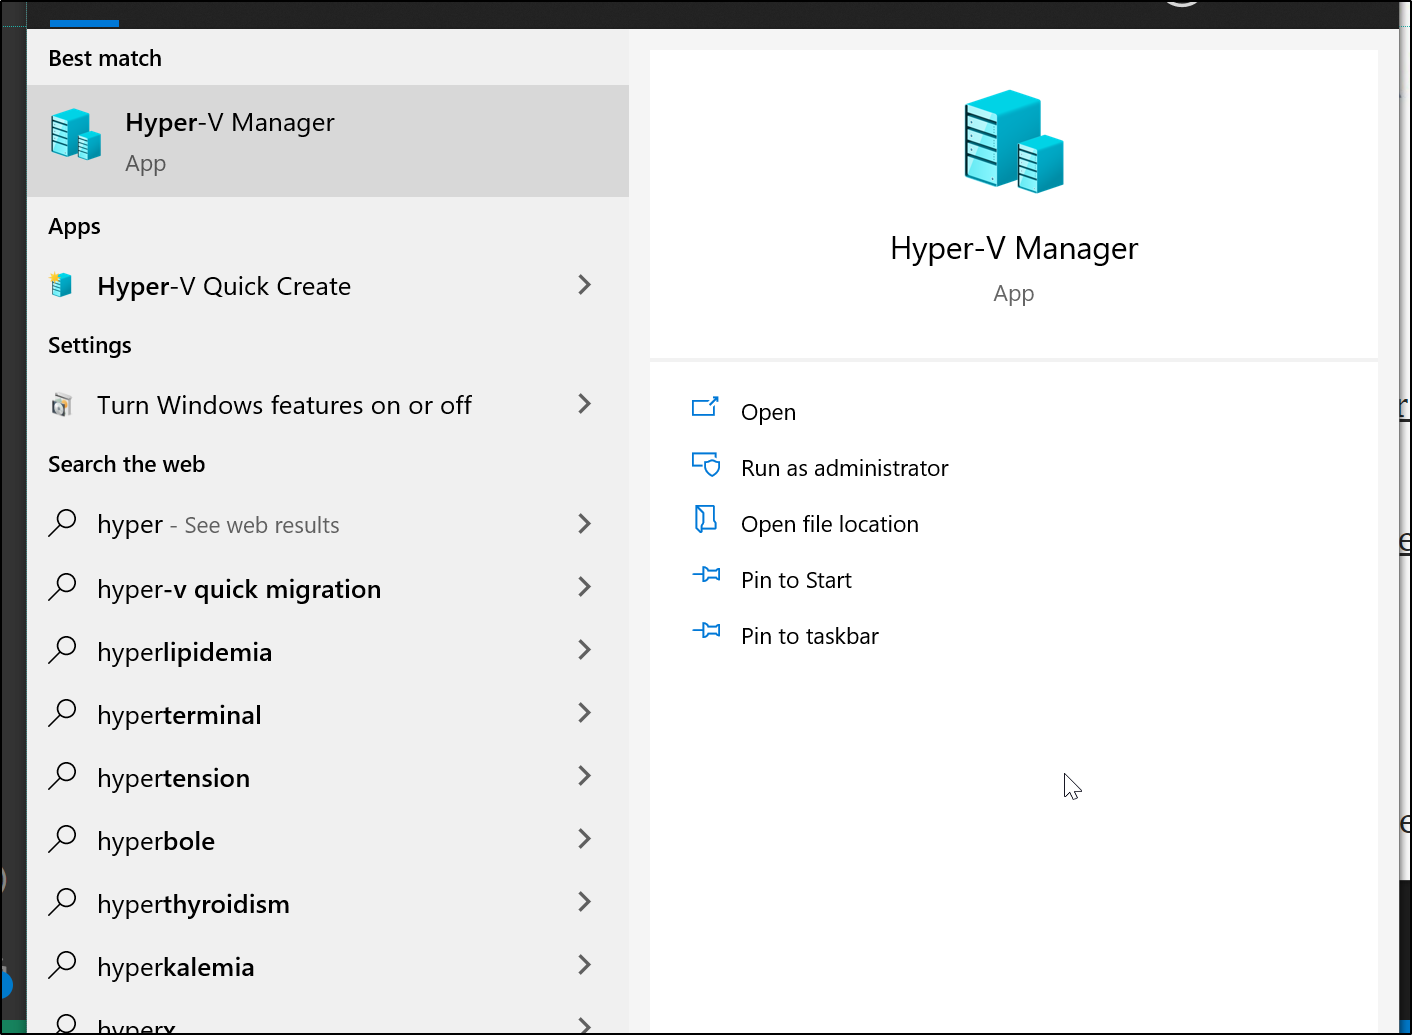
We also need Hyper-V installed. You can follow steps here. It is easy to check for Hyper-V Manager:
We need to use an Administrator command prompt
C:\WINDOWS\system32>choco install minikube
Chocolatey v0.11.2
Installing the following packages:
minikube
By installing, you accept licenses for the packages.
Progress: Downloading kubernetes-cli 1.22.2... 30%
Install k8s CLI
C:\WINDOWS\system32>choco install kubernetes-cli
Chocolatey v0.11.2
Installing the following packages:
kubernetes-cli
By installing, you accept licenses for the packages.
kubernetes-cli v1.22.2 already installed.
 Use --force to reinstall, specify a version to install, or try upgrade.

Chocolatey installed 0/1 packages.
 See the log for details (C:\ProgramData\chocolatey\logs\chocolatey.log).

Warnings:
 - kubernetes-cli - kubernetes-cli v1.22.2 already installed.
 Use --force to reinstall, specify a version to install, or try upgrade.
Setup a new VNet switch
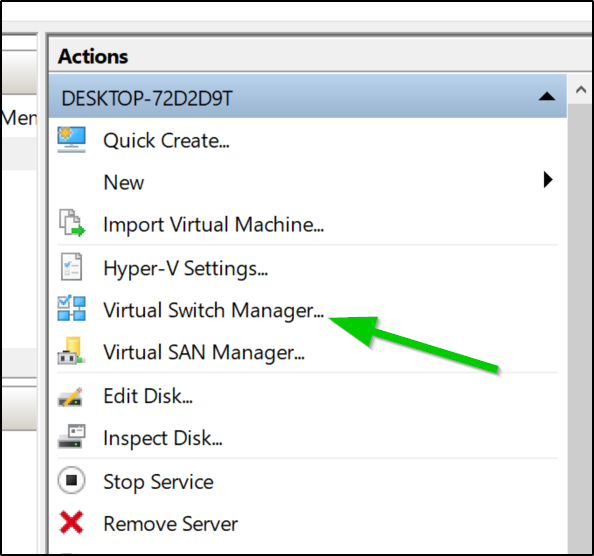
In the Hyper-V Manager, we will need to create a new virtual switch. Click create Virtual Network Switch under the Virtual Switch Manager in the Hyper-V manager
In order to be routable by WSL and our primary machine, we should make it attach to our external NIC:
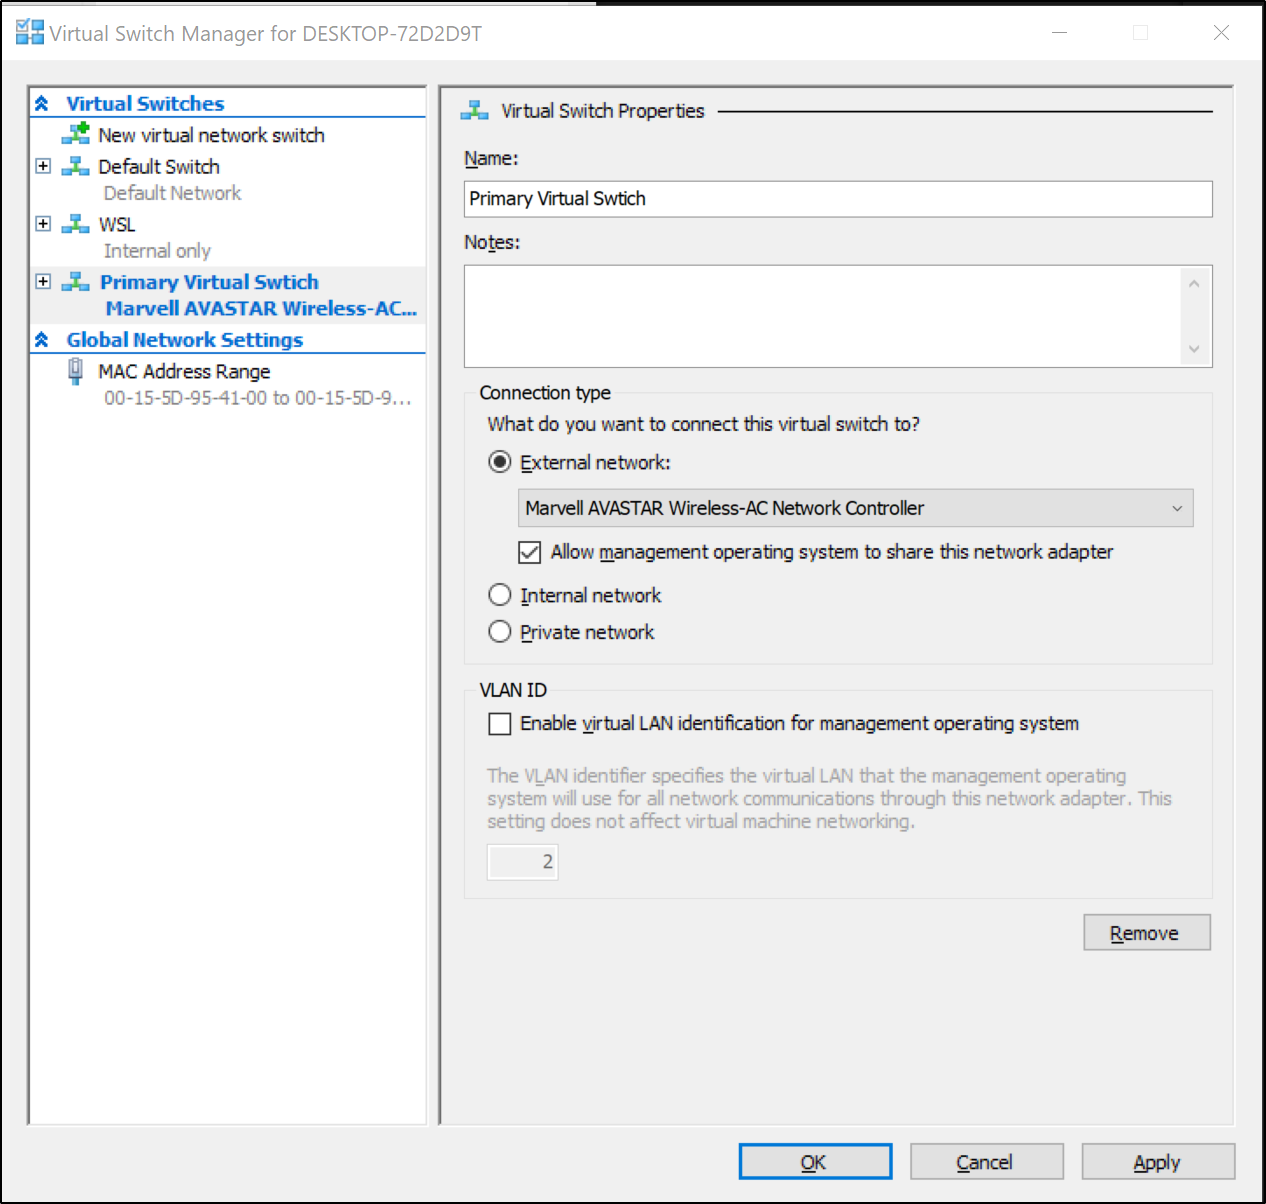
Use the defaults and select “Create Virtual Switch”
First pass gave me the error:
C:\WINDOWS\system32>minikube start --vm-driver hyperv --hyperv-virtual-switch "Primary Virtual Switch"
* minikube v1.23.2 on Microsoft Windows 10 Pro 10.0.19042 Build 19042
* Using the hyperv driver based on user configuration
* Downloading VM boot image ...
    > minikube-v1.23.1.iso.sha256: 65 B / 65 B [-------------] 100.00% ? p/s 0s
    > minikube-v1.23.1.iso: 225.22 MiB / 225.22 MiB  100.00% 72.04 KiB p/s 53m2
* Starting control plane node minikube in cluster minikube
* Downloading Kubernetes v1.22.2 preload ...
    > preloaded-images-k8s-v13-v1...: 511.84 MiB / 511.84 MiB  100.00% 70.96 Ki
* Creating hyperv VM (CPUs=2, Memory=4000MB, Disk=20000MB) ...
! StartHost failed, but will try again: creating host: create: precreate: vswitch "Primary Virtual Switch" not found
* Creating hyperv VM (CPUs=2, Memory=4000MB, Disk=20000MB) ...
* Failed to start hyperv VM. Running "minikube delete" may fix it: creating host: create: precreate: vswitch "Primary Virtual Switch" not found

X Exiting due to DRV_HYPERV_VSWITCH_NOT_FOUND: Failed to start host: creating host: create: precreate: vswitch "Primary Virtual Switch" not found
* Suggestion: Confirm that you have supplied the correct value to --hyperv-virtual-switch using the 'Get-VMSwitch' command
* Documentation: https://docs.docker.com/machine/drivers/hyper-v/
As you can see below, i had a typo in the name of the switch (swtich). I fixed and tried again
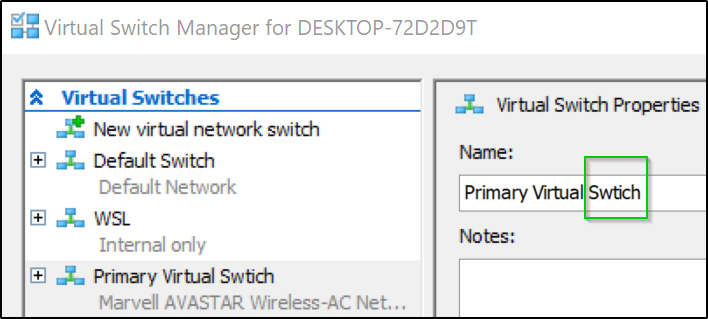
In the end, i just used “Default Switch”. You do want to specify something as the default behavior is to just grab whatever it finds first (which could be WSL)
C:\WINDOWS\system32>minikube start --vm-driver hyperv --hyperv-virtual-switch "Default Switch"
* minikube v1.23.2 on Microsoft Windows 10 Pro 10.0.19042 Build 19042
* Using the hyperv driver based on existing profile
* Starting control plane node minikube in cluster minikube
* Updating the running hyperv "minikube" VM ...
* Preparing Kubernetes v1.22.2 on Docker 20.10.8 ...

X Exiting due to DRV_CP_ENDPOINT: failed to get API Server URL: failed to parse ip for ""
* Suggestion:

    Recreate the cluster by running:
    minikube delete --profile=minikube
    minikube start --profile=minikube
testing k8s
C:\WINDOWS\system32>kubectl get nodes
NAME       STATUS   ROLES                  AGE   VERSION
minikube   Ready    control-plane,master   46s   v1.22.2
we can see our k8s config:
C:\Users\isaac\.kube>type config
apiVersion: v1
clusters:
- cluster:
    certificate-authority: C:\Users\isaac\.minikube\ca.crt
    extensions:
    - extension:
        last-update: Wed, 29 Sep 2021 09:43:05 CDT
        provider: minikube.sigs.k8s.io
        version: v1.23.2
      name: cluster_info
    server: https://192.168.231.137:8443
  name: minikube
contexts:
- context:
    cluster: minikube
    extensions:
    - extension:
        last-update: Wed, 29 Sep 2021 09:43:05 CDT
        provider: minikube.sigs.k8s.io
        version: v1.23.2
      name: context_info
    namespace: default
    user: minikube
  name: minikube
current-context: minikube
kind: Config
preferences: {}
users:
- name: minikube
  user:
    client-certificate: C:\Users\isaac\.minikube\profiles\minikube\client.crt
    client-key: C:\Users\isaac\.minikube\profiles\minikube\client.key

C:\Users\isaac\.kube>
To use in WSL, we just need to change a couple variables
apiVersion: v1
clusters:
- cluster:
    certificate-authority: /mnt/c/Users/isaac/.minikube/ca.crt
    extensions:
    - extension:
        last-update: Wed, 29 Sep 2021 09:43:05 CDT
        provider: minikube.sigs.k8s.io
        version: v1.23.2
      name: cluster_info
    server: https://192.168.231.137:8443
  name: minikube
contexts:
- context:
    cluster: minikube
    extensions:
    - extension:
        last-update: Wed, 29 Sep 2021 09:43:05 CDT
        provider: minikube.sigs.k8s.io
        version: v1.23.2
      name: context_info
    namespace: default
    user: minikube
  name: minikube
current-context: minikube
kind: Config
preferences: {}
users:
- name: minikube
  user:
    client-certificate: /mnt/c/Users/isaac/.minikube/profiles/minikube/client.crt
    client-key: /mnt/c/Users/isaac/.minikube/profiles/minikube/client.key
Exploring Bad Ideas
I tried both using the “Default Switch” but that created an independent NATed VM. When i tried using WSL, it would not allocate an IP address in that Virtual Network. The real (and priorly documented) solution was to use the “Primary Virtual Switch” which associates to the NIC and allows traffic routable across our network.
WSL fail:
The problem is that we cannot see the “Default Switch” VM since that is an isolated NATed network not reachable from WSL.
builder@DESKTOP-72D2D9T:~/Workspaces/jekyll-blog$ kubectl get nodes
Unable to connect to the server: dial tcp 192.168.231.137:8443: i/o timeout
Since using this from WSL is rather key, let’s move minikube there.
I’ll change first manually after stopping the minikube vm:
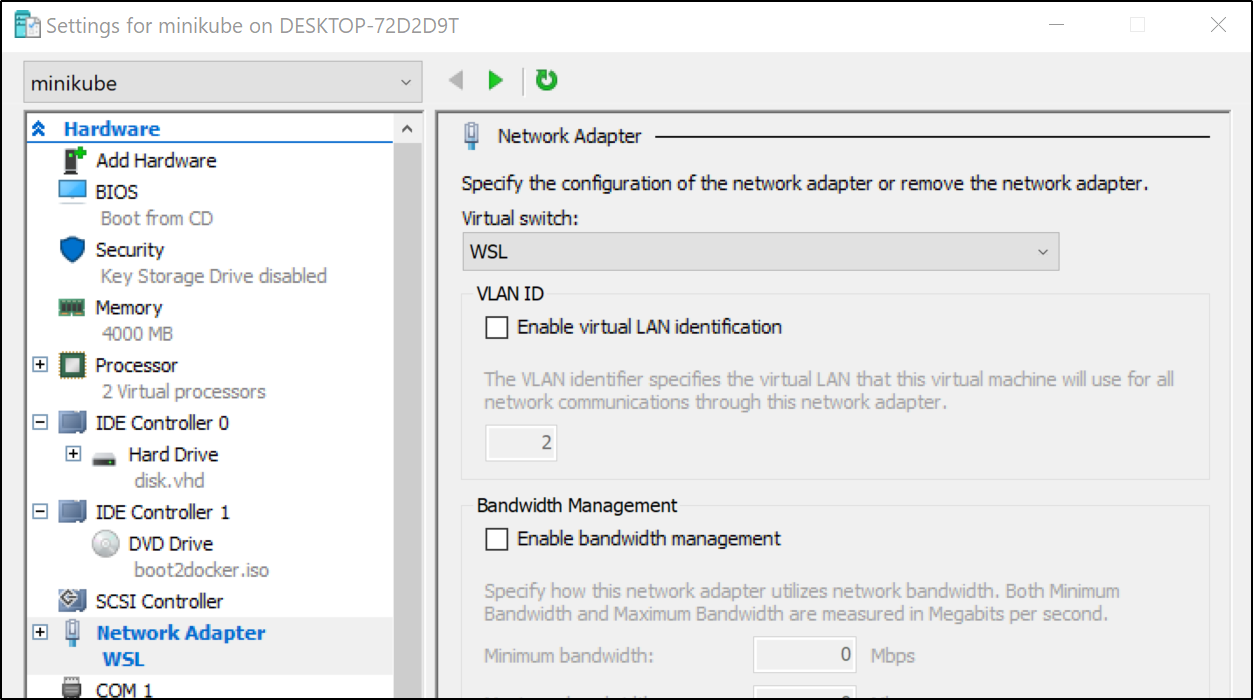
and
C:\WINDOWS\system32>minikube start --vm-driver hyperv --hyperv-virtual-switch "WSL"
However, as mentioned, this would not allocate an IP so it wasn’t usable..
Using the Primary Virtual Switch
C:\WINDOWS\system32>minikube start --vm-driver hyperv --hyperv-virtual-switch "Primary Virtual Switch"
* minikube v1.23.2 on Microsoft Windows 10 Pro 10.0.19042 Build 19042
* Using the hyperv driver based on existing profile
* Starting control plane node minikube in cluster minikube
* Restarting existing hyperv VM for "minikube" ...
* Preparing Kubernetes v1.22.2 on Docker 20.10.8 ...
* Verifying Kubernetes components...
  - Using image gcr.io/k8s-minikube/storage-provisioner:v5
* Enabled addons: storage-provisioner, default-storageclass
* Done! kubectl is now configured to use "minikube" cluster and "default" namespace by default

C:\WINDOWS\system32>kubectl get nodes
NAME       STATUS   ROLES                  AGE   VERSION
minikube   Ready    control-plane,master   25m   v1.22.2
and much as before:
C:\WINDOWS\system32>type C:\Users\isaac\.kube\config
apiVersion: v1
clusters:
- cluster:
    certificate-authority: C:\Users\isaac\.minikube\ca.crt
    extensions:
    - extension:
        last-update: Wed, 29 Sep 2021 10:05:32 CDT
        provider: minikube.sigs.k8s.io
        version: v1.23.2
      name: cluster_info
    server: https://192.168.204.74:8443
  name: minikube
contexts:
- context:
    cluster: minikube
    extensions:
    - extension:
        last-update: Wed, 29 Sep 2021 10:05:32 CDT
        provider: minikube.sigs.k8s.io
        version: v1.23.2
      name: context_info
    namespace: default
    user: minikube
  name: minikube
current-context: minikube
kind: Config
preferences: {}
users:
- name: minikube
  user:
    client-certificate: C:\Users\isaac\.minikube\profiles\minikube\client.crt
    client-key: C:\Users\isaac\.minikube\profiles\minikube\client.key
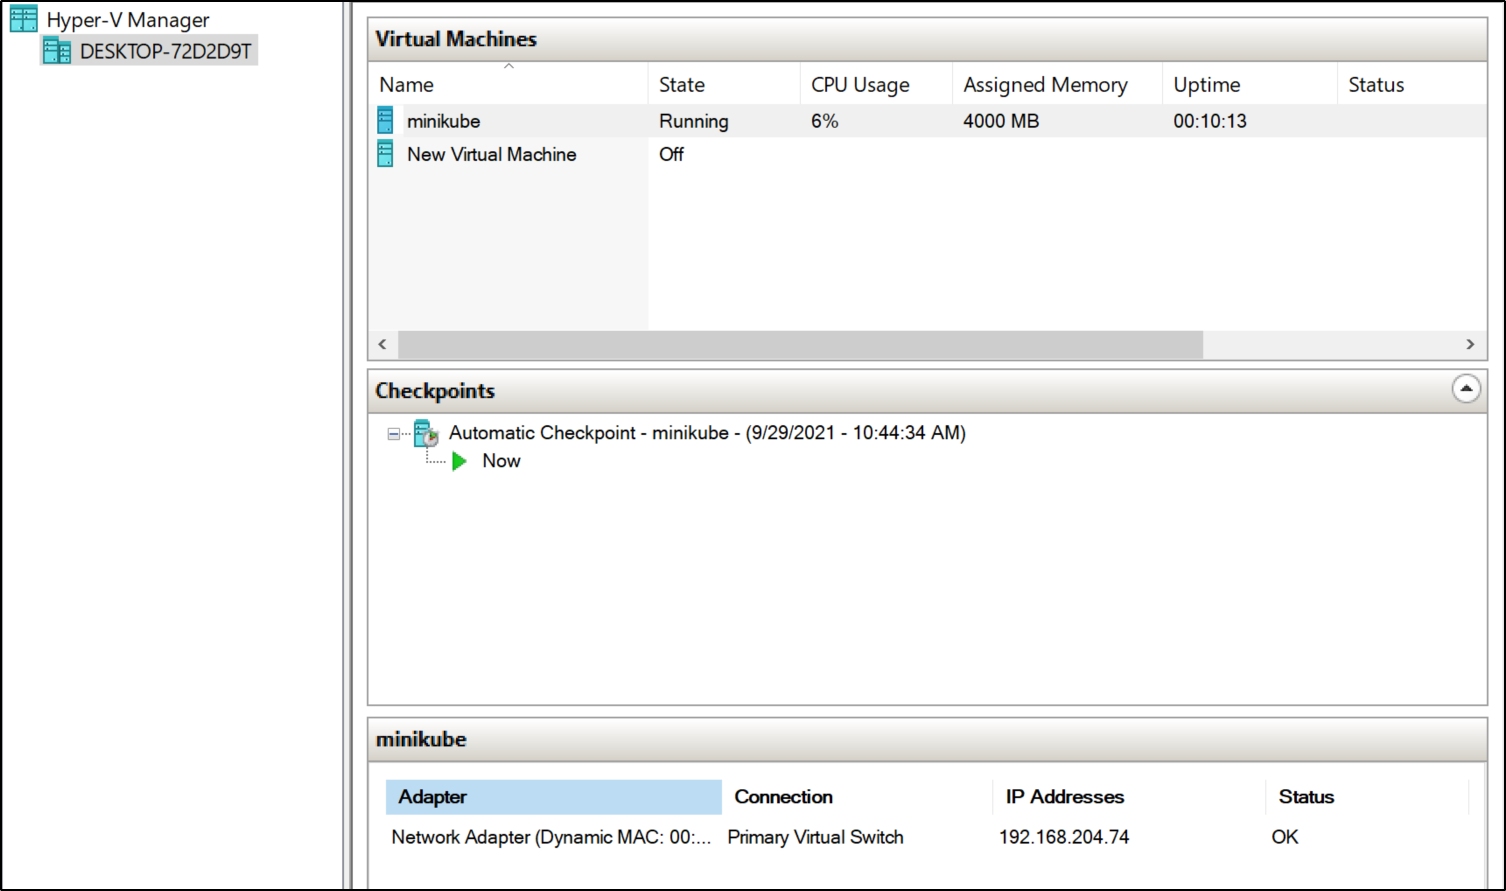
and we can verify in WSL:
builder@DESKTOP-72D2D9T:~/Workspaces/jekyll-blog$ kubectl get nodes
NAME       STATUS   ROLES                  AGE   VERSION
minikube   Ready    control-plane,master   72m   v1.22.2
Docker in Windows
We need to add the docker CLI
C:\WINDOWS\system32>choco install docker-cli
Chocolatey v0.11.2
Installing the following packages:
docker-cli
By installing, you accept licenses for the packages.
Progress: Downloading docker-cli 19.03.12... 100%

docker-cli v19.03.12 [Approved]
docker-cli package files install completed. Performing other installation steps.
The package docker-cli wants to run 'chocolateyInstall.ps1'.
Note: If you don't run this script, the installation will fail.
Note: To confirm automatically next time, use '-y' or consider:
choco feature enable -n allowGlobalConfirmation
Do you want to run the script?([Y]es/[A]ll - yes to all/[N]o/[P]rint): A

Downloading docker-cli 64 bit
  from 'https://github.com/StefanScherer/docker-cli-builder/releases/download/19.03.12/docker.exe'
Progress: 100% - Completed download of C:\ProgramData\chocolatey\lib\docker-cli\tools\docker.exe (60.52 MB).
Download of docker.exe (60.52 MB) completed.
Hashes match.
C:\ProgramData\chocolatey\lib\docker-cli\tools\docker.exe
 ShimGen has successfully created a shim for docker.exe
 The install of docker-cli was successful.
  Software install location not explicitly set, it could be in package or
  default install location of installer.

Chocolatey installed 1/1 packages.
 See the log for details (C:\ProgramData\chocolatey\logs\chocolatey.log).

Did you know the proceeds of Pro (and some proceeds from other
 licensed editions) go into bettering the community infrastructure?
 Your support ensures an active community, keeps Chocolatey tip-top,
 plus it nets you some awesome features!
 https://chocolatey.org/compare
We then need to set some vars.. you can set these in your windows env vars or just do it manually locally:
C:\WINDOWS\system32>minikube docker-env
SET DOCKER_TLS_VERIFY=1
SET DOCKER_HOST=tcp://192.168.204.74:2376
SET DOCKER_CERT_PATH=C:\Users\isaac\.minikube\certs
SET MINIKUBE_ACTIVE_DOCKERD=minikube
REM To point your shell to minikube's docker-daemon, run:
REM @FOR /f "tokens=*" %i IN ('minikube -p minikube docker-env') DO @%i
which i set
C:\WINDOWS\system32>SET DOCKER_TLS_VERIFY=1

C:\WINDOWS\system32>SET DOCKER_HOST=tcp://192.168.204.74:2376

C:\WINDOWS\system32>SET DOCKER_CERT_PATH=C:\Users\isaac\.minikube\certs

C:\WINDOWS\system32>SET MINIKUBE_ACTIVE_DOCKERD=minikube

C:\WINDOWS\system32>REM To point your shell to minikube's docker-daemon, run:

C:\WINDOWS\system32>REM @FOR /f "tokens=*" %i IN ('minikube -p minikube docker-env') DO @%i

C:\WINDOWS\system32>@FOR /f "tokens=*" %i IN ('minikube -p minikube docker-env') DO @%i
Now we can validate that indeed we can do docker commands in windows:
C:\WINDOWS\system32>docker ps
CONTAINER ID        IMAGE                  COMMAND                  CREATED             STATUS              PORTS               NAMES
dd8f90a5f0a0        6e38f40d628d           "/storage-provisioner"   16 minutes ago      Up 16 minutes                           k8s_storage-provisioner_storage-provisioner_kube-system_dd8d5f1f-d59c-407b-847f-e1ab773a9bc3_4
ce45ee3d13fe        8d147537fb7d           "/coredns -conf /etc…"   17 minutes ago      Up 17 minutes                           k8s_coredns_coredns-78fcd69978-4s9gp_kube-system_799a47c4-2831-4d2d-a02a-55a42c3de657_2
4fb5d6513f89        873127efbc8a           "/usr/local/bin/kube…"   17 minutes ago      Up 17 minutes                           k8s_kube-proxy_kube-proxy-m9ckz_kube-system_083360c1-ca89-4ac5-9e27-8aeec12362ee_2
88a5d0d523bd        k8s.gcr.io/pause:3.5   "/pause"                 17 minutes ago      Up 17 minutes                           k8s_POD_coredns-78fcd69978-4s9gp_kube-system_799a47c4-2831-4d2d-a02a-55a42c3de657_2
0bfec52cc387        k8s.gcr.io/pause:3.5   "/pause"                 17 minutes ago      Up 17 minutes                           k8s_POD_kube-proxy-m9ckz_kube-system_083360c1-ca89-4ac5-9e27-8aeec12362ee_2
7c1db8a41a31        k8s.gcr.io/pause:3.5   "/pause"                 17 minutes ago      Up 17 minutes                           k8s_POD_storage-provisioner_kube-system_dd8d5f1f-d59c-407b-847f-e1ab773a9bc3_2
99133e76be7e        004811815584           "etcd --advertise-cl…"   17 minutes ago      Up 17 minutes                           k8s_etcd_etcd-minikube_kube-system_b102818843fe0c7d6e47e7befedc1b3f_0
4954cef159b0        b51ddc1014b0           "kube-scheduler --au…"   17 minutes ago      Up 17 minutes                           k8s_kube-scheduler_kube-scheduler-minikube_kube-system_97bca4cd66281ad2157a6a68956c4fa5_2
3e7648a120f0        5425bcbd23c5           "kube-controller-man…"   17 minutes ago      Up 17 minutes                           k8s_kube-controller-manager_kube-controller-manager-minikube_kube-system_20326866d8a92c47afe958577e1a8179_2
01df9da571af        e64579b7d886           "kube-apiserver --ad…"   17 minutes ago      Up 17 minutes                           k8s_kube-apiserver_kube-apiserver-minikube_kube-system_b9bebab9d777a9c66c603e9ee824bd01_0
9c2c6a06e51d        k8s.gcr.io/pause:3.5   "/pause"                 17 minutes ago      Up 17 minutes                           k8s_POD_kube-scheduler-minikube_kube-system_97bca4cd66281ad2157a6a68956c4fa5_2
b842e144be5c        k8s.gcr.io/pause:3.5   "/pause"                 17 minutes ago      Up 17 minutes                           k8s_POD_kube-controller-manager-minikube_kube-system_20326866d8a92c47afe958577e1a8179_2
dfac849241cb        k8s.gcr.io/pause:3.5   "/pause"                 17 minutes ago      Up 17 minutes                           k8s_POD_kube-apiserver-minikube_kube-system_b9bebab9d777a9c66c603e9ee824bd01_0
00d9f1ecd0d3        k8s.gcr.io/pause:3.5   "/pause"                 17 minutes ago      Up 17 minutes                           k8s_POD_etcd-minikube_kube-system_b102818843fe0c7d6e47e7befedc1b3f_0
Installing docker CLI on Ubuntu
We’ll first install the pre-reqs
$ sudo apt-get update && sudo apt-get install apt-transport-https ca-certificates curl gnupg lsb-release
Then add the docker GPG key
$ curl -fsSL https://download.docker.com/linux/ubuntu/gpg | sudo gpg --dearmor -o /usr/share/keyrings/docker-archive-keyring.gpg
Add the stable repo
$ echo "deb [arch=amd64 signed-by=/usr/share/keyrings/docker-archive-keyring.gpg] https://download.docker.com/linux/ubuntu $(lsb_release -cs) stable" | sudo tee /etc/apt/sources.list.d/docker.list > /dev/null
then lastly install it:
$ sudo apt-get update && sudo apt-get install docker-ce docker-ce-cli containerd.io
to use our minikube as the host:
export DOCKER_TLS_VERIFY=1
export DOCKER_HOST=tcp://192.168.204.74:2376
export DOCKER_CERT_PATH=/mnt/c/Users/isaac/.minikube/certs
export MINIKUBE_ACTIVE_DOCKERD=minikube
and now we can see the same list on WSL:
builder@DESKTOP-72D2D9T:~/Workspaces/jekyll-blog$ docker ps
CONTAINER ID   IMAGE                  COMMAND                  CREATED          STATUS          PORTS     NAMES
dd8f90a5f0a0   6e38f40d628d           "/storage-provisioner"   26 minutes ago   Up 26 minutes             k8s_storage-provisioner_storage-provisioner_kube-system_dd8d5f1f-d59c-407b-847f-e1ab773a9bc3_4
ce45ee3d13fe   8d147537fb7d           "/coredns -conf /etc…"   26 minutes ago   Up 26 minutes             k8s_coredns_coredns-78fcd69978-4s9gp_kube-system_799a47c4-2831-4d2d-a02a-55a42c3de657_2
4fb5d6513f89   873127efbc8a           "/usr/local/bin/kube…"   27 minutes ago   Up 26 minutes             k8s_kube-proxy_kube-proxy-m9ckz_kube-system_083360c1-ca89-4ac5-9e27-8aeec12362ee_2
88a5d0d523bd   k8s.gcr.io/pause:3.5   "/pause"                 27 minutes ago   Up 26 minutes             k8s_POD_coredns-78fcd69978-4s9gp_kube-system_799a47c4-2831-4d2d-a02a-55a42c3de657_2
0bfec52cc387   k8s.gcr.io/pause:3.5   "/pause"                 27 minutes ago   Up 27 minutes             k8s_POD_kube-proxy-m9ckz_kube-system_083360c1-ca89-4ac5-9e27-8aeec12362ee_2
7c1db8a41a31   k8s.gcr.io/pause:3.5   "/pause"                 27 minutes ago   Up 27 minutes             k8s_POD_storage-provisioner_kube-system_dd8d5f1f-d59c-407b-847f-e1ab773a9bc3_2
99133e76be7e   004811815584           "etcd --advertise-cl…"   27 minutes ago   Up 27 minutes             k8s_etcd_etcd-minikube_kube-system_b102818843fe0c7d6e47e7befedc1b3f_0
4954cef159b0   b51ddc1014b0           "kube-scheduler --au…"   27 minutes ago   Up 27 minutes             k8s_kube-scheduler_kube-scheduler-minikube_kube-system_97bca4cd66281ad2157a6a68956c4fa5_2
3e7648a120f0   5425bcbd23c5           "kube-controller-man…"   27 minutes ago   Up 27 minutes             k8s_kube-controller-manager_kube-controller-manager-minikube_kube-system_20326866d8a92c47afe958577e1a8179_2
01df9da571af   e64579b7d886           "kube-apiserver --ad…"   27 minutes ago   Up 27 minutes             k8s_kube-apiserver_kube-apiserver-minikube_kube-system_b9bebab9d777a9c66c603e9ee824bd01_0
9c2c6a06e51d   k8s.gcr.io/pause:3.5   "/pause"                 27 minutes ago   Up 27 minutes             k8s_POD_kube-scheduler-minikube_kube-system_97bca4cd66281ad2157a6a68956c4fa5_2
b842e144be5c   k8s.gcr.io/pause:3.5   "/pause"                 27 minutes ago   Up 27 minutes             k8s_POD_kube-controller-manager-minikube_kube-system_20326866d8a92c47afe958577e1a8179_2
dfac849241cb   k8s.gcr.io/pause:3.5   "/pause"                 27 minutes ago   Up 27 minutes             k8s_POD_kube-apiserver-minikube_kube-system_b9bebab9d777a9c66c603e9ee824bd01_0
00d9f1ecd0d3   k8s.gcr.io/pause:3.5   "/pause"                 27 minutes ago   Up 27 minutes             k8s_POD_etcd-minikube_kube-system_b102818843fe0c7d6e47e7befedc1b3f_0
Compareing Docker Desktop vs Minikube+Hyper-V
When we have Docker Desktop up we can see the current running containers as well as look at images and volumes:
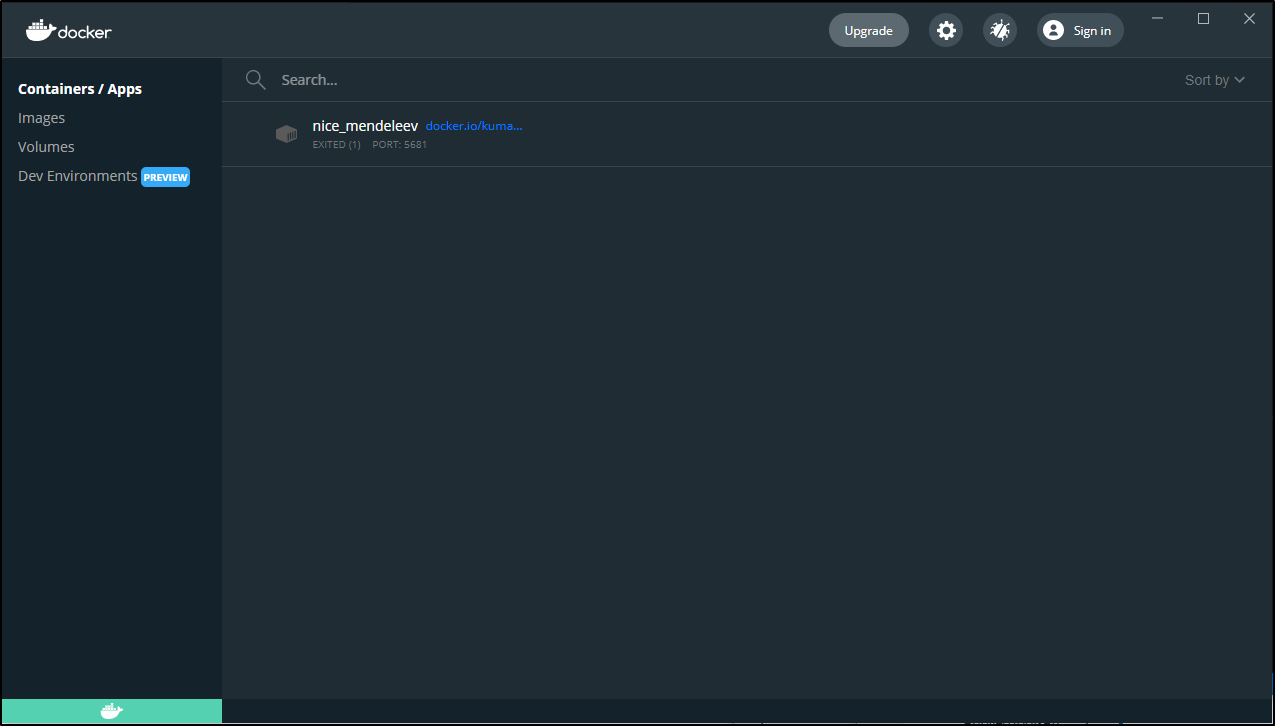
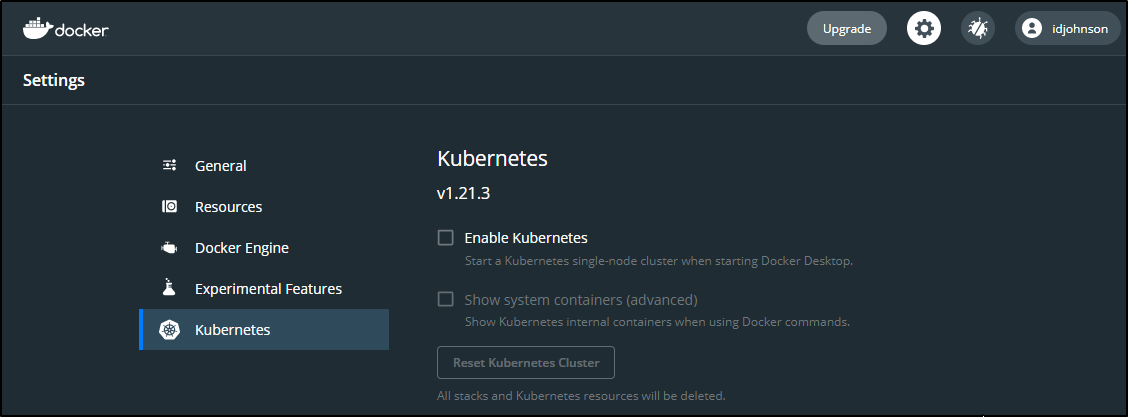
We can expose a kubernetes engine via Docker Desktop:
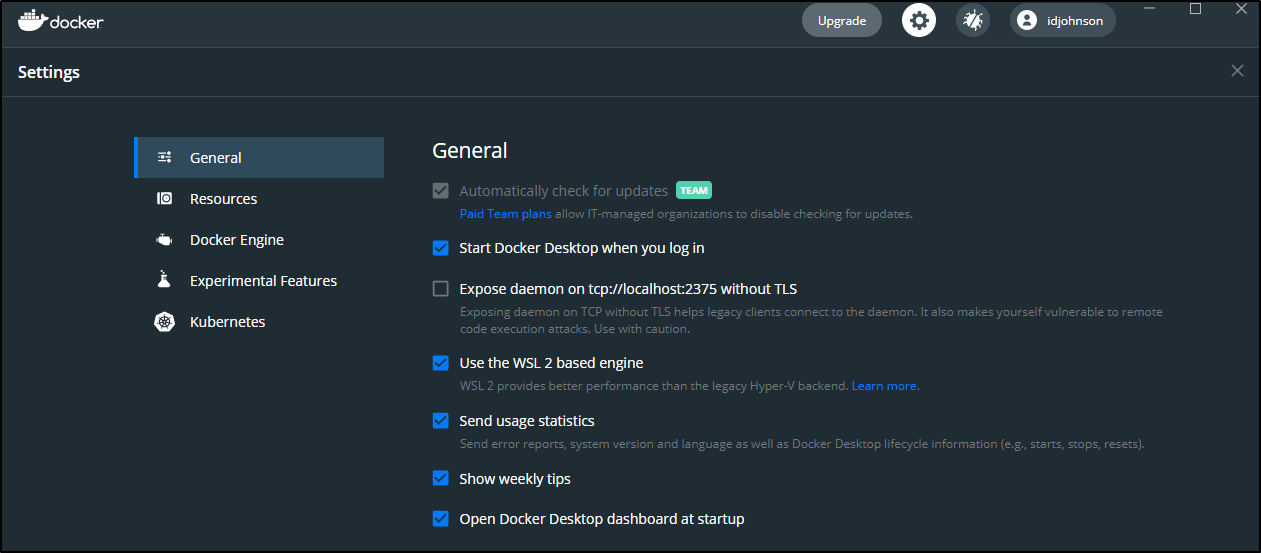
and for those that don’t have Windows 10 Pro (and thus do not have Hyper V), we can use WSL as a backend:
Kubernetes on Docker Desktop
It’s as easy as selecting to install it via the UI
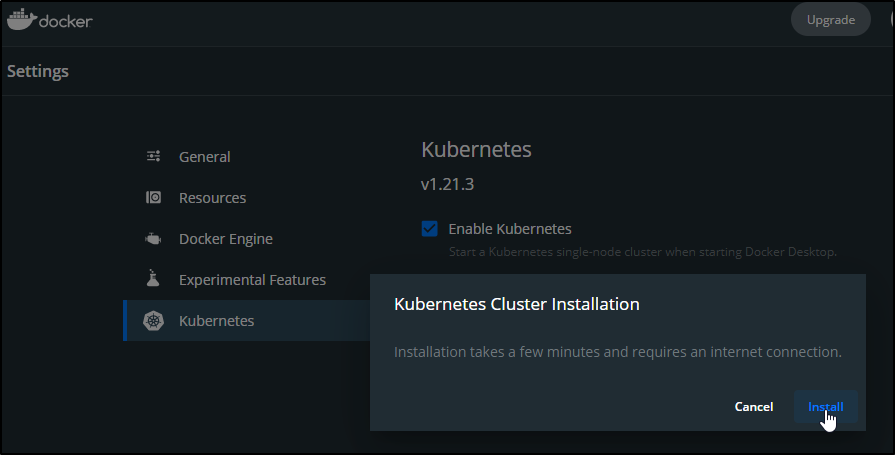
When ready we can see it:
C:\Users\isaac>kubectl get nodes
NAME             STATUS   ROLES                  AGE    VERSION
docker-desktop   Ready    control-plane,master   104s   v1.21.3

C:\Users\isaac>kubectl get pods --all-namespaces
NAMESPACE     NAME                                     READY   STATUS    RESTARTS   AGE
kube-system   coredns-558bd4d5db-46wkd                 1/1     Running   0          105s
kube-system   coredns-558bd4d5db-mtlst                 1/1     Running   0          105s
kube-system   etcd-docker-desktop                      1/1     Running   0          108s
kube-system   kube-apiserver-docker-desktop            1/1     Running   0          108s
kube-system   kube-controller-manager-docker-desktop   1/1     Running   0          107s
kube-system   kube-proxy-6z9r4                         1/1     Running   0          106s
kube-system   kube-scheduler-docker-desktop            1/1     Running   0          107s
kube-system   storage-provisioner                      1/1     Running   0          75s
kube-system   vpnkit-controller                        1/1     Running   0          75s
checking my .kube/config:
apiVersion: v1
clusters:
- cluster:
    certificate-authority-data: LS0tLS1CRUdJTiBDRVJUSUZJQ0FURS0tLS0tCk1JSUM1ekNDQWMrZ0F3SUJBZ0lCQURBTkJna3Foa2lHOXcwQkFRc0ZBREFWTVJNd0VRWURWUVFERXdwcmRXSmwKY201bGRHVnpNQjRYRFRJeE1Ea3pNREU1TWpBME9Gb1hEVE14TURreU9ERTVNakEwT0Zvd0ZURVRNQkVHQTFVRQpBeE1LYTNWaVpYSnVaWFJsY3pDQ0FTSXdEUVlKS29aSWh2Y05BUUVCQlFBRGdnRVBBRENDQVFvQ2dnRUJBS0pKClFIN0pqNHhNM1BWV0NTbnljdFQ2emFVOER2em5jZWZ6eDZlclJmUkdhMysxS2FZbnl6VnNsWjNRd0UzQUVoZWwKV1J4bDlSNjQ2NmNGejJ1bm9WRXpCM1k5V1pVdTlQaU1UcnExOG1Id2I4a3NsRC96a1h2UVJDVFBIRkExUGlNcgpPRGZKaTFWQk9oU1NjU0ZvY3VUbUkwcEQ5YXRUb0hqcktNaG80NnlrY2VmNGt4QkVCTGx3REk4UGNDTllBb0NrCnkwL3VOd1B2UzZjL0szQXR4SmYxOWY0WDU4K2I5Rk9QT3FueWVPcVVIaE1OencrUFdRTXBWZkhHeFloVC96MFUKZWFMVDEwTmN4QWo1eW9WaG5Ibm8zem9zTkVQbDJKSGlxNlhDRTZ0SVdTVlptY0U1SVFtQTdsTFd3clNoNXA0NAp3Vm9TcEJHbFJmSTZxTE5uNWFNQ0F3RUFBYU5DTUVBd0RnWURWUjBQQVFIL0JBUURBZ0trTUE4R0ExVWRFd0VCCi93UUZNQU1CQWY4d0hRWURWUjBPQkJZRUZLYXU2eFl6L2FXWGNlVWRSSFVKTHI3OHZkMTFNQTBHQ1NxR1NJYjMKRFFFQkN3VUFBNElCQVFCaVhJcHB0Z2Zoajh2VkpLL3duK2xGUDVKVit5T0EvYW4xY3hpWHFDa1hvRzVkOXlvOQp6bjRST0dqTUNtVVFYZDgrOHM3V0J2dUhOTHVOUnNiWG9GMUl5QTBmSGFMR2NBNHpBcklHK0JlM0J5SUlUWndoCnJyR25iWTVCSEtydEcwNStZN3RaNjFZdGJ4MjlyT1ZpU2gwM0tUSXVlbk10bnJnYW1vQVVQTlhJaU1OK2VoQ1MKTlc4eUpyWmJEamVTZFR4WHp6bDRIZUw3RXE3aFlsOWt1bGZuODZmZTlTVEVXZ0VjbFIydU9GbEV3VHFmbE8rZwpkc1o3bUltMmx5aFFhQUxVN1NDcFJwV3VNMDcwakp5R2lVNDcxVzBtK0NkeGtKcmNJVTFPZU9Fd0hCRlhheHlCCnVOeG1TTU8wMzhnL3p0ZTJIdzdWWnh5QWFJdHBabUlnSEJOUgotLS0tLUVORCBDRVJUSUZJQ0FURS0tLS0tCg==
    server: https://kubernetes.docker.internal:6443
  name: docker-desktop
contexts:
- context:
    cluster: docker-desktop
    user: docker-desktop
  name: docker-desktop
current-context: docker-desktop
kind: Config
preferences: {}
users:
- name: docker-desktop
  user:
    client-certificate-data: LS0tLS1CRUdJTiBDRVJUSUZJQ0FURS0tLS0tCk1JSURRakNDQWlxZ0F3SUJBZ0lJTnVEQ3JlUURKUG93RFFZSktvWklodmNOQVFFTEJRQXdGVEVUTUJFR0ExVUUKQXhNS2EzVmlaWEp1WlhSbGN6QWVGdzB5TVRBNU16QXhPVEl3TkRoYUZ3MHlNakE1TXpBeE9USXdORGxhTURZeApGekFWQmdOVkJBb1REbk41YzNSbGJUcHRZWE4wWlhKek1Sc3dHUVlEVlFRREV4SmtiMk5yWlhJdFptOXlMV1JsCmMydDBiM0F3Z2dFaU1BMEdDU3FHU0liM0RRRUJBUVVBQTRJQkR3QXdnZ0VLQW9JQkFRRGEwQWE5N2dFS1VpRloKOWt1VU9vTTEwcEMzb0M2RTJFMWt0Mm5YWEdFTWs3OW9DMEpFZkJESC84dEM1TXN2RHkzOUFxYjRmcjlVSnZrMAp4SGMzUHZJaEhkcmdKVHR1VndMYzgwTDMzT0xWMEYybUU3ZWp4VzhOTEJmL25MZlJxQndGWk9vSUFURG01NVd0Ckp3dnprcGZaYnRML0tXQ3I3TU5VSTdOaEFLcVBucDErTy8vOEwvUk9mUmRYd1UybFZjUi9qZlJHR2EwbUdXenEKaDRBbmkwSjBLVzk4NVRIaEIzYit3bUg4VDZqUnpLMWs0M29mTzJadmlmRlJORFlNUFBabFBMbXh1b3l0RzIvawp5WS9RQnBGZEpCdlE2Z3NlWHFTdElIdGdnWHVMMWVPL0FHZVJ6Z2U1dDFrc2liUGNxbXBZekFjTUFoUGhDcXhGClpqZDJlZWlKQWdNQkFBR2pkVEJ6TUE0R0ExVWREd0VCL3dRRUF3SUZvREFUQmdOVkhTVUVEREFLQmdnckJnRUYKQlFjREFqQU1CZ05WSFJNQkFmOEVBakFBTUI4R0ExVWRJd1FZTUJhQUZLYXU2eFl6L2FXWGNlVWRSSFVKTHI3OAp2ZDExTUIwR0ExVWRFUVFXTUJTQ0VtUnZZMnRsY2kxbWIzSXRaR1Z6YTNSdmNEQU5CZ2txaGtpRzl3MEJBUXNGCkFBT0NBUUVBSDZ6blNCclNCR0NuckhqMnVpZVhabjJPdTBNckJia1BoQWVrdHlCRE9DV25RVXRHSDE2Ty91SWMKYXFZb1dTRk5rM3hrTGg1c0xGNllQWU5rL1F5VWQxSmVsRVFQQ0owTnMvQ0RrZ2RyMktKdFpvWFo0WEtlc2pkVgpiM0dtVmpaemZRSU1YZFZOUmpYaHI1OGduNHpkNWgybmNLKzJIWWxmMmprWmxJN1FsYVBjdG9qMnVmdVZKYTRyCk1OOWUwWk0yUjVaaTdnay8yRThrTlpaQ1NoMDhrVG1IUVloaWpTZ04wUC9XMDFESHpFdmQ1ZHo3Qm5KQjcxeksKSktpYUtMVXR5Wm9TSEd6TlVSRmVzc05EY1FPeTluVkhKRTBxZVJCRHRWZkYyUXJjbXhOWVNMRnFxMlF2bzErdgpjNkJBRmR5M0N4NklNK0RwelNLUTByb1FjMFk0cmc9PQotLS0tLUVORCBDRVJUSUZJQ0FURS0tLS0tCg==
    client-key-data: LS0tLS1CRUdJTiBSU0EgUFJJVkFURSBLRVktLS0tLQpNSUlFcGdJQkFBS0NBUUVBMnRBR3ZlNEJDbEloV2ZaTGxEcUROZEtRdDZBdWhOaE5aTGRwMTF4aERKTy9hQXRDClJId1F4Ly9MUXVUTEx3OHQvUUttK0g2L1ZDYjVOTVIzTno3eUlSM2E0Q1U3YmxjQzNQTkM5OXppMWRCZHBoTzMKbzhWdkRTd1gvNXkzMGFnY0JXVHFDQUV3NXVlVnJTY0w4NUtYMlc3Uy95bGdxK3pEVkNPellRQ3FqNTZkZmp2LwovQy8wVG4wWFY4Rk5wVlhFZjQzMFJobXRKaGxzNm9lQUo0dENkQ2x2Zk9VeDRRZDIvc0poL0UrbzBjeXRaT042Ckh6dG1iNG54VVRRMkREejJaVHk1c2JxTXJSdHY1TW1QMEFhUlhTUWIwT29MSGw2a3JTQjdZSUY3aTlYanZ3Qm4Ka2M0SHViZFpMSW16M0twcVdNd0hEQUlUNFFxc1JXWTNkbm5vaVFJREFRQUJBb0lCQVFDb2Q2WFpNWmZIZEhpTgpKUjRIb0ExSnNUY095ZHRIR0twdHN2RmdpSldIODNGWkQrSVRqRm4zUWpBaTdyaXBJTXpOa2U4d1A1WGJtcTRnClBHdDFNNWVFZTlINjVXK2Vnb3VIeGh0M2JxK080NEJXejdPQitnNklXN3lXWnZqNENMQ2FUcG9KVTdGczlqeTkKTmVUendaZjhKbUY1WjBndzFuZUZIbitMWGRIMEJFVE4zK1NjRkZPMjZ6NGIvcmVKNkJ6K3lLeXFvTkRLU25OawpUVHhTUmRHOXlpSTE5SXBSRFRMZVdWN3BWUnlhMjZXbk1VTWQ5ek5IUXBtQVE2K2dJV1F5TVRZWlh3eXpGemxrCjcrSFJmWDFlKzlEWnFjR3JsQ2p2Vk1aWjFCV2V5b0YwamFlQ01ydFI1ZzNjaGNYVkpYdm5LV3R4Zmd3RjNkbXYKMkdBVHdLZ0JBb0dCQVBBRVZlbk1XQ2xoaDdkdkZ3UzlMeUFGOFY3ZG02WHdRQ3BpTTVGeVN1N0RPVzExc1B0TApSbFZCYzNGY2FTRisxZ05OQ3pOazZNek9KazlBVVBLM0pvVGs4aHFKNXlpYndxTytEay8ycGdkcDFheTREdXNvCkJZUTQyT3dSb0R6Qi9EeUxBb3VkYUg3WGNzUytiM1hZR2dyNm90RWZKTVFWd3NiZldLZUxQNkFKQW9HQkFPbGkKTmtiQU5lQ1FIa1d1dmRuRjdUeHNNRlBYYVpDRHdGN3JrQmRXM05oYkVFdThZc3dGejQreCs2Z2NOa0ViUzZkTwovK09JdmhkNHlweVZDWFVEWmhObVJHNDJuOTBocklJWTU1a3RSQ3hwbUQ2V01IUnVBMkd1bXpRZERqMTNCT2lsCmJoaHVqa2NPaGJtZ1VuY2NVbGt4OUNZTTlsT2V0SnFPTnZacDRTU0JBb0dCQU9aV1l0VENwSURoOWtyVnM3TjYKa3pVYVB1K1pvUHY0dXJ0eURxY3dsalRZNmMzZ09uNlBXT29NcSt0SWtpUHhBeFdiNUhub0IzbzFCSkxkMkZGMQo3dU51aStGb0lvellIa3poNGY1ZmFDcUpLT1JlcHdLS0gvRXFWUk1JUDB6UHBXKzh3QzZZVzJZUEFUZEt3dERICkdRY2NUUkIvNE5yRlAyMTNmaThiOVcxeEFvR0JBTWowejBXR2xoM0NHcjdub3dQVWdOMUpUeWV5VVd5bGRjeUYKeTNHOVVyWmRXeC9MbThxUHFsVFI3WjZvaERMMWZPUVlpdy95RzdSOFJ3SWk5cHl5QzMvaXpFT1dkM3JpVnZkQwoySkUxd0FENS82VE1qL2FCRUJwWlRiekcxQThxMzZndllpaFpjZHRQYnVnU1cwL0NyRW12VU1vKzJRL1JsVE9NCkIxbVFlOU9CQW9HQkFNeUFSaEkvczRFMUpwYnFJL3RQVWZsellFTWZUbG4xS085UkZnQUdGU0xsaG1seUhlUm8KUnMvS3lPbldnakhtRGd0TWh3NHdkNTc3UC9jUFdadVp6Nk1PbENvYy9YOGpTQ3ZQLzJ4ZXA2MXlES2lMaG9jeQpEdUdPM2E2cDZiUWd0NlVVakkvMTRQb21sUFVycDlScXpvUWRTVmY4VE9pbFFPRVFpY1pFdDVGMwotLS0tLUVORCBSU0EgUFJJVkFURSBLRVktLS0tLQo=
That same kubeconfig works just fine for WSL:
$ kubectl get nodes --kubeconfig=/mnt/c/Users/isaac/.kube/config
NAME             STATUS   ROLES                  AGE     VERSION
docker-desktop   Ready    control-plane,master   5m35s   v1.21.3
Building images with Docker Desktop
The simplest helloworld might be a simple Alpine based hello world example.
$ cat Dockerfile
FROM alpine
CMD ["echo", "Hello Freshbrewed.science!"]
We can then build that file and tag it with idjhello or some similar unique name
$ docker build --tag idjhello .
[+] Building 12.4s (6/6) FINISHED
 => [internal] load build definition from Dockerfile                                                                                                                                                                                                                                       0.0s
 => => transferring dockerfile: 92B                                                                                                                                                                                                                                                        0.0s
 => [internal] load .dockerignore                                                                                                                                                                                                                                                          0.0s
 => => transferring context: 2B                                                                                                                                                                                                                                                            0.0s
 => [internal] load metadata for docker.io/library/alpine:latest                                                                                                                                                                                                                          11.9s
 => [auth] library/alpine:pull token for registry-1.docker.io                                                                                                                                                                                                                              0.0s
 => [1/1] FROM docker.io/library/alpine@sha256:e1c082e3d3c45cccac829840a25941e679c25d438cc8412c2fa221cf1a824e6a                                                                                                                                                                            0.4s
 => => resolve docker.io/library/alpine@sha256:e1c082e3d3c45cccac829840a25941e679c25d438cc8412c2fa221cf1a824e6a                                                                                                                                                                            0.0s
 => => sha256:e1c082e3d3c45cccac829840a25941e679c25d438cc8412c2fa221cf1a824e6a 1.64kB / 1.64kB                                                                                                                                                                                             0.0s
 => => sha256:69704ef328d05a9f806b6b8502915e6a0a4faa4d72018dc42343f511490daf8a 528B / 528B                                                                                                                                                                                                 0.0s
 => => sha256:14119a10abf4669e8cdbdff324a9f9605d99697215a0d21c360fe8dfa8471bab 1.47kB / 1.47kB                                                                                                                                                                                             0.0s
 => => sha256:a0d0a0d46f8b52473982a3c466318f479767577551a53ffc9074c9fa7035982e 2.81MB / 2.81MB                                                                                                                                                                                             0.2s
 => => extracting sha256:a0d0a0d46f8b52473982a3c466318f479767577551a53ffc9074c9fa7035982e                                                                                                                                                                                                  0.1s
 => exporting to image                                                                                                                                                                                                                                                                     0.0s
 => => exporting layers                                                                                                                                                                                                                                                                    0.0s
 => => writing image sha256:81a8e52594e01f29f7e536dfe6ea4d5bc2629f66cfaf04ed5f8d61fef57c7764                                                                                                                                                                                               0.0s
 => => naming to docker.io/library/idjhello


Use 'docker scan' to run Snyk tests against images to find vulnerabilities and learn how to fix them
I can now see it
$ docker images | head -n 2
REPOSITORY                           TAG                                                     IMAGE ID       CREATED         SIZE
idjhello                             latest                                                  81a8e52594e0   4 weeks ago     5.6MB
and a quick run (and remove) shows the echo line:
$ docker run --rm idjhello
Hello Freshbrewed.science!
In the Docker Desktop GUI, we can see our image and even inspect the layers and push to docker hub:
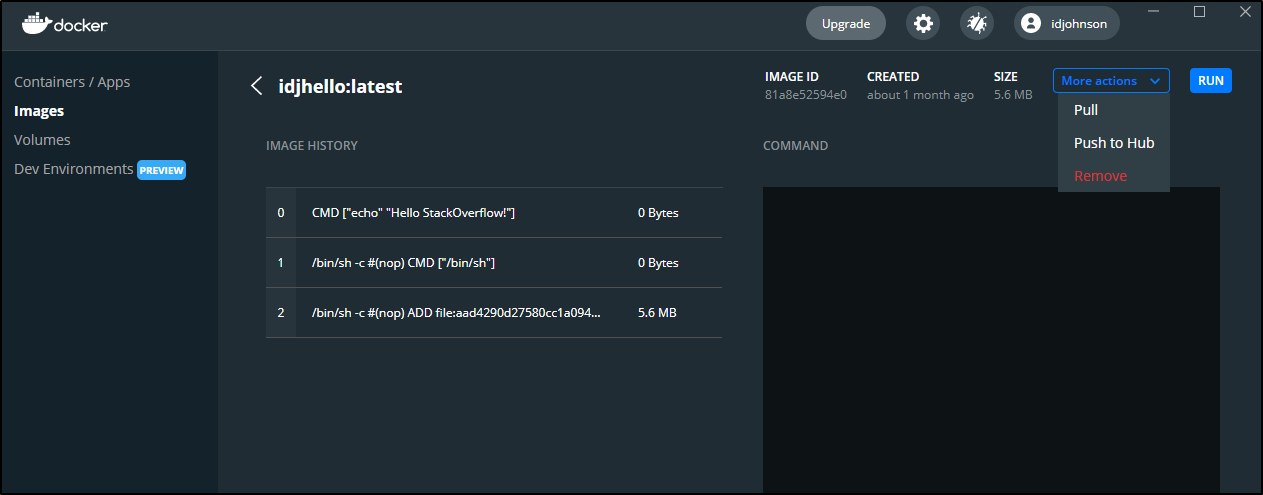
The docker push failed:

but that’s because we must tag our images with our dockerhub organization or user id.. having retagged, then i could push:
$ docker tag 81a8e52594e0 idjohnson/idjhello:latest
$ docker push idjohnson/idjhello:latest
The push refers to repository [docker.io/idjohnson/idjhello]
e2eb06d8af82: Pushed
latest: digest: sha256:420710463982a8cf926872058833cf36b4c565f70975504df99b3b1d7d0ba24d size: 527
Building images with Minikube
A couple of quick notes:
If you get errors about the x509 certificate being invalid .. usually because you switched locations and now Hyper-V has given out a different IP address, yet minikube is still signing the cert for the old, you can just stop and start Minikube on the Administrator Command prompt:
c:\Users\isaac\Downloads>minikube stop
* Stopping node "minikube"  ...
* Powering off "minikube" via SSH ...
E1004 14:41:02.047071    3980 main.go:126] libmachine: [stderr =====>] : Hyper-V\Stop-VM : Windows PowerShell is in NonInteractive mode. Read and Prompt functionality is not available.
At line:1 char:1
+ Hyper-V\Stop-VM minikube
+ ~~~~~~~~~~~~~~~~~~~~~~~~
    + CategoryInfo          : InvalidOperation: (:) [Stop-VM], VirtualizationException
    + FullyQualifiedErrorId : InvalidOperation,Microsoft.HyperV.PowerShell.Commands.StopVM


* Stopping node "minikube"  ...
* 1 nodes stopped.

c:\Users\isaac\Downloads>minikube start
* minikube v1.23.2 on Microsoft Windows 10 Pro 10.0.19042 Build 19042
  - MINIKUBE_ACTIVE_DOCKERD=minikube
* Using the hyperv driver based on existing profile
* Starting control plane node minikube in cluster minikube
* Restarting existing hyperv VM for "minikube" ...
* Preparing Kubernetes v1.22.2 on Docker 20.10.8 ...
* Verifying Kubernetes components...
  - Using image gcr.io/k8s-minikube/storage-provisioner:v5
* Enabled addons: storage-provisioner, default-storageclass
* Done! kubectl is now configured to use "minikube" cluster and "default" namespace by default
If you get a cert x509 time error such as:
$ docker build --tag idjhello2 .
error during connect: Post "https://192.168.1.87:2376/v1.24/build?buildargs=%7B%7D&cachefrom=%5B%5D&cgroupparent=&cpuperiod=0&cpuquota=0&cpusetcpus=&cpusetmems=&cpushares=0&dockerfile=Dockerfile&labels=%7B%7D&memory=0&memswap=0&networkmode=default&rm=1&shmsize=0&t=idjhello2&target=&ulimits=null&version=1": x509: certificate has expired or is not yet valid: current time 2021-10-04T12:56:05-05:00 is before 2021-10-04T19:36:00Z
this is often due to clock drift (my WSL is really bad at updating the time when it comes up from sleep). you can use ntpupdate to sort that out:
$ sudo ntpdate -s time.nist.gov
Here we will build the same Dockerfile as before, but this time using minikube (note, i updated the IP address to match what i see in Hyper-V now):
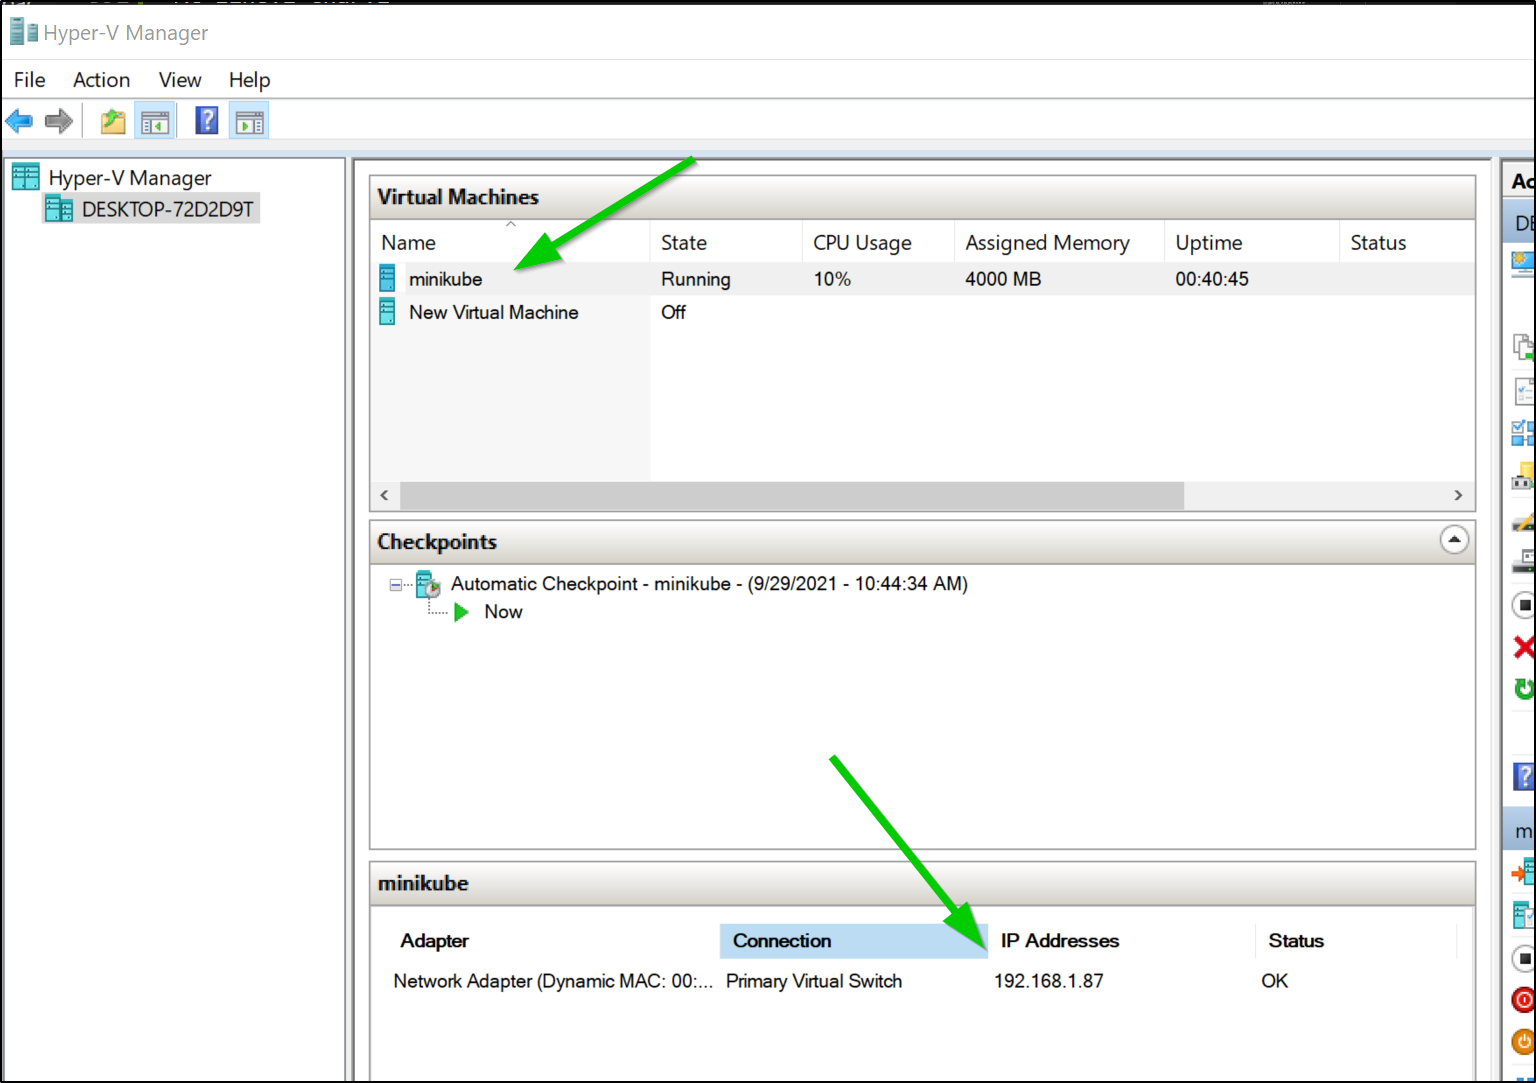
$ export DOCKER_HOST=tcp://192.168.1.87:2376
$ docker build --tag idjhello2 .
Sending build context to Docker daemon  924.8MB
Step 1/2 : FROM alpine
latest: Pulling from library/alpine
a0d0a0d46f8b: Pull complete
Digest: sha256:e1c082e3d3c45cccac829840a25941e679c25d438cc8412c2fa221cf1a824e6a
Status: Downloaded newer image for alpine:latest
 ---> 14119a10abf4
Step 2/2 : CMD ["echo", "Hello Freshbrewed.science!"]
 ---> Running in 14b0d618c1eb
Removing intermediate container 14b0d618c1eb
 ---> ebd80f87bf04
Successfully built ebd80f87bf04
Successfully tagged idjhello2:latest
and checking the images:
$ docker images | head -n2
REPOSITORY                                TAG       IMAGE ID       CREATED         SIZE
idjhello2                                 latest    ebd80f87bf04   7 minutes ago   5.6MB
and in Windows, i see much the same:
c:\Users\isaac\Downloads>SET DOCKER_HOST=tcp://192.168.1.87:2376

c:\Users\isaac\Downloads>docker images
REPOSITORY                                TAG                 IMAGE ID            CREATED             SIZE
idjhello2                                 latest              ebd80f87bf04        9 minutes ago       5.6MB
A reminder of our env vars:
DOCKER_CERT_PATH=C:\Users\isaac\.minikube\certs
DOCKER_HOST=tcp://192.168.1.87:2376
DOCKER_TLS_VERIFY=1
and in WSL/linux
$ export | grep DOCKER
declare -x DOCKER_CERT_PATH="/mnt/c/Users/isaac/.minikube/certs"
declare -x DOCKER_HOST="tcp://192.168.1.87:2376"
declare -x DOCKER_TLS_VERIFY="1"
Pushing to Docker Hub
if you want to still use the Docker registry, you can do so.
First, tag the image:
$ docker tag ebd80f87bf04 idjohnson/idjhello:latest
then login to Docker hub:
$ docker login
Login with your Docker ID to push and pull images from Docker Hub. If you don't have a Docker ID, head over to https://hub.docker.com to create one.
Username: idjohnson
Password:
WARNING! Your password will be stored unencrypted in /home/builder/.docker/config.json.
Configure a credential helper to remove this warning. See
https://docs.docker.com/engine/reference/commandline/login/#credentials-store

Login Succeeded
lastly, push the image:
$ docker push idjohnson/idjhello:latest
The push refers to repository [docker.io/idjohnson/idjhello]
e2eb06d8af82: Layer already exists
latest: digest: sha256:fcc731b75a878febbc2b70125494e1ccafb9683ea622294b3c6ceb1a26bdc92b size: 528
Minikube Dashboard
Since Minikube is a real cluster, we can fire up a dashboard browser with the minikube dashboard command:
c:\Users\isaac\Downloads>minikube dashboard
* Enabling dashboard ...
  - Using image kubernetesui/dashboard:v2.3.1
  - Using image kubernetesui/metrics-scraper:v1.0.7
* Verifying dashboard health ...
* Launching proxy ...
* Verifying proxy health ...
* Opening http://127.0.0.1:61775/api/v1/namespaces/kubernetes-dashboard/services/http:kubernetes-dashboard:/proxy/ in your default browser...
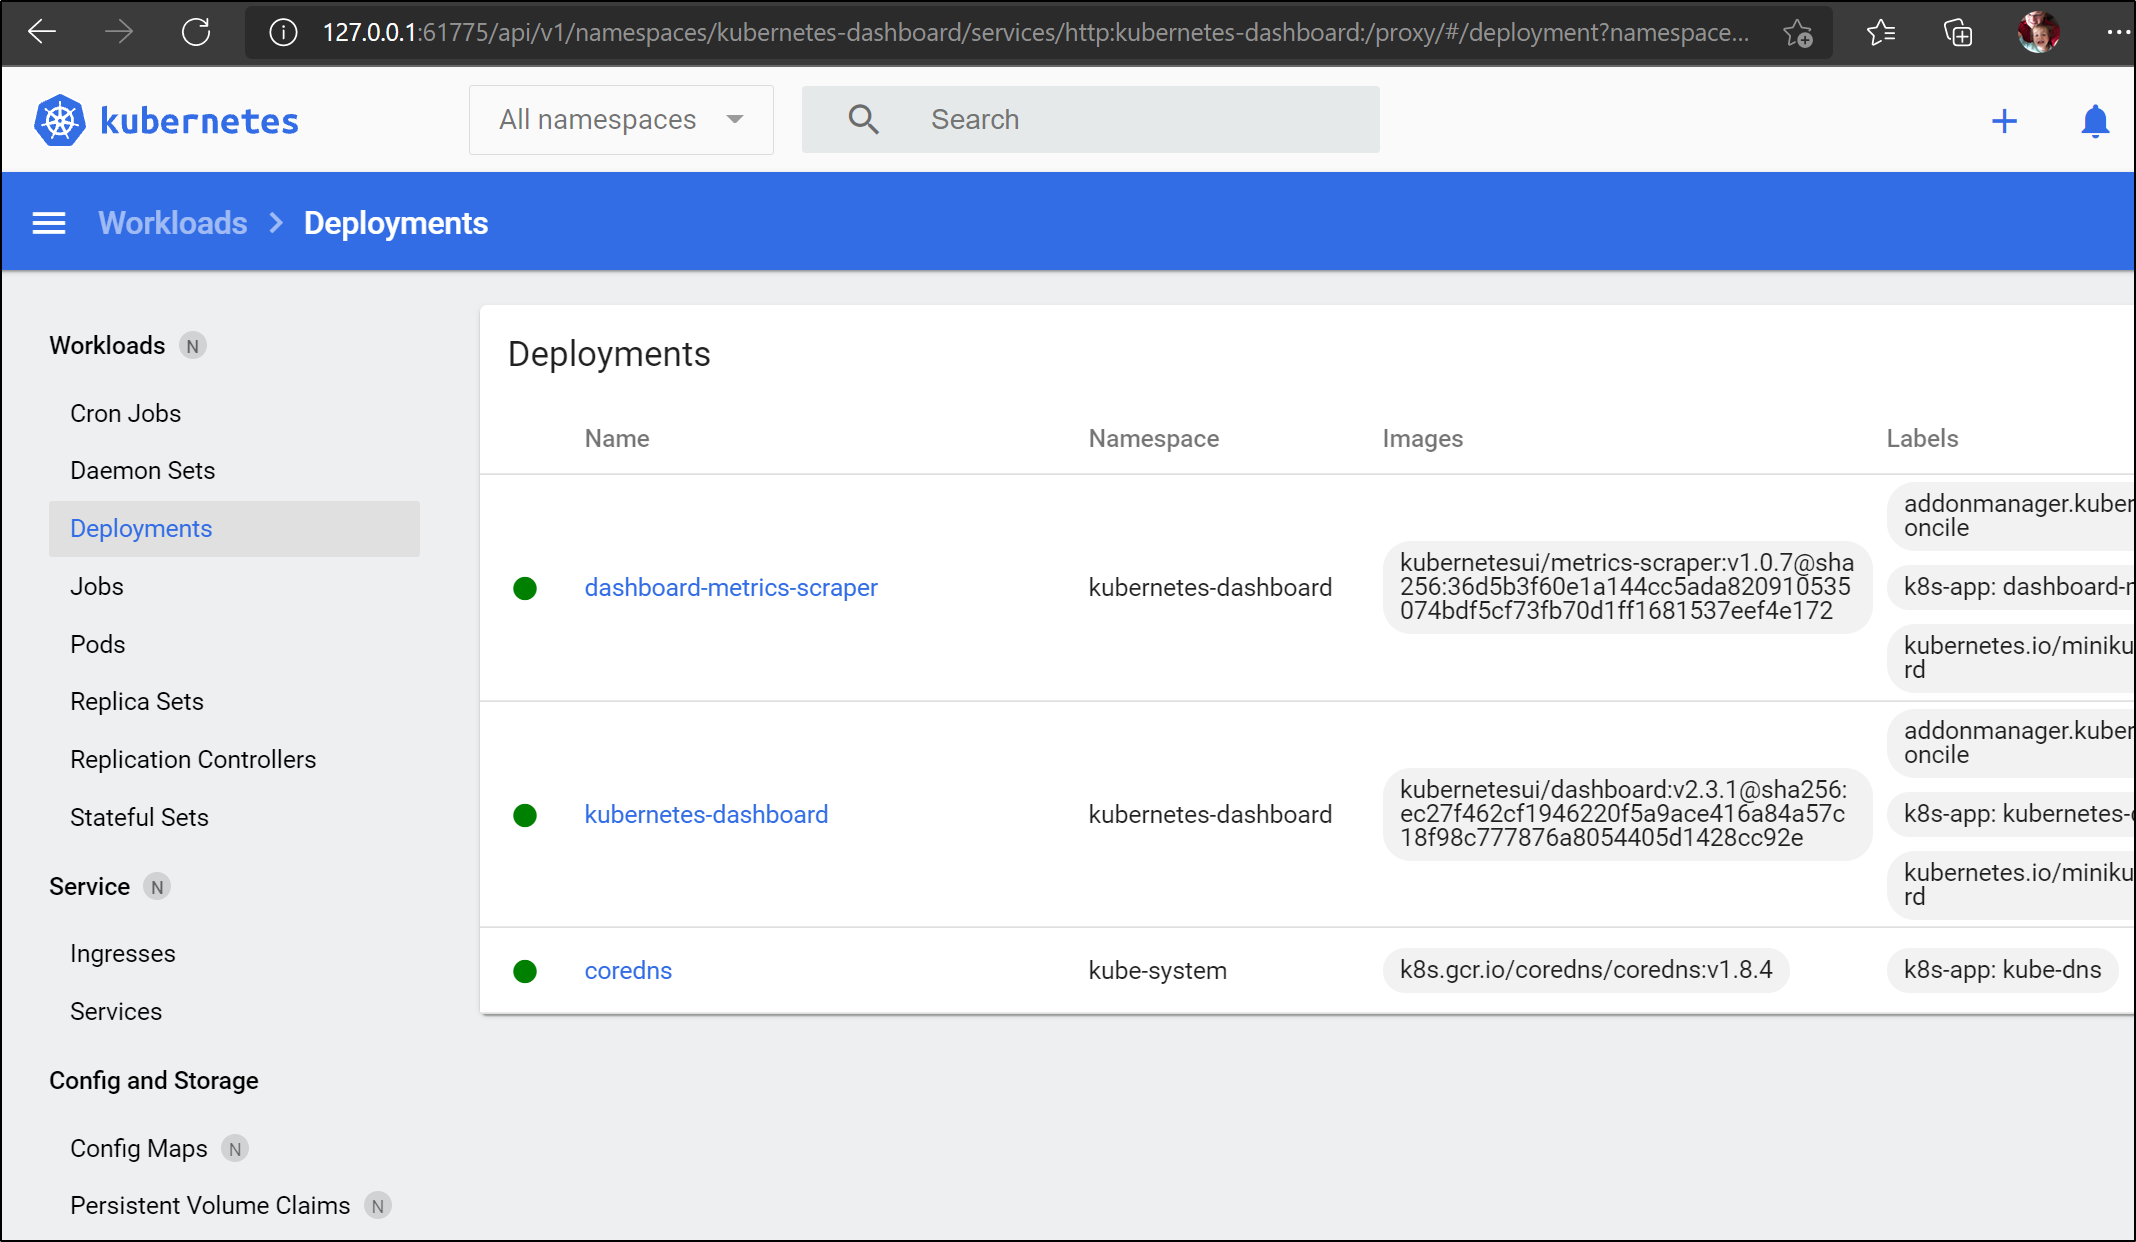
Reconnecting via WSL
We can just update the server IP in the kubeconfig to access minikube again:
$ sed -i 's/server: https:\/\/.*:8443/server: https:\/\/192.168.1.87:8443/g' ~/.kube/config
$ kubectl get nodes
NAME       STATUS   ROLES                  AGE    VERSION
minikube   Ready    control-plane,master   5d5h   v1.22.2
We can easily use the cluster to fire up a test Pod:
$ cat test.yaml
apiVersion: v1
kind: Pod
metadata:
  name: test-hello-world
  labels:
    role: testpod
spec:
  containers:
    - name: myimage
      image: idjohnson/idjhello:latest

$ kubectl apply -f test.yaml
pod/test-hello-world created

$ kubectl get pods
NAME               READY   STATUS              RESTARTS   AGE
test-hello-world   0/1     ContainerCreating   0          3s
in our example, we expect to see a crash since it doesnt stay up:
$ kubectl get pods
NAME               READY   STATUS             RESTARTS      AGE
test-hello-world   0/1     CrashLoopBackOff   2 (16s ago)   39s
But i do see the log in the logs which shows it pulled and ran:
$ kubectl logs test-hello-world
Hello Freshbrewed.science!
If we wish to use private images in docker hub, then we can create an image pull secret. since we did docker login I’m reasonable sure we have the secret already locally:
$ cat ~/.docker/config.json | head -n4
{
        "auths": {
                "harbor.freshbrewed.science": {},
                "https://index.docker.io/v1/": {
then we can load it to our local cluster with:
$ kubectl create secret generic registrycreds --from-file=.dockerconfigjson=/home/builder/.docke
r/config.json --type=kubernetes.io/dockerconfigjson
secret/registrycreds created
then our pod definition would use that:
$ cat test.yaml
apiVersion: v1
kind: Pod
metadata:
  name: test-hello-world
  labels:
    role: testpod
spec:
  containers:
    - name: myimage
      image: idjohnson/idjhello:latest
  imagePullSecrets:
    - name: registrycreds
and then delete and reapply (cannot update a pod spec with pull secrets, requires a delete/re-add):
$ kubectl delete -f test.yaml
pod "test-hello-world" deleted
$ kubectl apply -f test.yaml
pod/test-hello-world created
$ kubectl get pods | grep hello
test-hello-world   0/1     CrashLoopBackOff   1 (4s ago)   9s
$ kubectl logs test-hello-world
Hello Freshbrewed.science!
Using Minikube in Hyper-V with a Raspberry Pi
We can actually use our minikube running in hyper-v to build images on our Pi hosts.
Here is a pi running focal:
ubuntu@ubuntu:~$ docker ps
CONTAINER ID   IMAGE                                  COMMAND                  CREATED         STATUS          PORTS     NAMES
807d0cc253e0   rancher/rke-tools:v0.1.66              "/docker-entrypoint.…"   10 months ago   Up 12 minutes             etcd-rolling-snapshots
41cdb03fe025   rancher/hyperkube:v1.19.4-rancher1     "/opt/rke-tools/entr…"   10 months ago   Up 12 minutes             kube-proxy
654fb3b30afd   rancher/hyperkube:v1.19.4-rancher1     "/opt/rke-tools/entr…"   10 months ago   Up 12 minutes             kube-scheduler
5f6a13058dea   rancher/hyperkube:v1.19.4-rancher1     "/opt/rke-tools/entr…"   10 months ago   Up 5 seconds              kube-apiserver
d5c2388e4922   rancher/coreos-etcd:v3.4.13-rancher1   "/usr/local/bin/etcd…"   10 months ago   Up 12 minutes             etcd
But if we copy over all the minikube certs locally:
ubuntu@ubuntu:~/certs$ ls
ca-key.pem  ca.pem  cert.pem  key.pem
ubuntu@ubuntu:~/certs$ export | grep DOCKER
declare -x DOCKER_CERT_PATH="/home/ubuntu/certs"
declare -x DOCKER_HOST="tcp://192.168.1.87:2376"
declare -x DOCKER_TLS_VERIFY="1"
ubuntu@ubuntu:~/certs$ docker images
REPOSITORY                                TAG       IMAGE ID       CREATED        SIZE
idjhello2                                 latest    ebd80f87bf04   7 hours ago    5.6MB
idjohnson/idjhello                        latest    ebd80f87bf04   7 hours ago    5.6MB
k8s.gcr.io/kube-apiserver                 v1.22.2   e64579b7d886   2 weeks ago    128MB
k8s.gcr.io/kube-controller-manager        v1.22.2   5425bcbd23c5   2 weeks ago    122MB
k8s.gcr.io/kube-proxy                     v1.22.2   873127efbc8a   2 weeks ago    104MB
k8s.gcr.io/kube-scheduler                 v1.22.2   b51ddc1014b0   2 weeks ago    52.7MB
alpine                                    latest    14119a10abf4   5 weeks ago    5.6MB
kubernetesui/dashboard                    v2.3.1    e1482a24335a   3 months ago   220MB
k8s.gcr.io/etcd                           3.5.0-0   004811815584   3 months ago   295MB
kubernetesui/metrics-scraper              v1.0.7    7801cfc6d5c0   3 months ago   34.4MB
k8s.gcr.io/coredns/coredns                v1.8.4    8d147537fb7d   4 months ago   47.6MB
gcr.io/k8s-minikube/storage-provisioner   v5        6e38f40d628d   6 months ago   31.5MB
k8s.gcr.io/pause                          3.5       ed210e3e4a5b   6 months ago   683kB
This presents a rather neat option; the ability to build amd64 images on an ARM host:
ubuntu@ubuntu:~$ cat Dockerfile
FROM alpine
CMD ["echo", "Hello Fresh/Brewed!"]

ubuntu@ubuntu:~$ docker build --tag idjhello3 .
Sending build context to Docker daemon  1.142GB
Step 1/2 : FROM alpine
 ---> 14119a10abf4
Step 2/2 : CMD ["echo", "Hello Fresh/Brewed!"]
 ---> Running in 9c96862f9b5d
Removing intermediate container 9c96862f9b5d
 ---> 0108edd46e95
Successfully built 0108edd46e95
Successfully tagged idjhello3:latest
And now try running it:
ubuntu@ubuntu:~$ docker run --rm idjhello3
Hello Fresh/Brewed!
For Macs
Steps
One will still want to install Minikube, however, the backend will be hyperkit instead of hyper-v.
The summary steps are here.
Basically, you can install hyperkit with homebrew.
If you don’t have homebrew, first install that
/bin/bash -c "$(curl -fsSL https://raw.githubusercontent.com/Homebrew/install/HEAD/install.sh)"
Then install hyperkit with brew
$ brew install hyperkit
==> Downloading https://ghcr.io/v2/homebrew/core/libev/manifests/4.33
######################################################################## 100.0%
==> Downloading https://ghcr.io/v2/homebrew/core/libev/blobs/sha256:95ddf4b85924
==> Downloading from https://pkg-containers.githubusercontent.com/ghcr1/blobs/sh
######################################################################## 100.0%
==> Downloading https://ghcr.io/v2/homebrew/core/hyperkit/manifests/0.20200908
######################################################################## 100.0%
==> Downloading https://ghcr.io/v2/homebrew/core/hyperkit/blobs/sha256:26a203b17
==> Downloading from https://pkg-containers.githubusercontent.com/ghcr1/blobs/sh
######################################################################## 100.0%
==> Installing dependencies for hyperkit: libev
==> Installing hyperkit dependency: libev
==> Pouring libev--4.33.big_sur.bottle.tar.gz
🍺  /usr/local/Cellar/libev/4.33: 12 files, 484.0KB
==> Installing hyperkit
==> Pouring hyperkit--0.20200908.catalina.bottle.tar.gz
🍺  /usr/local/Cellar/hyperkit/0.20200908: 5 files, 4.3MB
If you don’t have homebrew or wish to compile it yourself, you can follow the steps on the github page:
$ git clone https://github.com/moby/hyperkit
$ cd hyperkit
$ make
there are more steps to enable qcow with opam. qcow/qcow2 images are often used with qemu which i last used for Pebble watch emulation. I would think for minikube, those steps won’t harm you, but aren’t neccessary for our x86 minikube install.
I’ll install minikube with homebrew:
$ brew install minikube
==> Downloading https://ghcr.io/v2/homebrew/core/kubernetes-cli/manifests/1.22.2
######################################################################## 100.0%
==> Downloading https://ghcr.io/v2/homebrew/core/kubernetes-cli/blobs/sha256:2c7bf6d0518f32822dabfe86c0c7a6fd54130024c2e632a0182e70ca4b3d1ab9
==> Downloading from https://pkg-containers.githubusercontent.com/ghcr1/blobs/sha256:2c7bf6d0518f32822dabfe86c0c7a6fd54130024c2e632a0182e70ca4b3d1ab9?se=2021-1
######################################################################## 100.0%
==> Downloading https://ghcr.io/v2/homebrew/core/minikube/manifests/1.23.2
######################################################################## 100.0%
==> Downloading https://ghcr.io/v2/homebrew/core/minikube/blobs/sha256:0f123e76f821fa427496a1d73551cdcd5c4b7cc74c3d6c8fb45f6259fd17635e
==> Downloading from https://pkg-containers.githubusercontent.com/ghcr1/blobs/sha256:0f123e76f821fa427496a1d73551cdcd5c4b7cc74c3d6c8fb45f6259fd17635e?se=2021-1
######################################################################## 100.0%
==> Installing dependencies for minikube: kubernetes-cli
==> Installing minikube dependency: kubernetes-cli
==> Pouring kubernetes-cli--1.22.2.big_sur.bottle.tar.gz
🍺  /usr/local/Cellar/kubernetes-cli/1.22.2: 226 files, 57.5MB
==> Installing minikube
==> Pouring minikube--1.23.2.big_sur.bottle.tar.gz
==> Caveats
Bash completion has been installed to:
  /usr/local/etc/bash_completion.d
==> Summary
🍺  /usr/local/Cellar/minikube/1.23.2: 9 files, 68.7MB
==> Caveats
==> minikube
Bash completion has been installed to:
  /usr/local/etc/bash_completion.d
then start minikube with the hyperkit backend
$ minikube start --driver=hyperkit
😄  minikube v1.23.2 on Darwin 11.6
✨  Using the hyperkit driver based on user configuration
💾  Downloading driver docker-machine-driver-hyperkit:
    > docker-machine-driver-hyper...: 65 B / 65 B [----------] 100.00% ? p/s 0s
    > docker-machine-driver-hyper...: 10.53 MiB / 10.53 MiB  100.00% 43.33 MiB
🔑  The 'hyperkit' driver requires elevated permissions. The following commands will be executed:

    $ sudo chown root:wheel /Users/johnisa/.minikube/bin/docker-machine-driver-hyperkit
    $ sudo chmod u+s /Users/johnisa/.minikube/bin/docker-machine-driver-hyperkit


Password:
💿  Downloading VM boot image ...
    > minikube-v1.23.1.iso.sha256: 65 B / 65 B [-------------] 100.00% ? p/s 0s
    > minikube-v1.23.1.iso: 225.22 MiB / 225.22 MiB [ 100.00% 20.86 MiB p/s 11s
👍  Starting control plane node minikube in cluster minikube
💾  Downloading Kubernetes v1.22.2 preload ...
    > preloaded-images-k8s-v13-v1...: 511.84 MiB / 511.84 MiB  100.00% 38.75 Mi
🔥  Creating hyperkit VM (CPUs=2, Memory=4000MB, Disk=20000MB) ...
❗  This VM is having trouble accessing https://k8s.gcr.io
💡  To pull new external images, you may need to configure a proxy: https://minikube.sigs.k8s.io/docs/reference/networking/proxy/
🐳  Preparing Kubernetes v1.22.2 on Docker 20.10.8 ...
    ▪ Generating certificates and keys ...
    ▪ Booting up control plane ...
    ▪ Configuring RBAC rules ...
🔎  Verifying Kubernetes components...
    ▪ Using image gcr.io/k8s-minikube/storage-provisioner:v5
🌟  Enabled addons: storage-provisioner, default-storageclass
🏄  Done! kubectl is now configured to use "minikube" cluster and "default" namespace by default
setting up Minikube
chrmacjohnisa:jekyll-blog johnisa$ cat ~/.kube/config | grep server
    server: https://192.168.64.2:8443
chrmacjohnisa:jekyll-blog johnisa$ export DOCKER_TLS_VERIFY=1
chrmacjohnisa:jekyll-blog johnisa$ export DOCKER_HOST=tcp://192.168.64.2:2376
chrmacjohnisa:jekyll-blog johnisa$ export MINIKUBE_ACTIVE_DOCKERD=minikube
chrmacjohnisa:jekyll-blog johnisa$ vi ~/.kube/config
chrmacjohnisa:jekyll-blog johnisa$ export DOCKER_CERT_PATH=/Users/johnisa/.minikube/
If you need the docker client, you can use brew for that:
$ brew install docker
Warning: Treating docker as a formula. For the cask, use homebrew/cask/docker
==> Downloading https://ghcr.io/v2/homebrew/core/docker/manifests/20.10.9
######################################################################## 100.0%
==> Downloading https://ghcr.io/v2/homebrew/core/docker/blobs/sha256:f0cf1c8352a7172bdbbc28d7c16f4b5f91f65dad382abe76b99a7622b0fd3659
==> Downloading from https://pkg-containers.githubusercontent.com/ghcr1/blobs/sha256:f0cf1c8352a7172bdbbc28d7c16f4b5f91f65dad382abe76b99a7622b0fd3659?se=2021-1
######################################################################## 100.0%
==> Pouring docker--20.10.9.big_sur.bottle.tar.gz
==> Caveats
Bash completion has been installed to:
  /usr/local/etc/bash_completion.d
==> Summary
🍺  /usr/local/Cellar/docker/20.10.9: 12 files, 56.8MB
Now we can test in much the same way as before:
$ docker ps
CONTAINER ID   IMAGE                  COMMAND                  CREATED          STATUS          PORTS     NAMES
570c7c93d9cb   6e38f40d628d           "/storage-provisioner"   13 minutes ago   Up 13 minutes             k8s_storage-provisioner_storage-provisioner_kube-system_0d5abcd3-21cc-4dd8-8778-8770c0283446_1
810d84e3ca14   8d147537fb7d           "/coredns -conf /etc…"   13 minutes ago   Up 13 minutes             k8s_coredns_coredns-78fcd69978-7kctr_kube-system_4bdea130-39ca-4804-b323-96b9b9f3681d_0
8c4de9019c54   873127efbc8a           "/usr/local/bin/kube…"   13 minutes ago   Up 13 minutes             k8s_kube-proxy_kube-proxy-cvhkp_kube-system_48799f2c-89fe-4eeb-be98-8bd3e8d1d213_0
7ff6f070a73d   k8s.gcr.io/pause:3.5   "/pause"                 13 minutes ago   Up 13 minutes             k8s_POD_coredns-78fcd69978-7kctr_kube-system_4bdea130-39ca-4804-b323-96b9b9f3681d_0
a543fbd3eb7e   k8s.gcr.io/pause:3.5   "/pause"                 13 minutes ago   Up 13 minutes             k8s_POD_kube-proxy-cvhkp_kube-system_48799f2c-89fe-4eeb-be98-8bd3e8d1d213_0
b2167ee3600e   k8s.gcr.io/pause:3.5   "/pause"                 13 minutes ago   Up 13 minutes             k8s_POD_storage-provisioner_kube-system_0d5abcd3-21cc-4dd8-8778-8770c0283446_0
12694443b784   b51ddc1014b0           "kube-scheduler --au…"   14 minutes ago   Up 14 minutes             k8s_kube-scheduler_kube-scheduler-minikube_kube-system_97bca4cd66281ad2157a6a68956c4fa5_0
bd8535fd4dea   004811815584           "etcd --advertise-cl…"   14 minutes ago   Up 14 minutes             k8s_etcd_etcd-minikube_kube-system_911c6f255a373704eb5467fbcba00e71_0
832e2c31badd   5425bcbd23c5           "kube-controller-man…"   14 minutes ago   Up 14 minutes             k8s_kube-controller-manager_kube-controller-manager-minikube_kube-system_20326866d8a92c47afe958577e1a8179_0
6ab813dc3810   e64579b7d886           "kube-apiserver --ad…"   14 minutes ago   Up 14 minutes             k8s_kube-apiserver_kube-apiserver-minikube_kube-system_6f3a88bb8d2ad4abe06ffbeb687149ba_0
ab0168715503   k8s.gcr.io/pause:3.5   "/pause"                 14 minutes ago   Up 14 minutes             k8s_POD_etcd-minikube_kube-system_911c6f255a373704eb5467fbcba00e71_0
71278b161972   k8s.gcr.io/pause:3.5   "/pause"                 14 minutes ago   Up 14 minutes             k8s_POD_kube-scheduler-minikube_kube-system_97bca4cd66281ad2157a6a68956c4fa5_0
8eda7b45c836   k8s.gcr.io/pause:3.5   "/pause"                 14 minutes ago   Up 14 minutes             k8s_POD_kube-controller-manager-minikube_kube-system_20326866d8a92c47afe958577e1a8179_0
6f6773159e07   k8s.gcr.io/pause:3.5   "/pause"                 14 minutes ago   Up 14 minutes             k8s_POD_kube-apiserver-minikube_kube-system_6f3a88bb8d2ad4abe06ffbeb687149ba_0
If we wish to view the VM started with Hyperkit, we can use ps for that:
$ ps -Af | grep hyperkit
    0  9815     1   0  8:30PM ttys000   12:20.96 /usr/local/bin/hyperkit -A -u -F /Users/johnisa/.minikube/machines/minikube/hyperkit.pid -c 2 -m 4000M -s 0:0,hostbridge -s 31,lpc -s 1:0,virtio-net -U 29d4094e-270e-11ec-9ac8-acde48001122 -s 2:0,virtio-blk,/Users/johnisa/.minikube/machines/minikube/minikube.rawdisk -s 3,ahci-cd,/Users/johnisa/.minikube/machines/minikube/boot2docker.iso -s 4,virtio-rnd -l com1,autopty=/Users/johnisa/.minikube/machines/minikube/tty,log=/Users/johnisa/.minikube/machines/minikube/console-ring -f kexec,/Users/johnisa/.minikube/machines/minikube/bzimage,/Users/johnisa/.minikube/machines/minikube/initrd,earlyprintk=serial loglevel=3 console=ttyS0 console=tty0 noembed nomodeset norestore waitusb=10 systemd.legacy_systemd_cgroup_controller=yes random.trust_cpu=on hw_rng_model=virtio base host=minikube
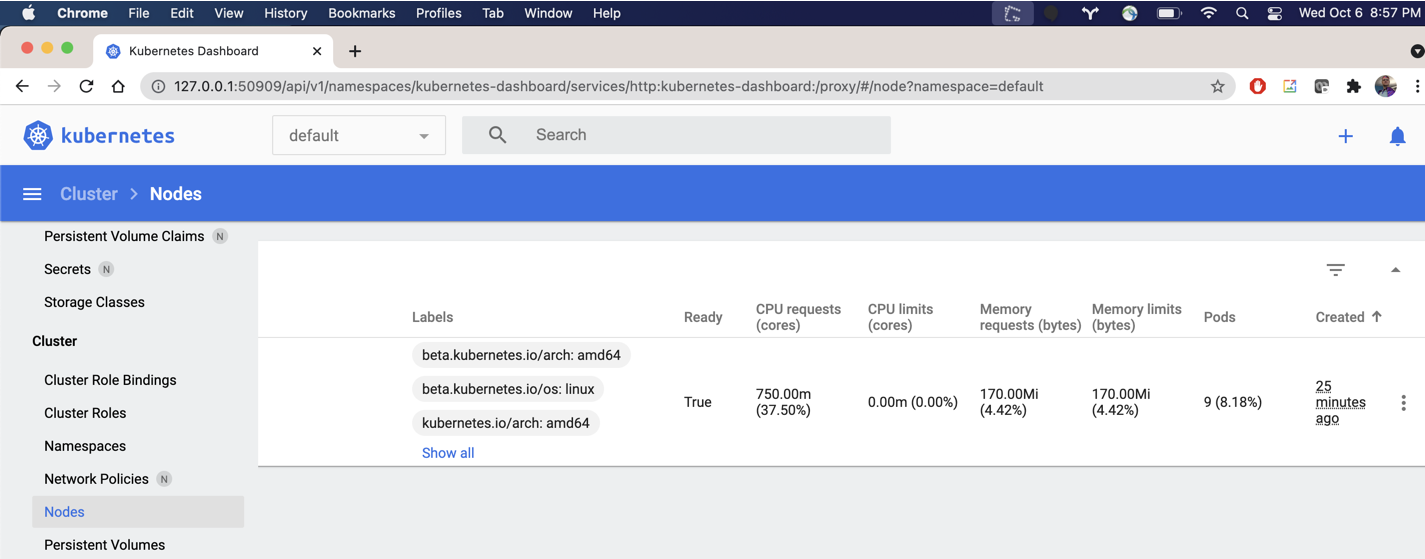
We can view the dashboard from minikube on the mac as well:
$ minikube dashboard --url
🤔  Verifying dashboard health ...
🚀  Launching proxy ...
🤔  Verifying proxy health ...
http://127.0.0.1:50909/api/v1/namespaces/kubernetes-dashboard/services/http:kubernetes-dashboard:/proxy/
Docker in K8s
There is another odd end-case. Using a local K8s cluster to engage with Docker running on a different host via Hyper-V.
We can follow the guide here to make a quick Docker-in-Docker pod:
Create the DinD pod:
$ cat k8s-dind.yaml
apiVersion: v1
kind: Pod
metadata:
    name: dind
spec:
    containers:
      - name: docker-cmds
        image: docker:1.12.6
        command: ['docker', 'run', '-p', '80:80', 'httpd:latest']
        resources:
            requests:
                cpu: 10m
                memory: 256Mi
        env:
          - name: DOCKER_HOST
            value: tcp://localhost:2375
      - name: dind-daemon
        image: docker:1.12.6-dind
        resources:
            requests:
                cpu: 20m
                memory: 512Mi
        securityContext:
            privileged: true
        volumeMounts:
          - name: docker-graph-storage
            mountPath: /var/lib/docker
    volumes:
      - name: docker-graph-storage
        emptyDir: {}

$ kubectl apply -f k8s-dind.yaml
pod/dind created
Set the env vars, including a path to local certs:
builder@DESKTOP-QADGF36:~/Workspaces/jekyll-blog$ kubectl exec -it dind -- /bin/sh
Defaulted container "docker-cmds" out of: docker-cmds, dind-daemon
/ # docker ps
CONTAINER ID        IMAGE               COMMAND             CREATED             STATUS              PORTS               NAMES
/ # export DOCKER_TLS_VERIFY=1
/ # export DOCKER_HOST=tcp://192.168.1.87:2376
/ # export MINIKUBE_ACTIVE_DOCKERD=minikube
/ # export DOCKER_CERT_PATH=/tmp/certs
Then I had to copy over my certs:
/ # cat t.sh
#!/bin/sh

cd /tmp/certs/
umask 0002


echo LS0tLS1CRUdJTiBDRasdfasfasdfasdfsadfsadfasdfasdfasdfS0tLS0K | base64 -d > ca.pem

echo LS0tLS1CRasdfasdfasdfasdfasdfasdfasdfasdfsadfsadfLS0K | base64 -d > cert.pem

echo LS0tLasdfasdfasdfasdfasdfasdfasdfasdf0tCg== | base64 -d > key.pem

echo LS0tasdfasdfasdfasdfasdfasdfasdfsadfasdfasdfasdfS0tCg== | base64 -d > ca-key.pem
Then i could do docker commands on my k3s cluster against the laptop running minikub in hyper-v
/ # docker ps
CONTAINER ID        IMAGE                  COMMAND                  CREATED             STATUS              PORTS               NAMES
c7ff3d798e35        6e38f40d628d           "/storage-provisioner"   20 minutes ago      Up 20 minutes                           k8s_storage-provisioner_storage-provisioner_kube-system_dd8d5f1f-d59c-407b-847f-e1ab773a9bc3_1267
cfc6d4d4e6f1        e1482a24335a           "/dashboard --insecur"   21 minutes ago      Up 21 minutes                           k8s_kubernetes-dashboard_kubernetes-dashboard-654cf69797-9z5dj_kubernetes-dashboard_ff30b73f-4ce3-4d2c-969c-2f05b8dfec9b_2
542e41323112        8d147537fb7d           "/coredns -conf /etc/"   21 minutes ago      Up 21 minutes                           k8s_coredns_coredns-78fcd69978-4s9gp_kube-system_799a47c4-2831-4d2d-a02a-55a42c3de657_4
fa8073701585        7801cfc6d5c0           "/metrics-sidecar"       21 minutes ago      Up 21 minutes                           k8s_dashboard-metrics-scraper_dashboard-metrics-scraper-5594458c94-lbvqk_kubernetes-dashboard_7f951009-05c4-44a7-9887-fccea6a71e41_1
Problems
One issue I experienced often was minikube not coming back from sleep.
I often slap my laptop closed and come back later. However, i would experience the issue that minikube lost it’s IP address. Resetting the Hyper-V VM did re-establish it, but then docker was down.
c:\Users\isaac\Downloads>docker images
error during connect: Get https://192.168.1.87:2376/v1.40/images/json: dial tcp 192.168.1.87:2376: connectex: No connection could be made because the target machine actively refused it.
I could reset it with “minikube start” on the Administrator command prompt. But this took time as it wanted to check for updates.
c:\Users\isaac\Downloads>minikube start
* minikube v1.23.2 on Microsoft Windows 10 Pro 10.0.19042 Build 19042
  - MINIKUBE_ACTIVE_DOCKERD=minikube
* Using the hyperv driver based on existing profile
* Starting control plane node minikube in cluster minikube
* Updating the running hyperv "minikube" VM ...
* Preparing Kubernetes v1.22.2 on Docker 20.10.8 ...
* Verifying Kubernetes components...
  - Using image gcr.io/k8s-minikube/storage-provisioner:v5
  - Using image kubernetesui/metrics-scraper:v1.0.7
  - Using image kubernetesui/dashboard:v2.3.1
* Enabled addons: storage-provisioner, default-storageclass, dashboard
* Done! kubectl is now configured to use "minikube" cluster and "default" namespace by default

c:\Users\isaac\Downloads>docker images
REPOSITORY                                TAG                 IMAGE ID            CREATED             SIZE
idjhello3                                 latest              0108edd46e95        14 hours ago        5.6MB
This is not a blocking issue, more of an inconvenience.
Summary
We explored using Minikube via Hyper-V to provide all the functionality that Docker Desktop offers us today. We used the Docker backend in Windows and Linux (WSL). We even showed how to use it in yet-another Kubernetes in the same WAN as well as on a different hardware architecture (armhf) with a Raspberry Pi.
We talked about the pitfalls (coming up from sleep and nuances in the virtual switch) and the advantages (having a full k8s cluster with dashboard and being in full license compliance, that is, getting it for free).
I might run Minikube on a host that run continuously locally so as not to deal with sleep mode on the laptop. I also think Docker Desktop might be a superior offering when using Windows 10 Home (that doesn’t expose Hyper-V). As it stands, all my machines use Windows 10 Pro so that doesn’t apply.
Let me Soap Box a bit (let the old man rant)…
Docker Desktop is a good product. It is. For the longest time Docker has acted like Sun: build it and we’ll figure out how to make money later.
In much the same way, as earlier pioneers, they had the lead on container scheduling with Swarm.
I think back to the 90s and in a similar way, Sun machines were the Web. They were the web servers most used at the start. I recall dismantling a MicroSparc and was amazed by the elegance of design. And when the dotcom bubble burst and sales were decimated in 2004, Sun scrambled to find profit. In 2005 they even explored making a Grid computer (Sun Grid). Unlike my former employer, Control Data, Sun never gave up hardware hopes.. they just couldnt seem to find a way to turn a profit on the one free thing we all used: Java.
By 2008, Sun was in a tailspin laying off nearly 18% of it’s workforce and grasping at straws. Oracle consumed them in 2009 and well, I won’t speak on what happened after. But Oracle, with all the finesse of SCO, has it’s own use for Sun IP.
Circling back to Docker. Docker likewise had a great product with a rich interface and container offering. And had Swarm taken off, they might have a solid way forward. But when Swarm fell behind Kubernetes, they sold it off to Mirantis. Now, they have the name and a great desktop client, but it’s offered for free. Thus they now are demanding companies of size (more than 250, at the time of this writing) start to pay for the client (see their blog.)
They may be successfull, but the genie is out of the bottle. Much like Open-source Java has moved on after Oracle (if you use Azure, you’ll note the Java is ‘Zulu’, not ‘Oracle JDK’ by default). The Open Container Initiative is taking the care and feeding of future Docker Containers out of Dockers hands. The removal of the Docker runtime from kubernetes last year futhered the isolation of Docker as a commercial product.
Docker is not dead. It might very well be swallowed up by a big company like Amazon, Google or Microsoft if they cannot dance their way to profit. Perhaps Apple will see it as way to further dev cred the way i suspect Microsoft did when they bought out Github. Other companies have pivotted successfully. I think of Perforce in that way, seeing their Revision Control System faltering to GIT they moved to buy many many products and start to form comprehensive suites.
Backstroy on the cover image
The Arthur M. Anderson is a 767ft ship that drafts 27ft and can haul 25k tons. It was launched in 1952, named after the then VP of Finace of JP Morgan.
It was one of the first on the scene and the last to be in contact with the ill-fated Edmund Fitzgerald.
This ship is nearly 70 years old. It was grounded in 2001 near Port Inland, MI. Then, in 2003, it stuck it’s bulkhead naer Green Bay at Fox River. Most recently, it was caught up in 2015 in thick ice in Lake Erie. That could have been the end, but it was freed after five days and sent to dock at Fraser Shipyards for 4 years and brought back in service in 2019.
The reason i used this image was to say, things can pivot. Not all old ships just get cut for scrap. Docker has served us well. It could come back, and like the merchant marines on the Arthur M. Anderson, serve customers and crew for many many more years.


