

Published: Aug 19, 2019 by Isaac Johnson
Aspen Meshis a supported distribution of Istio with hosted Graphana and Prometheus among other features. It has an “Enterprise” offering “coming soon” but for now has a free public beta. I became aware of it from an advert and it wanted to take it for a spin on a DigitalOcean k8s cluster.
Setup
After signing up, you’ll get a login to use on their portal:

The next page will let you schedule a call if you desire, but let’s skip that and go to docs and getting started to install the demo app.


Which will point us to running:
bash <(curl -Ls https://aspenmesh.io/install)
Let’s pause here to create a quick cluster. Since we are doing it graphically for Aspen Mesh, let’s just use the UI in Digital Oceanto spin a small k8s cluster:

Make sure to give a healthy amount of memory for service mesh;

Then create the cluster:

When it’s done, you can follow the getting started to get the kubeconfig (also in Actions dropdown, Download config)
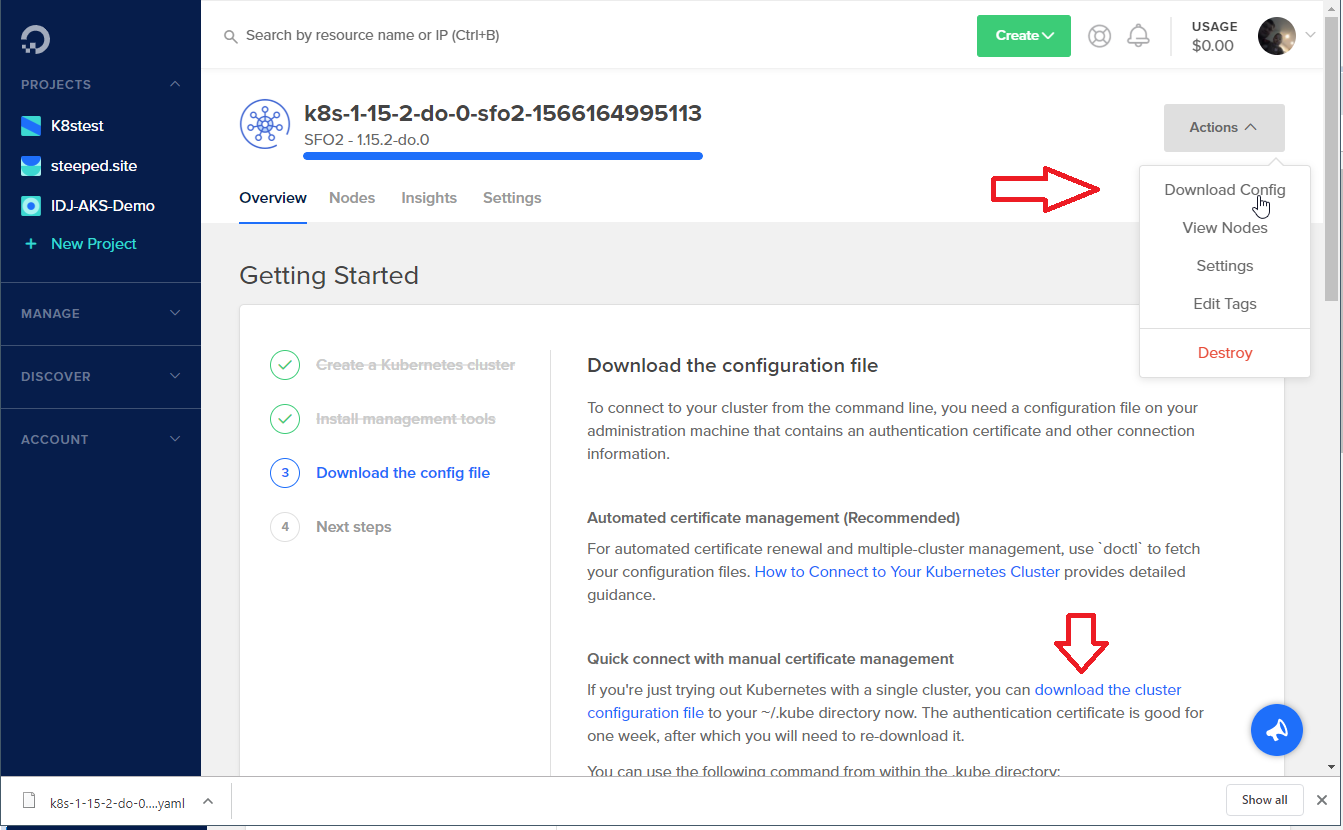
We can continue to use the config by setting an env var or passing it in (e.g. –kubeconfig=”~/Downloads/k8s-1-15-2-do-0-sfo2-1566164995113-kubeconfig.yaml). But i prefer to just copy it into the local location and keep it simple.

Getting Kubectl setup on Linux
You can use this guide (https://kubernetes.io/docs/tasks/tools/install-kubectl/) Or we can install via the Azure CLI.
Let’s get a blank WSL instance updated (because even though im on windows at the moment, i like some good old fashioned bash): https://docs.microsoft.com/en-us/cli/azure/install-azure-cli-apt?view=azure-cli-latest
$ sudo apt-get update
$ curl -sL https://aka.ms/InstallAzureCLIDeb | sudo bash
$ sudo az aks install-cli
Downloading client to "/usr/local/bin/kubectl" from "https://storage.googleapis.com/kubernetes-release/release/v1.15.2/bin/linux/amd64/kubectl"
Please ensure that /usr/local/bin is in your search PATH, so the `kubectl` command can be found.
$ export KUBECONFIG="/mnt/c/Users/isaac/Downloads/k8s-1-15-2-do-0-sfo2-1566164995113-kubeconfig.yaml"
e.g.

Installing Aspen Mesh:
First try, WSL:

Let’s try git bash:

Circling back on WSL, i decided to try as root:
builder@DESKTOP-JBA79RT:/mnt/c/WINDOWS/system32$ sudo su --
root@DESKTOP-JBA79RT:/mnt/c/WINDOWS/system32# cd ..
root@DESKTOP-JBA79RT:/mnt/c/WINDOWS# cd ..
root@DESKTOP-JBA79RT:/mnt/c# mkdir root
root@DESKTOP-JBA79RT:/mnt/c# cd root
root@DESKTOP-JBA79RT:/mnt/c/root# bash <(curl -Ls https://aspenmesh.io/install)

This is the Aspen Mesh installer. This script is intended to help you
get started using our product by performing the following actions.

  * Download the Aspen Mesh installer for your operating system
  * The download installer will:
    * Gather some information about your Aspen Mesh account and cluster
    * Install Aspen Mesh Enterprise Service Mesh in your Kubernetes Cluster
    * Configure and connect the Aspen Mesh agent to our hosted SaaS portal
    * Install a demo application that can be visualized in our SaaS portal

To continue press [ENTER]

  Checking for curl executable [OK]

Downloading Aspen Mesh executable installer [OK]
Running Aspen Mesh executable installer
Aspen Mesh Installer Version: am-installer-f471796
Enter the email address you used to register with Aspen Mesh:
This just means they really should be suggesting to people to use:
$ curl -Ls https://aspenmesh.io/install | sudo bash

(note: i figured out a password issue after the fact so i had Aspen running - the installer detected this and uninstalled for me)
When done we’ll have a demo app and new cluster info

The sample app as listed above: http://138.68.37.170:80/productpage

Manual Install
First we verified that admissionregistration is on:
builder@DESKTOP-JBA79RT:/mnt/c/Users/isaac/bash$ kubectl api-versions | grep admissionregistration
admissionregistration.k8s.io/v1beta1
Then we downloaded the linux version from : https://my.aspenmesh.io/client/dashboard/docs/releases/
$ cp ../Downloads/aspenmesh-1.1.10-am2-linux.tar.gz ./
$ tar -xzvf aspenmesh-1.1.10-am2-linux.tar.gz
$ export PATH=/mnt/c/Users/isaac/bash/aspenmesh-1.1.10-am2/bin:$PATH
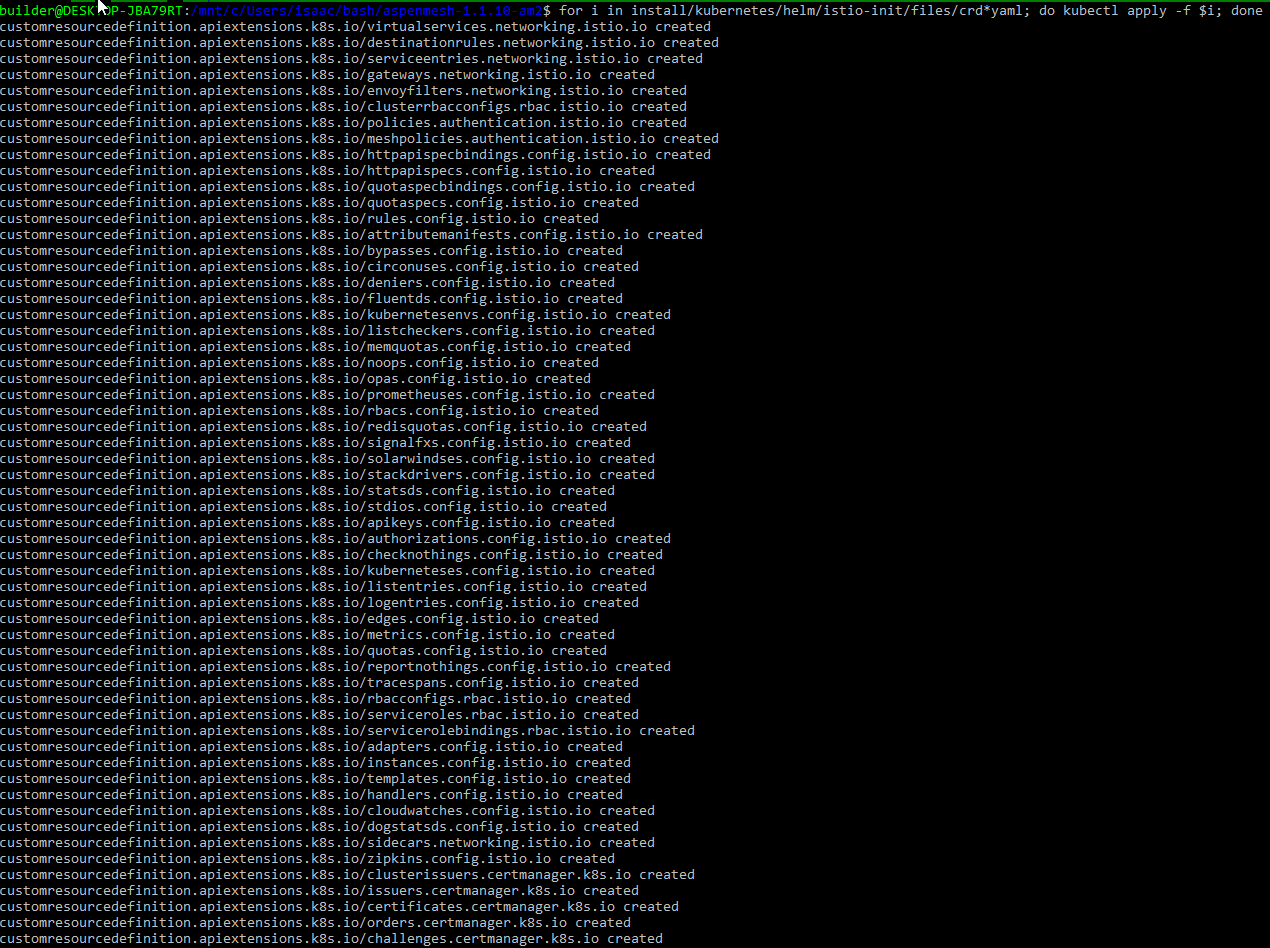
Then cd to the extracted directory and install the CRDs:

This will scroll for a while
Next, we install Aspen Mesh (Istio, agent and Prometheus):
$ kubectl apply -f install/kubernetes/aspenmesh-auth.yaml
Then we get the cluster info from our dashboard:

And apply that:
$ kubectl create secret generic aspenmesh --namespace istio-system --from-literal=TOKEN=2a7ef2e6021197xxxxxxxxxxxxxxxxxxxxxxxxxxxxxxxxxxxxba4c --from-literal=CLUSTER_NAME=gauche-aardwolf
secret/aspenmesh created
Verification
Check that services are running with the following:
$ kubectl -n istio-system get svc,deployment -listio

We can also go to the dashboard to see our Mesh Health:

https://my.aspenmesh.io/client/dashboard/mesh-health/
Viewing information.
Having installed a sample app via the installer, our Mesh Health status now lists pods in mesh:

We can also see the namespaces with Istio injection via kubectl as well:
builder@DESKTOP-JBA79RT:/mnt/c/Users/isaac/bash$ kubectl get namespace -L istio-injection
NAME STATUS AGE ISTIO-INJECTION
default Active 78m enabled
istio-system Active 39m disabled
kube-node-lease Active 78m
kube-public Active 78m
kube-system Active 78m
builder@DESKTOP-JBA79RT:/mnt/c/Users/isaac/bash$ kubectl get pods -n default
NAME READY STATUS RESTARTS AGE
details-v1-654ff47b98-2h9mx 2/2 Running 0 38m
productpage-v1-59f6c775dd-4p5sl 2/2 Running 0 38m
ratings-v1-67d8456b6-zxbsv 2/2 Running 0 38m
reviews-v1-9fc498cf9-j2sts 2/2 Running 0 38m
reviews-v2-5d95588945-xd7mv 2/2 Running 0 38m
reviews-v3-5f47997bd7-vdz2j 2/2 Running 0 38m
traffic-generator-productpage-7cdb7c89f4-d5n7k 1/1 Running 0 37m
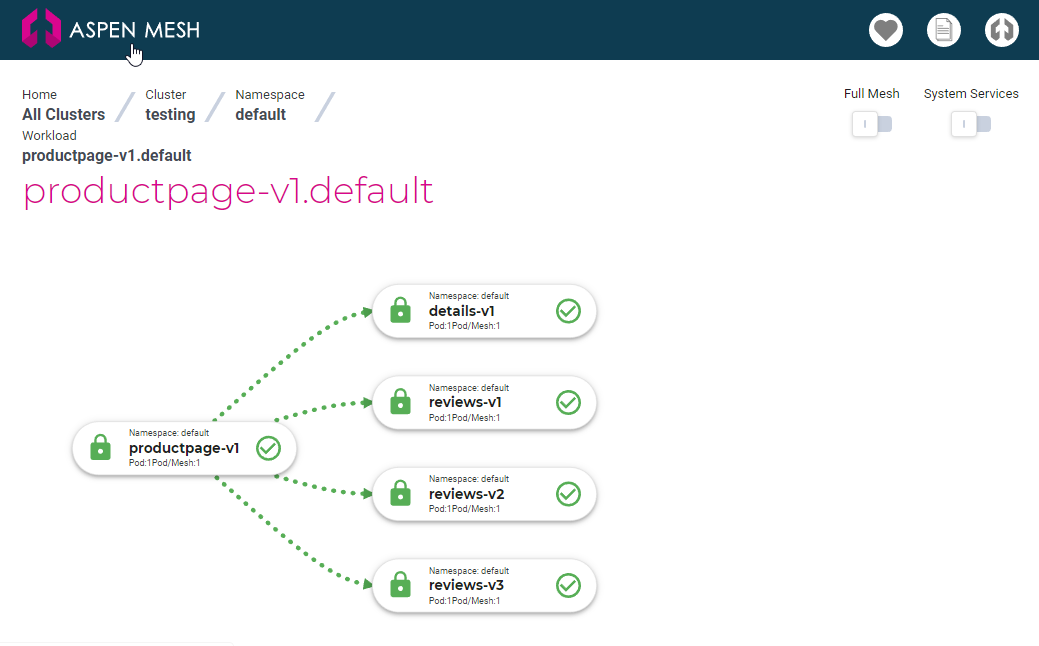
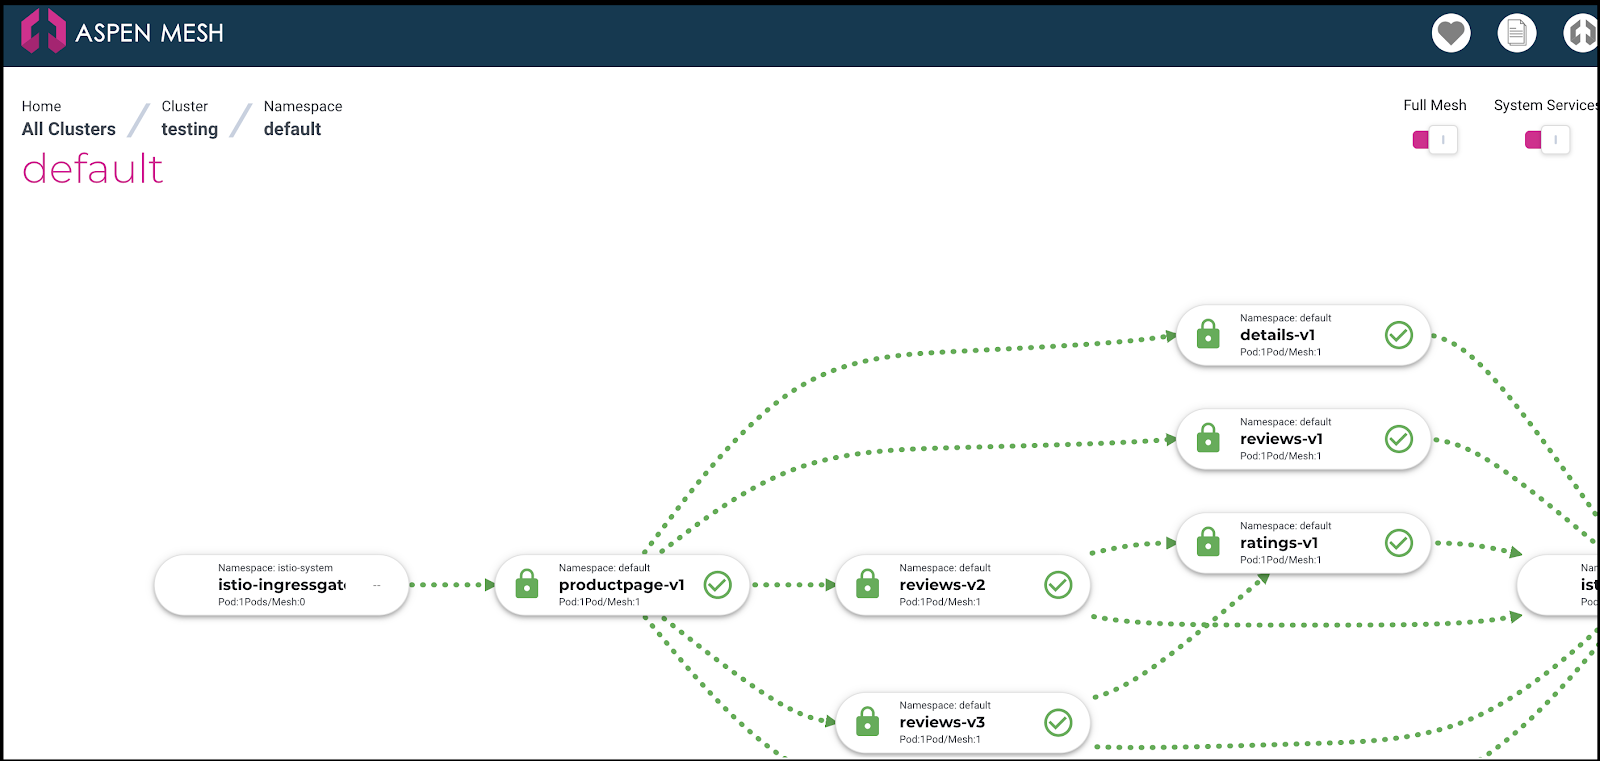
Another nice feature of Aspen is the namespace view:

This let’s us dig to the pod level to investigate which pods are tied to others:
If we click the green check on a pod, we can see details on pod health:
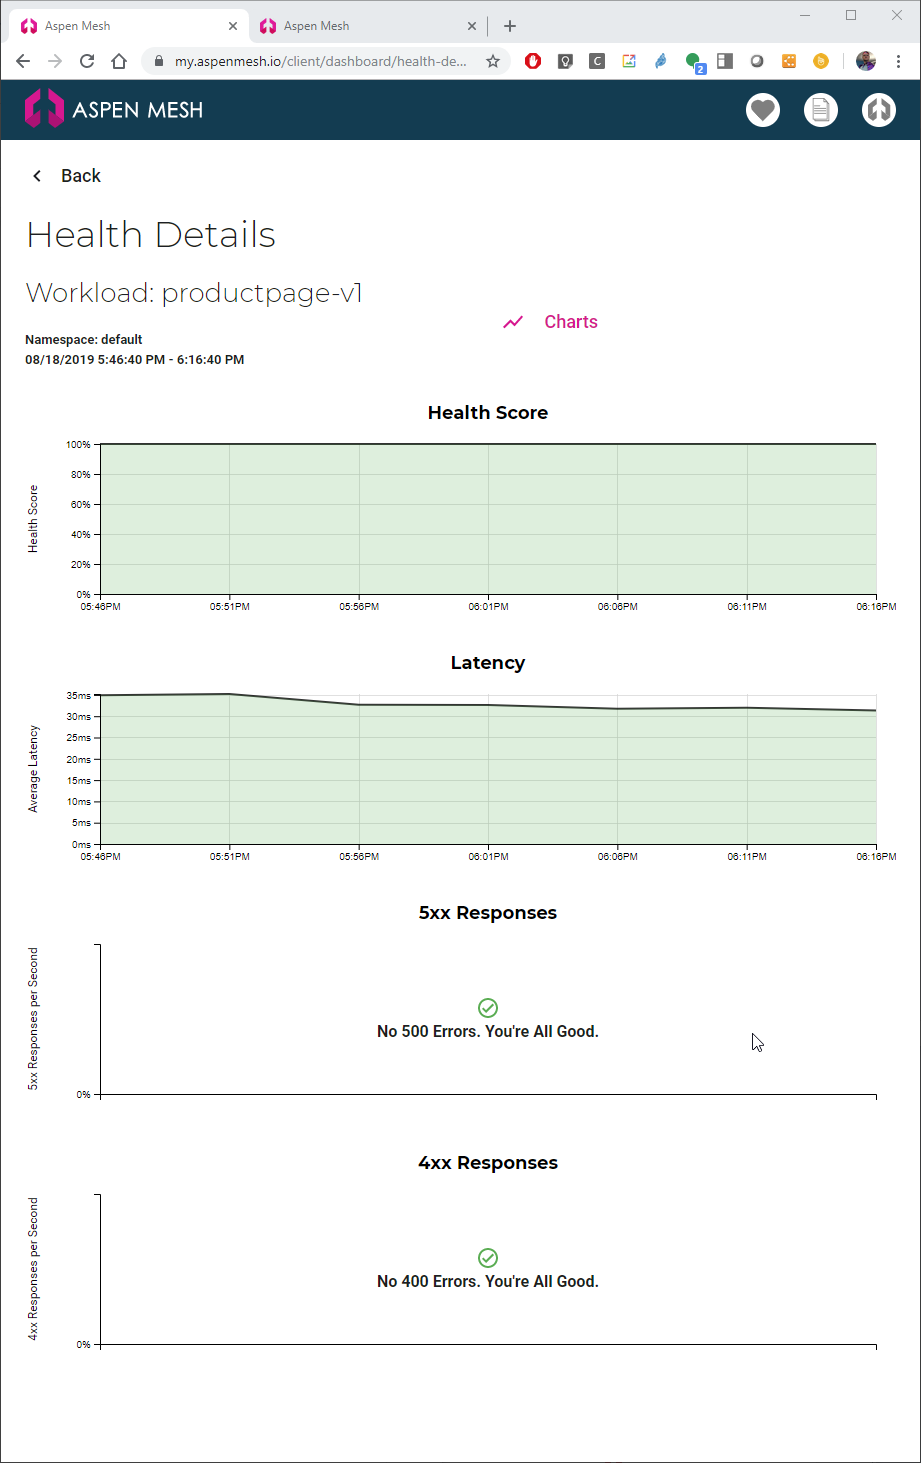
Clicking the pink charts icon links us to hosted Grafana charts as well:


One can also link Aspen with Okta for SSO (https://my.aspenmesh.io/client/dashboard/docs/okta-sso/)
mTLS is a feature of Aspen Mesh enabled by default.
We can see Istio auth is installed:
builder@DESKTOP-JBA79RT:/mnt/c/Users/isaac/bash$ kubectl api-versions | grep authentication
authentication.istio.io/v1alpha1
And again, by checking MeshPolicies applied:
$ kubectl get MeshPolicy default -o yaml
apiVersion: authentication.istio.io/v1alpha1
kind: MeshPolicy
metadata:
  annotations:
    kubectl.kubernetes.io/last-applied-configuration: |
      {"apiVersion":"authentication.istio.io/v1alpha1","kind":"MeshPolicy","metadata":{"annotations":{},"labels":{"app":"security","chart":"security","heritage":"Tiller","release":"aspenmesh-auth-1.1.10-am2"},"name":"default","namespace":""},"spec":{"peers":[{"mtls":{}}]}}
  creationTimestamp: "2019-08-18T22:24:55Z"
  generation: 1
  labels:
    app: security
    chart: security
    heritage: Tiller
    release: aspenmesh-auth-1.1.10-am2
  name: default
  resourceVersion: "4228"
  selfLink: /apis/authentication.istio.io/v1alpha1/meshpolicies/default
  uid: 088a7490-d5bc-43e9-87db-1f871bd31c4a
spec:
  peers:
  - mtls: {}
Istio-vet
Istio-vet is their Istio validation tool that is open-sourced: The istio-vet tool is a utility to validate the configuration of Istio and user applications installed in a Kubernetes cluster.
$ git clone https://github.com/aspenmesh/istio-vet.git
Cloning into 'istio-vet'...
remote: Enumerating objects: 42, done.
remote: Counting objects: 100% (42/42), done.
remote: Compressing objects: 100% (29/29), done.
remote: Total 865 (delta 14), reused 28 (delta 10), pack-reused 823
Receiving objects: 100% (865/865), 251.66 KiB | 368.00 KiB/s, done.
Resolving deltas: 100% (490/490), done.
$ cd istio-vet/
$ kubectl apply -f install/kubernetes/istio-vet.yaml

clusterrole.rbac.authorization.k8s.io/istio-vet-istio-system created
clusterrolebinding.rbac.authorization.k8s.io/istio-vet-istio-system created
serviceaccount/istio-vet-service-account created
job.batch/istio-vet created

$ kubectl -n istio-system logs -l "app=istio-vet" --tail=0
AHD-MBP13-048:istio-vet isaac.johnson$
AKS with AAD RBAC
The question then became, how might this work in an RBAC enabled AKS cluster.
$ bash <(curl -Ls https://aspenmesh.io/install)
This is the Aspen Mesh installer. This script is intended to help you
get started using our product by performing the following actions.

  * Download the Aspen Mesh installer for your operating system
  * The download installer will:
    * Gather some information about your Aspen Mesh account and cluster
    * Install Aspen Mesh Enterprise Service Mesh in your Kubernetes Cluster
    * Configure and connect the Aspen Mesh agent to our hosted SaaS portal
    * Install a demo application that can be visualized in our SaaS portal

To continue press [ENTER]

  Checking for curl executable [OK]

Downloading Aspen Mesh executable installer [OK]
Running Aspen Mesh executable installer
Aspen Mesh Installer Version: am-installer-f471796
Enter the email address you used to register with Aspen Mesh: isaac.johnson@thinkahead.com
Enter your Aspen Mesh password:
  Requesting Aspen Mesh auth token [OK]
  Requesting Aspen Mesh cluster info [OK]

Installing with these options:
  1 - Kubernetes configuration file [/Users/isaac.johnson/.kube/config]
  2 - Kubernetes namespace for demo application [default]
  3 - Download directory for Aspen Mesh tarball [/Users/isaac.johnson/Workspaces/aspen-aks-aad]
Does this look correct? [Y/n]: Y

Checking Kubernetes cluster prerequisites...
  Server Version: v1.12.8 [OK]
  Client Version: v1.15.2 [OK]
  Admission Control: [OK]
  # of Ready Nodes: 0
  WARNING: 4+ nodes recommended for demo app. Application may be slow to initialize...

  Existing install of Istio or Aspen Mesh: None [OK]
Installing Aspen Mesh
  Downloading software [OK]
  Extracting Aspen Mesh to temp directory [OK]
  Installing Aspen Mesh Custom Resource Definitions [OK]
  Installing Aspen Mesh in cluster [OK]
  Creating Aspen Mesh Kubernetes secrets [OK]
  Enable sidecar injection for 'default' namespace [OK]
  Verify sidecar injection enabled [OK]
Verifying Aspen Mesh deployment ..................
Creating Demo Application
  Deploying demo in the default namespace [OK]
  Verify demo is running ...............
  Adding gateway for demo app [OK]
  Verify gateway enabled [OK]
  Getting the cluster IP and port for the Traffic Generator..
  Getting the external IP and port for the Demo App
    (This may take up to 5 minutes) .............................................................
  Failed getting external IP and port; this is expected behavior for some environments
(Error: Could not determine external IP for service istio-ingressgateway)


    Aspen Mesh installation complete.

    Please log into your Aspen Mesh portal and verify:
        * The service graph is populated
        * You can see the demo application's services in the mesh


    Your demo app is available in the cluster and running at a URL matching
    http://10.0.220.176/productpage
    The service cluster IP is 10.0.220.176, but we were unable to find an EXTERNAL IP and
    PORT from your load-balancer.

    If your Kubernetes cluster has a load-balancer, check with the
    cluster administrator to diagnose why it did not assign an
    external IP to the service istio-ingressgateway in namespace istio-system.

    Otherwise, determine the external IP and port for your
    cluster then visit the url as shown above.


    If you have any questions or problems contact Aspen Mesh Support
    via email at support@aspenmesh.io

      Cleaning Up [OK]
Removing Aspen Mesh executable installation file
You’ll note that in my cluster, it couldn’t get a Public IP
It did properly track status as the DigitalOcean cluster did. However I couldn’t index other namespaces - this is likely my fault, not knowing exactly how to expand Istio indexing.
$ kubectl get namespace -L istio-injection

NAME STATUS AGE ISTIO-INJECTION
azdo Active 24d
default Active 24d enabled
devops Active 14d
istio-system Active 28m disabled
kube-public Active 24d
kube-system Active 24d
sandbox Active 14d enabled
However it does show the cluster lacks prefixes

While it was also possible to add more clusters, but I was not able to figure out how to properly index other namespaces

Summary
Aspen Mesh made it easy to install Istio including Prometheus and Grafana as well as mTLS with proper TLS certs. The hosted dashboards are handy though not entirely necessary. It was originally soft announced in 2018 during KubeCon has the enterprise Istio from F5 Networks (https://www.marketwatch.com/press-release/aspen-mesh-beta-now-available-for-microservice-infrastructures-2018-12-10).
Aspen Mesh is one of the first projects to come out of F5 Networks’ recently launched corporate incubation program aimed at developing enhanced solutions to better support modern application services, regardless of the underlying infrastructure.
It’s a promising product, albeit no clear cost model. F5 is an older company (1996) which clearly has a need to move away from its core products of physical load balancers in a cloud world.