
In our first blog entry we showed how we could create a ClickUp project, Gitlab repo and setup basic notifications. We now want to actually create a basic Oauth2 flow using NodeJS. We will create a ClickUp Integration App while showcasing the features of CU, Gitab (with GL CICD) and Google App Engine.
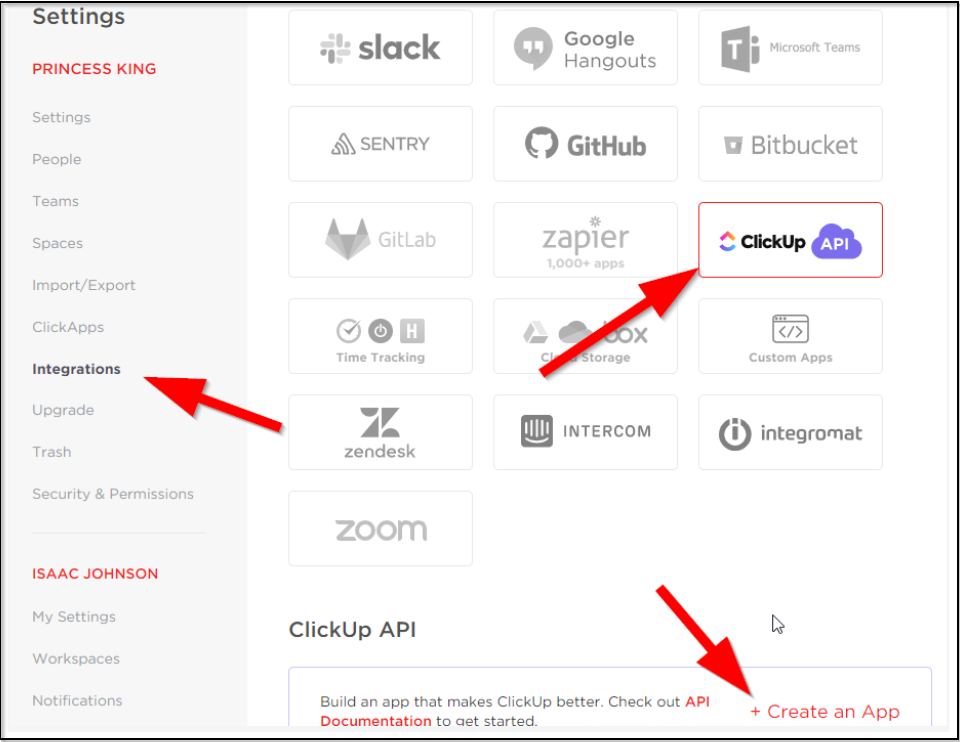
Creating an App in ClickUp
Let's go to Clickup / Create App under Custom Apps.
You can find it in Integration's ClickUp API - Create an App:

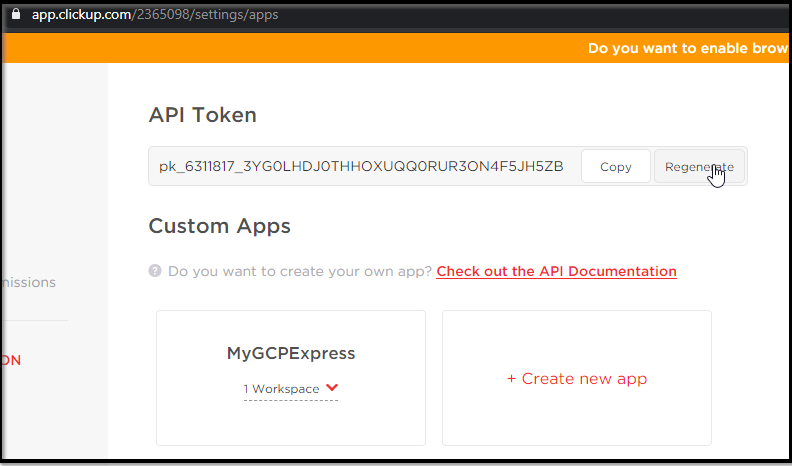
Clicking Create App will give us a Client ID and Secret (if you don't have a GCP app yet, you can put what you want. Our first test just needs the code we'll get later)
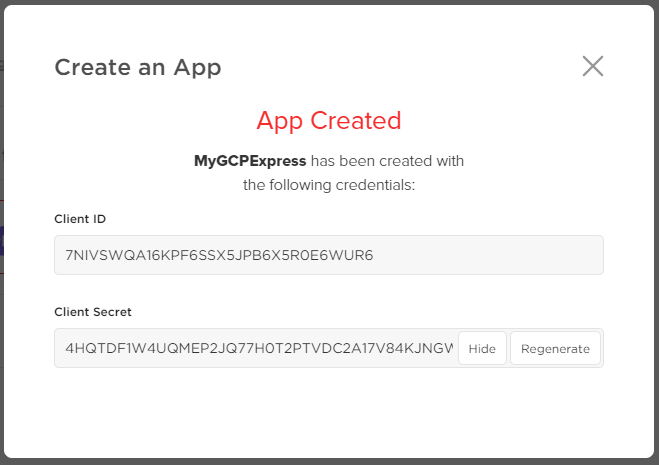
We will want to store these details for later. While the Client ID cannot be changed (without deleting), the Secret can be rotated at any point:
Client ID: 7NIVSWQA16KPF6SSX5JPB6X5R0E6WUR6
Client secret: 4HQTDF1W4UQMEP2JQ77H0T2PTVDC2A17V84KJNGWKC8NNHII51HHEOXXF8SWC6SU
Testing
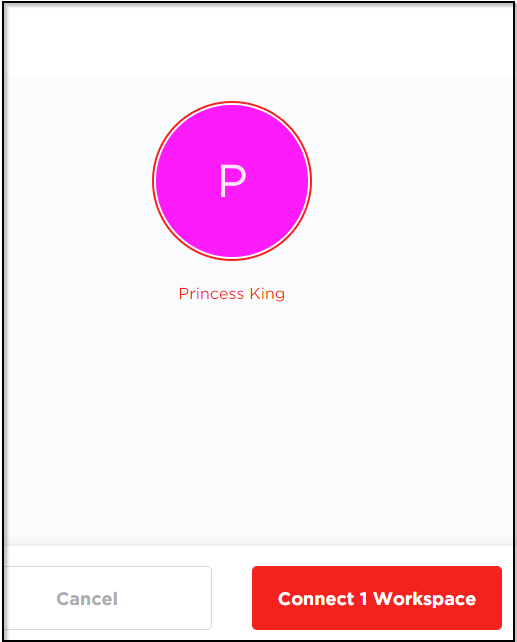
Let’s now onboard this app to our specific project (This would represent the flow from our final application)
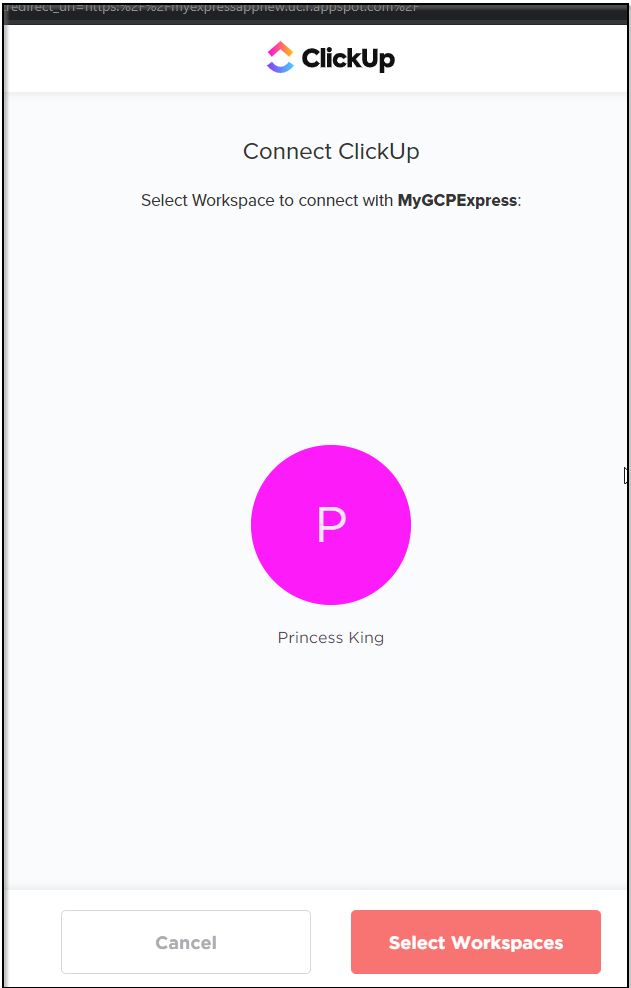
This code returned (which we can see on the URL) identifies this particular onboarding. We can pair the code with our App ID and Secret to generate a session access token.

Don't worry if at this point you don't have a GCP App running. You might very well get a 404 or error without a server. but the URL has the code= code we need.
Now we can test with that code:
$ curl -d code=A3TL5FN76U7U0DXSBFFG6WYBZWJKEXY4 -d client_id=7NIVSWQA16KPF6SSX5JPB6X5R0E6WUR6 -d client_secret=4HQTDF1W4UQMEP2JQ77H0T2PTVDC2A17V84KJNGWKC8NNHII51HHEOXXF8SWC6SU https://app.clickup.com/api/v2/oauth/token
{"access_token":"6311817_e762b30fe6c9a0684b4b4fc83594371bae9297f5"}
That Access Token should now grant us access.
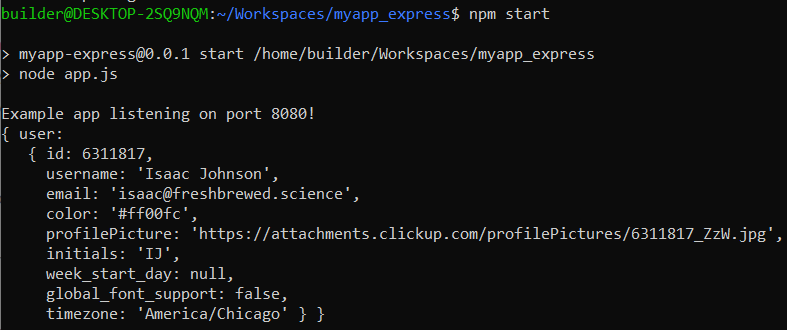
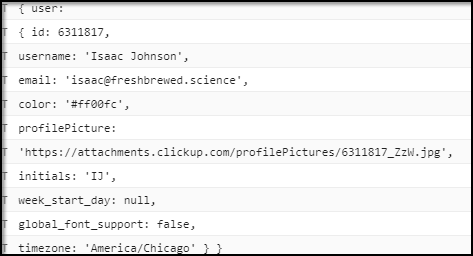
$ curl -X GET --header "Accept: application/json" --header "x-api-key: 7NIVSWQA16KPF6SSX5JPB6X5R0E6WUR6" --header "Authorization: 6311817_e762b30fe6c9a0684b4b4fc83594371bae9297f5" https://app.clickup.com/api/v2/user
{"user":{"id":6311817,"username":"Isaac Johnson","email":"isaac@freshbrewed.science","color":"#ff00fc","profilePicture":"https://attachments.clickup.com/profilePictures/6311817_ZzW.jpg","initials":"IJ","week_start_day":null,"global_font_support":false,"timezone":"America/Chicago"}}
Now that we see some data we can pull down, let’s update our node app to do something.
builder@DESKTOP-2SQ9NQM:~/Workspaces/myapp_express$ cat app.js
const express = require('express')
const bodyParser = require('body-parser')
const app = express()
const port = process.env.PORT || 8080;
const debug = 1

// app.js

// parse application/x-www-form-urlencoded
app.use(bodyParser.urlencoded({ extended: false }))

// parse application/json
app.use(bodyParser.json())

app.use(function (req, res) {
  res.setHeader('Content-Type', 'text/plain')
  res.write('you posted:\n')
  var postedData= JSON.stringify(req.body, null, 2);
  console.log("req.body");
  console.log(req.body);
  var queryData= JSON.stringify(req.query, null, 2);
  console.log("req.query");
  console.log(req.query);
  res.end(postedData + "\n QueryData: " + queryData);


})

app.get('/', function(req, res){
            //console.log(req.query.name);
            res.send('Response send to client::'+req.query.name);

});

app.listen(port, () => {
        if (debug == 1) {
                const request = require('request');

                // var apiKey = process.env.API_KEY;
                var apiKey = "7NIVSWQA16KPF6SSX5JPB6X5R0E6WUR6";
                // Code back from API Server
                var authz = "6311817_e762b30fe6c9a0684b4b4fc83594371bae9297f5";

                const options = {
                    url: 'https://app.clickup.com/api/v2/user',
                    method: 'GET',
                    headers: {
                            'Accept': 'application/json',
                            'X-Api-Key': apiKey,
                            'Authorization': authz
                        }
                };

                request(options, function(err, res, body) {
                            let json = JSON.parse(body);
                            console.log(json);
                });

        }

        console.log(`Example app listening on port ${port}!`)

})
Once we get our code good enough to test, we can commit it to git.
Gitignore
It’s a good time to set your .gitignore file to avoid committing binary, generated and temporary files. I use https://gitignore.io. And since my candidate code expected secrets set as env vars, i avoided checking in a setup.sh file. See my gitignore here: https://gitlab.com/princessking/gcpclickupdemo/-/blob/master/.gitignore
CICD in Gitlab
Gitlab has a great Continuous Integration / Deployment system. I first became familiar with it as gitlab runners, a plugin, that is now part of their standard offering.
To use CICD, you need to create a .gitlab-ci.yml file:
image: node:latest

stages:
  - build
  - test

cache:
  paths:
    - node_modules/

install_dependencies:
  stage: build
  script:
    - npm install
  artifacts:
    paths:
      - node_modules/

testing_testing:
  stage: test
  script: npm test
This should build our app.js and run the basic unit tests in our package.json.
{
  "name": "myapp-express",
  "description": "Simple Hello World Node.js sample for GCP App Engine Flexible Environment.",
  "version": "0.0.1",
  "private": true,
  "license": "MIT",
  "author": "Isaac Johnson",
  "repository": {
    "type": "git",
    "url": "https://gitlab.com/princessking/gcpclickupdemo.git"
  },
  "engines": {
    "node": ">=8.0.0"
  },
  "scripts": {
    "deploy": "gcloud app deploy",
    "start": "node app.js",
    "system-test": "repo-tools test app",
    "test": "npm run system-test",
    "e2e-test": "repo-tools test deploy"
  },
  "dependencies": {
    "express": "^4.16.3"
  },
  "devDependencies": {
    "@google-cloud/nodejs-repo-tools": "^3.3.0",
    "body-parser": "^1.19.0",
    "request": "^2.88.2"
  },
  "cloud-repo-tools": {
    "test": {
      "app": {
        "msg": "Hello, world from Express!"
      }
    },
    "requiresKeyFile": true,
    "requiresProjectId": true
  }
}
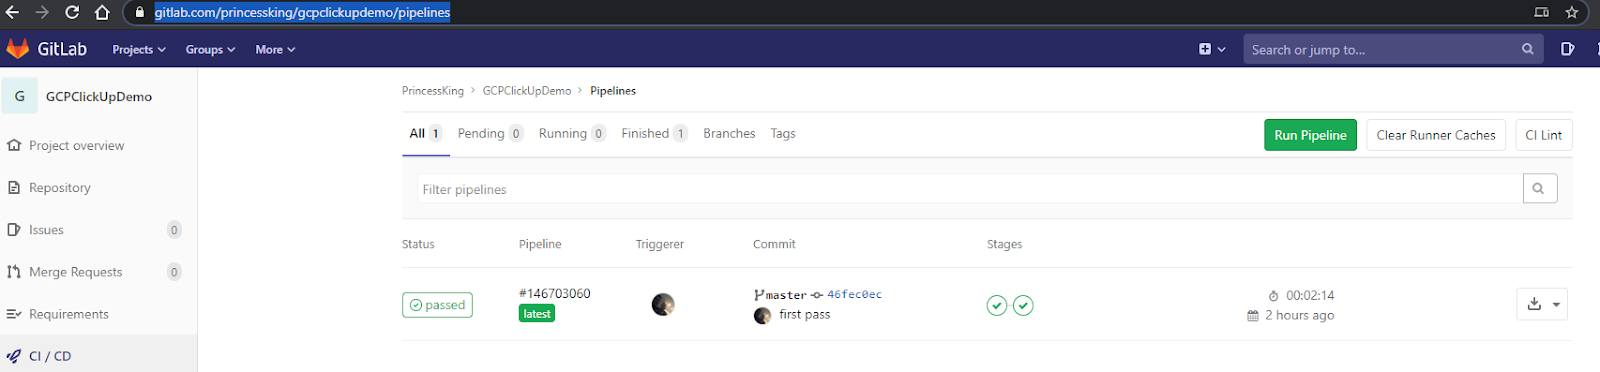
Once you commit the gitlab-ci file, it will fire a build almost immediately:
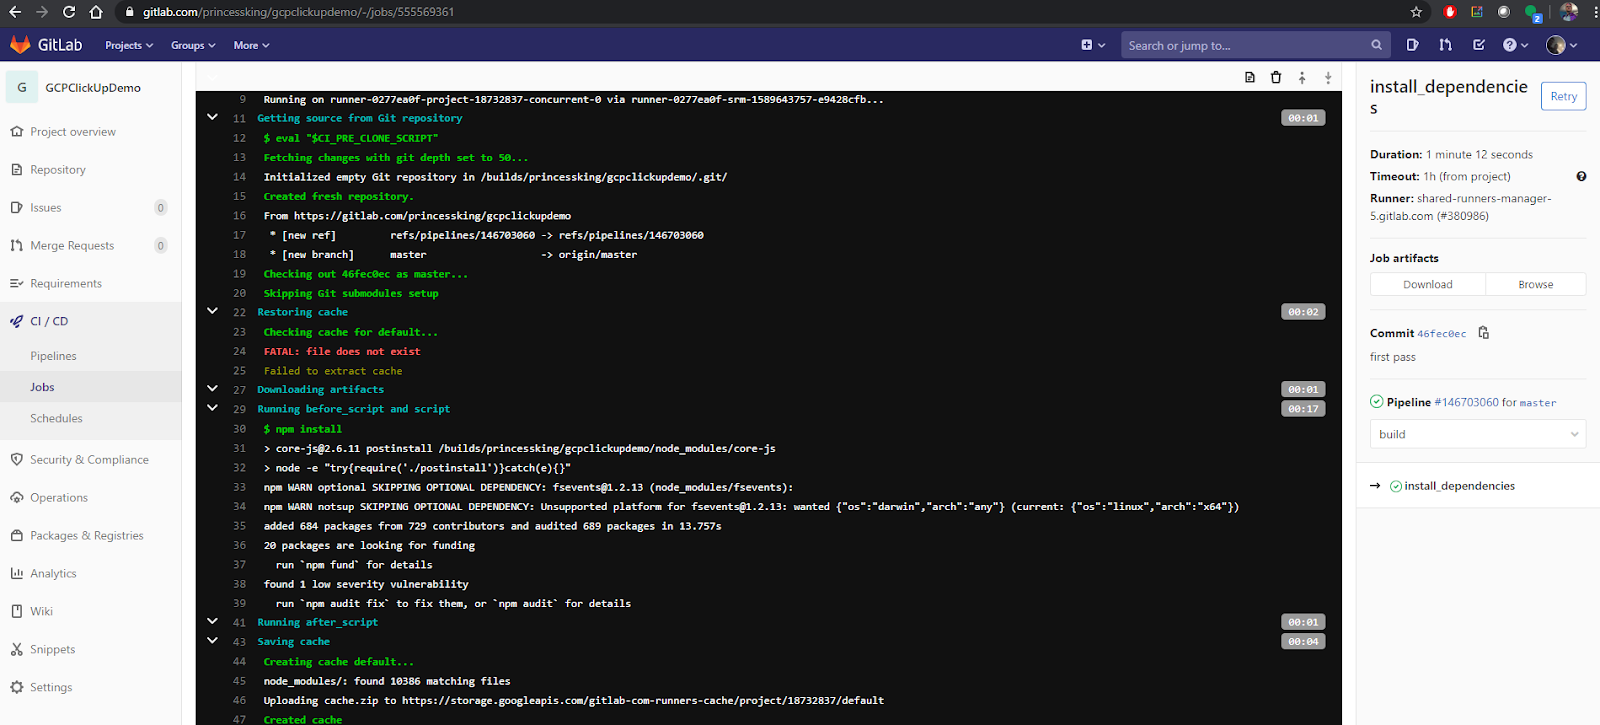
As you would expect, you can click any stage and get the logs from that stage:
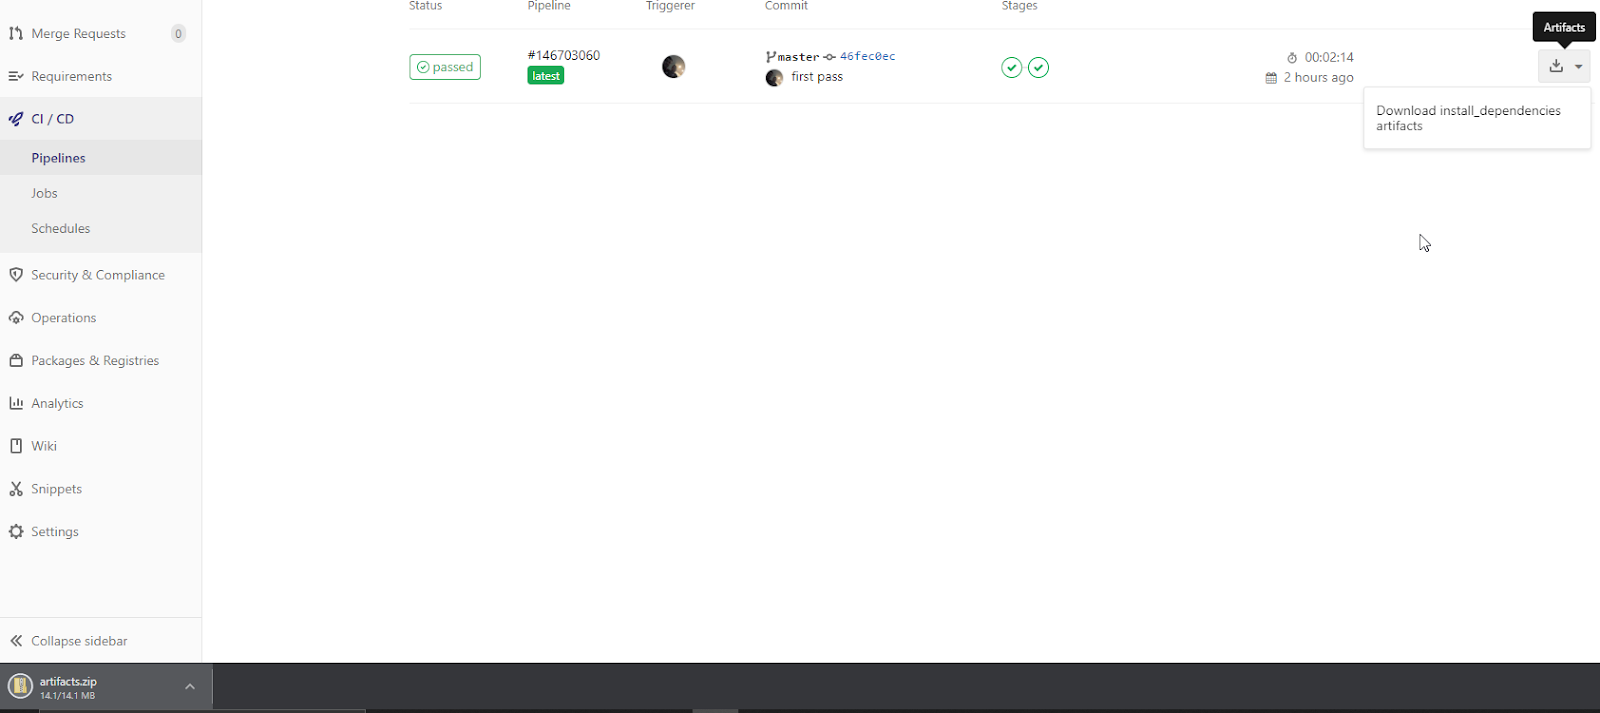
We can also download the artifacts as defined in our gitlab ci file:
When you have multiple stages, you can see each stage as it’s run and get at the logs:
Deploying to GCP
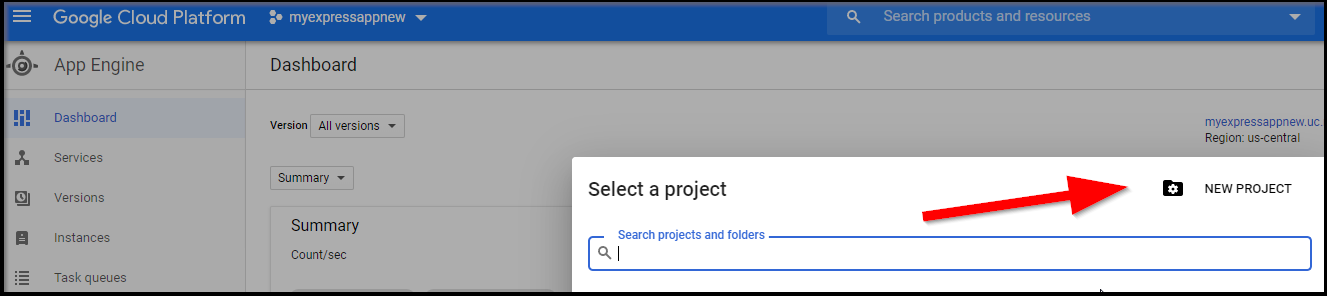
We’ll need to set up a GCP Project for App Engine Express (if you haven’t already).
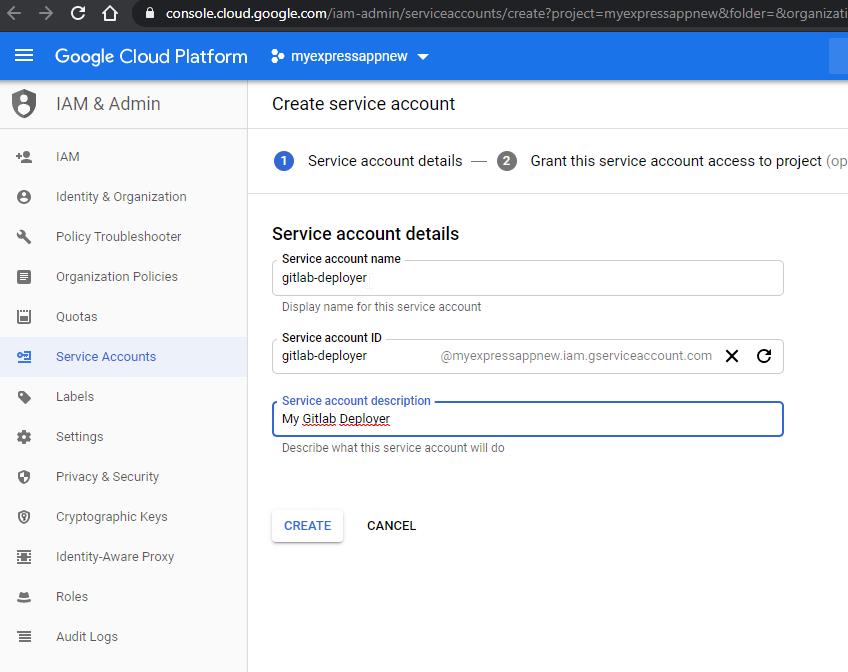
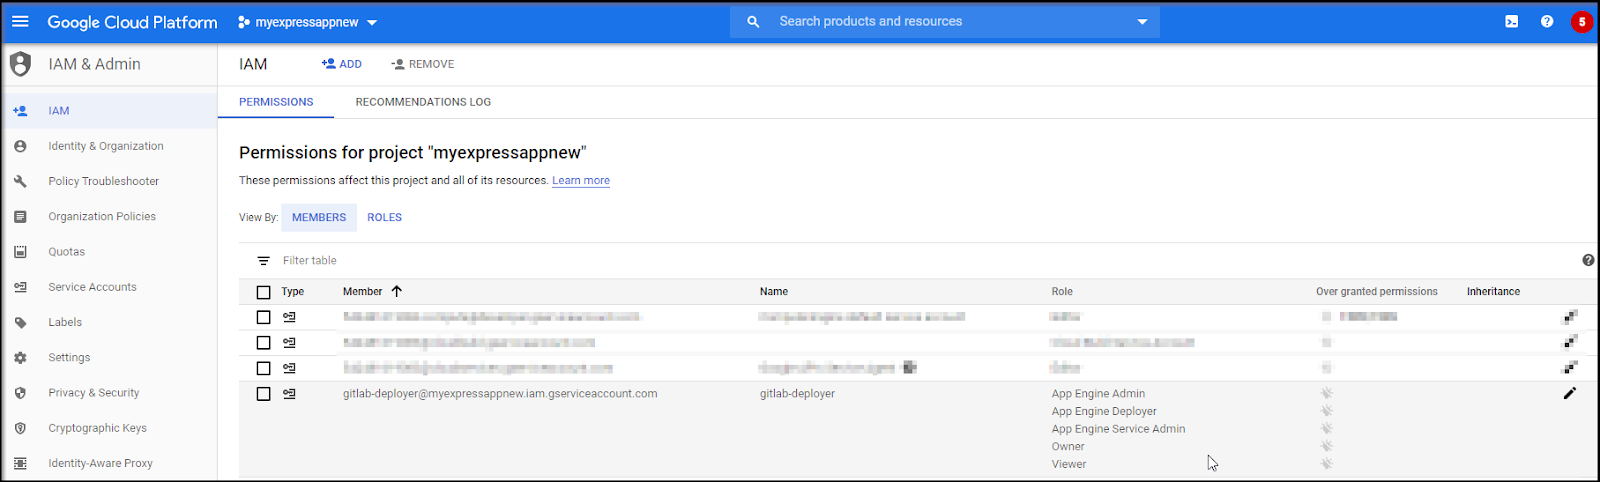
Next we’ll want to add an iam user (service account) we can use to deploy from the iam-admin page.
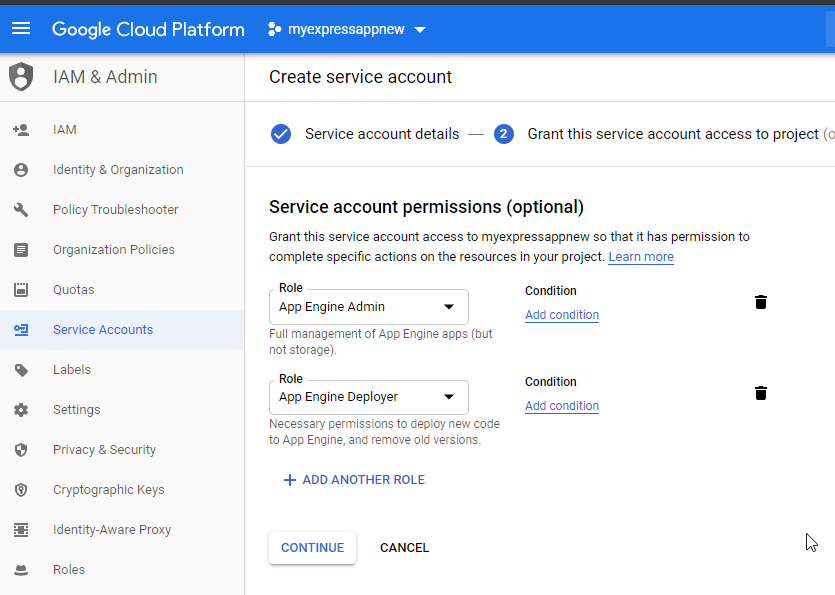
Next we add some Roles (Permissions) - namely app engine Admin and Deployer.
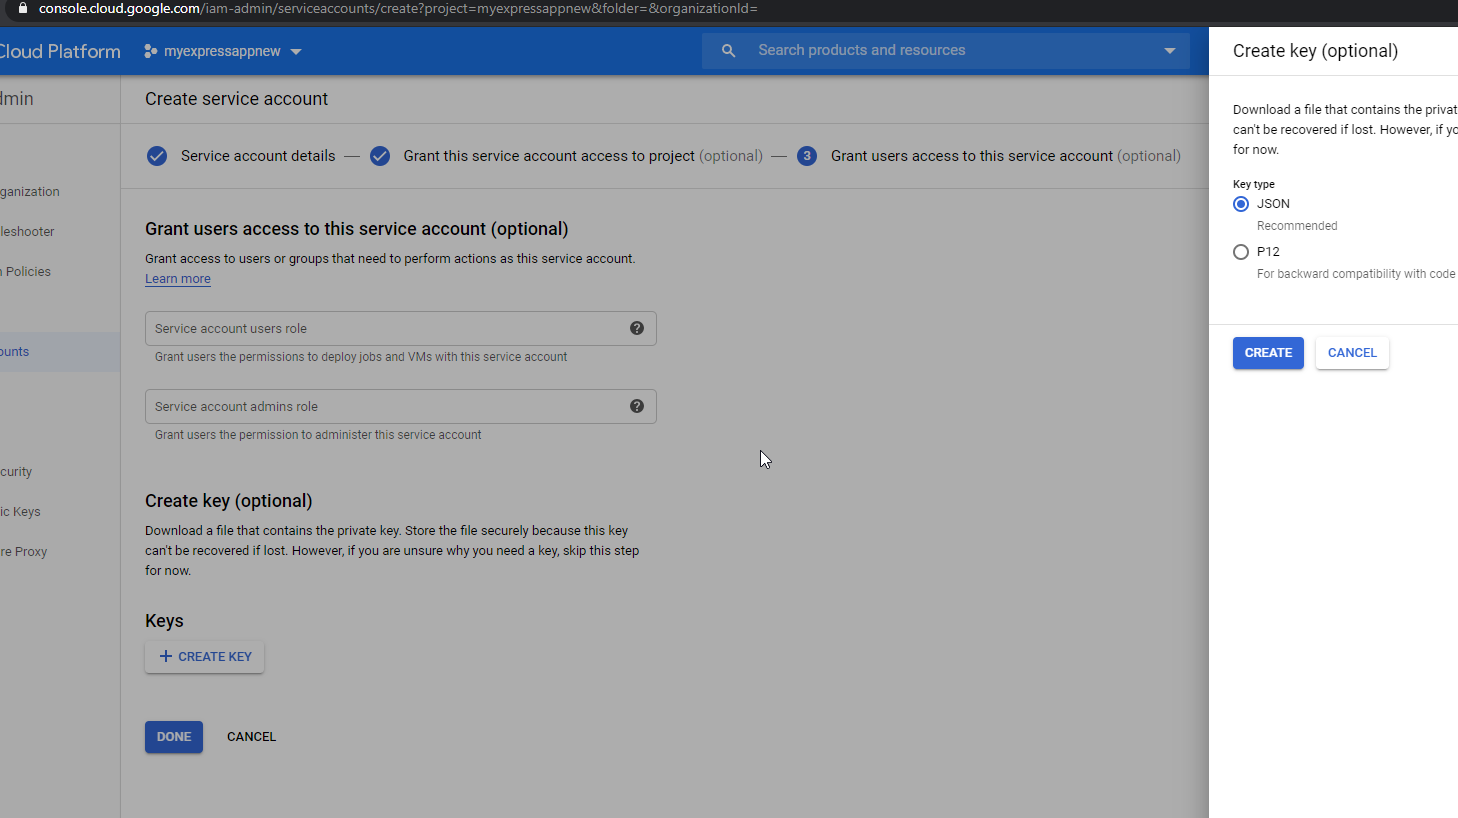
Next create a JSON key we can use in our Runner:
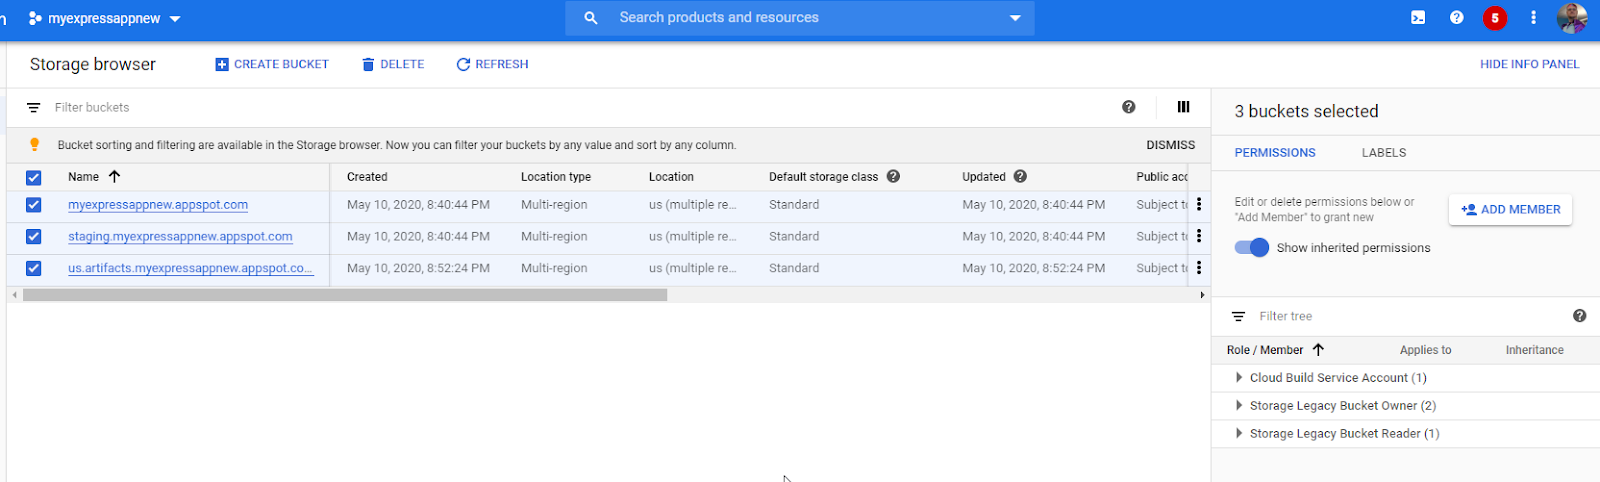
Next we head to our storage buckets for the App Service to grant permissions to this service user. Pick the 3 buckets and choose “+Add Member” from the right.
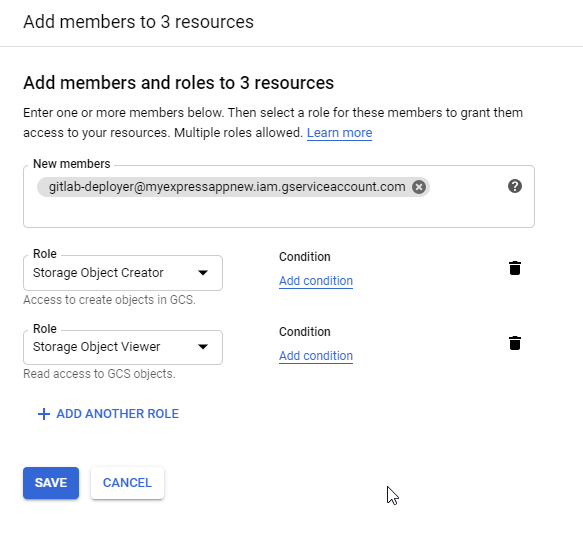
We’ll then add our service account with creator and reader permissions:
Note: if you neglected to save the user id to the clipboard as i had, the email is in the json you downloaded as the “client_email” field.
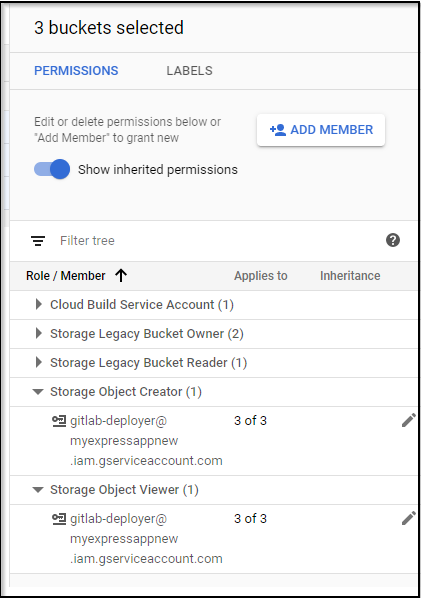
We can then see it reflected it those roles:
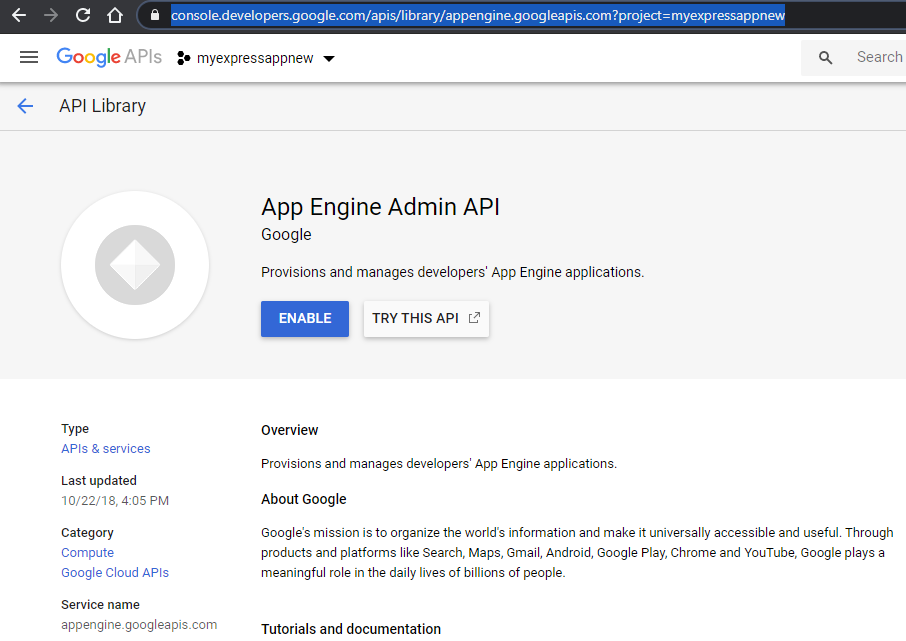
Lastly, we need to enable the App Engine Admin API against our Project.
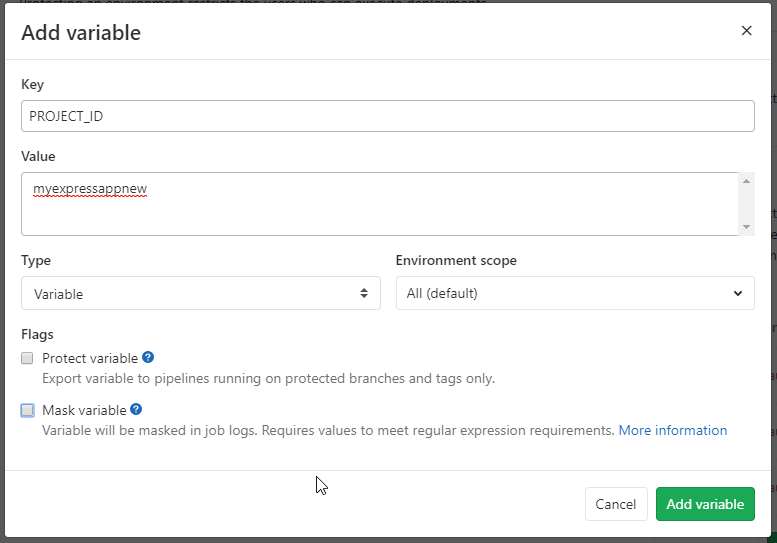
Gitlab Secrets
Next we go to GL Settings > CICD and variables to add PROJECT_ID and SERVICE_ACCOUNT
SERVICE_ACCOUNT should be the contents of the JSON.. e.g.
{
"type": "service_account",
"project_id": "myexpressappnew",
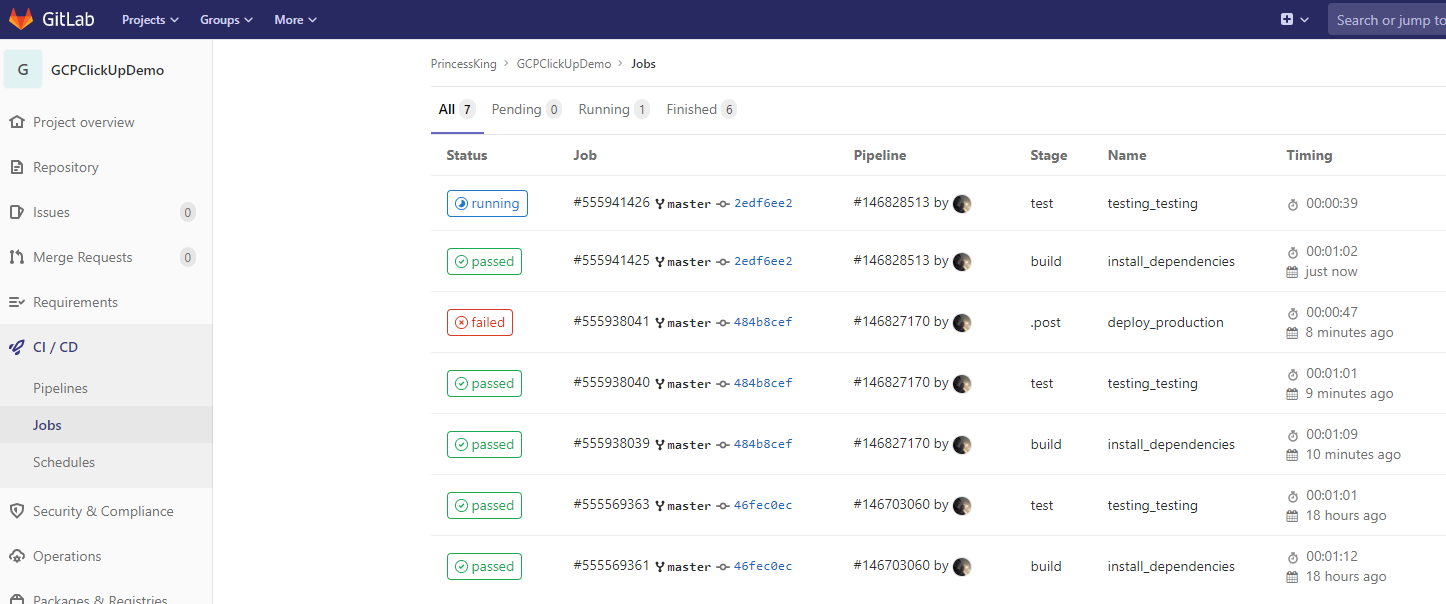
....Likely as you validate the gitlab file, you’ll want to review current and past jobs. Job details are listed under “Jobs” in CICD:
I needed to tweak the Permissions of my service user. You can edit that later.
When it’s working, you can see success in the build output:
$ gcloud --quiet --project $PROJECT_ID app deploy app.yaml
Services to deploy:

descriptor:      [/builds/princessking/gcpclickupdemo/app.yaml]
source:          [/builds/princessking/gcpclickupdemo]
target project:  [myexpressappnew]
target service:  [default]
target version:  [20200517t101805]
target url:      [https://myexpressappnew.uc.r.appspot.com]


Beginning deployment of service [default]...
Building and pushing image for service [default]
Started cloud build [2cca1953-538f-4b52-b83f-52ceed61b801].
To see logs in the Cloud Console: https://console.cloud.google.com/cloud-build/builds/2cca1953-538f-4b52-b83f-52ceed61b801?project=542481619083
----------------------------- REMOTE BUILD OUTPUT ------------------------------
starting build "2cca1953-538f-4b52-b83f-52ceed61b801"

FETCHSOURCE
Fetching storage object: gs://staging.myexpressappnew.appspot.com/us.gcr.io/myexpressappnew/appengine/default.20200517t101805:latest#1589710687030855
Copying gs://staging.myexpressappnew.appspot.com/us.gcr.io/myexpressappnew/appengine/default.20200517t101805:latest#1589710687030855...
/ [0 files][    0.0 B/ 60.2 KiB]
/ [1 files][ 60.2 KiB/ 60.2 KiB]
Operation completed over 1 objects/60.2 KiB.
BUILD
Starting Step #0
Step #0: Pulling image: gcr.io/gcp-runtimes/nodejs/gen-dockerfile@sha256:d5293a583629252c12c478b572103b557ee26235c6b03a57d1f18d52882fb937
Step #0: sha256:d5293a583629252c12c478b572103b557ee26235c6b03a57d1f18d52882fb937: Pulling from gcp-runtimes/nodejs/gen-dockerfile
Step #0: c4272b5b18a1: Pulling fs layer
Step #0: 99f31d2d2127: Pulling fs layer
Step #0: 3c2cba919283: Pulling fs layer
Step #0: e83dbc3576f7: Pulling fs layer
Step #0: 9efe1b0c1e82: Pulling fs layer
Step #0: 83001cb10871: Pulling fs layer
Step #0: 1162305be692: Pulling fs layer
Step #0: 9519340f6b21: Pulling fs layer
Step #0: 85ea7b697da2: Pulling fs layer
Step #0: 6403c14e19e4: Pulling fs layer
Step #0: d9919eba9859: Pulling fs layer
Step #0: 8665cabad70f: Pulling fs layer
Step #0: e83dbc3576f7: Waiting
Step #0: 9efe1b0c1e82: Waiting
Step #0: 83001cb10871: Waiting
Step #0: 1162305be692: Waiting
Step #0: 9519340f6b21: Waiting
Step #0: 85ea7b697da2: Waiting
Step #0: 6403c14e19e4: Waiting
Step #0: d9919eba9859: Waiting
Step #0: 8665cabad70f: Waiting
Step #0: 3c2cba919283: Verifying Checksum
Step #0: 3c2cba919283: Download complete
Step #0: 99f31d2d2127: Verifying Checksum
Step #0: 99f31d2d2127: Download complete
Step #0: 9efe1b0c1e82: Verifying Checksum
Step #0: 9efe1b0c1e82: Download complete
Step #0: c4272b5b18a1: Verifying Checksum
Step #0: c4272b5b18a1: Download complete
Step #0: 83001cb10871: Verifying Checksum
Step #0: 83001cb10871: Download complete
Step #0: 1162305be692: Verifying Checksum
Step #0: 1162305be692: Download complete
Step #0: e83dbc3576f7: Verifying Checksum
Step #0: e83dbc3576f7: Download complete
Step #0: 85ea7b697da2: Verifying Checksum
Step #0: 85ea7b697da2: Download complete
Step #0: 9519340f6b21: Verifying Checksum
Step #0: 9519340f6b21: Download complete
Step #0: 6403c14e19e4: Verifying Checksum
Step #0: 6403c14e19e4: Download complete
Step #0: d9919eba9859: Verifying Checksum
Step #0: d9919eba9859: Download complete
Step #0: 8665cabad70f: Verifying Checksum
Step #0: 8665cabad70f: Download complete
Step #0: c4272b5b18a1: Pull complete
Step #0: 99f31d2d2127: Pull complete
Step #0: 3c2cba919283: Pull complete
Step #0: e83dbc3576f7: Pull complete
Step #0: 9efe1b0c1e82: Pull complete
Step #0: 83001cb10871: Pull complete
Step #0: 1162305be692: Pull complete
Step #0: 9519340f6b21: Pull complete
Step #0: 85ea7b697da2: Pull complete
Step #0: 6403c14e19e4: Pull complete
Step #0: d9919eba9859: Pull complete
Step #0: 8665cabad70f: Pull complete
Step #0: Digest: sha256:d5293a583629252c12c478b572103b557ee26235c6b03a57d1f18d52882fb937
Step #0: Status: Downloaded newer image for gcr.io/gcp-runtimes/nodejs/gen-dockerfile@sha256:d5293a583629252c12c478b572103b557ee26235c6b03a57d1f18d52882fb937
Step #0: gcr.io/gcp-runtimes/nodejs/gen-dockerfile@sha256:d5293a583629252c12c478b572103b557ee26235c6b03a57d1f18d52882fb937
Step #0: Checking for Node.js.
Finished Step #0
Starting Step #1
Step #1: Already have image (with digest): gcr.io/kaniko-project/executor@sha256:f87c11770a4d3ed33436508d206c584812cd656e6ed08eda1cff5c1ee44f5870
Step #1: [36mINFO[0m[0000] Removing ignored files from build context: [node_modules .dockerignore Dockerfile npm-debug.log yarn-error.log .git .hg .svn app.yaml]
Step #1: [36mINFO[0m[0000] Downloading base image gcr.io/google-appengine/nodejs@sha256:ef8be7b4dc77c3e71fbc85ca88186b13214af8f83b8baecc65e8ed85bb904ad5
Step #1: [36mINFO[0m[0016] Taking snapshot of full filesystem...
Step #1: [36mINFO[0m[0027] Using files from context: [/workspace]
Step #1: [36mINFO[0m[0027] COPY . /app/
Step #1: [36mINFO[0m[0027] Taking snapshot of files...
Step #1: [36mINFO[0m[0027] RUN /usr/local/bin/install_node '>=8.0.0'
Step #1: [36mINFO[0m[0027] cmd: /bin/sh
Step #1: [36mINFO[0m[0027] args: [-c /usr/local/bin/install_node '>=8.0.0']
Step #1: [36mINFO[0m[0028] Taking snapshot of full filesystem...
Step #1: [36mINFO[0m[0032] No files were changed, appending empty layer to config. No layer added to image.
Step #1: [36mINFO[0m[0032] RUN npm install --unsafe-perm ||   ((if [ -f npm-debug.log ]; then       cat npm-debug.log;     fi) && false)
Step #1: [36mINFO[0m[0032] cmd: /bin/sh
Step #1: [36mINFO[0m[0032] args: [-c npm install --unsafe-perm ||   ((if [ -f npm-debug.log ]; then       cat npm-debug.log;     fi) && false)]
Step #1: added 50 packages from 37 contributors and audited 689 packages in 3.265s
Step #1: found 1 low severity vulnerability
Step #1:   run `npm audit fix` to fix them, or `npm audit` for details
Step #1: [36mINFO[0m[0036] Taking snapshot of full filesystem...
Step #1: [36mINFO[0m[0041] CMD npm start
Step #1: 2020/05/17 10:19:21 existing blob: sha256:95016fdb07dce7dc6d6ff2746f985d6787da05314ff8180602b868a53b437c46
Step #1: 2020/05/17 10:19:21 existing blob: sha256:912fe0956b48e9e5d140e4947e09be36c1bb2d2186a5ca7b6e57f31e423a4404
Step #1: 2020/05/17 10:19:21 existing blob: sha256:81b9a32df3efd40d591bf4f1257c68c2de442c43466c8b5b151561d62fee1da2
Step #1: 2020/05/17 10:19:21 existing blob: sha256:81bb7127678a82e8e9131e2f47bbae5853ba33b89c6ade91201c0fca8a1c8dd9
Step #1: 2020/05/17 10:19:21 existing blob: sha256:40a5c2875f881a931f7b7340904bbc939b8bcebe131e058501659ee24597571f
Step #1: 2020/05/17 10:19:21 existing blob: sha256:72be9390242a715ac08d82becdbae8c3e13d7b893a384156d63dad87c099478b
Step #1: 2020/05/17 10:19:21 existing blob: sha256:4ad0e69275819c37c5a3ff6f9c3579f4ae19657c0ea40580a347cfa3fc32d7f6
Step #1: 2020/05/17 10:19:21 existing blob: sha256:537932092991e0c9f705cdfad7cdc5bb6fe83fda36af0452de2f5d2fac6eb6b1
Step #1: 2020/05/17 10:19:21 existing blob: sha256:3c2cba919283a210665e480bcbf943eaaf4ed87a83f02e81bb286b8bdead0e75
Step #1: 2020/05/17 10:19:21 existing blob: sha256:3597d82c78f6eeb6cd66bd1ec35f5e8bcdad9f8cd392cd3dc6cbfc0111aff2da
Step #1: 2020/05/17 10:19:23 pushed blob sha256:62e107a936646d81157986785657dbb973c9e72187378b2c8e9394f16b721298
Step #1: 2020/05/17 10:19:23 pushed blob sha256:549080961992845c22e4059918c18189a86e36a76ec37efee821daeffe30cae8
Step #1: 2020/05/17 10:19:23 pushed blob sha256:08e7e16a828f73d5ce2bc664b5e3f25f7962d24464061b9ee86e4bd969bd07d4
Step #1: 2020/05/17 10:19:24 us.gcr.io/myexpressappnew/appengine/default.20200517t101805:latest: digest: sha256:e13ceb06967fa4bd2fc4c5a3bb8f5e95b6ee8a37141caa9bdb72528c0055b29a size: 2219
Finished Step #1
PUSH
DONE
--------------------------------------------------------------------------------
Let’s finish our app.
We need to:
- Set some secrets for our API Key and Secret (so we can set it in the app.yml)
- Update our build steps to do that
- Move some dependencies from build to runtime.
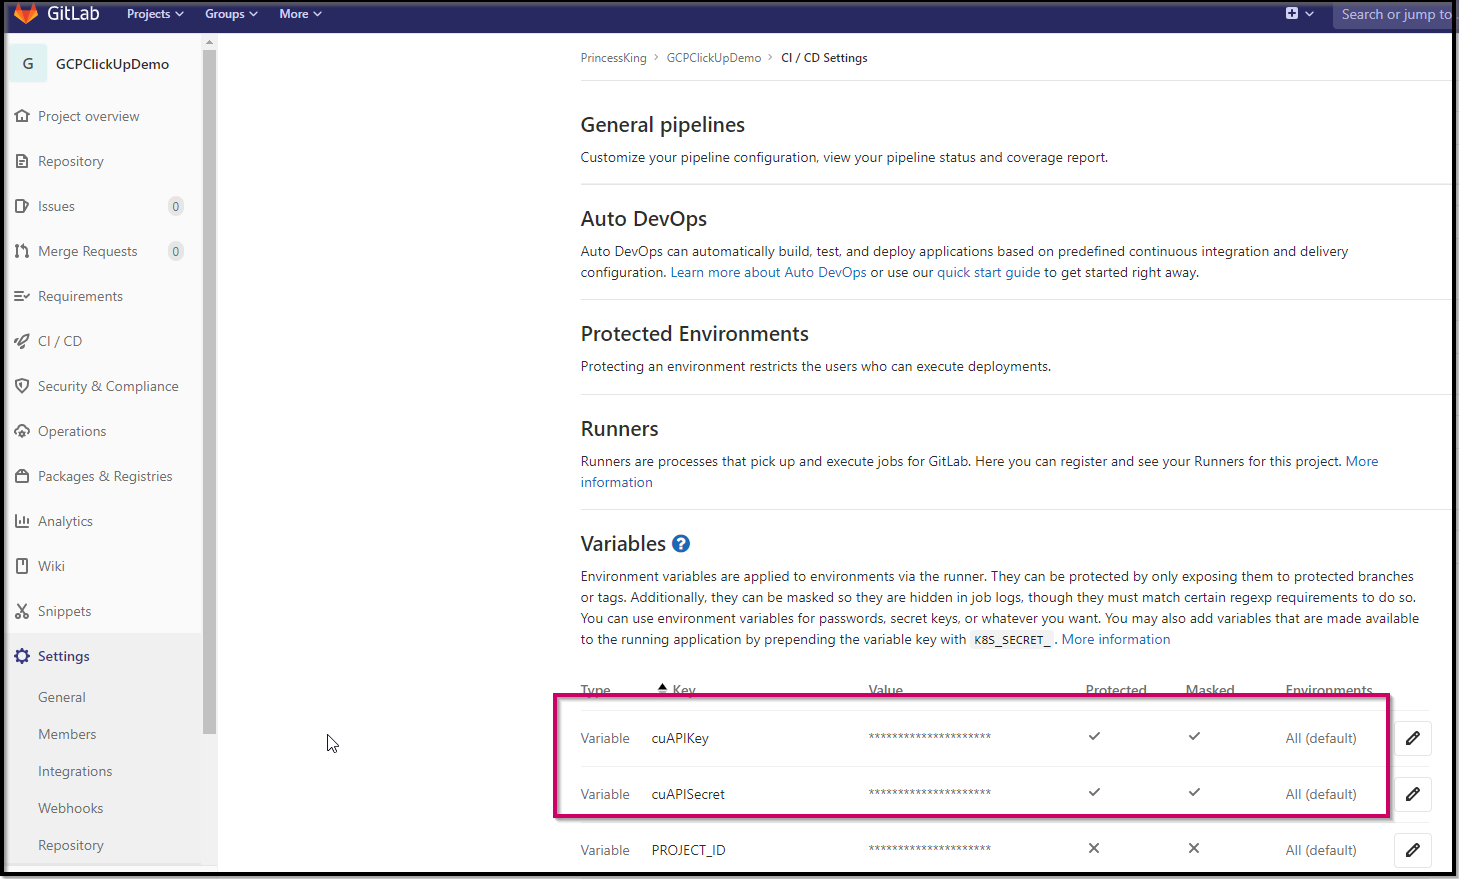
First, we can go to Gitlab settings, CICD to add a Clickup APIKey and Secret variable (cuAPIKey, cuAPISecret, respectively):
Next, we need to refer to them in the app.yml (last 3 lines):
runtime: nodejs
api_version: '1.0'
env: flexible
threadsafe: true
manual_scaling:
  instances: 1
network: {}
resources:
  cpu: 1
  memory_gb: 0.5
  disk_size_gb: 10
liveness_check:
  initial_delay_sec: 300
  check_interval_sec: 30
  timeout_sec: 4
  failure_threshold: 4
  success_threshold: 2
readiness_check:
  check_interval_sec: 5
  timeout_sec: 4
  failure_threshold: 2
  success_threshold: 2
  app_start_timeout_sec: 300
env_variables:
  cuAPIKey: "MYCUAPIKEY"
  cuAPISecret: "MYCUAPISECRET"
Next, we’ll update the .gitlab-ci.yaml to sed the values in at production deployment time:
image: node:latest

stages:
  - build
  - test

cache:
  paths:
    - node_modules/

install_dependencies:
  stage: build
  script:
    - npm install
  artifacts:
    paths:
      - node_modules/

testing_testing:
  stage: test
  script: npm test

deploy_production:
  image: google/cloud-sdk:alpine
  stage: .post
  environment: Production
  only:
  - master
  script:
  - cp app.yaml app.bak
  - sed -i "s/MYCUAPIKEY/`echo $cuAPIKey`/g" app.yaml
  - sed -i "s/MYCUAPISECRET/`echo $cuAPISecret`/g" app.yaml
  - echo $SERVICE_ACCOUNT > /tmp/$CI_PIPELINE_ID.json
  - gcloud auth activate-service-account --key-file /tmp/$CI_PIPELINE_ID.json
  - gcloud --quiet --project $PROJECT_ID app deploy app.yaml
  - cp -f app.bak app.yaml

after_script:
- rm /tmp/$CI_PIPELINE_ID.json
Lastly, we should ensure our request module is moved into production (runtime) dependencies.
{
  "name": "myapp-express",
  "description": "Simple Hello World Node.js sample for GCP App Engine Flexible Environment.",
  "version": "0.0.1",
  "private": true,
  "license": "MIT",
  "author": "Isaac Johnson",
  "repository": {
    "type": "git",
    "url": "https://gitlab.com/princessking/gcpclickupdemo.git"
  },
  "engines": {
    "node": ">=8.0.0"
  },
  "scripts": {
    "deploy": "gcloud app deploy",
    "start": "node app.js",
    "system-test": "repo-tools test app",
    "test": "npm run system-test",
    "e2e-test": "repo-tools test deploy"
  },
  "dependencies": {
    "express": "^4.16.3",
    "request": "^2.88.2"
  },
  "devDependencies": {
    "@google-cloud/nodejs-repo-tools": "^3.3.0",
    "body-parser": "^1.19.0"
  },
  "cloud-repo-tools": {
    "test": {
      "app": {
        "msg": "Hello, world from Express!"
      }
    },
    "requiresKeyFile": true,
    "requiresProjectId": true
  }
}
And let us revisit once more the app.js that does the work. You’ll see that we catch the query params and for code, we’ll use our secret to come up with the client authtoken. And with the authtoken, we can pair it with our app id to run queries against the API.
const express = require('express')
const bodyParser = require('body-parser')
const app = express()
const port = process.env.PORT || 8080;
const apiKey = process.env.cuAPIKey;
const apiSecret = process.env.cuAPISecret;
const debug = 0

const request = require('request');
// app.js

// parse application/x-www-form-urlencoded
app.use(bodyParser.urlencoded({ extended: false }))

// parse application/json
app.use(bodyParser.json())

app.use(function (req, res) {
  res.setHeader('Content-Type', 'text/plain')
  res.write('you posted:\n')
  var postedData= JSON.stringify(req.body, null, 2);
  console.log("req.body");
  console.log(req.body);
  var queryData= JSON.stringify(req.query, null, 2);
  console.log("req.query");
  console.log(req.query);
  // check for Auth Code
  for (const key in req.query) {
     if (key == "authtoken") {
      var options = {
        url: 'https://app.clickup.com/api/v2/user',
        method: 'GET',
        headers: {
          'Accept': 'application/json',
          'X-Api-Key': apiKey,
          'Authorization': req.query[key]
        }
      }
      request(options, function(err, res, body) {
        let json = JSON.parse(body);
        console.log(json);
        });
      console.log(key, req.query[key])
    }
    if (key == "code") {
      request.post(
        'https://app.clickup.com/api/v2/oauth/token',
        {
          json: {
            client_id: apiKey,
            client_secret: apiSecret,
            code: req.query[key],
          }
        },
        (error, res, body) => {
          if (error) {
            console.error(error)
            return
          }
          console.log(`statusCode: ${res.statusCode}`)
          console.log(body)
        }
      )
      console.log(key, req.query[key])
    }
  };
  res.end(postedData + "\n QueryData: " + queryData);
})

app.get('/', function(req, res){
            //console.log(req.query.name);
            res.send('Response send to client::'+req.query.name);

});

app.listen(port, () => {

  console.log(`Example app listening on port ${port}!`)

})
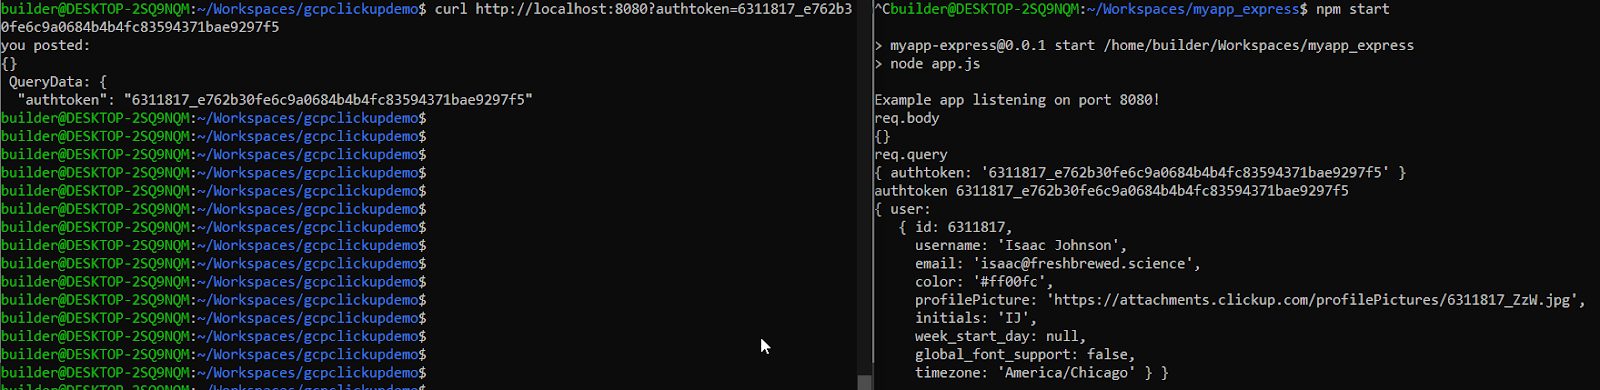
And we can see it work locally first:
Once you have your nodejs code working, it should confirm the deployment to gcp app service:
Updating service [default] (this may take several minutes)...
.......................................................................................................................................................................................................................................................................................................................................................................................................................................................................................................................................................................................................................................................................................................................................................................................................................................................................................................................................................................................................................................................................................................................................................................................................................................................................................................................................................................................................................................................................................................................................................................................................................................................................................................................................................................................................................................................................................................................done.
Setting traffic split for service [default]...
..................................done.
Stopping version [myexpressappnew/default/20200510t211122].
Sent request to stop version [myexpressappnew/default/20200510t211122]. This operation may take some time to complete. If you would like to verify that it succeeded, run:
  $ gcloud app versions describe -s default 20200510t211122
until it shows that the version has stopped.
Deployed service [default] to [https://myexpressappnew.uc.r.appspot.com]

You can stream logs from the command line by running:
  $ gcloud app logs tail -s default

To view your application in the web browser run:
  $ gcloud app browse --project=myexpressappnew
[32;1m$ cp -f app.bak app.yaml[0;m
section_end:1589744046:build_script
[0Ksection_start:1589744046:after_script
[0K[0K[36;1mRunning after_script[0;m
[0;m[32;1mRunning after script...[0;m
[32;1m$ rm /tmp/$CI_PIPELINE_ID.json[0;m
section_end:1589744048:after_script
[0Ksection_start:1589744048:archive_cache
[0K[0K[36;1mSaving cache[0;m
[0;m[32;1mCreating cache default...[0;m
node_modules/: found 10386 matching files         [0;m
Uploading cache.zip to https://storage.googleapis.com/gitlab-com-runners-cache/project/18732837/default[0;m
[32;1mCreated cache[0;m
section_end:1589744052:archive_cache
[0Ksection_start:1589744052:upload_artifacts_on_success
[0K[0K[36;1mUploading artifacts for successful job[0;m
[0;msection_end:1589744054:upload_artifacts_on_success
[0K[32;1mJob succeeded
[0;m
We can confirm it works:

And we can verify in the logs that it pulled user details. You’ll find “Logs” by the current running version:

But you can also get there from Operations/Logs in your project:
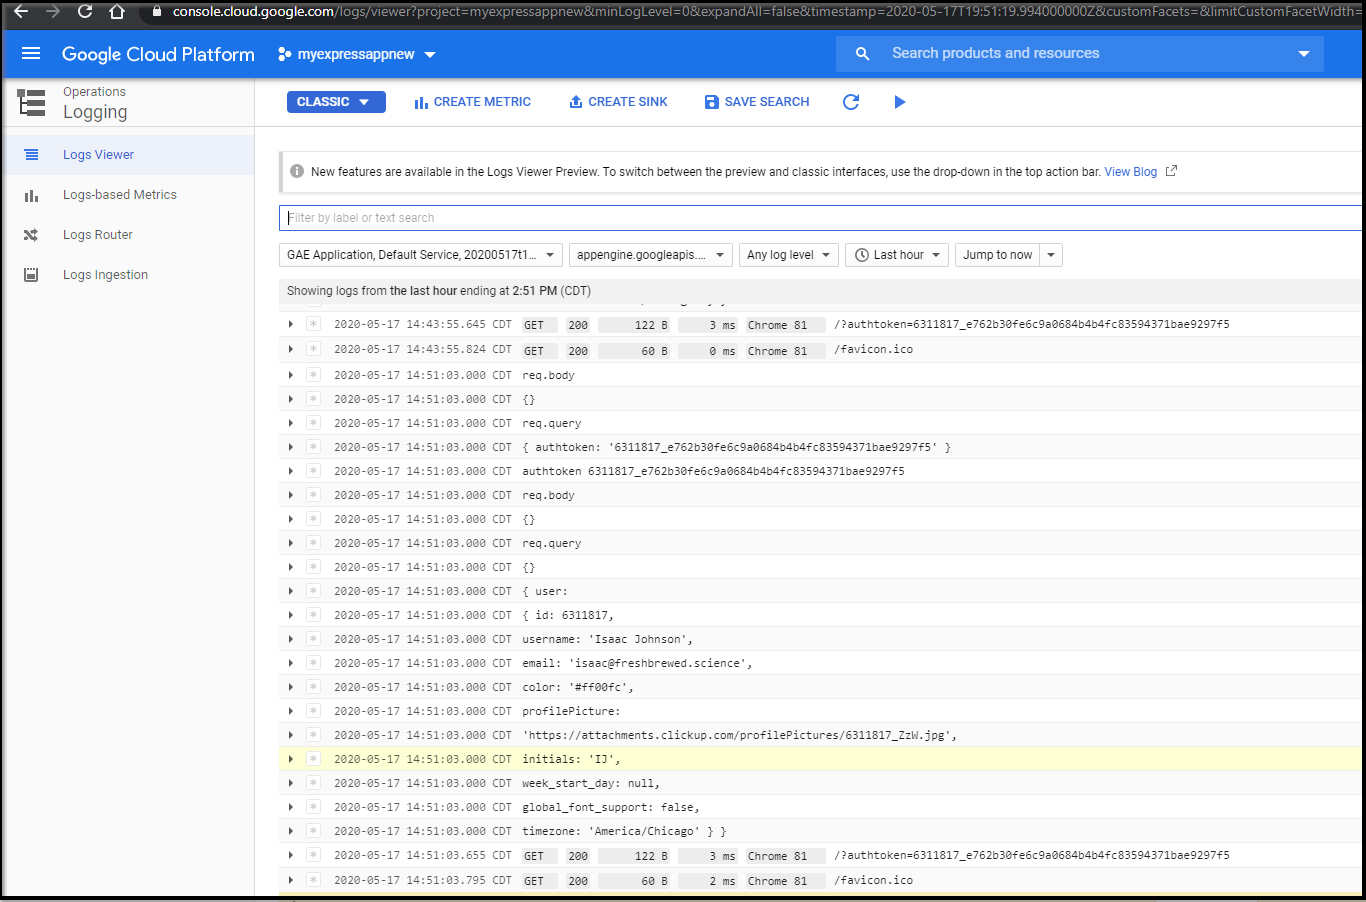
We can see the results of my user (zooming in on the block above)
I should take a moment to mention that this manual flow is clearly good for demoing how OAuth2 works. In a real world app we would likely use one of many prebuilt libraries such as node-openid-client. e.g.
const { Issuer } = require('openid-client');
Issuer.discover('https://app.clickup.com/') // => Promise
  .then(function (cuIssuer) {
    console.log('Discovered issuer %s %O', cuIssuer.issuer, cuIssuer.metadata);
  });

const client = new cuIssuer.Client({
  client_id: '7NIVSWQA16KPF6SSX5JPB6X5R0E6WUR6',
  client_secret: '4HQTDF1W4UQMEP2JQ77H0T2PTVDC2A17V84KJNGWKC8NNHII51HHEOXXF8SWC6SU',
  redirect_uris: ['https://myexpressappnew.uc.r.appspot.com/'],
  response_types: ['code'],
}); // => Client
Cleanup
Resetting our GCP App token, in settings/My Apps/Apps, you can regenerate your API token:
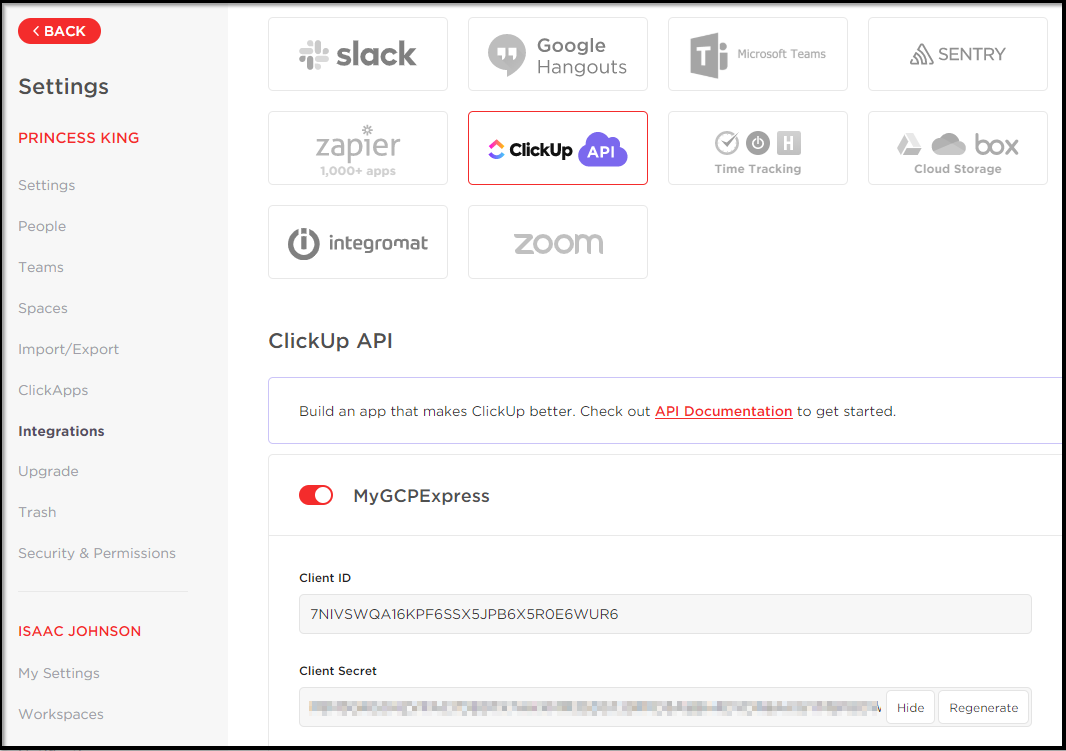
We can also reset our Client Secret in Settings / Integrations / ClickUp API:
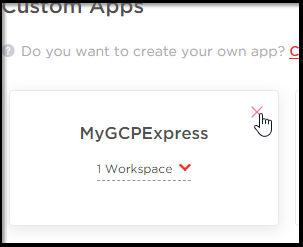
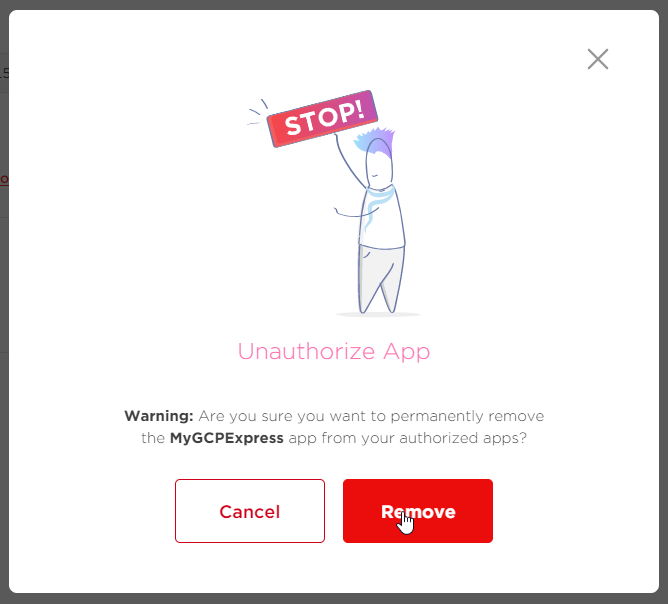
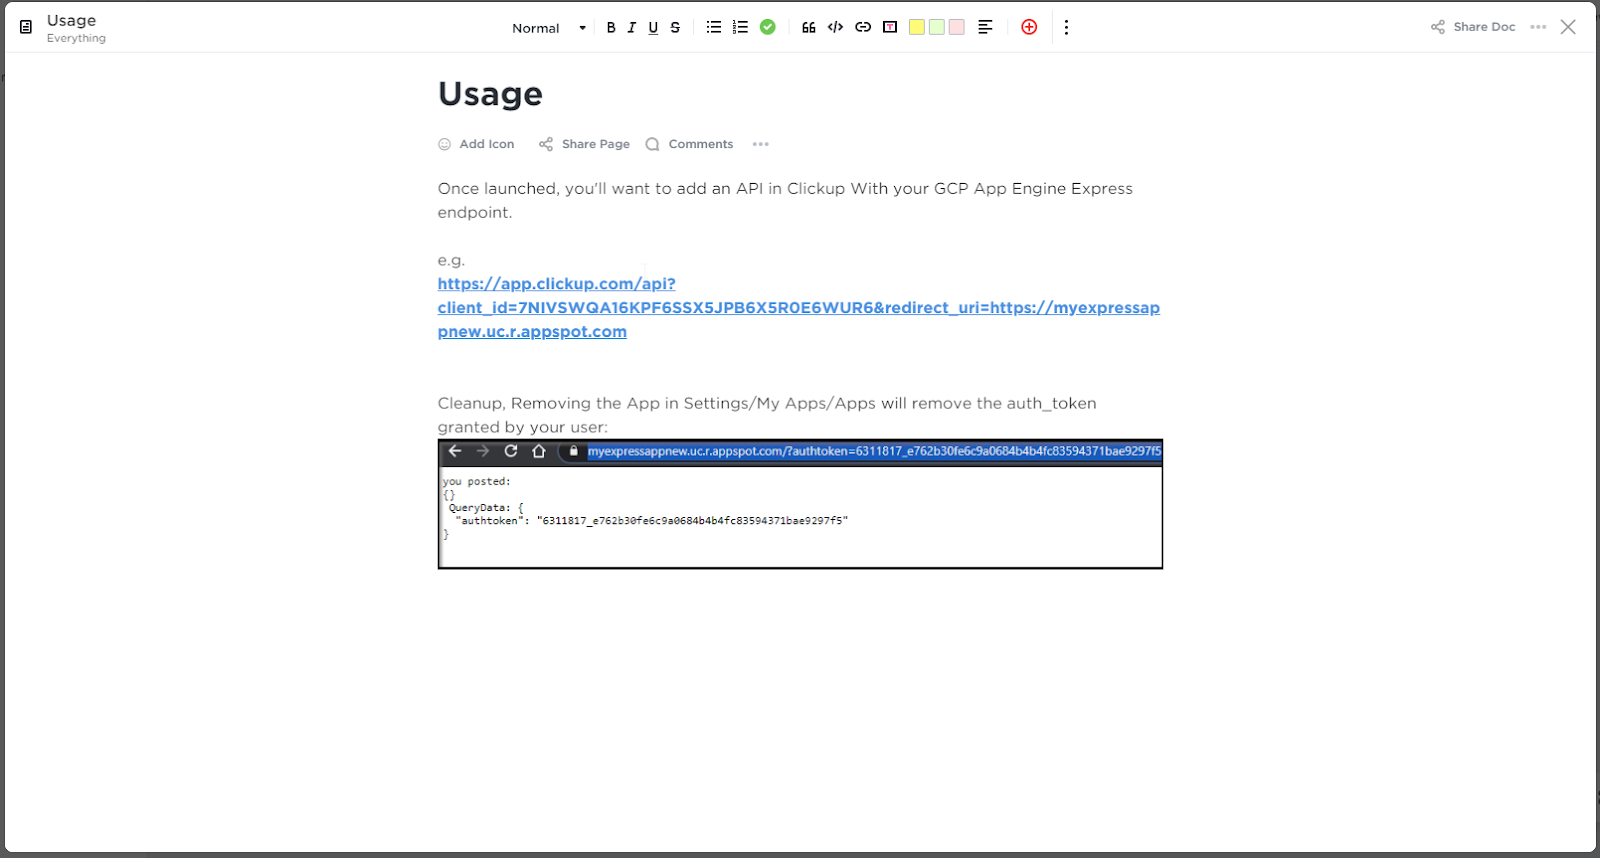
Also, even though we’ve reset the secret, the pairing of API Client ID and Auth token would still give access to the API. To reset that granted access, i need to remove (and re-add to keep working on this) in Settings / My Apps / Apps:
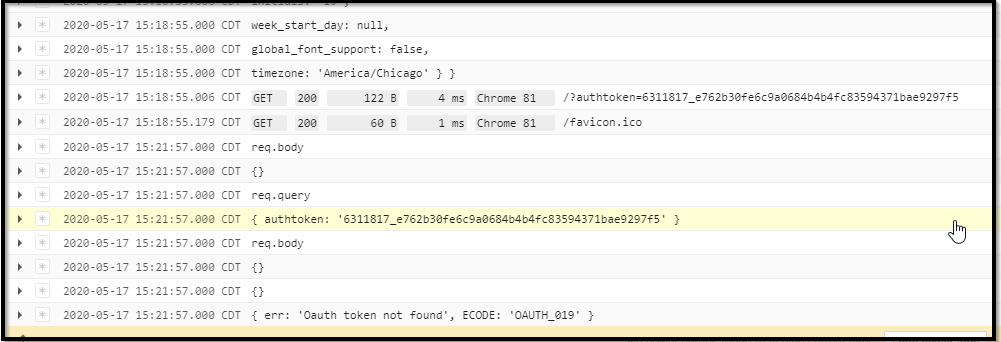
And we can verify it’s now been expired by re-running our URL and checking the logs:

If we want to re-add, we can just authorize with the Client ID again and select our project: https://app.clickup.com/api?client_id=7NIVSWQA16KPF6SSX5JPB6X5R0E6WUR6&redirect_uri=https://myexpressappnew.uc.r.appspot.com
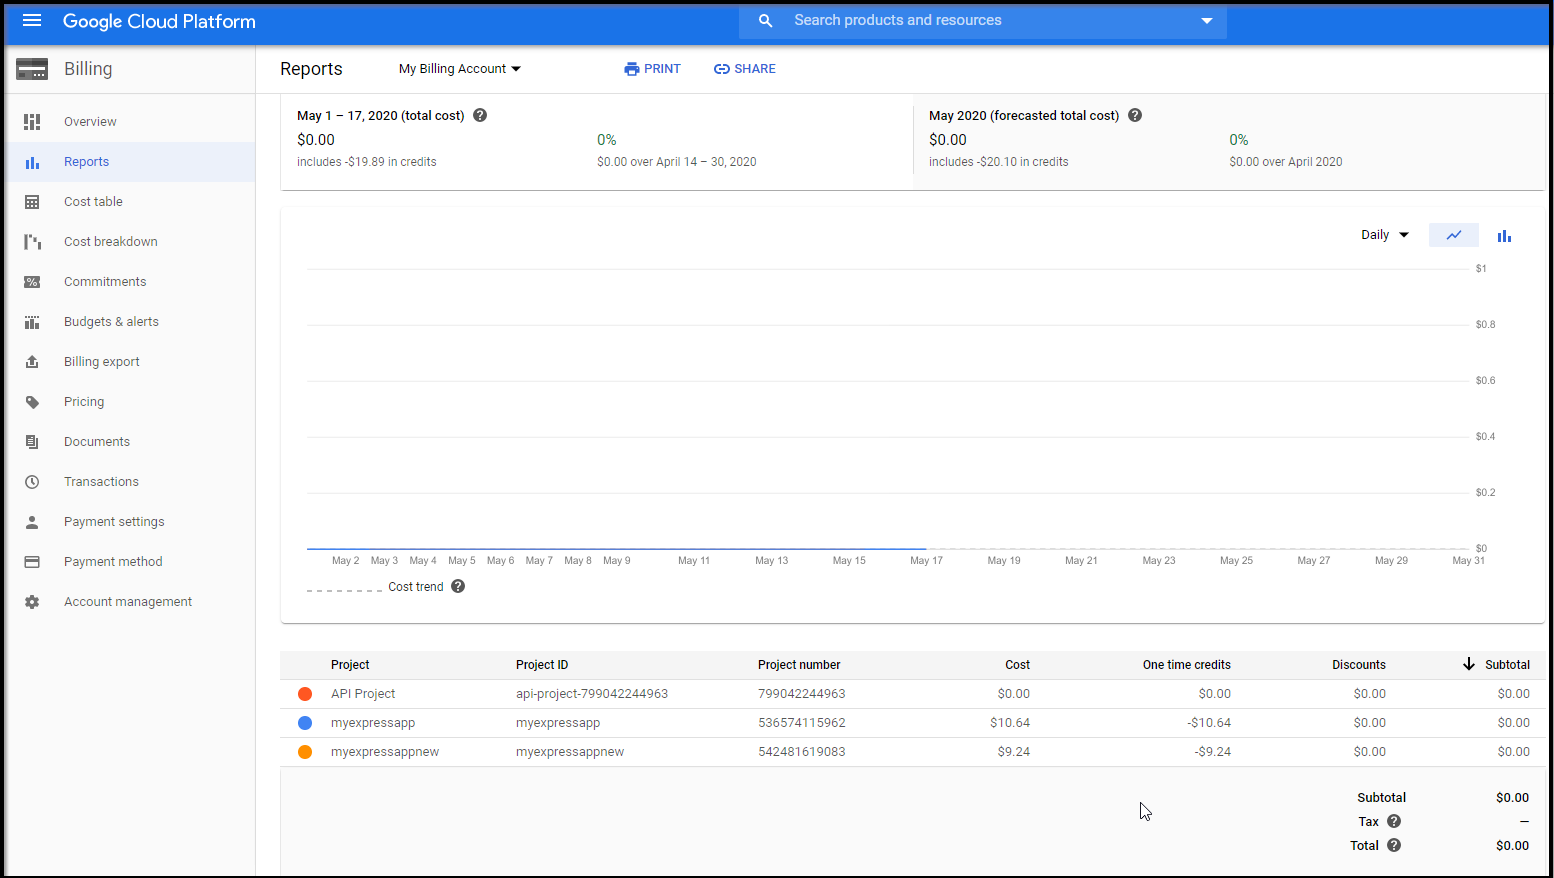
I checked my GCP costs. For the week or so of running this version, i totalled up $9.24 in charges. I like App Engine Standard over Flex for costs, but that would add up over time:
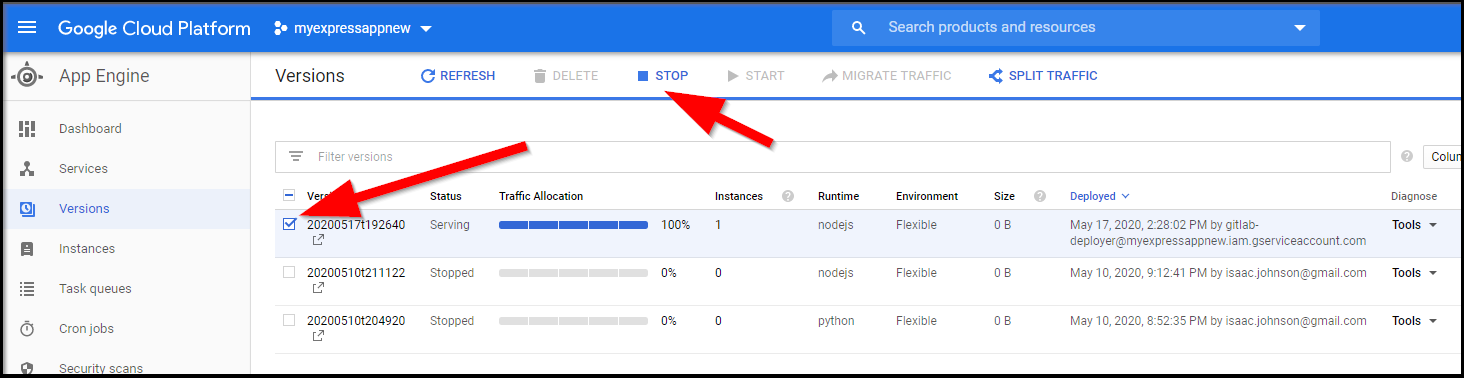
To prevent further charges, you need to just stop the running version (and you’ll get only minor pennies charges for storage):
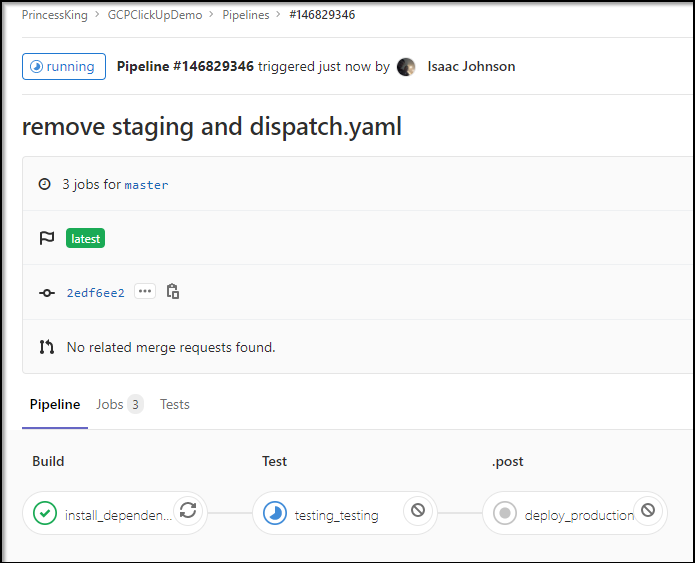
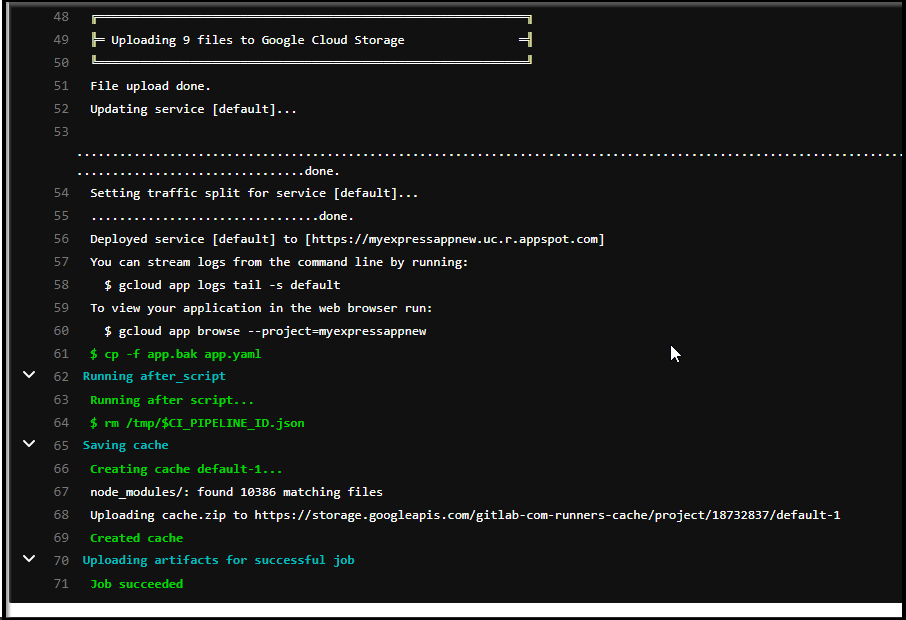
Lastly, just in case we echoed any secrets or left any dirty files, we can clean up gitlabl runner caches in the pipelines page of gitlab:
Documentation
We can write docs in Markdown for all users (such as the Readme), but we can also write guides within Click Up.

Go to docs to use the builtin UI.
You can the share to the team or even publicly (say to embed in user guides or websites):
https://doc.clickup.com/d/h/285na-189/77b1a2b5c0878ca
Gitlab metrics
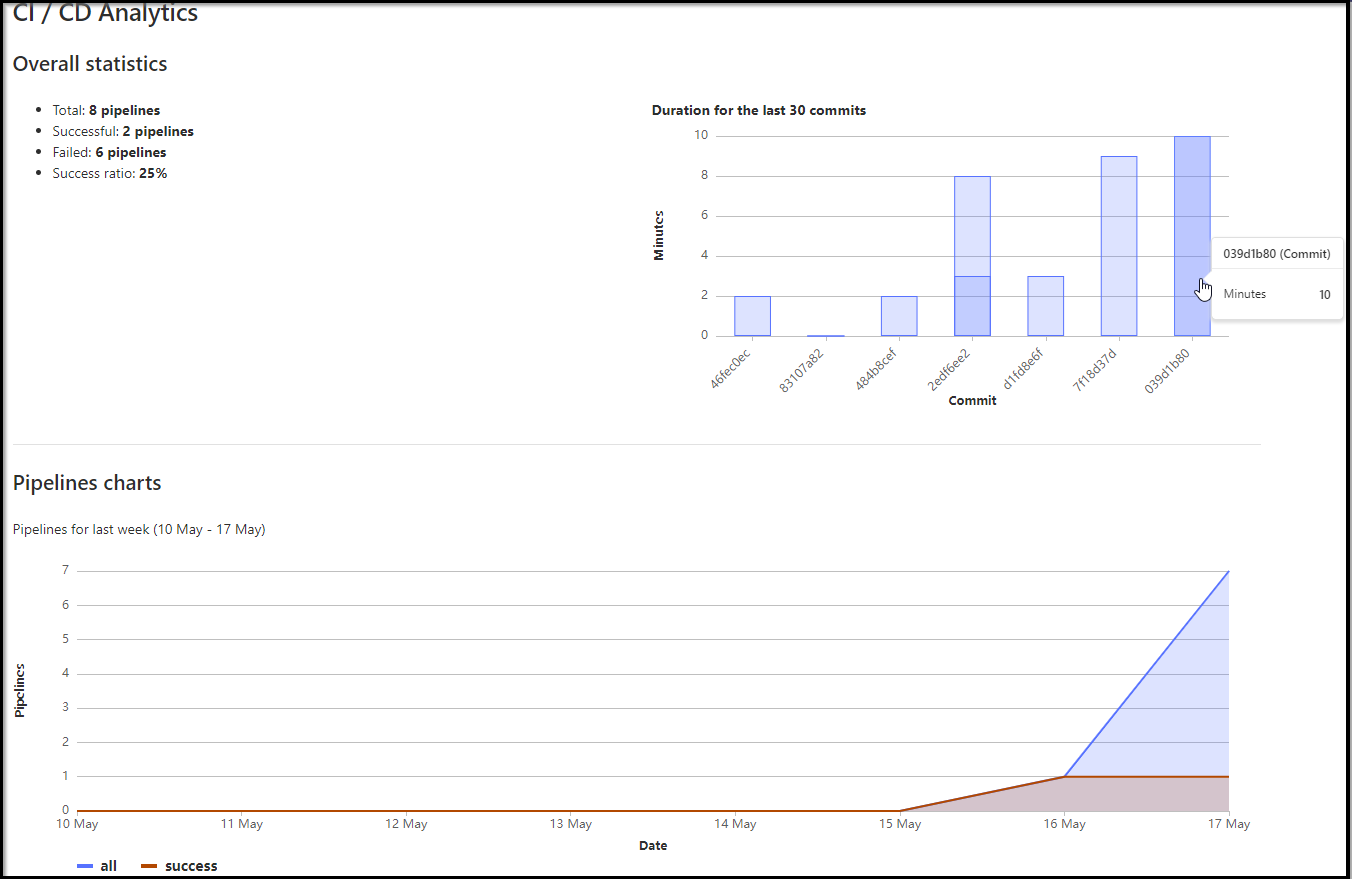
I should take a moment to revisit Gitlab and the metrics they can provide. For instance, we can to go CICD metrics to view our build success metrics: https://gitlab.com/princessking/gcpclickupdemo/pipelines/charts
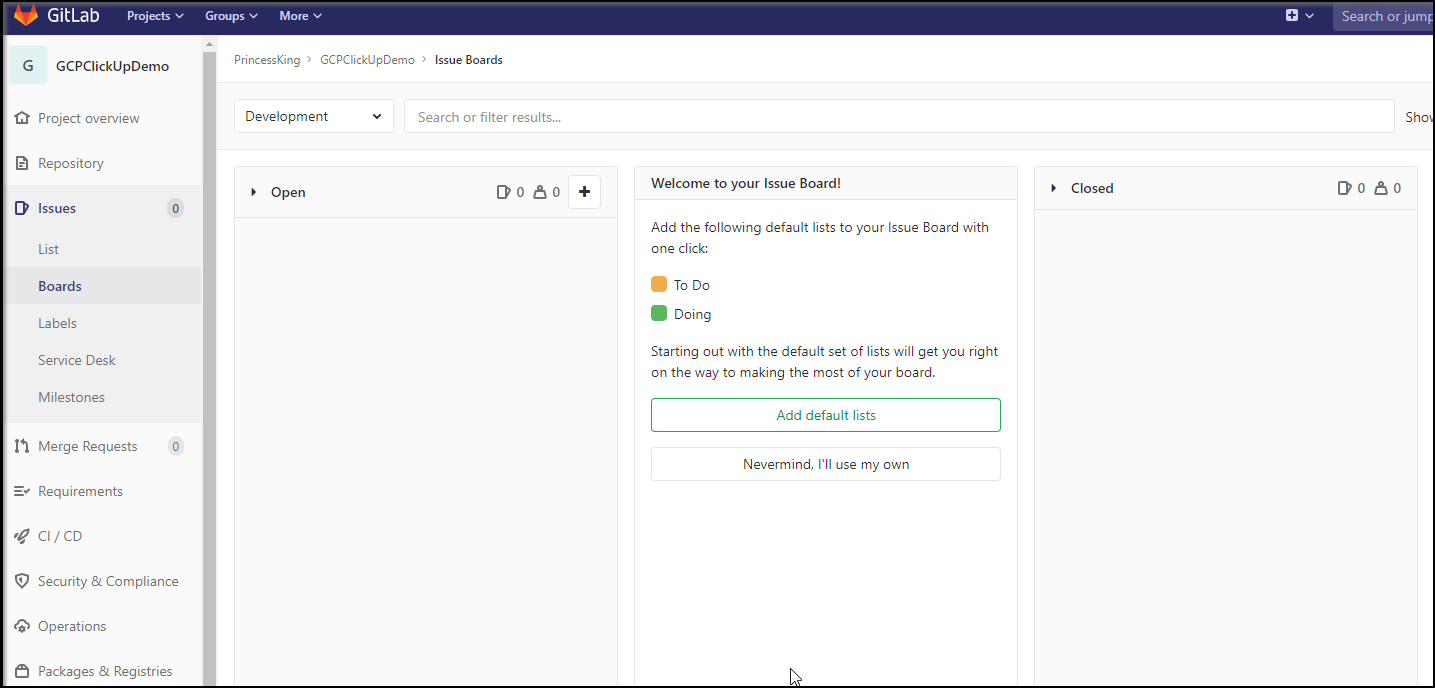
Gitlab also offers an alternative to Clickup for Issue tracking. We can have a simple Kanban board and track issues in Gitlab itself:
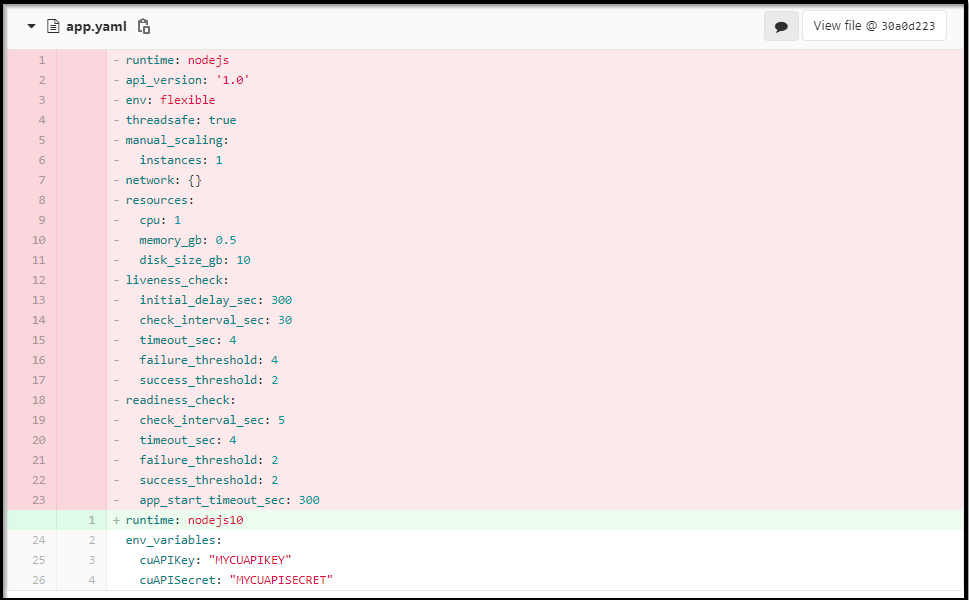
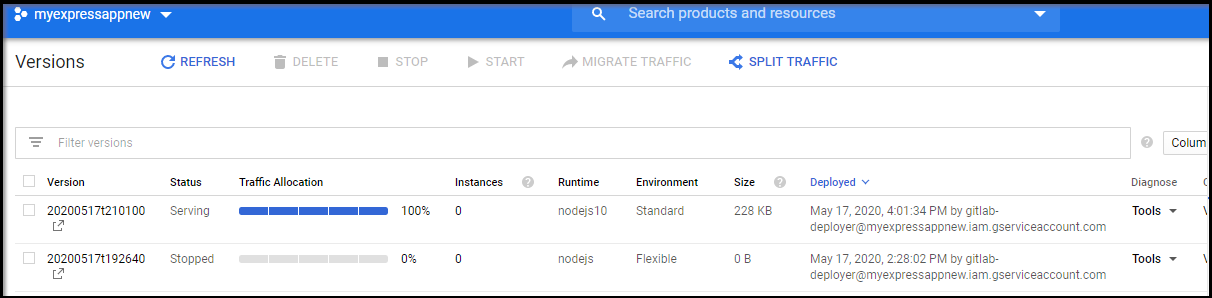
GCP App Engine Flex vs Standard
I sat on it a bit then thought, what would it take to change from App Engine Flex to the much cheaper App Engine Standard? It was surprisingly simple. All it took to change from flex to standard was changing the app.yaml:
Which fired a build:
And deployed as a standard app. Note the type changed from Flexible to Standard:
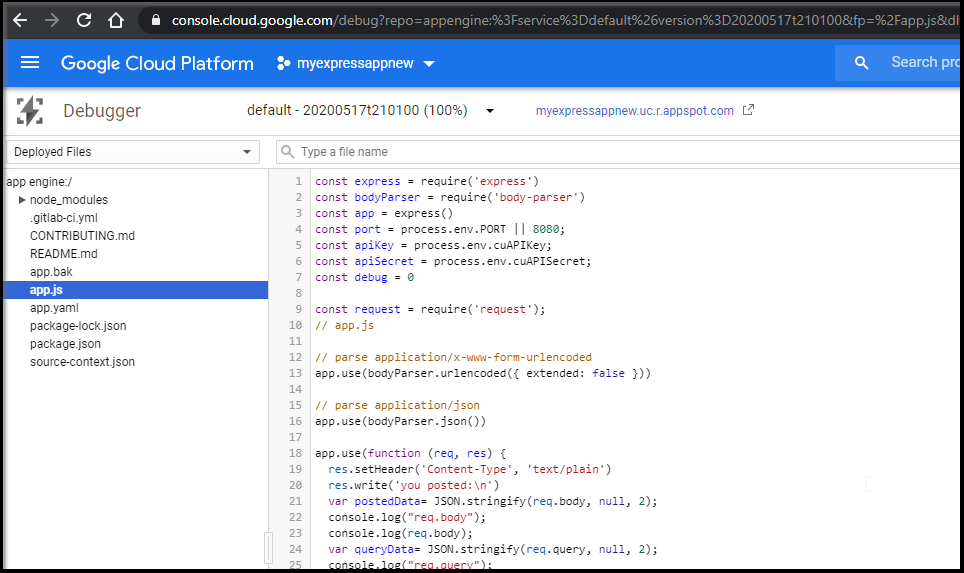
One advantage of standard besides cost, is under tools, we can view source:
Summary
We had a simple goal. We wanted to use Clickup to create a project and manage work. We then needed a revision control tool with CICD and for that, we leveraged a public project on Gitlab.com. We leveraged the flexibility of Google App Engine Flex to host our API endpoint. Considering GCP pricing, we switched to GCP App Engine Standard by simply changing our app.yaml. Lastly, we looked at Documentation and Metrics and touched on Issues that can be handled in Gitlab itself.
I believe ClickUp shows promise for a workstream management tool. It has a lot of integrations and for me to really commit to it, I would want tighter CICD integration. I plan to explore it more. Gitlab as well impressed me with how far it’s come in the last couple years. I compare it to how we used it at ThomsonReuters and it has so much more in its current offering. I might do a full blog just on Gitlab.
I don’t think I’ll continue on with FB @ Workplace, however. The free offering is too limited and perhaps I’m just old and not with it anymore, but I don't see the value outside yet-another video chat and chat board.
Referenced Guides:
- Clickup API: https://clickup.com/api / https://docs.clickup.com/en/articles/2171168-api-create-your-own-app
- Medium post on deploying to GAE from GL CI (was a bit older so i updated steps in this guide): https://medium.com/google-cloud/automatically-deploy-to-google-app-engine-with-gitlab-ci-d1c7237cbe11